Back to Top

Tech, Web, Cloud & Cabling Services

Category: Windows 7

Change the Processor Affinity setting in Windows 7 to gain a performance edge

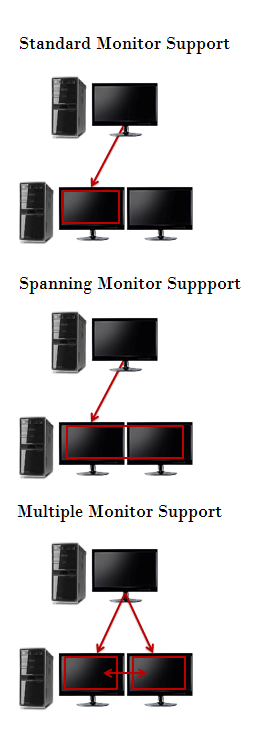
Under specific circumstances and with careful tweaking, you can increase Windows 7’s performance using the Processor Affinity setting.

If you have a multi-core processor, chances are good that on the Performance tab in Windows Task Manager, you have noticed that the CPU Usage History graphs look about the same for each core, as shown in Figure A. The reason for this is that most applications you run these days have been designed with multi-core processors in mind and will work with the operating system to distribute their operations as evenly as possible across all the available cores.

Figure A

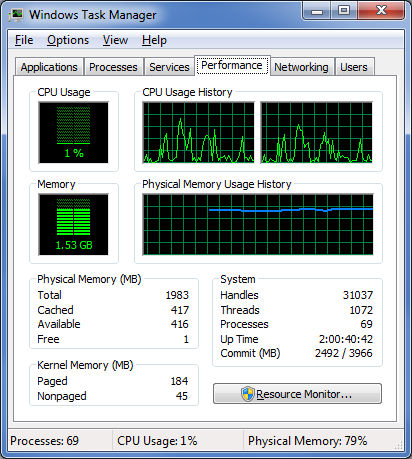
In most cases, you’ll notice that the CPU Usage History graphs look about the same for each core.

In most cases this even distribution provides you with the best performance possible. However, that’s not always going to be the case. For instance, older applications that were designed for single-core processors can behave irrationally — they may all of a sudden begin maxing out the CPU usage at 100 percent and appear to be locked up. In other circumstances, you might be able to achieve better overall performance from certain applications by configuring each of them to run on different processor cores.

Fortunately, Windows 7 allows you to configure applications to use only one, or several, of the processor cores in a multi-core system by using the Processor Affinity setting.

In this edition of the Windows Desktop Report, Iwe’ll show you two ways to change the Processor Affinity setting in Windows 7.

From Task Manager

Changing the Processor Affinity setting from within Task Manager is a pretty straightforward operation once you know how to do it. To launch Task Manger, you can use the keystroke combination [Ctrl] + [Shift] + [Esc] or you can simply right-click on the taskbar and select Task Manager from the context menu.

Once Task Manager is up and running, select the Applications tab, right-click on the application that you want to work with, and select the Go to Process command, as shown in Figure B. When you get to the Processes tab, right-click on the process and from that context menu, select the Set Affinity command, as shown in Figure C. (If the processes are jumping around, it may be hard to select the correct process, so you might just want to press the Application key or [Shift]+[F10].)

Figure B

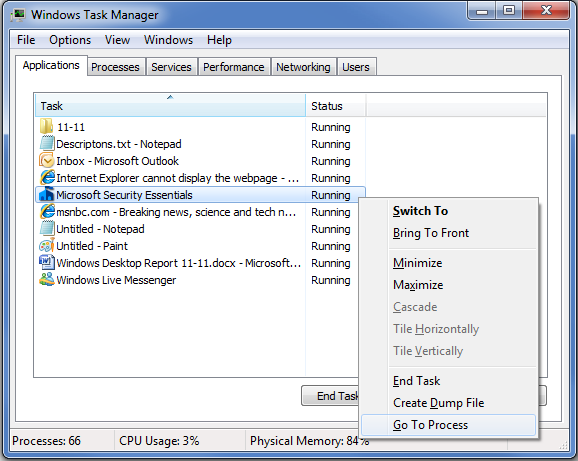
Right-click on an application and select the Go to Process command.

Figure C

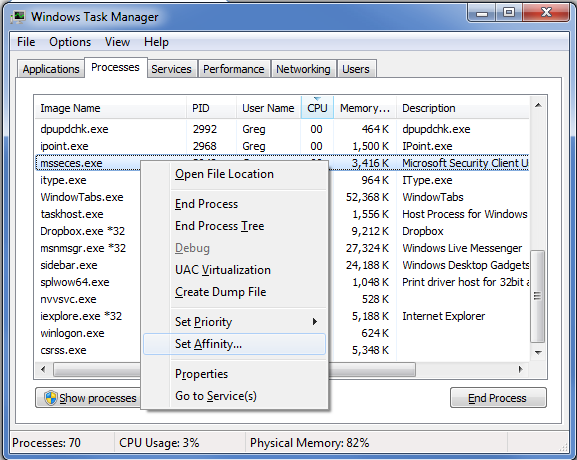
Right-click on the process and select the Set Affinity command.

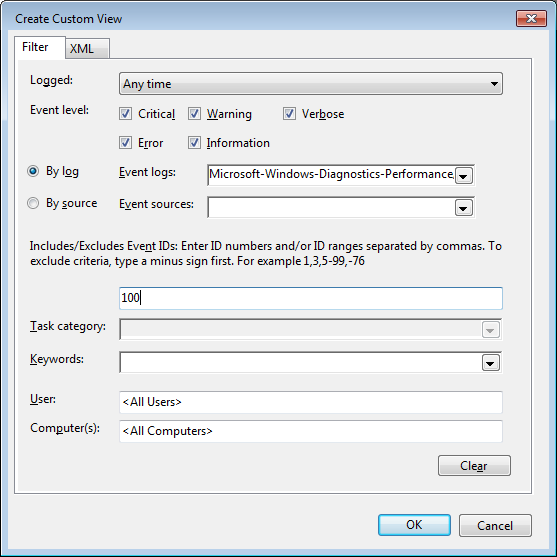
After you select the Set Affinity command, you’ll see the Processor Affinity dialog box shown in Figure D. As you can see, the default setting is All Processors, which in the case of my example system are CPU 0 and CPU 1. At this point, you can clear the All Processors check box and then select the CPU on which you want the process to run.

Figure D

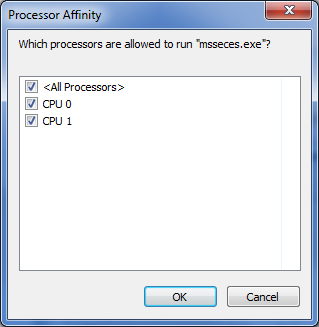
The Processor Affinity dialog box allows you to choose which processor(s) you want to use.

An example

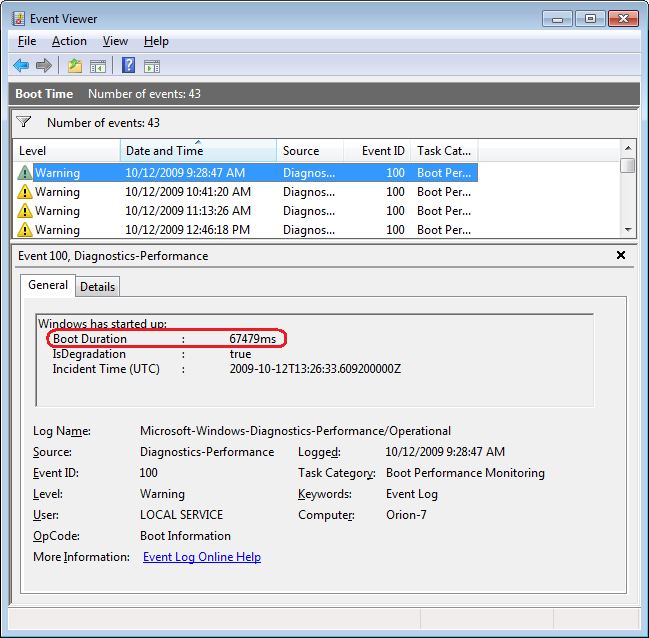
To take a look at the effects of using the Set Affinity command, we launched two applications: Microsoft Security Essentials and Disk Defragmenter. Next we used the Set Affinity command to assign Microsoft Security Essentials to CPU 0 and Disk Defragmenter to CPU 1. We then started each application running — Microsoft Security Essentials performing a full scan and Disk Defragmenter defragging a 500GB disk.

Once each application began working, they started sucking up CPU time, so we went to the Performance tab in Windows Task Manager to look at the CPU Usage History graphs. When we did, we could see that each graph was showing different measurements, as shown in Figure E.

Figure E

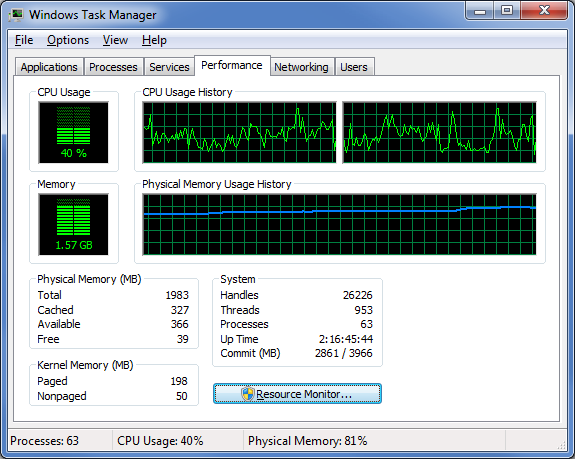
Each of the CPU Usage History graphs shows different measurements.

To specifically see how each CPU core was faring, we launched Resource Monitor and selected the CPU tab. Again, we could see that each CPU core was showing different usage measurements, as shown in Figure F.

Figure F

Resource Monitor’s CPU tab specifically identifies each CPU core and its usage.

Now, of course, my example combination is purely for the sake of showing each CPU handling a separate process. However, there are instances where running Microsoft Security Essentials on a separate CPU core would be beneficial.

From a shortcut

Now if you find that running an application on a specific CPU core works well, you might want to use it again in the future. If so, chances are that you won’t want to have to go through the Task Manager each time. Fortunately you can create a shortcut to launch an application with a specific affinity setting.

For example, to launch Disk Defragmenter so that it runs only on CPU 0, you would create a shortcut with the following command line:

C:\Windows\System32\cmd.exe /C start /affinity 1 dfrgui.exe

To launch Disk Defragmenter on CPU 1, you would create a shortcut with the following command line:

C:\Windows\System32\cmd.exe /C start /affinity 2 dfrgui.exe

The number that follows the start /affinity command is called the affinity mask and is defined as a hexadecimal number. However, the CPU core number can be calculated more easily using binary numbers. For instance, the command

C:\Windows\System32\cmd.exe /C start /affinity 3 dfrgui.exe

will launch Disk Defragmenter on both CPU 0 and CPU 1. If you convert 3 into a binary number you will get 0011. Under the affinity mask system, processors are numbered from the right to left beginning with 0 and since there are 1’s in the first two places, this indicates CPU 0 and CPU 1.

Suppose you have a Quad core processor. If so and you use an affinity mask of 4, that will convert into binary 0100, which indicates CPU 2. If you use an affinity mask of 9, that will convert into binary 1001, which indicates CPU 0 and CPU 3.

For more information on the start /affinity command, open a Command Prompt window and type the command

start /?

Have questions?

Get answers from Microsofts Cloud Solutions Partner!
Call us at: 856-745-9990 or visit: https://southjerseytechies.net/

South Jersey Techies, LL C is a full Managed Web and Technology Services Company providing IT Services, Website Design ServicesServer SupportNetwork ConsultingInternet PhonesCloud Solutions Provider and much more. Contact for More Information.

To read this article in its entirety click here.

Use multiple monitors with Windows 7’s Remote Desktop Connection

In Windows 7 you can connect to a remote computer and take full advantage of your local system’s multiple monitors. Here’s how.

If you’re using multiple monitors on your system setup and you regularly connect to other systems via Remote Desktop, you know how frustrating it is to go from a multiple-monitor display to a single-monitor display for your remote connection. If so, you’ll definitely want to learn how you can take advantage of multiple monitors in Microsoft Windows 7’s Remote Desktop Connection.

However, before going any further it is important to understand right off the bat that multiple-monitors support in Windows 7’s Remote Desktop is available only on Windows 7 Ultimate and Windows 7 Enterprise. (It is also available in Windows Server 2008 R2.) Furthermore, both the local and remote systems must be running one of the supported versions. For example, Windows 7 Ultimate is running on the local and Windows 7 Enterprise is running on the remote.

As long as you have the proper configuration, Windows 7 provides you with real multiple-monitor support as opposed to the monitor-spanning feature that was introduced in the previous version of Remote Desktop Connection. This means that in Windows 7 you can use this feature to connect to a remote computer and take full advantage of your local system’s multiple monitors on your remote system.

In this edition of the Windows Desktop Report, we’ll describe Windows 7’s Remote Desktop support for multiple monitors and show you how to configure it for connecting to other Windows 7 systems. we’ll also show you how to use Remote Desktop’s monitor-spanning feature when connecting to, and from, Windows versions that do not support the multiple-monitors feature.

What’s the difference?

Before we get started, let’s take a moment to discuss the different types of Remote Desktop monitor configurations you can have when using a system with multiple monitors. In the standard type of connection, Remote Desktop displays the remote system in a window on one monitor. In a connection configured with the monitor-spanning feature, Remote Desktop displays the remote system in a window on one monitor but allows you to drag or span that window across multiple monitors. In a connection configured with the multiple-monitors feature, Remote Desktop makes the remote system behave as if it were physically connected to multiple monitors. Each of these configurations is illustrated in Figure A.

Figure A

There are three types of configurations you can use when using Remote Desktop on a system with multiple monitors.

Configuring a multiple-monitors connection

If you have the proper setup, configuring Windows 7’s Remote Desktop multiple-monitor feature is easy. To begin, Launch Remote Desktop Connection and select the system you want to connect to with multiple-monitor support from the Computer drop-down list. Then, click the Options button to expand the Remote Desktop Connection window so that you can see all the tabs. Next, choose the Display tab and select the Use All My Monitors for the Remote Session check box, as shown in Figure B. To complete the procedure, return to the General tab and click the Save button.

Figure B

Selecting the Use All My Monitors for the Remote Session check box is all that is needed to enable the multiple-monitor feature.

When you connect to the remote system, the remote system’s monitor will instantly fill your multiple monitors, just as if it were physically connected to the monitors.

Configuring a monitor-spanning connection

As mentioned, in a connection configured with the monitor-spanning feature, Remote Desktop allows you to drag or span the window across multiple monitors. However, there are a couple of caveats. First your multiple monitors must have the same screen resolution. Second, the monitors must be aligned, or positioned, side-by-side. Third, the combined screen resolution of your multiple monitors must be under 4096 x 2048.

To launch Remote Desktop Connection with monitor-spanning support, just click the Start button and type the following command in the Start Search box. (Alternatively, you can open a Command Prompt window and type the same command.)

Mstsc /span

When you do, you’ll see the standard Remote Desktop Connection dialog box, and you can launch the connection as you normally would. As soon as you make a connection, you’ll immediately see the desktop of the remote system spread across your multiple monitors. If you need to have access to both the local and remote desktops, you can reduce the size of the remote system’s desktop to only one monitor by clicking the Restore Down button on the Remote Desktop window. As a shortcut, you can also use the keystroke: [Ctrl][Alt][Break].

Once the window is on one monitor, you use click and drag to resize the window to completely cover a single monitor. Keep in mind that when you reduce the size of a spanned remote widow, it will display both horizontal and vertical scroll bars, as shown in Figure C, that you’ll have to use to see the entire screen. However, you can instantly span the window by clicking the Maximize button.

Figure C

When you resize the remote desktop’s spanned window, you’ll have to use scroll bars to view the entire screen.

Creating a shortcut

Of course, using a command line to launch your Remote Desktop connection isn’t the most convenient way to use the monitor-spanning feature. Chances are that you already have a Remote Desktop Connection RDP file saved on your desktop. If so, you can create a standard Windows shortcut that will incorporate both the special command line and your RDP file.

To begin, right-click anywhere on the desktop and then select New | Shortcut from the context menu. When you see the Create Shortcut wizard, just type mstsc /span and the path to the RDP file in the text box, as shown in Figure D. Be sure that you enclose the path to the RDP file in double quotes if the path has spaces in it. To continue, click Next and give the shortcut an appropriate name, such as Saturn – Remote Spanning, and then click Finish.

Figure D

You can create a standard Windows shortcut that will incorporate both the special command line and your RDP file.

You can now use this shortcut to launch your remote desktop connection and span the Remote Desktop window across all the available space on your multiple monitors. Of course, the spanned desktop won’t exactly behave like a multiple-monitor setup when you open multiple windows. As such you’ll have to use a little creative click-and-drag resizing to reposition the windows on the spanned desktop.

Have questions?

Get answers from Microsofts Cloud Solutions Partner!
Call us at: 856-745-9990 or visit: https://southjerseytechies.net/

South Jersey Techies, LL C is a full Managed Web and Technology Services Company providing IT Services, Website Design ServicesServer SupportNetwork ConsultingInternet PhonesCloud Solutions Provider and much more. Contact for More Information.

To read this article in its entirety click here.http://www.techrepublic.com/blog/windows-and-office/use-multiple-monitors-with-windows-7s-remote-desktop-connection/

Change and customize Windows 7’s Logon screen wallpaper

In this edition of the Windows Vista and Windows 7 Report, we show you how to change Windows 7’s Logon screen wallpaper.

While experimenting with several Microsoft Windows 7 systems recently, we spent a lot of time staring at the Logon screen. During that time, we began to think about changing the Logon screen wallpaper. Now, we have changed the Logon screen wallpaper in just about every version of Windows we’ve used, so we know that there had to be a way to do so.

When we began to investigate the procedure in Windows 7, we discovered that changing the Logon screen wallpaper in the newest version of the Windows operating system is easy, once you know the steps — and you don’t even need any third-party software to do it.

In order to make it easy for OEMs to customize Windows 7, Microsoft built the ability to change the Logon screen wallpaper right in to the operating system. In this edition of the Windows Vista and Windows 7 Report, we’ll show you how to change Windows 7’s Logon screen wallpaper.

A Registry tweak

The process begins with a very minor Registry tweak. Even for those who would not normally feel comfortable editing the Registry, this one’s a piece of cake. To begin, click the Start button and type Regedit in the Search box. Then, select the appropriate result and press [Enter]. When you do, you’ll see the User Account Control, shown in Figure A, and will need to click the Yes button.Note: Editing the Windows Registry file is not without its risks, so be sure you have a verified backup before making any changes.

Figure A

You will encounter a UAC when you launch the Registry Editor.

Once the Registry Editor launches, locate and right-click on HKEY_LOCAL_MACHINE key and select the Find command. When you see the Find dialog box, type OEMBackground in the text box and make sure that only the Values check box is selected, as shown in Figure B.

Figure B

Type OEMBackground in the Find dialog box.

When the HKEY_LOCAL_MACHINE\SOFTWARE\Microsoft\Windows\CurrentVersion\Authentication\LogonUI\Background key opens, locate and double-click the OEMBackground value. When you see the Edit DWORD dialog box, change the value data from 0 to 1, as shown in Figure C. (If the OEMBackground value doesn’t exist in the Background key, you’ll need to pull down the Edit menu from that key and select New | DWORD (32-bit) Value).

Figure C

Change the value data from 0 to 1.

To complete this part of the operation, click OK to close the Edit DWORD dialog box and then close the Registry Editor.

Creating folders

In the second part of the operation, you’ll need to create a couple of folders. To begin, launch Windows Explorer. Then navigate to the C:\Windows\System32\Oobe folder. Once you access the Oobe folder, click the New Folder button in the Windows Explorer toolbar. You’ll see a confirmation dialog box, like the one shown in Figure D. When you click Continue, the new folder will be created and you can name it info.

Figure D

When you click the New Folder button, you’ll encounter a confirmation dialog box.

Then, open the info folder, click the New Folder button again, work through the confirmation dialog box, and then name the second new folder backgrounds.

Configuring the wallpaper

You can use any image that you want for your new Logon screen wallpaper. However, the image has to be in JPG format and you need to name it backgroundDefault.jpg. When you copy your file to the Windows\System32\Oobe\info\backgrounds folder, you’ll encounter and will need to work through a confirmation dialog box similar to the one shown in Figure D.

Two other things to keep in mind: First, the actual file size of backgroundDefault.jpg cannot exceed 256 KB. Second, you’ll want to use an image whose dimensions match the screen resolution that you are using. If you use a file whose dimensions are smaller, the image will be stretched and may appear distorted.

Altering shadows

As you know, the button and the text used to identify your user account on the Logon screen have shadows behind them to give them a 3D-like look, and these shadows work well with the default Logon screen wallpaper. Depending on what image you use for your new Logon screen wallpaper, these shadows might not work so well.

In addition to making it easy to change the Logon screen wallpaper, Microsoft also made it easy to adjust or disable the text and button shadows to accommodate your particular image.

To alter the shadows, launch the Registry Editor again as described above and access the

HKEY_LOCAL_MACHINE\SOFTWARE\Microsoft\Windows\CurrentVersion\Authentication\LogonUI folder

Once you open the LogonUI folder, you’ll create a new DWORD value called ButtonSet, as shown in Figure E. You can then configure the shadow by setting the value data to one of the following numbers:

  • 0 — Light shadow
  • 1 — Dark shadow
  • 2 — No shadow

Figure E

The ButtonSet value allows you to adjust or disable the text and button shadows.

Have questions?

Get answers from Microsofts Cloud Solutions Partner!
Call us at: 856-745-9990 or visit: https://southjerseytechies.net/

South Jersey Techies, LL C is a full Managed Web and Technology Services Company providing IT Services, Website Design ServicesServer SupportNetwork ConsultingInternet PhonesCloud Solutions Provider and much more. Contact for More Information.

To read this article in its entirety click here.

End of Life Windows 7, Server 2008 R2, & Small Business Server 2011

The End of Life for Windows 7, Server 2008 R2, & Small Business Server 2008 + 2011

End of Life Windows 7, Server 2008 R2, & Small Business Server 2011
[wpdevart_countdown text_for_day=”Days” text_for_hour=”Hours” text_for_minut=”Minutes” text_for_second=”Seconds” countdown_end_type=”date” end_date=”13-01-2020 23:59″ start_time=”1556805309″ end_time=”0,1,1″ action_end_time=”hide” content_position=”center” top_ditance=”10″ bottom_distance=”10″ countdown_type=”button” font_color=”#000000″ button_bg_color=”#3DA8CC” circle_size=”130″ circle_border=”5″ border_radius=”8″ font_size=”30″ countdown_font_famaly=”monospace” animation_type=””][/wpdevart_countdown]

Microsoft has announced that its support for Windows 7, Windows Server 2008 R2, and Small Business Server (SBS) 2011 will be coming to an end on January 14, 2020.

What does that mean for you? First, security patches and updates will no longer be implemented, leaving Windows 7 workstations and servers susceptible to security breaches. On January 13, 2015, Microsoft ended mainstream support for Windows 7, but now extended support is ending as well. Extended support is still safe to use until 2020 currently. Normally Microsoft would add new features during the mainstream support phase, but they will not be being doing this anymore. They will however, continue to patch any security treats. South Jersey Techie’s strongly recommends upgrading your business’s servers and workstations before the January 2020 deadline- and to start planning now to avoid the urgency of the deadline. Businesses in the healthcare industry will be impacted by the changes in relation to HIPPA violations if their server isn’t updated before the deadline. The deadline will be here before you know it and updating an IT infrastructure is a large task and shouldn’t be put off until the last minute.

What are the next steps for your business? Many of our clients are starting to upgrade now or are planning to include the upgrades in their 2019 budget. Send us an email or give us a call and we will evaluate your line of business software for Windows 10 and upgraded server compatibility. If your company decides to upgrade its old server and workstations to meet the January 2020 deadline, South Jersey Techie’s has the reliable solutions and experienced technicians you need for managing the data migration and even the retired hardware. You can have peace of mind knowing your old data will be securely erased and destroyed.

Unsure if this deadline will affect your business? South Jersey Techie’s can review your server for you and determine its end of life date or if it will be affected by the 2020 end of support date. If you have any questions or concerns about your office and the 2020 end of support date, please give us a call today: (856)745-9990.

GET STARTED WITH A NEW WINDOWS 10 PC

HP ELITEDESK 800 G4 – SFF – CORE I7
HP ELITEDESK 800 G4 – SFF – CORE I5
HP ProDesk 400 G5 – SFF – Core i5 8500

Can’t Find What You’re Looking For?

Whether you are upgrading an existing device, buying a new one, or just need support deploying, we have the help you need.


10 Windows 7 tips to get the most out of your machine

If you’re one of the many business users who has not upgraded their computer to Windows 10, there are still resources to boost your experience. Here are 10 tips for getting the most out of the OS.

Windows 10 faced a controversial roll-out, with privacy concerns, bugs, and other issues plaguing many users. And as of August 2016, just 1% of business machines had upgraded to Windows 10, according to a study from Softchoice. Instead, 91% of the machines were operating with Windows 7—an 18% increase over the same period of time in 2015.

“It seems businesses don’t see an urgent need to move operating systems, so long as their cloud-based applications are still running fine on Windows 7,” Softchoice’s Microsoft director Craig McQueen wrote in a press release at the time. “In addition to the security benefits, I think once organizations grasp the user benefits—such as touch and Cortana—we will start to see a boost in adoption.”

While experts predict Windows 10 deployments will pick up this year, it’s important for those still using Windows 7 for business to get the most out of their machines. Here are 10  articles with Windows 7 tips that will help enterprise users operate the machines more effectively.

1. 10 ways to speed up Windows 7

While Windows 7 generally performs well, over time, the system can slow down and require some care to get it back up to speed. The OS also contains certain features that users can take advantage of to improve overall performance. Here, we outline 10 steps business users can take to enhance the performance of your Windows 7 system.

2. Use multiple monitors with Windows 7’s Remote Desktop Connection

Windows 7 allows users to connect to a remote computer and utilize the local system’s multiple monitors. Here is a step by step advice on how to configure and operate multiple monitors using Windows 7’s Remote Desktop Connection, as well as how to connect to and from Windows versions that do not support this feature.

3. Quick Tips: Flush the ARP cache in Windows 7

The Address Resolution Protocol (ARP) cache is an important part of IP networking on any OS, as it links Ethernet addressing to hardware addressing. Newly mapped addresses are saved in an ARP cache, which is usually fine, but can sometimes cause issues with internet connections and web page loading times. Here, are the necessary steps to clear the ARP cache, and how to manage it going forward.

4. 10+ Windows 7 services you may not need

While every version of Windows includes a core set of system services, business users can disable some that are not necessary in order to improve performance and security. In this article, we highlight 13 services that users can disable if they so choose on Windows 7 systems that will likely not have any impact on business operations, including IP Helper, offline files, and Network Access Protection.

5. 10 Windows 7 commands every administrator should know

IT staff who troubleshoot Windows 7 problems often have to dive into the command line. Here, are 10 fundamental Windows 7 commands that are useful for IT administrators, including System File Checker, File Signature Verification, and Driverquery.

6. Modifying the Windows 7 boot loader with the Boot Configuration Data Editor tool

In Windows Vista and later versions of Windows, the bootloader was moved from boot.ini to a utility called BCDEdit. This article walks users through how to modify the boot config data using this tool.

7. Change and customize Windows 7’s Logon screen wallpaper

Changing and customizing the Windows 7 Logon screen wallpaper is easy once you know the steps, as Microsoft built the ability to change the wallpaper right into the OS, as opposed to needing any third-party software. Here, we offer a tutorial on doing so.

8. Change the Processor Affinity setting in Windows 7 to gain a performance edge

Most applications have been designed for multi-core processors, and work with an OS to distribute their operations evenly across cores to enhance performance. However, you can sometimes achieve better overall performance from certain applications by configuring them to run on different processor cores, which Windows 7 allows via the Processor Affinity setting. In this article, we explain two ways to change the Processor Affinity setting in Windows 7.

9. Use Windows 7 Event Viewer to track down issues that cause slower boot times

Experiencing a slow Windows 7 boot time? You can use Windows 7’s Event View to investigate the source of the problem. The Event Viewer includes a category of event logs called Applications and Services Logs, which track key elements of the OS. Here, we explain how it is possible to find out how long it took to boot up your system every time, since the day Windows 7 was first installed, along with instances where boot time slowed down, all through these logs.

10. Tag your files for easier searches in Windows 7

This article, walks users through how to tag files to make them searchable via the Search filters built into Windows Explorer’s Search box in Windows 7. It’s possible to do this easily from many applications while saving a file. The ability to more easily find files is a boon for business users who want to enhance their productivity.

Have questions?

Get answers from Microsofts Cloud Solutions Partner!
Call us at: 856-745-9990 or visit: https://southjerseytechies.net/

South Jersey Techies, LL C is a full Managed Web and Technology Services Company providing IT Services, Website Design ServicesServer SupportNetwork ConsultingInternet PhonesCloud Solutions Provider and much more. Contact for More Information.

To read this article in its entirety click here.

10 Windows 7 commands every administrator should know

The command line is often the best place to resolve Windows 7 desktop problems. These basic commands will help speed your troubleshooting tasks.

PC troubleshooting is becoming less common in larger organizations, but consultants and techs in smaller shops still have to get their hands dirty identifying and fixing desktop problems. Oftentimes, troubleshooting Windows 7 means delving into the command line. Here are 10 fundamental Windows 7 commands you might find helpful.

1: System File Checker

Malicious software will often attempt to replace core system files with modified versions in an effort to take control of the system. The System File Checker can be used to verify the integrity of the Windows system files. If any of the files are found to be missing or corrupt, they will be replaced. You can run the System File Checker by using this command:

sfc /scannow

2: File Signature Verification

One way to verify the integrity of a system is to make sure that all the system files are digitally signed. You can accomplish this with the File Signature Verification tool. This tool is launched from the command line but uses a GUI interface. It will tell you which system files are signed and which aren’t. As a rule, all the system files should be digitally signed, although some hardware vendors don’t sign driver files. The command used to launch the File Signature Verification tool is:

sigverif

3: Driverquery

Incorrect device drivers can lead to any number of system problems. If you want to see which drivers are installed on a Windows 7 system, you can do so by running the driverquery tool. This simple command-line tool provides information about each driver that is being used. The command is:

driverquery

If you need a bit more information, you can append the -v switch. Another option is to append the -si switch, which causes the tool to display signature information for the drivers. Here’s how they look:

driverquery -v
driverquery -si

4: Nslookup

The nslookup tool can help you to verify that DNS name resolution is working correctly. When you run nslookup against a host name, the tool will show you how the name was resolved, as well as which DNS server was used during the lookup. This tool can be extremely helpful when troubleshooting problems related to legacy DNS records that still exist but that are no longer correct.

To use this tool, just enter the nslookup command, followed by the name of the host you want to resolve. For example:

nslookup dc1.contoso.com

5: Ping

Ping is probably the simplest of all diagnostic commands. It’s used to verify basic TCP/IP connectivity to a network host. To use it, simply enter the command, followed by the name or IP address of the host you want to test. For example:

ping 192.168.1.1

Keep in mind that this command will work only if Internet Control Message Protocol (ICMP) traffic is allowed to pass between the two machines. If at any point a firewall is blocking ICMP traffic, the ping will fail.

6: Pathping

Ping does a good job of telling you whether two machines can communicate with one another over TCP/IP, but if a ping does fail, you won’t receive any information regarding the nature of the failure. This is where the pathping utility comes in.

Pathping is designed for environments in which one or more routers exist between hosts. It sends a series of packets to each router that’s in the path to the destination host in an effort to determine whether the router is performing slowly or dropping packets. At its simplest, the syntax for pathping is identical to that of the ping command (although there are some optional switches you can use). The command looks like this:

pathping 192.168.1.1

7: Ipconfig

The ipconfig command is used to view or modify a computer’s IP addresses. For example, if you wanted to view a Windows 7 system’s full IP configuration, you could use the following command:

ipconfig /all

Assuming that the system has acquired its IP address from a DHCP server, you can use the ipconfig command to release and then renew the IP address. Doing so involves using the following commands:

ipconfig /release
ipconfig /renew

Another handy thing you can do with ipconfig is flush the DNS resolver cache. This can be helpful when a system is resolving DNS addresses incorrectly. You can flush the DNS cache by using this command:

ipconfig /flushdns

8: Repair-bde

If a drive that is encrypted with BitLocker has problems, you can sometimes recover the data using a utility called repair-bde. To use this command, you will need a destination drive to which the recovered data can be written, as well as your BitLocker recovery key or recovery password. The basic syntax for this command is:

repair-bde <source> <destination> -rk | rp <source>

You must specify the source drive, the destination drive, and either the rk (recovery key) or the rp (recovery password) switch, along with the path to the recovery key or the recovery password. Here are two examples of how to use this utility:

repair-bde c: d: -rk e:\recovery.bek
repair-bde c: d: -rp 111111-111111-111111-111111-111111-111111

9: Tasklist

The tasklist command is designed to provide information about the tasks that are running on a Windows 7 system. At its most basic, you can enter the following command:

tasklist

The tasklist command has numerous optional switches, but there are a couple I want to mention. One is the -m switch, which causes tasklist to display all the DLL modules associated with a task. The other is the -svc switch, which lists the services that support each task. Here’s how they look:

tasklist -m
tasklist -svc

10: Taskkill

The taskkill command terminates a task, either by name (which is referred to as the image name) or by process ID. The syntax for this command is simple. You must follow the taskkill command with -pid (process ID) or -im (image name) and the name or process ID of the task that you want to terminate. Here are two examples of how this command works:

taskkill -pid 4104
taskkill -im iexplore.exe

Have questions?

Get answers from Microsofts Cloud Solutions Partner!
Call us at: 856-745-9990 or visit: https://southjerseytechies.net/

South Jersey Techies, LL C is a full Managed Web and Technology Services Company providing IT Services, Website Design ServicesServer SupportNetwork ConsultingInternet PhonesCloud Solutions Provider and much more. Contact for More Information.

To read this article in its entirety click here.

10+ Windows 7 services you may not need

If you evaluate your organization’s need for certain Windows 7 services, you may find that a number of them can be safely disabled.

Every version of Windows has shipped with a core set of system services that must run so that the system can perform basic operations. However, your organization may not necessarily need to have all the services running, and disabling unnecessary services can enhance performance and security. We’ve put together a list of 13 services you can disable on your Windows 7 systems that will probably not negatively affect your business operations at all.

Before you take drastic action, such as disabling a service on every PC in your organization, make sure that the service you’re disabling is not actually in use. This article makes a couple of broad assumptions: that your company doesn’t need to share Windows Media files and doesn’t use Windows 7’s HomeGroup features.

This is not a definitive list of services that can be disabled; these are just some obvious ones. Read carefully and make sure you test changes before deploying them across your organization.

1: IP Helper

Windows description: Provides tunnel connectivity using IPv6 transition technologies (6to4, ISATAP, Port Proxy, and Teredo) and IP-HTTPS. If this service is stopped, the computer will not have the enhanced connectivity benefits that these technologies offer. Why this can be disabled:Many organizations haven’t even started testing IPv6, much less fully deployed it. As indicated in the service description, the IP Helper service is leveraged in IPv4-to-IPv6 transitions.

2: Offline Files

Windows description: The Offline Files service performs maintenance activities on the Offline Files cache, responds to user logon and logoff events, implements the internals of the public API, and dispatches interesting events to those interested in Offline Files activities and changes in cache state. Why this can be disabled: If your organization doesn’t use the Offline Files feature found in both Windows client and server products, this service can be safely disabled. Obviously, if you are synchronizing files across the network, you shouldn’t disable this service.

3: Network Access Protection Agent

Windows description: The Network Access Protection (NAP) agent service collects and manages health information for client computers on a network. Information collected by the NAP agent is used to make sure that the client computer has the required software and settings. If a client computer is not compliant with health policy, it can be provided with restricted network access until its configuration is updated. Depending on the configuration of health policy, client computers might be automatically updated so that users quickly regain full network access without having to manually update their computer. Why this can be disabled: If you’re not doing network-based remediation or if you’re doing remediation with a third-party tool that doesn’t leverage the NAP client, this service can be disabled.

4: Parental Controls

Windows description: This service is a stub for Windows Parental Control functionality that existed in Vista. It is provided for backward compatibility only. Why this can be disabled:Corporate networks rarely used Vista’s Parental Control functionality. Further, this is a legacy service from Windows Vista.

5: Smart Card

Windows description: Manages access to smart cards read by this computer. If this service is stopped, this computer will be unable to read smart cards. If this service is disabled, any services that explicitly depend on it will fail to start. Why this can be disabled: If your organization does not use smart cards for authentication purposes, you can safely disable this service.

6: Smart Card Removal Policy

Windows description: Allows the system to be configured to lock the user desktop upon smart card removal. Why this can be disabled: If your organization does not use smart cards for authentication purposes, you can safely disable this service.

7: Windows Media Center Receiver Service

Windows description: Windows Media Center Service for TV and FM broadcast reception. Why this can be disabled: In most corporate environments, TV and FM broadcast reception on desktop computers is not considered a “business critical” item that needs support, and it’s often not allowed anyway. You can disable this service to save some resources.

8: Windows Media Center Scheduler Service

Windows description: Starts and stops recording of TV programs within Windows Media Center.Why this can be disabled: Likewise, there’s no need to record TV programs in a corporate environment.

9: Windows Media Player Network Sharing Service

Windows description: Shares Windows Media Player libraries to other networked players and media devices using Universal Plug and Play. Why this can be disabled: On a corporate network, Windows Media Player doesn’t have nearly the place it might have on a home network. Disabling this service will have no impact on business activities.

10: Fax

Windows description: Enables you to send and receive faxes, utilizing fax resources available on this computer or on the network. Why this can be disabled: If your organization is not using a network-based faxing service, disabling this service will have no business impact.

11: HomeGroup Listener

Windows description: Makes local computer changes associated with configuration and maintenance of the homegroup-joined computer. If this service is stopped or disabled, your computer will not work properly in a homegroup and your homegroup might not work properly. It is recommended that you keep this service running. Why this can be disabled: It’s highly unlikely that a business organization — except a very small one — is using HomeGroups as a way to share resources on a network. It’s almost always safe to disable this service in a business setting.

12: HomeGroup Provider

Windows description: Performs networking tasks associated with configuration and maintenance of homegroups. If this service is stopped or disabled, your computer will be unable to detect other homegroups and your homegroup might not work properly. It is recommended that you keep this service running. Why this can be disabled: As noted above: Only very small organizations are likely to use HomeGroups to share resources on a network, so it’s almost always safe to disable this service in a business setting.

13: Tablet PC Input Service

Windows description: Enables Tablet PC pen and ink functionality. Why this can be disabled: The vast majority of PCs that are deployed to users do not have hardware that can leverage tablet-like capability. This service simply uses system resources with no possible benefit.

Have questions?

Get answers from Microsofts Cloud Solutions Partner!
Call us at: 856-745-9990 or visit: https://southjerseytechies.net/

South Jersey Techies, LL C is a full Managed Web and Technology Services Company providing IT Services, Website Design ServicesServer SupportNetwork ConsultingInternet PhonesCloud Solutions Provider and much more. Contact for More Information.

To read this article in its entirety click here.

10 ways to speed up Windows 7

You don’t have to live with a Windows 7 machine that’s becoming unbearably slow. Here are 10 basic steps that will optimize system performance.

With Windows 7, Microsoft did a really good job making the system perform well. However, over time, Windows 7 systems can slow down and need some care and feeding to regain their former glory. Further, some Windows 7 features can be leveraged to improve overall system performance. In this article, we will outline 10 steps you can take to boost the performance of your Windows 7 systems.

1: Disable unnecessary services

Not every system service that is running on a stock Windows 7 machine is necessary. A number of services can either be disabled or modified to run only when needed. Once you make these changes, the service no longer has to consume system resources and the system no longer has to spend time starting the service.

2: Reduce the number of startup items

Windows 7 systems eventually begin to suffer under the weight of software that is installed in the normal course of business. Many software titles install more than is necessary and include helper applications designed solely to make the software start up more quickly or facilitate other communication (e.g., iTunes helper). And new software installations might add a permanent presence to the system tray, even if it’s not absolutely necessary for the system to function (Steam games, for example).

You could go through your system tool by tool and remove the offending software, but you might want to keep the underlying tool around and just prevent the helper from loading. This and more can be accomplished through the use of MSconfig, a tool that has long been a part of Windows. MSconfig allows you to selectively disable startup items and take other steps toward improving overall system performance.

To use MSconfig, go to Start and in the search box, type MSconfig. From the Startup tab (Figure A), you can disable items. Just be careful about what you choose.

Figure A

Disable items to improve overall system performance.

3: Remove the bloatware installed by vendors

Microsoft’s OEMs sometimes actively work against the Redmond behemoth and sully the company’s name. Nowhere is this more evident than in the case of what has become known as “bloatware.” In the never-ending race to the bottom of the PC market, lower cost PCs have had their profit margins bolstered by OEMs through the inclusion of mostly junk software – short-term trials and the like — that does nothing but add a few dollars of profit while bringing performance to a crawl. Frankly, this is one of the reasons that I believe that Microsoft’s Surface announcement, in which Microsoft noted that it would make its own device, is brilliant. The company needs to start with a clean slate in some ways (no pun intended).

If your PC shipped with a bunch of stuff you’ll never use, get rid of that software. Generally, you can go to Start | Control Panel | Programs And Features (Figure B) and remove software you no longer plan to use. If the software adds items to the startup process, getting rid of it will make the PC start faster and, ultimately, perform better overall.

Figure B

Use Programs And Features to remove unwanted software.

4: Keep viruses and spyware off your system

If you’re running Windows, you need to be running an anti-malware program to keep viruses and spyware off your system. Nothing will ruin good performance like a boatload of spyware. Our personal favorite (and free!) tool for combating malware is Microsoft Security Essentials. In my experience, it’s been successful in catching bad stuff while not significantly degrading system performance itself.

5: Check your memory

How much RAM do you have? Is your system consuming all or most of your RAM? Does the system page out to disk? If so, you’re suffering a massive performance hit, which can be solved by adding more memory to your PC.

6: Go solid state

Solid state is all the rage these days, and with good reason. It’s fast! More and more laptops and even desktops are moving to the technology because of the performance benefits. Solid state disks use memory cells from which data can be read very quickly, as opposed to the relatively plodding nature of rotational storage. By moving to SSD, you can give your Windows 7 system renewed life — and give yourself a whole new user experience.

7: Ensure that power settings favor performance

This one is easy! When you’re plugged in, configure Windows 7’s power plans to favor performance over power savings. When you choose to use Windows 7′ high performance power plan, you might increase the computer’s performance in some (but not all) circumstances. It really depends on the kind of work you’re doing and how often you allow the computer to sit idle.

To change power plans, go to Start | Control Panel | Power Options and choose your power plan settings (Figure C).

Figure C

Go to Power Options to choose Windows 7 power plan settings.

8: Keep your system defragmented (unless you’ve followed item 6)

If you’re using a traditional spinning disk in your Windows 7 system, you can keep your system operating at peak efficiency by periodically defragmenting the hard drive. If, however, you’ve opted to go with SSD-based storage, don’t do this. First, you won’t get any performance benefit and second, you’ll significantly reduce the life of that expensive SSD.

Disk defragmentation is scheduled to take place once per week, but you can change this by going to Start | Accessories | System Tools | Disk Defragmenter (Figure D). In addition to changing the schedule, you can run an on-demand defrag from here. You can also run a defrag from the command line instead of from a GUI.

Figure D

You can schedule a defrag in the Disk Defragmenter dialog box.

9: Disable or tune search indexing

Windows 7’s search is good, but it can also affect system performance. If you really need to run a tool at full tilt, you can disable indexing altogether. Or you can tune the indexer to meet your specific needs, possibly reducing its overall impact on system performance.

10: Use ReadyBoost

Perhaps you don’t want to jump into the solid-state game right away but would like some of the benefit that can be had from flash-based storage. Using nothing more than a USB stick, you can do so through a Windows 7 feature known as ReadyBoost. (Note that if you’re already using an SSD as your system drive, ReadyBoost won’t be available, since there would be no performance gain.)

ReadyBoost allows the system to make use of one of these speedy storage devices as a cache, improving overall performance of the system. The flash storage device that you choose to use for ReadyBoost should meet the following specifications set by Microsoft:

  • Capacity of at least 256 MB, with at least 64 kilobytes (KB) of free space
  • At least a 2.5 MB/sec throughput for 4-KB random reads
  • At least a 1.75 MB/sec throughput for 1MB random writes

Have questions?

Get answers from Microsofts Cloud Solutions Partner!
Call us at: 856-745-9990 or visit: https://southjerseytechies.net/

South Jersey Techies, LL C is a full Managed Web and Technology Services Company providing IT Services, Website Design ServicesServer SupportNetwork ConsultingInternet PhonesCloud Solutions Provider and much more. Contact for More Information.

To read this article in its entirety click here.


Use Windows 7 Event Viewer to track down issues that cause slower boot times

Here’s how to use some of the new features in Windows 7’s Event Viewer to investigate a slow boot time.

Overview

Windows 7’s Event Viewer includes a new category of event logs called Applications and Services Logs, which includes a whole host of subcategories that track key elements of the operating system. The majority of these subcategories contain an event log type called Operational that is designed to track events that can be used for analyzing and diagnosing problems. (Other event log types that can be found in these subcategories are Admin, Analytic, and Debug; however, describing them is beyond the scope of this article.)

Now, within the operating system section is a subcategory titled Diagnostic-Performance with an Operational log that contains a set of a Task Category called Boot Performance Monitoring. The Event IDs in this category are 100 through 110. By investigating all the Event ID 100 events, you will be able to find out exactly how long it took to boot up your system every time since the day you installed Windows 7. By investigating all the Event ID 101 thru 110 events, you will be able to identify all instances where boot time slowed down.

Getting started

You can find and launch Event Viewer by opening the Control Panel, accessing the System and Security category, selecting the Administrative Tools item, and double-clicking the Event Viewer icon. However, you can also simply click the Start button, type Event in the Start Search box, and press Enter once Event Viewer appears and the top of the results display.

Creating a Custom View

Once you have Event Viewer up and running, you can, of course, drill down through the Applications and Services Logs and locate the Diagnostic-Performance Operational log and begin manually looking through the events recorded in the log. However, you can save yourself time and energy by taking advantage of the new Custom View feature, which is essentially a filter that you can create and save.

To do so, pull down the Action menu and select the Create Custom View command. When you see the Create Custom View dialog box, leave the Logged option set at the default value of Any Time and select all the Event level check boxes. Next, select the By Log option button, if it is not already selected, and click the dropdown arrow. Then, drill down through the tree following the path: Applications and Services Logs | Microsoft | Windows | Diagnostics-Performance. When you open the Diagnostics-Performance branch, select the Operational check box, as shown in Figure A.

Figure A

When you get to the Diagnostics-Performance branch, select the Operational check box.

To continue, type 100 in the Includes/Excludes Event IDs box, as shown in Figure B, and then click OK.

Figure B

Event ID 100 records how long it takes to boot up your system.

When you see the Save Filter to Custom View dialog box, enter a name, as shown in Figure C, and click OK.

Figure C

To save the filter as a Custom View, simply provide an appropriate name, such as Boot Time.

You’ll now repeat these steps and create another Custom View, and this time, you’ll type 101-110 in the Includes/Excludes Event IDs box and name it Boot Degradation.

Investigating Boot Time

To investigate your Windows 7 system’s boot time, select Boot Time in the Custom Views tree and then sort the Date and Time column in ascending order. When you do, you’ll see a complete history of every time you have booted your system since the day you installed Windows 7. In Figure D, you can see that we have hidden the Console Tree and the Action Pane to focus on the events.

Figure D

By sorting the Date and Time column in ascending order, you’ll see a complete history of every time you have booted your system since the day you installed Windows 7.

As you can see, the first recorded Boot Time on my sample system was 67479 milliseconds in October 2009. Dividing by 1,000 tells me that it took around 67 seconds to boot up. Of course, this was the first time, and a lot was going on right after installation. For example, drivers were being installed, startup programs were being initialized, and the SuperFetch cache was being built. By December 2009 the average boot time was around 37 seconds.

In any case, by using the Boot Time Custom View, you can scroll through every boot time recorded on your system. Of course, keep in mind that there will be normal occurrences that may lengthen the boot time, such as when updates, drivers, and software is installed.

Now, if you click the Details tab, you’ll see the entire boot process broken down in an incredible amount of detail, as shown in Figure E. (You can find more information about the boot process in the “Windows On/Off Transition Performance Analysis” white paper.) However, for the purposes of tracking the boot time, we can focus on just three of the values listed on the Details tab.

Figure E

The Details tab contains an incredible amount of detail on the boot time.

MainPathBootTime

MainPathBootTime represents the amount of time that elapses between the time the animated Windows logo first appears on the screen and the time that the desktop appears. Keep in mind that even though the system is usable at this point, Windows is still working in the background loading low-priority tasks.

BootPostBootTime

BootPostBootTime represents the amount of time that elapses between the time that the desktop appears and the time that you can actually begin using the system.

BootTime

Of course, BootTime is the same value that on the General tab is called Boot Duration. This number is the sum of MainPathBootTime and BootPostBootTime. Something that we didn’t tell you before is that Microsoft indicates that your actual boot time is about 10 seconds less that the recorded BootTime. The reason is that it usually takes about 10 seconds for the system to reach an 80-percent idle measurement at which time the BootPostBootTime measurement is recorded.

Investigating Boot Degradation

To investigate instances that cause Windows 7 system’s boot time to slow down, select Boot Degradation in the Custom Views tree and then sort Event ID column in ascending order. Each Event ID, 101 through 110, represents a different type of situation that causes degradation of the boot time.

While there are ten different Event IDs here, not all of them occur on all systems and under all circumstances. As such, I’ll focus on the most common ones that we have encountered and explain some possible solutions.

Event ID 101

Event ID 101 indicates that an application took longer than usual to start up. This is typically the result of an update of some sort. As you can see in Figure F, the AVG Resident Shield Service took longer than usual to start up right after an update to the virus database. If you look at the details, you can see that it took about 15 seconds for the application to load (Total Time), and that is about 9 seconds longer than it normally takes (Degradation Time).

Figure F

Event ID 101 indicates that an application took longer than usual to start up.

An occasional degradation is pretty normal; however, if you find that a particular application is being reported on a regular basis or has a large degradation time, chances are that there is a problem of some sort. As such, you may want to look for an updated version, uninstall and reinstall the application, uninstall and stop using the application, or maybe find an alternative.

(In the case of my friend’s Windows 7 system, there were several applications that were identified by Event ID 101 as the cause of his system slowdown. Uninstalling them was the solution, and he is currently seeking alternatives.)

Event ID 102

Event ID 102 indicates that a driver took longer to initialize. Again, this could be the result of an update. However, if it occurs regularly for a certain driver or has a large degradation time, you should definitely look in to a newer version of the driver. If a new version is not available, you should uninstall and reinstall the driver.

Event ID 103

Event ID 103 indicates that a service took longer than expected to start up, as shown in Figure G.

Figure G

Event ID 103 indicates that a service took longer than expected to start up.

Services can occasionally take longer to start up, but they shouldn’t do so on a regular basis. If you encounter a service that is regularly having problems, you can go to the Services tool and experiment with changing the Startup type to Automatic (Delayed Start) or Manual.

Event ID 106

Event ID 106 indicates that a background optimization operation took longer to complete. On all the Windows 7 systems that we investigated, this event identified the BackgroundPrefetchTime as the culprit, as shown in Figure H. Since the Prefetch cache is a work in progress, this should not really represent a problem.

Figure H

Event ID 106 indicates that a background optimization operation took longer to complete.

If you encounter regular or long degradation times related to Prefetch, you may want to investigate clearing this cache and allowing the operating system to rebuild it from scratch. However bear in mind that doing so can be tricky and instructions on doing so are beyond the scope of this article.

Event ID 109

Event ID 109 indicates that a device took longer to initialize. Again, if this is happening occasionally, there shouldn’t be anything to worry about. But if it is occurring regularly, you should make sure that you regularly back up your hard disk and begin investigating replacing the device in question.

Have questions?

Get answers from Microsofts Cloud Solutions Partner!
Call us at: 856-745-9990 or visit: https://southjerseytechies.net/

South Jersey Techies, LL C is a full Managed Web and Technology Services Company providing IT Services, Website Design ServicesServer SupportNetwork ConsultingInternet PhonesCloud Solutions Provider and much more. Contact for More Information.

To read this article in its entirety click here.

Modifying the Windows 7 boot loader with the Boot Configuration Data Editor tool

In Windows Vista and later versions of Windows, the bootloader was moved from boot.ini to a utility called BCDEdit. Here’s how to modify the boot config data with the new tool.

Sometimes dual-booting a system is a handy way to test new software, a new operating system, or an application that needs to be run in a specific version of Windows. Other reasons to dual-boot might include replication of a client environment.

Windows handles dual-booting by using boot.ini to display a menu of bootable choices or partitions found on the current system. In Windows Vista and later versions of Windows, the bootloader was moved from boot.ini to a utility called BCDEdit.

Recently, we decided we could make better use of some disk space that we had set aside to create a bootable VHD for Windows Server 2008 R2. There was no data other than the OS installation contained within the file because we had used it only to prepare a blog post about booting from Virtual Hard Disks. To free up the space, we deleted the VHD.

Note: Always make sure to back up any data that you want to keep before deleting or modifying partitions on VHDs. Your changes could make the partition unbootable.

Once we had the VHD removed, we thought Windows would be smart enough to clean up the boot loader, but we were not so lucky. We had Windows 7 set as the primary OS, so we were not without a system.

We started looking around for boot.ini and was directed toward the Boot Configuration Data Editor (BCDEdit) as the utility to use when editing boot loader information in Windows 7 (and in Vista too).

To begin, open the Start menu, select All Programs, and then choose Accessories. Right-click on Command Prompt and select Run As Administrator. Once in the command window, type bcdedit. This will return the current running configuration of your boot loader, showing any and all items that can boot on this system.

In this example, we decided to remove the entry for my Windows 2008 R2 installation, as we wouldn’t need it for the time being. To remove an entry, you will need to know the Boot Loader Identifier (found in curly braces in Figure A).

Figure A

we copied the whole list into Notepad and then selected and copied just the ID, braces included.

Removing an entry from the Boot Loader

One simple command got the Windows Server 2008 R2 entry out of the boot loader. At the command prompt, enter the following:

Bcdedit /delete {boot loader identifier}

Press Enter, and the Boot Configuration Data Editor (BCDEdit) will remove the entry for the ID you specified and display a message when finished. When Windows starts, the only choice available in the boot menu should be the current Windows installation.

Warning: Be careful when editing the boot configuration data. If you mistakenly remove the current instance of Windows, you may render your computer unbootable.

Have questions?

Get answers from Microsofts Cloud Solutions Partner!
Call us at: 856-745-9990 or visit: https://southjerseytechies.net/

South Jersey Techies, LL C is a full Managed Web and Technology Services Company providing IT Services, Website Design ServicesServer SupportNetwork ConsultingInternet PhonesCloud Solutions Provider and much more. Contact for More Information.

To read this article in its entirety click here.

CALL US NOW!