Back to Top

Tech, Web, Cloud & Cabling Services

Category: Windows 7

Quick Tips: Flush the ARP cache in Windows 7

Here’s how to clear the Address Resolution Protocol cache and how to manage that cache with a few command switches.

The Address Resolution Protocol (ARP) cache is a crucial component of IP networking on any operating system. What ARP does is link Ethernet addressing (IP addressing) to hardware addressing (MAC addressing). Without this system, a machine could not communicate to the outside world as one addressing scheme could not communicate with the other.

The ARP Cache is a collection of ARP entries (mostly dynamic) that are created when a hostname is resolved to an IP address and then an IP address is resolved to a MAC address (so the computer can effectively communicate with the IP address).

When this happens, the PC will store that newly mapped address in the ARP cache, and it will stay there until the ARP cache entry timeout expires. This isn’t usually a problem, but sometimes a bad ARP entry can cause issues with Internet connections and Web page loading. When this occurs, one step that can be taken toward resolution is to clear the ARP cache. Yes, this means the ARP cache has to be rebuilt, which means a little more work for the PC, but that cache will rebuild fairly quickly.

Clearing the ARP cache is done completely through the command line, so stretch out those fingers and get ready to type. After we show you how to clear the ARP cache, we will show you how to manage that cache with a few command switches.

Flush the cache

Step 1: Open the command prompt

Click Start and then type “cmd” (no quotes) in the search dialog box, but don’t hit Enter yet. Right-click the cmd.exe icon and select Run as Administrator (Figure A). After answering the UAC, the terminal window will open offering up the command prompt.

Figure A

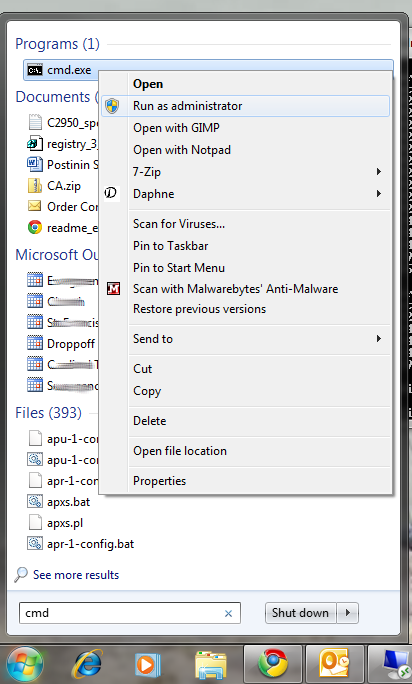
If the icon is already pinned in the Start menu, entering cmd is not necessary.

Step 2: Run the commands

The first command to run is

arp -a

This command will display all your ARP entries (Figure B). Naturally the -a option is not the only option available. The arp command also allows for the following switches:

-d Delete an IP address (arp -d 192.168.100.10)
-d -a Delete all entries in the ARP table
-s Add an entry to the ARP table (arp -s ADDRESS MAC_ADDRESS – Where ADDRESS is the address to be added and MAC_ADDRESS is the MAC address of the machine)

Figure B

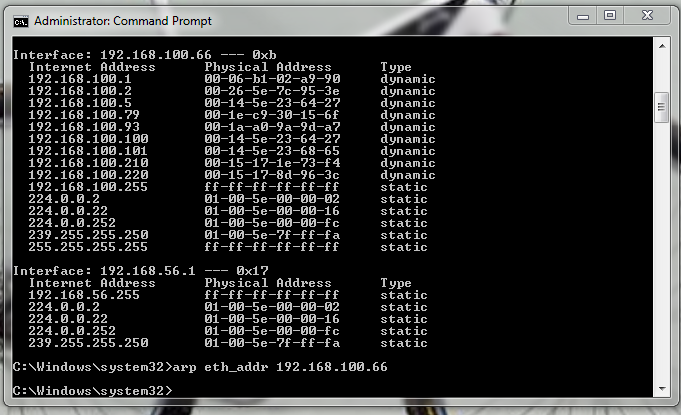
Here you see the arp cache for two different interfaces on a single machine.

To flush the entire cache, issue the following command:

netsh interface ip delete arpcache

The above command will flush the entire ARP cache on your system. Now as soon as network connections are made, the ARP cache will begin to repopulate.

Verify the flush

Once you have flushed the ARP cache, make sure to issue the command arp -a to see if the cache has, in fact, been flushed. If it does not flush, it could be the system is a victim of a Windows bug caused when Routing and Remote Services is enabled. This is a simple bug to fix:

1.           Click Start | Control Panel.

2.           Click Administrative Tools.

3.           Click Computer Management.

4.           Double-click Services and Applications.

5.           Double-click Services.

6.           Scroll down to Routing and Remote Services.

7.           Double-click Routing and Remote Services.

8.           Set the Startup Type to Disable.

9.           Make sure the service is stopped.

Now try flushing the ARP cache again. It should work this time.

Troubleshooting

It is also possible to troubleshoot network connections using the ARP cache. For example, it is important to look out for invalid ARP entries that go to a MAC address of 00-00-00-00-00-00. If one such entry shows up, make sure to delete it from the cache using the -d switch. Say you have an ARP entry that looks like:

224.0.0.24           00-00-00-00-00-00 static

In order to delete this entry, use the arp command like so:

arp -d 224.0.0.24

And that invalid entry will be gone.

Final thoughts

There are so many ways to troubleshoot networking connections. Flushing the ARP cache is just one of those methods that is rarely thought of, but when all else fails this might be the last-gasp effort that makes you the hero of the day.

Have questions?

Get answers from Microsofts Cloud Solutions Partner!
Call us at: 856-745-9990 or visit: https://southjerseytechies.net/

South Jersey Techies, LL C is a full Managed Web and Technology Services Company providing IT Services, Website Design ServicesServer SupportNetwork ConsultingInternet PhonesCloud Solutions Provider and much more. Contact for More Information.

To read this article in its entirety click here.

Microsoft hints at September release of Windows 10’s next feature upgrade

Based on the current progress for Windows 10 version 1903, due to arrive next spring, it now looks like the fall update for the OS will arrive around Sept. 10 or Sept. 24.

Microsoft last week released the first preview of what will become Windows 10 version 1903, the opening feature upgrade of next year, slated to ship in the spring.

The debut of what Microsoft calls the “Skip Ahead” build for Windows 10 1903 also hints that the release of this fall’s upgrade, aka 1809, will take place in September. If so, it would be the first time since late-2015 that the actual delivery date matched the numerical label.

On July 25, Microsoft forked the 1809 preview of Windows 10 – as it’s done before when a feature upgrade approaches – so developers could continue to deliver betas for that build while also beginning to work on the next-in-line, 1903. (Microsoft uses a yymm labeling system to mark its Windows 10 feature upgrades; 1809 should indicate a September 2018 release, while 1903 would be a March 2019 release.)

When it forks preview code, Microsoft provides the even-further-in-the-future build, in this case, 1903, to Windows Insider participants who earlier volunteered for Skip Ahead. As the current feature upgrade gets close to release, Microsoft switches Skip Ahead users to the following upgrade, so that engineers can start collecting feedback on that version even as they keep polishing the one set to launch soon. The bulk of Insiders remain on the latter.

Think of the Skip Ahead debut as a warning bell, like the one rung at track meets when racers start the final lap: When Microsoft begins to ship Skip Ahead code, it’s close to wrapping up the impending feature upgrade.

In 2017, as Windows 10 1709 (aka “Fall Creators Update”) neared completion, Microsoft first forked the preview code and distributed a different build to Skip Aheaders on Aug. 31. Windows 10 1709 began its release cycle on Oct. 17, or 47 days later. With this year’s version 1803, Skip Ahead debuted Feb. 14, or 75 days before the April 30 release of that upgrade.

(Windows 10 1803’s original launch date, reportedly April 10 – which was one of two dates Computerworld had forecast in February – was postponed by 20 days after a deal-breaking bug was uncovered at nearly the last minute.)

For one estimate of the release date for Windows 10 1809, Computerworld added 47 days to July 25, arriving at Sept. 10. A second estimate was generated by adding 61 days – the average of the two previous Skip Ahead triggers – to July 25, resulting in a Sept. 24 rollout.

Because the last three feature upgrades launched on either a Monday or Tuesday – April 11, 2017 for version 1703; Oct. 17, 2017 for 1709; April 30, 2018 for 1803 – Sept. 10 or 11 would be the most likely release dates for 1809, absent a show-stopping problem like the bug before 1803’s launch. Computerworld’s alternate forecast would be September 24 or 25, also a Monday/Tuesday combination, because it would match the previous upgrades’ average time-between-Skip-Ahead-and-release.

If Microsoft does release Windows 10 1809 in September, it would be the first time since November 2015 that the company has matched delivery date and the upgrade’s label. Version 1511 debuted Nov. 10, 2015. The four subsequent upgrades, 1607, 1703, 1709 and 1803, all missed their release months by between 2 and 30 days. (Version 1607 came the nearest, releasing Aug. 2, 2016.)

Although Microsoft has never expressly tied itself to March and September release months – in a support document, it gives itself wiggle room by stating that feature upgrades will be released “twice per year, around March and September [emphasis added]” – the disconnect between release and numerical designation has always seemed odd.

Issuing feature upgrades during the appointed months would be a sign that Microsoft has gotten a better handle on the rapid development tempo it has at times struggled with executing. It would also be a step toward a more predictable schedule, which was the point of the pledge it made over a year ago to issue a pair of feature upgrades annually.

Delete WINDOWS.OLD on Windows Server


After performing an in-place upgrade on a Windows machine, you will find a WINDOWS.OLD folder in the root of C:. This folder will have a backup of your old program files, appdata and Windows folder… just in case you need to revert back or recover something that might have been lost during the upgrade. When you try to delete it though you are told you don’t have permissions. Just a small point here, it is generally not recommended to do in-place upgrades on servers. In fact there are some products (e.g. Exchange, ConfigMgr) that explicitly state they do not support upgrading the Operating System. There is of course a difference between “what works” and “what is supported”, but we do suggest where possible you do a clean Server install and migrate your application to the new server. Anyway, let’s assume you’ve understand all the risks and have done a successful in-place upgrade, you now find the old WINDOWS.OLD folder of several GB in size sitting there. If all is well, then you might as well just delete it.

SOLUTION

On Desktop OS version, you can just use the disk cleanup tool to remove it, but that is not available (by default) on Servers, so there are a couple of approaches.

Command line tools to take ownership and delete the folder. Make sure to “run as administrator”

How can I delete the windows.old from an upgraded Windows Server?

For a client OS that’s upgraded, the Disk Cleanup utility can be used to delete the very large windows.old folder containing the old OS. This isn’t available on a server OS without installing the Desktop Experience feature.

To delete, it is necessary to take ownership of the folder, give administrators full control, then delete. This can be done with the commands below:

  •  takeown /F c:\Windows.old\* /R /A /D Y
  •  cacls c:\Windows.old\*.* /T /grant administrators:F
  •  rmdir /S /Q c:\Windows.old


Or you can add the “Desktop” features to provide the Disk Cleanup tool:

Step By Step Guide to Enabling “Disk Cleanup Utility”

1. Open The Roles and Features Wizard

To open the roes and feauture wizard. Lauch the “server manager” by pressing the Windows key

and clicking on the server manage please see Screenshot as shown.

Personally, the command line option is less messy and saves having to add features to your server that don’t really need to be there.

2. Click on Add role and Feature

Click on add role and feture to launch the add role and feature wizard.

3.  Choose installation Type

Choose rolebase or feature based installation to install to local machine.

4. Click Next all the way to features

Click “next” all the way to features. Locate “User Interface and Infrastructure”. Click on “Desktop Experience”

and install additional required feature.

5.  Proceed with the installation and Reboot

Make it sure that you reboot the system

6.  Verify that the Utility is indeed installed

Ready to run diskcleanup. See screen shot below.

Disk Cleanup in Action

Below is a sample snapshot of disk cleanup in action.

What you need to know about the WannaCry Ransomware

What has happened?

On May 12, 2017 a new variant of the Ransom.CryptXXX ransomware family (detected as Ransom.Wannacry) began spreading widely, impacting a large number of organizations, particularly in Europe.

What is the WannaCry ransomware?

WannaCry encrypts data files and asks users to pay a US$300 ransom in bitcoins. The ransom note indicates that the payment amount will be doubled after three days. If payment is not made after seven days, the encrypted files will be deleted.

Figure 1. Ransom demand screen displayed by the WannaCry Trojan

It also drops a file named !Please Read Me!.txt which contains the ransom note.

Figure 2. Ransom demand note from WannaCry Trojan

It propagates to other computers by exploiting a known SMB remote code execution vulnerability (MS17-010) in Microsoft Windows computers.

Are you protected against this threat?

South Jersey Techies, LLC recommends and offers Symantec Endpoint Protection to its clients. Symantec Endpoint Protection customers are protected against WannaCry using a combination of technologies: Antivirus, SONAR protection, Network-based protection.

All South Jersey Techies Managed IT Services client computers have the latest Windows security updates installed, in particular MS17-010, to prevent spreading. If your business / organization is not on our Managed IT Services plan please check or contact us to ensure that you have the latest updates installed.

Who is impacted?

A number of organizations globally have been affected, the majority of which are in Europe.

Is this a targeted attack?

No, this is not believed to be a targeted attack at this time. Ransomware campaigns are typically indiscriminate.

Can I recover the encrypted files?

Decryption is not available at this time but companies are investigating. South Jersey Techies, LLC does not recommend paying the ransom. Encrypted files should be restored from back-ups where possible. South Jersey Techies offers a number of backup solutions including Carbonite Online Backup and cloud storage solutions. If you are unsure about your computer / server backups, please check or contact us to discuss the best solution for your business.

What are best practices for protecting against ransomware?

  • New ransomware variants appear on a regular basis. Always keep your security software up to date to protect yourself against them.
  • Keep your operating system and other software updated. Software updates will frequently include patches for newly discovered security vulnerabilities that could be exploited by ransomware attackers.
  • Email is one of the main infection methods. Be wary of unexpected emails especially if they contain links and/or attachments.
  • Be extremely wary of any Microsoft Office email attachment that advises you to enable macros to view its content. Unless you are absolutely sure that this is a genuine email from a trusted source, do not enable macros and instead immediately delete the email.
  • Backing up important data is the single most effective way of combating ransomware infection. Attackers have leverage over their victims by encrypting valuable files and leaving them inaccessible. If the victim has backup copies, they can restore their files once the infection has been cleaned up. However organizations should ensure that back-ups are appropriately protected or stored off-line so that attackers can’t delete them.
  • Using cloud services could help mitigate ransomware infection, since many retain previous versions of files, allowing you to “roll back” to the unencrypted form.

Have additional questions?

Feel free to call us at contact us or (856) 745-9990 with any questions you may have.

CALL US NOW!