Windows 10 quick tips: 10 ways to speed up your PC

Want Windows 10 to run faster? Take a few minutes to try out these tips, and your machine will be zippier and less prone to performance and system issues.


1. Change your power settings

If you’re using Windows 10’s Power saver plan, you’re slowing down your PC. That plan reduces your PC’s performance in order to save energy. (Even desktop PCs typically have a Power saver plan.) Changing your power plan from Power saver to High performance or Balanced will give you an instant performance boost.

To do it, launch Control Panel, then select Hardware and Sound > Power Options. You’ll typically see two options: Balanced (recommended) and Power saver. (Depending on your make and model, you might see other plans here as well, including some branded by the manufacturer.) To see the High performance setting, click the down arrow by Show additional plans.
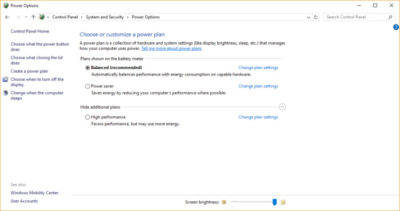
To change your power setting, simply choose the one you want, then exit Control Panel. High performance gives you the most oomph, but uses the most power; Balanced finds a median between power use and better performance; and Power saver does everything it can to give you as much battery life as possible. Desktop users have no reason to choose Power saver, and even laptop users should consider the Balanced option when unplugged and High performance when connected to a power source.


2. Disable programs that run on startup

One reason your Windows 10 PC may feel sluggish is you’ve got too many programs running in the background programs that you may never use, or only rarely use. Stop them from running, and your PC will run more smoothly.

Start by launching the Task Manager: Press Ctrl-Shift-Esc or right-click the lower-right corner of your screen and select Task Manager. If the Task Manager launches as a compact app with no tabs, click “More details” at the bottom of your screen. The Task Manager will then appear in all of its full-tabbed glory. There’s plenty you can do with it, but we’re going to focus only on killing unnecessary programs that run at startup.

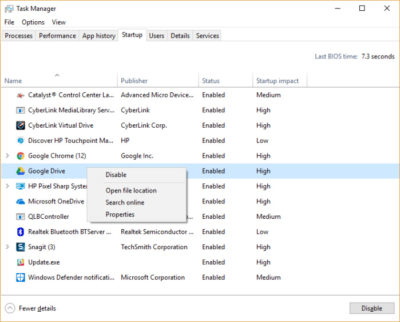
Click the Startup tab. You’ll see a list of the programs and services that launch when you start Windows. Included on the list is each program’s name as well as its publisher, whether it’s enabled to run on startup, and its “Startup impact,” which is how much it slows down Windows 10 when the system starts up.

To stop a program or service from launching at startup, right-click it and select “Disable.” This doesn’t disable the program entirely; it only prevents it from launching at startup — you can always run the application after launch. Also, if you later decide you want it to launch at startup, you can just return to this area of the Task Manager, right-click the application and select “Enable.”
Many of the programs and services that run on startup may be familiar to you, like OneDrive or Evernote Clipper. But you may not recognize many of them. (Anyone who immediately knows what “bzbui.exe” is, please raise your hand. No fair Googling it first.)

The Task Manager helps you get information about unfamiliar programs. Right-click an item and select Properties for more information about it, including its location on your hard disk, whether it has a digital signature, and other information such as the version number, the file size and the last time it was modified.

You can also right-click the item and select “Open file location.” That opens File Explorer and takes it to the folder where the file is located, which may give you another clue about the program’s purpose.

Finally, and most helpfully, you can select “Search online” after you right-click. Bing will then launch with links to sites with information about the program or service.

If you’re really nervous about one of the listed applications, you can go to a site run by Reason Software called Should I Block It? and search for the file name. You’ll usually find very solid information about the program or service.

Now that you’ve selected all the programs that you want to disable at startup, the next time you restart your computer, the system will be a lot less concerned with unnecessary program.


3. Turn off search indexing

Windows 10 indexes your hard disk in the background, allowing you – in theory – to search your PC more quickly than if no indexing were being done. But slower PCs that use indexing can see a performance hit, and you can give them a speed boost by turning off indexing. Even if you have an SSD disk, turning off indexing can improve your speed as well, because the constant writing to disk that indexing does can eventually slow down SSDs.
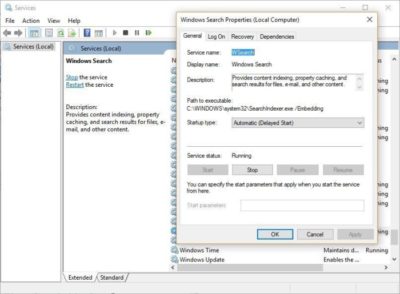
To get the maximum benefit in Windows 10, you need to turn indexing off completely. To do so, first type services.msc in the Start Menu search box, and click the Services result that come up. The Services app then appears. Scroll down to either Indexing Service or Windows Search in the list of services. Double-click it, and from the screen that appears, click Stop. Then reboot. Your searches may be slightly slower, although you may not notice the difference. But you should get an overall performance boost.

If you’d like, you can turn off indexing for only files in certain locations. To do this, first type index in the Start Menu search box, and click the Indexing Options result that appears. The Indexing Options page of Control Panel appears. Click the Modify button and you’ll see a list of locations that are being indexed, such as Microsoft Outlook, your personal files, and so on. Uncheck the boxes next to any location, and it will no longer be indexed.


4. Clean out your hard disk

If you’ve got a bloated hard disk filled with files you don’t need, you could be slowing down your PC. Cleaning it out can give you a speed boost. Windows 10 has a surprisingly useful built-in tool for doing this called Storage Sense. Go to Settings > System > Storage and at the top of the screen – in the Storage Sense section – move the toggle from Off to On. When you do this, Windows constantly monitors your PC, and deletes old junk files you no longer need; temporary files; files in the Downloads folder that haven’t been changed in a month; and old Recycle Bin files.

You can customize how Storage Sense works and also use it to free up even more space than it normally would. Underneath Storage Sense, click “Change how we free up space automatically.” From the screen that appears, you can change how often Storage Sense deletes files (every day, every week, every month or when Windows decides). You can also tell Storage Sense to delete files in your Download folder, depending on how long they’ve been there. And you can also set how long to wait to delete files in the Recycle Bin automatically.
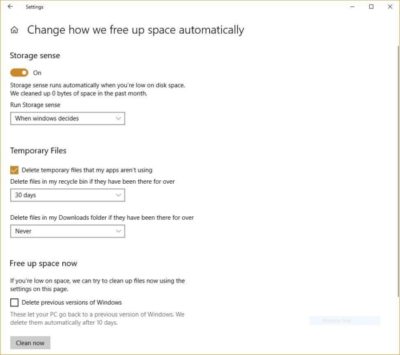
You can also delete old versions of Windows that might be hogging space. At the bottom of the screen, check the box next to “Delete previous versions of Windows.” Storage Sense will then delete old versions of Windows ten days after you’ve installed an upgrade. Note that if you do this, you won’t be able to revert to the older version of Windows.


5. Clean out your Registry

Under the Windows hood, the Registry tracks and controls just about everything about the way Windows works and looks. That includes information about where your programs are stored, which DLLs they use and share, what file types should be opened by which program or just about everything else.

But the Registry is a very messy thing. When you uninstall a program, for example, that program’s settings don’t always get cleaned up in the Registry. So over time, it can get filled with countless outdated settings of all types. And that can lead to system slowdowns.

Don’t even think of trying to clean any of this out yourself. It’s impossible. To do it, you need a Registry Cleaner. There are plenty available, some free and some paid. But there’s really no need to outright buy  one, because the free Auslogics Registry Cleaner does a solid job.

Before using Auslogics or any other Registry Cleaner, you should back up your Registry so you can restore it if anything goes wrong. (Auslogics Registry Cleaner does this for you as well, but it can’t hurt to have it backed up twice.) To do your own Registry backup, type regedit.ext in the search box, then press Enter. That runs the Registry editor.  From the File menu, select Export. From the screen that appears, make sure to choose the “All” option in the Export range section at the bottom of the screen. Then choose a file location and file name and click Save. To restore the Registry, open the Registry editor, select Import from the File menu, then open the file you saved.
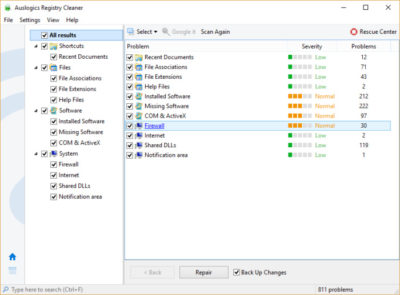
Now download, install and run Auslogics Registry Cleaner. On the left-hand side of the screen you can select the kinds of Registry issues you want to clean up – for example, File Associations, Internet or Fonts. I generally select them all.

Next tell it to scan the Registry for problems. To do that, click “Scan Now” and from a drop-down menu that appears select Scan. That lets you first examine the Registry problems it finds. If you instead choose “Scan and Repair,” it makes the fixes without you checking them.

It now scans your Registry for errors, then shows you what it found. It ranks the errors according to their severity, to help you decide which to fix. Click Repair when you’ve made your decision, and make sure that “Back up Changes” is checked, so you can restore the Registry easily if something goes wrong.


6. Disable shadows, animations and visual effects

Windows 10 has some nice eye candy — shadows, animations and visual effects. On fast, newer PCs, these don’t usually affect system performance. But on slower and older PCs, they can exact a performance hit.
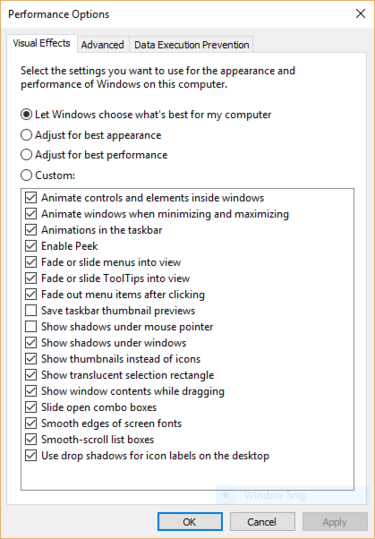
It’s easy to turn them off. In the Windows 10 search box type sysdm.cpl and press Enter. That launches the System Properties dialog box. Click the Advanced tab and click “Settings” in the Performance section. That brings you to the Performance Options dialog box. You’ll see a varied list of animations and special effects.

If you have time on your hands and love to tweak, you can turn individual ones on and off. These are the animations and special effects you’ll probably want to turn off, because they have the greatest effect on system performance:

  • Animate controls and elements inside windows
  • Animate windows when minimizing and maximizing
  • Animations in the taskbar
  • Fade or slide menus into view
  • Fade or slide ToolTips into view
  • Fade out menu items after clicking
  • Show shadows under windows

However, it’s probably a lot easier to just select “Adjust for best performance” at the top of the screen and then click OK. Windows 10 will then turn off the effects that slow down your system.


7. Launch the Windows troubleshooter
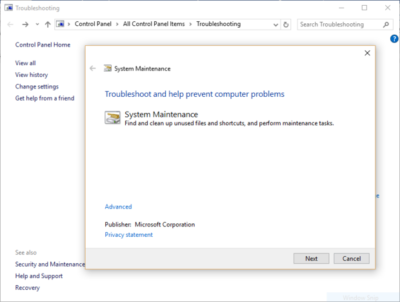
Windows 10 has a very useful, little-known tool that can sniff out performance problems and solve them. To launch it, run Control Panel and select System and Security > Security and Maintenance > Troubleshooting > Run maintenance tasks. A screen titled “Troubleshoot and help prevent computer problems” will appear. Click Next.

The troubleshooter will find files and shortcuts you don’t use, identify any performance and other issues on your PC, report them to you and then fix them. Note that you may get a message that says, “Try troubleshooting as an administrator.” If you have administrative rights to the PC, click it and the troubleshooter will launch and do its work.


8. Get help from the Performance Monitor

There’s a great tool in Windows 10 called the Performance Monitor that can, among other things, create a detailed performance report about your PC, detail any system and performance issues, and suggest fixes.

To get the report, type perfmon /report into your search box and press Enter. (Make sure there’s a space between “perfmon” and the slash mark.) The Resource and Performance Monitor launches and gathers information about your system. It will say that it will take 60 seconds, but I’ve found that it takes several minutes. When the Monitor finishes, it will launch an interactive report.

You’ll find a lot of extremely detailed information in the report, and it can take a lot of time to go through. Your best bet is to first look at the Warnings section, which details the biggest issues (if any) it found on your PC, such as problems with Windows, with drivers and so on. It also tells you how to fix each problem — for example, how to turn on a device that has been disabled.
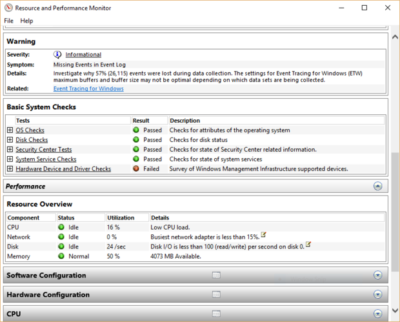
It is also worthwhile to scroll down to the Resource Overview section, where you’ll find an analysis of how well your CPU, network, disk and memory are performing. Each result is color-coded, with green meaning no problems, yellow meaning potential issues, and red showing a problem.

Beyond that, the Resource Overview also reports performance metrics and explanatory details. For example, for the CPU, it might show green and a utilization of 21%, with the details, “Normal CPU load.” Or for Memory, it might show yellow, with 62% utilization and the details, “1520 MB is available.” Based on what you get, you might want to do something about your hardware — for example, add more memory.


9. Kill bloatware

Sometimes the biggest factor slowing down your PC isn’t Windows 10 itself, but bloatware or adware that takes up CPU and system resources. Adware and bloatware are particularly insidious because they may have been installed by your computer’s manufacturer. You’d be amazed at how much more quickly your Windows 10 PC can run if you get rid of it.

First, run a system scan to find adware and malware. If you’ve already installed a security suite such as Norton Security or McAfee LiveSafe, you can use that. You can also use Windows 10’s built in anti-malware app — just type Windows Defender in the search box, press Enter, and then click Scan Now. Windows Defender will look for malware and remove any it finds.

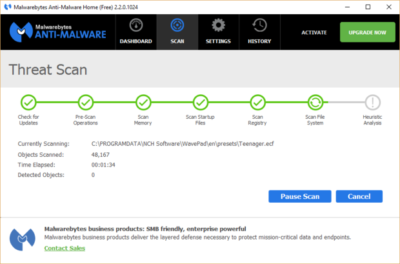
It’s a good idea to get a second opinion, though, so consider a free tool like Malwarebytes Anti-Malware. The free version scans for malware and removes what it finds; the paid version offers always-on protection to stop infections in the first place.

Now you can check for bloatware and get rid of it. Several free programs will do this for you; your best bet is to run several of them, because no single one will find all the bloatware on your PC. Good choices are the PC Decrapifier, Should I Remove It? and SlimComputer.
 

10. Shut down and restart Windows

Here’s one of IT’s not-quite-secret weapons for troubleshooting and speeding up a PC: Shut it down and restart it. Doing that clears out any excess use of RAM that otherwise can’t be cleared. It also kills processes that you might have set in motion and are no longer needed, but that continue running and slow your system. If your Windows 10 PC has turned sluggish over time for no apparent reason, you may be surprised at how much more quickly it will run when you do this.

Try just some of these tricks, and you’ll find that you’ve got a faster Windows 10 PC — and one that is less likely to have any reliability problems.

How to access Compliance Manager by Office 365

Compliance Manager is now available

Compliance Manager is a cross-Microsoft-cloud services feature designed to help organizations meet complex compliance obligations, including GDPR, ISO 27001, ISO 27018, NIST 800-53, and HIPAA. Compliance Manger is rolling out and has been moved from Public Preview to General Availability.

How to access Compliance Manager?

Users can access Compliance Manager by signing into their Office 365, Dynamics 365, or Azure user account via the Service Trust Portal. This new compliance solution is designed to help organizations meet their data protection and regulatory requirements while using Microsoft cloud services. Compliance Manager enables users to perform on-going risk assessments, gain actionable insights to improve data protection capabilities, and simplifies compliance processes through its built-in control management and audit-ready reporting tools.

Compliance Manager is now generally available for Azure, Dynamics 365, and Office 365 Business and Enterprise subscribers in public clouds. Note that Office 365 GCC customers can access Compliance Manager, however, you should evaluate whether to use the document upload feature of compliance manager, as the storage for document upload is currently compliant with Office 365 Tier C only.

What do I need to do to prepare for this change?

By default, everyone in your organization with an Office 365, Dynamics 365 or Azure user account has access to Compliance Manager and can perform any action in Compliance Manager. To change the default permissions, at least one user must be added to each Compliance Manager role (see the instructions on our support page linked from Additional Information below). After a user is added to a role, the default permissions are removed and only users that have been added to a role will be able to access Compliance Manager and perform the actions allowed by that role.

Once you log into Compliance Manager you will see a number of assessments and what Microsoft has completed for the various assessments.  You will also see what controls your organization are responsible for.  You can export the assessment to excel if you need to provide it for an auditor or wish to save it for retention purposes.

Once in an assessment, you can update what your organization is doing to meet the requirements for the various supported standards.  This gives you the ability to track your compliance activities.  Some organization may already have GRC tracking software but they will find this tool useful if for no other reason to see the results of Microsoft Managed controls.

If Microsoft allowed you to have an assessment for your on-premises systems.  Like a blank questionnaire, clients could use it might be able to replace a GRC app for some companies.

When updating the Customer Managed Controls you have the ability to upload documents, lookup the related controls, assign an assessor, a test date and document the test results.

Microsoft provides you with detailed guidance for customer actions and allows you to document your control implementation details along with a test plan and any response to the assessment.

There is a Compliance Score that, “is a new intelligent scoring feature that is calculated based on an analysis of industry standard control components. Compliance Manager analyzes controls for their the impact to the confidentiality, availability, and integrity of protected data, as well as external drivers in order to weigh controls based on their impact.”

We think this is a great tool especially for small to medium businesses and local governments.  Most often these smaller organizations don’t have formal governance practices or necessary skills in-house.  This tool could help them develop those processes. We also see this as a great tool or internal auditors to use. It gives businesses a place to document the testing methods and results.


What You Need to Know About the Big Chip Security Problem

According to Intel Corp.,most of the processors running the world’s computers and smartphones have a feature that makes them susceptible to hacker attacks. The chipmaker, working with partners and rivals, says it has already issued updates to protect most processor products introduced in the past five years, but the news sparked concern about this fundamental building block of the internet, PCs and corporate networks.

The revelation of the so-called Meltdown and Spectre vulnerabilities spurred a scramble among technology’s biggest players, from Apple Inc. to Amazon.com Inc., to enact fixes and reassure customers they were on top of the problem.

1. What’s the problem?

Modern processors guess what they’ll have to do next and fetch the data they think they’ll need. That makes everything from supercomputers to smartphones operate very fast. Unfortunately, as Google researchers discovered, it also provides a way for bad actors to read data stored in memory that had been thought to be secure. In a worst-case scenario, that would let someone access your passwords.

2. How bad is it?

The vulnerability won’t stop your computer working and doesn’t provide an avenue for hackers to put malicious software on your machine. Though it could put important data at risk, there’s been no report so far of anyone’s computer being attacked in this manner. More broadly, though, the new fears could undermine longtime assurances that hardware and chip-level security is more tamper-proof than software.

3. How was it discovered?

The weakness was discovered last year by folks Google employs to find such issues before the bad guys do. Usually, solutions are developed in private and announced in a coordinated way. This time the news leaked before the companies involved had a chance to get a fix in place.


4. What’s being done to fix it?

Chipmakers and operating system providers, such as Alphabet Inc.’s Google and Microsoft Corp., are rushing to create software patches that will close the potential window of attack. Intel said that it expects to have issued updates for more than 90 percent of recently introduced processor products. Amazon.com Inc. said “all but a small single-digit percentage” of its servers have already been protected. In a blog post, Google said its security teams immediately “mobilized to defend” its systems and user data. Some customers of Android devices, Google Chromebook laptops and its cloud services still need to take steps to patch security holes, the company said. Patches for Windows devices are out now and the company is securing its cloud services, Microsoft said in a statement.

5. Is this just an Intel problem?

No, though that seems to be what panicky investors initially thought. Intel says it’s an issue for all modern processors. But rival Advanced Micro Devices Inc. stated that its products are at “near-zero risk.” ARM Holdings, which has chip designs that support all smartphones, said that, at worst, the vulnerability could “result in small pieces of data being accessed” and advised users of its technology to keep their software up to date. Google fingered all three companies. Apple said all Mac computers and iOS devices — including iPhones and iPads — were affected, but stressed there were no known exploits impacting users and that steps taken to address the issue haven’t dented performance.

6. What will the fallout be?

Some computers, mostly older ones, could be slowed down by the software patches that will make them more secure. Intel said that in common situations software might be slowed down by as much as 3 percent or not at all. But in other rare situations, performance might be reduced as much as 30 percent. The company doesn’t expect any financial impact and said it thinks customers will keep buying. As the fixes haven’t been widely deployed yet, it’s unclear whether anyone will even notice or whether computer slowdowns will be widespread. Intel has only done lab tests.

RingCentral Mobile Users Without A Digital Line

Ring Central allows your employees to communicate anywhere, anytime on any device. In the past, Ring Central has not been enforcing licenses for employees that are using the system on mobile devices without a digital line. That is about to change. 


RingCentral Mobile Users FAQ


Why are you now charging for Mobile Users without a digital line?
Mobile Users without a digital line can make and receive calls and have access to many of the same capabilities as users with digital lines. These include RingCentral Glip, RingCentral Meetings, integrations and more. With this advanced functionality, these users have begun using the product the same way they would a digital line.

Consequently, Mobile Users using the system without a digital line will now be considered part of the total licensed users and will be charged based on their account’s current cost per digital line.

Will I be charged for using the Mobile App?
No. Mobile Users with a digital line are not affected, and can continue to use the Mobile App for no additional charge. This change only affects Mobile Only Users without a digital line.

When does this take effect?
Please refer to the email notification for the timing of this change for your account.

What will be the cost?
The cost for each Mobile User without a digital line will be the same as users who have a digital line. If you want to add digital lines for your Mobile Users at no additional cost (excluding taxes and fees), please contact your RingCentral account manager.

What are the benefits to Mobile Users of adding a digital line?
By adding a digital line, the Mobile User will get full access to RingCentral’s softphone (inbound and outbound) and the ability to use a desk phone if needed. If you are interested, please contact your account manager by calling  800-591-7973.

How do I know which Mobile Users without a digital line will be billed at any given time?
System administrators can log into their RingCentral account and see this information under the billing tab. See more details here. If a mobile user without a digital line is inactive or is only used for internal company calls, within a given month, there will be no charge.


How to leave a Google review for South Jersey Techies, LLC

Google lets you write a review or describe a place

On Google Maps, you can write reviews for South Jersey Techies. Your reviews are public, so anyone can see what you write. You can’t add an anonymous review.

To leave us a review click here

Note: Google has a zero tolerance policy for fake reviews. Google reserves the right to take down any review that they deem to be fake or which doesn’t comply with their user content and conduct policies.

Why we want you to leave a review on Google?


At South Jersey Techies, we recognize the challenges businesses face and can help you improve your technology with affordable professional Managed IT Services and Website Maintenance Plans.We’ll help your company save time and money while giving you excellent service and tech support. In return we would like to know if we are doing our optimum best to help you and your business thrive

Here are some other things that others will be able to see:

> Your name that appears on your About me page
> Other reviews you’ve written on Google Maps
> Photos you’ve added to Google Maps

Tip: If you like adding place information or writing reviews, join the Local Guides community. By contributing to Google Maps, you can earn points and get a special badge next to your reviews. For more info and answers to your other questions, check out the Local Guides forum.

[tabby title=”Computer”]

Find other people’s ratings or reviews

  1. On your computer, open Google Maps.
  2. Search for a place.
  3. Below the search box, you’ll see a rating.
  4. To read all the reviews for the place, to the right of the rating, click on the total number of reviews.

Tip: If you want to see a translated review in another language, go to your languages and then on the right, click Edit Edit and then choose a language.

Add a rating or review

  1. On your computer, open Google Maps and make sure you’re signed in.
  2. Search for a place.
  3. Click Write a review.
  4. In the window that appears, click the stars to score the place. If you want, you can also write a review.


[tabby title=”Android”]

Find or share other people’s ratings or reviews

  1. On your Android phone or tablet, open the Google Maps app Google Maps.
  2. Search for a place or tap it on the map
  3. At the bottom, tap the place’s name or address.
  4. At the top, tap Reviews.
  5. To share a review, go to the bottom of the review and tap Share Share.

Tips:

> To find high-quality reviews, look for Local Guides . A star means a Local Guide wrote the review.

> If you want to see a translated review in another language, go to your languages and then on the right, click Edit Edit and then choose a language.

Add a rating or review

  1. On your Android phone or tablet, open the Google Maps app Google Maps.
  2. Search for a place or tap it on the map.
  3. At the bottom, tap the place’s name or address.
  4. At the top, tap Reviews and then scroll down until you see 5 empty stars.
  5. Tap the stars to score a place or write a review.

[tabby title=”iPhone & iPad”]

Find or share other people’s ratings or reviews

  1. On your iPhone or iPad, open the Google Maps app Google Maps.
  2. Search for a place or tap it on the map.
  3. At the bottom, tap the place’s name or address.
  4. Scroll down until you see reviews.
  5. To share a review, go to the bottom of the review and tap Share .

Tips:

> To find high-quality reviews, look for Local Guide  . A star means the review was written by a Local Guide.

> If you want to see a translated review in another language, go to your languages and then on the right, click Edit Edit and then choose a language.

Add a rating or review

  1. On your iPhone or iPad, open the Google Maps app Google Maps.
  2. Search for a place or tap it on the map.
  3. At the bottom, tap the place’s name or address.
  4. Scroll down until you see 5 empty stars.
  5. Tap the stars to score a place or write a review.

[tabbyending]

[tabby title=”See Review”]

If you have Location History turned on, you can see a list of places you’ve visited or places that you might want to review.

  1. On your iPhone or iPad, open the Google Maps app Google Maps.
  2. In the top left, tap the Menu Menu and then Your contributions.
    • To see places that you’ve already reviewed, choose Reviews.
    • To see places you might want review, choose Contribute.

[tabby title=”Share/Edit/Delete Review”]

  1. On your iPhone or iPad, open the Google Maps app Google Maps.
  2. In the top left, tap the Menu Menu and then Your contributions and then Reviews.
  3. Find the review you want to share, edit, or delete.
    • Share your review: Tap on your review and then scroll down until you see your review and then at the bottom of your review, tap Share .
    • Edit your review: Tap More More and then Edit review.
    • Delete your review: Tap More More and then Delete review.

[tabby title=”Report a Review”]

  1. On your iPhone or iPad, open the Google Maps app Google Maps.
  2. Find the review that violates Google’s review policies.
  3. Next to the review, tap More More and then Report review.

[tabbyending]

Have questions?

Get answers from Microsofts Cloud Solutions Partner!
Call us at: 856-745-9990 or visit: https://southjerseytechies.net/

South Jersey Techies, LL C is a full Managed Web and Technology Services Company providing IT Services, Website Design Services, Server Support, Network Consulting, Internet Phones, Cloud Solutions Provider and much more. Contact for More Information.

Atari’s Ataribox console will run Linux

Cost $250-$300, if it ever materializes

Now it just needs an E.T. game.


Atari announced in June that it was getting back into the hardware business, with plans for an upcoming “Ataribox” console. Of course, it didn’t release any actual details at the time—only a slick-looking render of a retro-styled box, complete with real wood paneling. Oh, plus a promise to crowdfund the upcoming console.

If alarm bells just started ringing in your head, visions of another Ouya-style disaster, well we can’t say those fears are unfounded. This week Atari further detailed the Ataribox to GamesBeat, and the plan seems even weirder than before.

According to Ataribox creator Feargal Mac, we’re looking at a device that will a) run Linux and b) cost in the neighborhood of $250 to $300. Featuring a custom AMD processor and launching alongside a catalog of classic Atari games, GamesBeat writes, “the idea is to create a box that makes people feel nostalgic about the past, but it’s also capable of running the independent games they want to play today, like Minecraft or Terraria.”

You know what? Best of luck to them. If Valve couldn’t make the Linux-centric living room PC a hot item, though, We’re not sure that Atari will be able to. And that’s all this is—a very cheap Steam Machine, cheaper even than Alienware’s quaint little model.

Is that enough? Probably not. The problem, as always, is the games. Linux gaming is worlds better than it was a few years ago, especially if Atari focuses on the indie scene. Still, we’re talking a pretty small subset of available titles. Atari’s trotted out the ol’ Valve line of “You can install Windows on it if you want,” and that’s not a great omen in my mind.

And even a $250 Ataribox is still plenty expensive considering this thing won’t run any big-budget games. You can buy an Xbox One S for $250 right now on Amazon, and a PlayStation 4 is only $50 more expensive. Sure, it’s a console, but it’ll at least play Wolfenstein II just as easily as it’ll play Terraria.

Atari’s also been quiet about how you’ll control the Ataribox. GamesBeat mentions a “user interface [Atari is] customizing for TVs,” so I assume a controller, but every photo of the Ataribox is just the console on its own. Hell, for all we know Atari will be buying Steam Controllers in bulk and packaging them with the system. Might as well. Those who want to get into the system level and tinker, though, will probably need a keyboard and mouse, which isn’t very living room-friendly.

One last red flag: It’s still being crowdfunded. Plans are for an Indiegogo campaign later this fall, with a release scheduled for Spring 2018. We’ll keep you updated.

Have questions?

Get answers from Microsofts Cloud Solutions Partner!
Call us at: 856-745-9990 or visit: https://southjerseytechies.net/

South Jersey Techies, LL C is a full Managed Web and Technology Services Company providing IT Services, Website Design Services, Server Support, Network Consulting, Internet Phones, Cloud Solutions Provider and much more. Contact for More Information.

To read this article in its entirety click here.

CALL US NOW!