TECHIE NEWS

Change the Processor Affinity setting in Windows 7 to gain a performance edge

Under specific circumstances and with careful tweaking, you can increase Windows 7’s performance using the Processor Affinity setting.
If you have a multi-core processor, chances are good that on the Performance tab in Windows Task Manager, you have noticed that the CPU Usage History graphs look about the same for each core, as shown in Figure A. The reason for this is that most applications you run these days have been designed with multi-core processors in mind and will work with the operating system to distribute their operations as evenly as possible across all the available cores.

Figure A
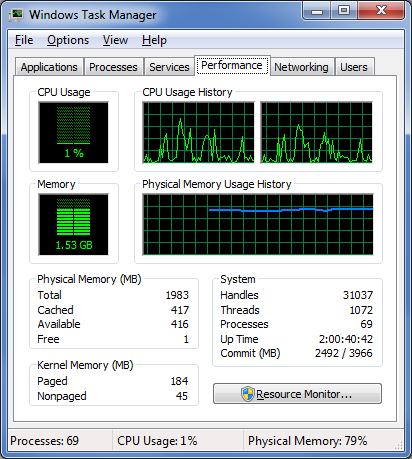
In most cases, you’ll notice that the CPU Usage History graphs look about the same for each core.

In most cases this even distribution provides you with the best performance possible. However, that’s not always going to be the case. For instance, older applications that were designed for single-core processors can behave irrationally — they may all of a sudden begin maxing out the CPU usage at 100 percent and appear to be locked up. In other circumstances, you might be able to achieve better overall performance from certain applications by configuring each of them to run on different processor cores.

Fortunately, Windows 7 allows you to configure applications to use only one, or several, of the processor cores in a multi-core system by using the Processor Affinity setting.

In this edition of the Windows Desktop Report, Iwe’ll show you two ways to change the Processor Affinity setting in Windows 7.

From Task Manager

Changing the Processor Affinity setting from within Task Manager is a pretty straightforward operation once you know how to do it. To launch Task Manger, you can use the keystroke combination [Ctrl] + [Shift] + [Esc] or you can simply right-click on the taskbar and select Task Manager from the context menu.

Once Task Manager is up and running, select the Applications tab, right-click on the application that you want to work with, and select the Go to Process command, as shown in Figure B. When you get to the Processes tab, right-click on the process and from that context menu, select the Set Affinity command, as shown in Figure C. (If the processes are jumping around, it may be hard to select the correct process, so you might just want to press the Application key or [Shift]+[F10].)

Figure B
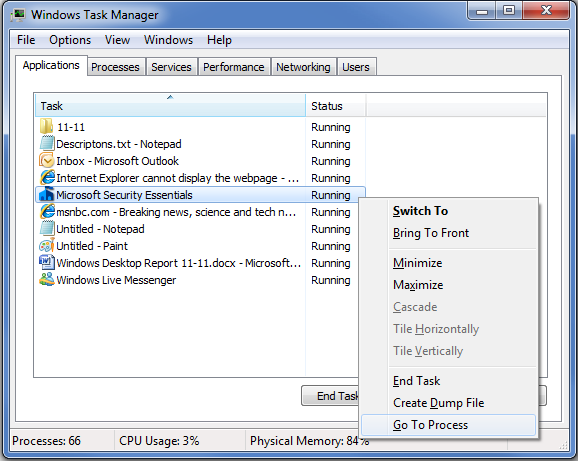
Right-click on an application and select the Go to Process command.

Figure C
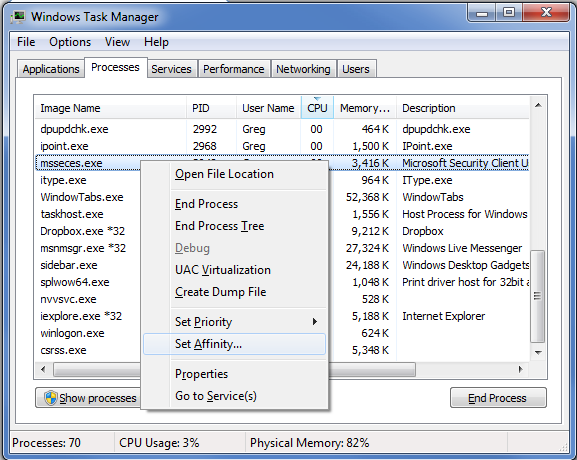
Right-click on the process and select the Set Affinity command.

After you select the Set Affinity command, you’ll see the Processor Affinity dialog box shown in Figure D. As you can see, the default setting is All Processors, which in the case of my example system are CPU 0 and CPU 1. At this point, you can clear the All Processors check box and then select the CPU on which you want the process to run.

Figure D
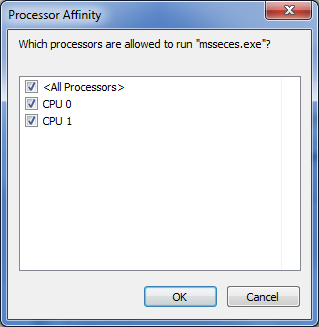
The Processor Affinity dialog box allows you to choose which processor(s) you want to use.

An example

To take a look at the effects of using the Set Affinity command, we launched two applications: Microsoft Security Essentials and Disk Defragmenter. Next we used the Set Affinity command to assign Microsoft Security Essentials to CPU 0 and Disk Defragmenter to CPU 1. We then started each application running — Microsoft Security Essentials performing a full scan and Disk Defragmenter defragging a 500GB disk.

Once each application began working, they started sucking up CPU time, so we went to the Performance tab in Windows Task Manager to look at the CPU Usage History graphs. When we did, we could see that each graph was showing different measurements, as shown in Figure E.

Figure E
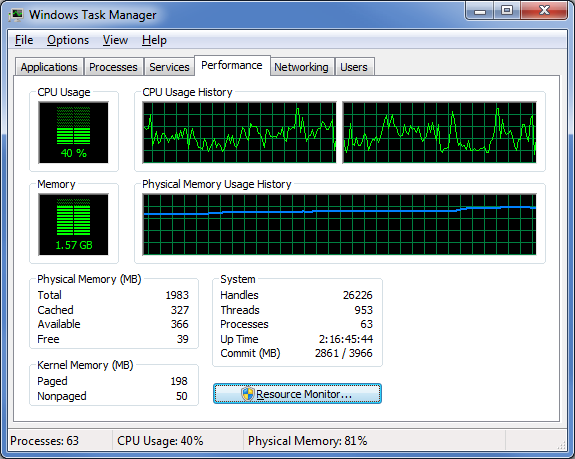
Each of the CPU Usage History graphs shows different measurements.

To specifically see how each CPU core was faring, we launched Resource Monitor and selected the CPU tab. Again, we could see that each CPU core was showing different usage measurements, as shown in Figure F.

Figure F
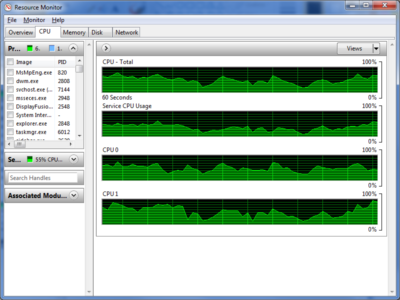
Resource Monitor’s CPU tab specifically identifies each CPU core and its usage.

Now, of course, my example combination is purely for the sake of showing each CPU handling a separate process. However, there are instances where running Microsoft Security Essentials on a separate CPU core would be beneficial.

From a shortcut

Now if you find that running an application on a specific CPU core works well, you might want to use it again in the future. If so, chances are that you won’t want to have to go through the Task Manager each time. Fortunately you can create a shortcut to launch an application with a specific affinity setting.

For example, to launch Disk Defragmenter so that it runs only on CPU 0, you would create a shortcut with the following command line:

C:\Windows\System32\cmd.exe /C start /affinity 1 dfrgui.exe

To launch Disk Defragmenter on CPU 1, you would create a shortcut with the following command line:

C:\Windows\System32\cmd.exe /C start /affinity 2 dfrgui.exe

The number that follows the start /affinity command is called the affinity mask and is defined as a hexadecimal number. However, the CPU core number can be calculated more easily using binary numbers. For instance, the command

C:\Windows\System32\cmd.exe /C start /affinity 3 dfrgui.exe

will launch Disk Defragmenter on both CPU 0 and CPU 1. If you convert 3 into a binary number you will get 0011. Under the affinity mask system, processors are numbered from the right to left beginning with 0 and since there are 1’s in the first two places, this indicates CPU 0 and CPU 1.

Suppose you have a Quad core processor. If so and you use an affinity mask of 4, that will convert into binary 0100, which indicates CPU 2. If you use an affinity mask of 9, that will convert into binary 1001, which indicates CPU 0 and CPU 3.

For more information on the start /affinity command, open a Command Prompt window and type the command

start /?

Have questions?

Get answers from Microsofts Cloud Solutions Partner!
Call us at: 856-745-9990 or visit: https://southjerseytechies.net/

South Jersey Techies, LL C is a full Managed Web and Technology Services Company providing IT Services, Website Design Services, Server Support, Network Consulting, Internet Phones, Cloud Solutions Provider and much more. Contact for More Information.

To read this article in its entirety click here.

Exclusive offer from BigBeagle.com

Exclusive offer from: BigBeagle.com  |  24/7 Support: 8885051532

Don’t forget to visit our coupon page at http://bigbeagle.com/coupons for the latest and greatest promotions.

Save upto 15% on all new purchases. Great products just for you. Hurry before the offer expires.

Use promo code in your cart when you order.

*Some limitations apply. Applicable to new purchases only. Enter promo code into shopping cart to see full details. No Minimum required. Offer expires Wednesday, August 16, 2017 at midnight (Mountain Time).

Copyright © 2017 BigBeagle.com. All rights reserved.

10 Windows 7 Commands Admins Need

The command line is often the best place to resolve Windows 7 desktop problems. These basic commands will help speed your troubleshooting tasks.

PC troubleshooting is becoming less common in larger organizations, but consultants and techs in smaller shops still have to get their hands dirty identifying and fixing desktop problems. Oftentimes, troubleshooting Windows 7 means delving into the command line. Here are 10 fundamental Windows 7 commands you might find helpful.

1: System File Checker

Malicious software will often attempt to replace core system files with modified versions in an effort to take control of the system. The System File Checker can be used to verify the integrity of the Windows system files. If any of the files are found to be missing or corrupt, they will be replaced. You can run the System File Checker by using this command:

sfc /scannow

2: File Signature Verification

One way to verify the integrity of a system is to make sure that all the system files are digitally signed. You can accomplish this with the File Signature Verification tool. This tool is launched from the command line but uses a GUI interface. It will tell you which system files are signed and which aren’t. As a rule, all the system files should be digitally signed, although some hardware vendors don’t sign driver files. The command used to launch the File Signature Verification tool is:

sigverif

3: Driverquery

Incorrect device drivers can lead to any number of system problems. If you want to see which drivers are installed on a Windows 7 system, you can do so by running the driverquery tool. This simple command-line tool provides information about each driver that is being used. The command is:

driverquery

If you need a bit more information, you can append the -v switch. Another option is to append the -si switch, which causes the tool to display signature information for the drivers. Here’s how they look:

driverquery -v
driverquery -si

4: Nslookup

The nslookup tool can help you to verify that DNS name resolution is working correctly. When you run nslookup against a host name, the tool will show you how the name was resolved, as well as which DNS server was used during the lookup. This tool can be extremely helpful when troubleshooting problems related to legacy DNS records that still exist but that are no longer correct.

To use this tool, just enter the nslookup command, followed by the name of the host you want to resolve. For example:

nslookup dc1.contoso.com

5: Ping

Ping is probably the simplest of all diagnostic commands. It’s used to verify basic TCP/IP connectivity to a network host. To use it, simply enter the command, followed by the name or IP address of the host you want to test. For example:

ping 192.168.1.1

Keep in mind that this command will work only if Internet Control Message Protocol (ICMP) traffic is allowed to pass between the two machines. If at any point a firewall is blocking ICMP traffic, the ping will fail.

6: Pathping

Ping does a good job of telling you whether two machines can communicate with one another over TCP/IP, but if a ping does fail, you won’t receive any information regarding the nature of the failure. This is where the pathping utility comes in.

Pathping is designed for environments in which one or more routers exist between hosts. It sends a series of packets to each router that’s in the path to the destination host in an effort to determine whether the router is performing slowly or dropping packets. At its simplest, the syntax for pathping is identical to that of the ping command (although there are some optional switches you can use). The command looks like this:

pathping 192.168.1.1

7: Ipconfig

The ipconfig command is used to view or modify a computer’s IP addresses. For example, if you wanted to view a Windows 7 system’s full IP configuration, you could use the following command:

ipconfig /all

Assuming that the system has acquired its IP address from a DHCP server, you can use the ipconfig command to release and then renew the IP address. Doing so involves using the following commands:

ipconfig /release
ipconfig /renew

Another handy thing you can do with ipconfig is flush the DNS resolver cache. This can be helpful when a system is resolving DNS addresses incorrectly. You can flush the DNS cache by using this command:

ipconfig /flushdns

8: Repair-bde

If a drive that is encrypted with BitLocker has problems, you can sometimes recover the data using a utility called repair-bde. To use this command, you will need a destination drive to which the recovered data can be written, as well as your BitLocker recovery key or recovery password. The basic syntax for this command is:

repair-bde <source> <destination> -rk | rp <source>

You must specify the source drive, the destination drive, and either the rk (recovery key) or the rp (recovery password) switch, along with the path to the recovery key or the recovery password. Here are two examples of how to use this utility:

repair-bde c: d: -rk e:\recovery.bek
repair-bde c: d: -rp 111111-111111-111111-111111-111111-111111

9: Tasklist

The tasklist command is designed to provide information about the tasks that are running on a Windows 7 system. At its most basic, you can enter the following command:

tasklist

The tasklist command has numerous optional switches, but there are a couple I want to mention. One is the -m switch, which causes tasklist to display all the DLL modules associated with a task. The other is the -svc switch, which lists the services that support each task. Here’s how they look:

tasklist -m
tasklist -svc

10: Taskkill

The taskkill command terminates a task, either by name (which is referred to as the image name) or by process ID. The syntax for this command is simple. You must follow the taskkill command with -pid (process ID) or -im (image name) and the name or process ID of the task that you want to terminate. Here are two examples of how this command works:

taskkill -pid 4104
taskkill -im iexplore.exe

Have questions?

Get answers from Microsofts Cloud Solutions Partner!
Call us at: 856-745-9990 or visit: https://southjerseytechies.net/

South Jersey Techies, LL C is a full Managed Web and Technology Services Company providing IT Services, Website Design Services, Server Support, Network Consulting, Internet Phones, Cloud Solutions Provider and much more. Contact for More Information.

To read this article in its entirety click here.

iPhone Wi-Fi Hack Alert: Fix Issued

If you use Wi-Fi on your iOS device, get this security update

The tech giant says there is a new cyber threat, but has taken steps to thwart the attack.  According to the reports, “Apple has now issued a critical security patch for all iOS devices and for Mac computers against a potential hack that could come remotely via Wi-Fi.”


The virus is being considered a potentially serious threat, so the company is urging users to install the updates to protect their devices.

The latest cyber threat is also a risk to Android device users, but Google has taken steps as well to block the virus.

“The vulnerability also has the potential to attack Android devices, but Google issued its own security patch earlier this month.”

Have questions?

Get answers from Microsofts Cloud Solutions Partner!
Call us at: 856-745-9990 or visit: https://southjerseytechies.net/

South Jersey Techies, LL C is a full Managed Web and Technology Services Company providing IT Services, Website Design Services, Server Support, Network Consulting, Internet Phones, Cloud Solutions Provider and much more. Contact for More Information.

To read this article in its entirety click here.

New Website Design – Main Line Bike Race

The Website Design team of South Jersey Techies has been constantly working on developing great looking websites using the latest web technologies. The most recent website developed by our team is for an event organized by Narberth Ambulance, called, Main Line Bike Race.

The 1st annual  Main Line Bike Race of Ardmore to be held on Sunday, August 20th, 2017 from 8:00 am to 4:00 pm. The team – comprised of volunteers from Narberth Ambulance, Human Zoom Bikes and Boards, Lower Merion Township, Ardmore Business Association, and many others – is working hard to ensure a successful presentation of a first-class event for a first-class township. Please consider supporting the First Annual Main Line Bike Race. Your support will not only help Narberth Ambulance; it will also assist us in bringing our communities together for an action-packed day of bike racing!


Have questions?

Our Web Design team is here to help
Call us at: 856-745-9990 or visit: https://southjerseytechies.net

South Jersey Techies, LLC is a full Managed Web and IT Services Company located in Marlton, NJ providing IT Services, Managed IT Services, Website Design Services, Server Support, IT Consulting, VoIP Phones, Cloud Solutions Provider and much more. Contact Us Today.

Exclusive offer from BigBeagle.com

Exclusive offer from: BigBeagle.com  |  24/7 Support: 8885051532

Don’t forget to visit our coupon page at http://bigbeagle.com/coupons for the latest and greatest promotions.

Save upto 10% on all new purchases of $50 or more. Hurry before the offer expires.

Use promo code rs217a7 in your cart when you order.

*Some limitations apply. Applicable to new purchases only. Enter promo code into shopping cart to see full details. Minimum purchase of $50 required. Offer expires Wednesday, August 02, 2017 at midnight (Mountain Time).

Copyright © 2017 BigBeagle.com. All rights reserved.

CALL US NOW!