You don’t have to live with a Windows 7 machine that’s becoming unbearably slow. Here are 10 basic steps that will optimize system performance.

With Windows 7, Microsoft did a really good job making the system perform well. However, over time, Windows 7 systems can slow down and need some care and feeding to regain their former glory. Further, some Windows 7 features can be leveraged to improve overall system performance. In this article, we will outline 10 steps you can take to boost the performance of your Windows 7 systems.
1: Disable unnecessary services
Not every system service that is running on a stock Windows 7 machine is necessary. A number of services can either be disabled or modified to run only when needed. Once you make these changes, the service no longer has to consume system resources and the system no longer has to spend time starting the service.
2: Reduce the number of startup items
Windows 7 systems eventually begin to suffer under the weight of software that is installed in the normal course of business. Many software titles install more than is necessary and include helper applications designed solely to make the software start up more quickly or facilitate other communication (e.g., iTunes helper). And new software installations might add a permanent presence to the system tray, even if it’s not absolutely necessary for the system to function (Steam games, for example).
You could go through your system tool by tool and remove the offending software, but you might want to keep the underlying tool around and just prevent the helper from loading. This and more can be accomplished through the use of MSconfig, a tool that has long been a part of Windows. MSconfig allows you to selectively disable startup items and take other steps toward improving overall system performance.
To use MSconfig, go to Start and in the search box, type MSconfig. From the Startup tab (Figure A), you can disable items. Just be careful about what you choose.
Figure A
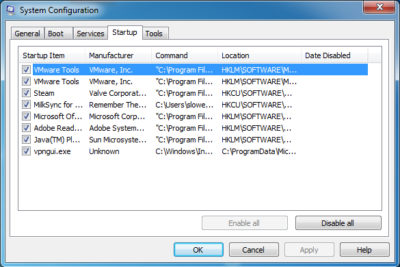
Disable items to improve overall system performance.
3: Remove the bloatware installed by vendors
Microsoft’s OEMs sometimes actively work against the Redmond behemoth and sully the company’s name. Nowhere is this more evident than in the case of what has become known as “bloatware.” In the never-ending race to the bottom of the PC market, lower cost PCs have had their profit margins bolstered by OEMs through the inclusion of mostly junk software – short-term trials and the like — that does nothing but add a few dollars of profit while bringing performance to a crawl. Frankly, this is one of the reasons that I believe that Microsoft’s Surface announcement, in which Microsoft noted that it would make its own device, is brilliant. The company needs to start with a clean slate in some ways (no pun intended).
If your PC shipped with a bunch of stuff you’ll never use, get rid of that software. Generally, you can go to Start | Control Panel | Programs And Features (Figure B) and remove software you no longer plan to use. If the software adds items to the startup process, getting rid of it will make the PC start faster and, ultimately, perform better overall.
Figure B

Use Programs And Features to remove unwanted software.
4: Keep viruses and spyware off your system
If you’re running Windows, you need to be running an anti-malware program to keep viruses and spyware off your system. Nothing will ruin good performance like a boatload of spyware. Our personal favorite (and free!) tool for combating malware is Microsoft Security Essentials. In my experience, it’s been successful in catching bad stuff while not significantly degrading system performance itself.
5: Check your memory
How much RAM do you have? Is your system consuming all or most of your RAM? Does the system page out to disk? If so, you’re suffering a massive performance hit, which can be solved by adding more memory to your PC.
6: Go solid state
Solid state is all the rage these days, and with good reason. It’s fast! More and more laptops and even desktops are moving to the technology because of the performance benefits. Solid state disks use memory cells from which data can be read very quickly, as opposed to the relatively plodding nature of rotational storage. By moving to SSD, you can give your Windows 7 system renewed life — and give yourself a whole new user experience.
7: Ensure that power settings favor performance
This one is easy! When you’re plugged in, configure Windows 7’s power plans to favor performance over power savings. When you choose to use Windows 7′ high performance power plan, you might increase the computer’s performance in some (but not all) circumstances. It really depends on the kind of work you’re doing and how often you allow the computer to sit idle.
To change power plans, go to Start | Control Panel | Power Options and choose your power plan settings (Figure C).
Figure C
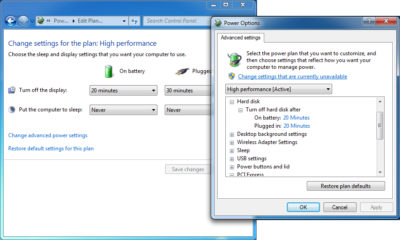
Go to Power Options to choose Windows 7 power plan settings.
8: Keep your system defragmented (unless you’ve followed item 6)
If you’re using a traditional spinning disk in your Windows 7 system, you can keep your system operating at peak efficiency by periodically defragmenting the hard drive. If, however, you’ve opted to go with SSD-based storage, don’t do this. First, you won’t get any performance benefit and second, you’ll significantly reduce the life of that expensive SSD.
Disk defragmentation is scheduled to take place once per week, but you can change this by going to Start | Accessories | System Tools | Disk Defragmenter (Figure D). In addition to changing the schedule, you can run an on-demand defrag from here. You can also run a defrag from the command line instead of from a GUI.
Figure D
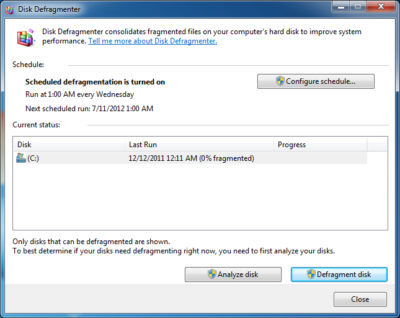
You can schedule a defrag in the Disk Defragmenter dialog box.
9: Disable or tune search indexing
Windows 7’s search is good, but it can also affect system performance. If you really need to run a tool at full tilt, you can disable indexing altogether. Or you can tune the indexer to meet your specific needs, possibly reducing its overall impact on system performance.
10: Use ReadyBoost
Perhaps you don’t want to jump into the solid-state game right away but would like some of the benefit that can be had from flash-based storage. Using nothing more than a USB stick, you can do so through a Windows 7 feature known as ReadyBoost. (Note that if you’re already using an SSD as your system drive, ReadyBoost won’t be available, since there would be no performance gain.)
ReadyBoost allows the system to make use of one of these speedy storage devices as a cache, improving overall performance of the system. The flash storage device that you choose to use for ReadyBoost should meet the following specifications set by Microsoft:
- Capacity of at least 256 MB, with at least 64 kilobytes (KB) of free space
- At least a 2.5 MB/sec throughput for 4-KB random reads
- At least a 1.75 MB/sec throughput for 1MB random writes
Have questions?
Get answers from Microsofts Cloud Solutions Partner!
Call us at: 856-745-9990 or visit: https://southjerseytechies.net/
South Jersey Techies, LL C is a full Managed Web and Technology Services Company providing IT Services, Website Design Services, Server Support, Network Consulting, Internet Phones, Cloud Solutions Provider and much more. Contact for More Information.
To read this article in its entirety click here.