Back to Top

Tech, Web, Cloud & Cabling Services

Category: Quick Reference Guides

Quick Reference Guides Category

The BlackBerry platform’s slow fade to black

blackberry-logo-SJTechiesBlackBerry’s operating system was recently dealt blow by Facebook. Find out how this could be the final nail in the BB10 coffin.

The only reason this headline should surprise anyone is the fact that BlackBerry OS is actually still alive. End of story, right? Truth be told, most assumed BlackBerry’s operating system dead when the company decided to release a device running the Android platform. It seemed to be the only logical step forward for BlackBerry Limited. And yet, BB continues on.

Only now, they continue on without Whatsapp and Facebook support.

When pressed for the reason why they are pulling support, Facebook made their case quite simple, stating that 99.5 % of all smartphone sales are of the Android, iOS, and Windows Mobile platforms.

Makes sense.

What doesn’t make sense is the fact that the BlackBerry OS is still alive and kicking. Yes, I understand BlackBerry was the platform for business users for a very long time, but that time has come and gone and the only relevant platforms are obvious. In fact, even Windows Mobile is barely hanging on to any semblance of relevancy.

What can you expect

If you happen to be a BlackBerry user, you already knew that Whatsapp pulled the plug. Now you can count on the Facebook app functioning (sans updates) until the end of the year. Once 2016 passes, the app will cease to be available in any form.

My guess is, once the Facebook app no longer functions on the platform, the Grim Reaper will swoop into the offices of the BB10 developers and have a field day. Facebook holds a powerful sway over the ebb and flow of the consumer. No Facebook, no platform.

And you may be saying to yourself, “BB10 is a business-centric platform, there’s no need for a Facebook app”. That assumption is false for at least two reasons. First, businesses actually use Facebook as a form of marketing. Second, you’re assuming that business users do not spend any amount of time on Facebook. According to comScore, the average American citizen spends 40 minutes a day on the social network platform. Relatively speaking, that’s a significant amount of time (considering users tend to work on Facebook in a sort of “hit and run” style). And if you factor in the peak Facebook hours of 1 p.m. – 3 p.m., it’s clear that business users do spend time on Facebook.

BlackBerry’s reaction

Of this separation, BlackBerry said:

“We are extremely disappointed in their decision as we know so many users love these apps. We fought back to work with WhatsApp and Facebook to change their minds, but at this time, their decision stands,”

BlackBerry even started a Twitter campaign to change Facebook’s mind, with the hashtag #ILoveBB10Apps. I did a quick Twitter search for that hashtag and found the hashtag (somewhat) backfired on BlackBerry. Tweets ranging from angry users (one user asking how his BlackBerry device could be showing 0% battery, yet still be functioning), to the usual flood of memes and spam. Some users did proclaim they’d be sticking with BlackBerry by way of the PRIV (which, if we’re being honest, at that point you are as much in support of Android as you are BlackBerry). Of course, there were the BlackBerry faithful, extolling the values of BlackBerry 10 multitasking, security, and such to convince Facebook to not pull the plug.

The truth is in the numbers

You really shouldn’t need anything more than that telling number 99.5. That is beyond significant. We’ve watched new (and promising) platforms come and go, thanks to the might that is Android and iOS. Because BlackBerry has been around for a while, doesn’t give them a special hall pass to avoid the apple flavored robotic death hammer.

If BlackBerry wants to continue on, their only hope clearly lies in Android. The BlackBerry faithful will gladly continue on, with their physical keyboards and Android platform. Either that, or they can say goodbye to BlackBerry altogether, because Facebook pulling support could well be the killing blow to the little platform.

Have questions?

Get answers from Microsofts Cloud Solutions Partner!
Call us at: 856-745-9990 or visit: https://southjerseytechies.net/

South Jersey Techies, LL C is a full Managed Web and Technology Services Company providing IT Services, Website Design ServicesServer SupportNetwork ConsultingInternet PhonesCloud Solutions Provider and much more. Contact for More Information.

To read this article in its entirety click here.

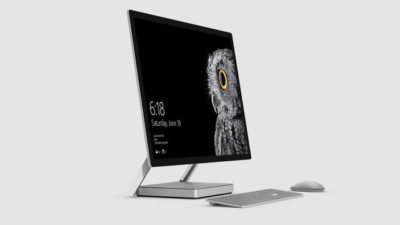
Microsoft Surface Studio: The smart person’s guide

Everything you need to know about the Surface Studio, Microsoft’s new all-in-one PC designed to tempt professional artists and designers over to Windows.

microsoft-surface-studio

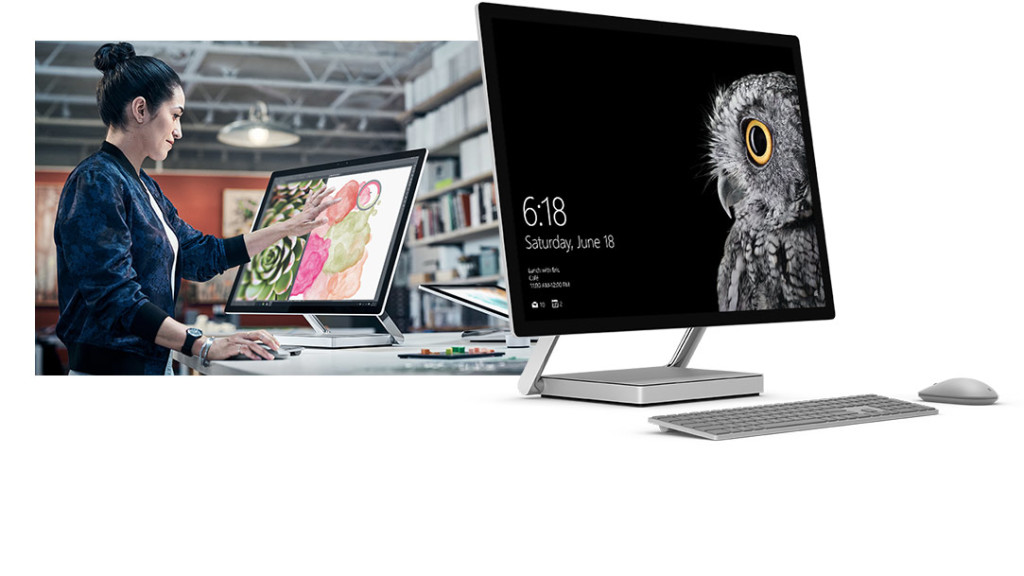
The Surface Studio is an all-in-one PC with premium specs, designed to wow professional artists, designers, architects and other creatives.

While the $2,999 price tag will deter most consumers, Microsoft seems to be targeting the Studio at design professionals, who would otherwise be using Apple Macs alongside specialist devices like Wacom’s Cintiq drawing tablet.

The Studio is a machine with a lot to recommend it, but one that could still be a leap too far for creatives already heavily invested in alternative tech.

Executive summary

  • What it is: The Surface Studio is a high-end, all-in-one PC aimed at being a drafting table and canvas for creatives.
  • Why it matters: The machine marks Microsoft’s first venture into designing desktop PCs and may put pressure on Apple and other manufacturers to crank up specs on competing machines.
  • Who it is for: Artists, designers, architects — creative professionals who want a machine that shows off their work at its best.
  • Why you should get it: For its super sleek, razor-sharp display that lets users draw straight onto the screen.
  • Why you shouldn’t get it: The price is too high or you’re a professional already heavily invested in alternative software and hardware.
  • How to get it: Pre-order online, although stock is limited according to Microsoft

What it is

An all-in-one, Windows 10 PC designed to dazzle users with its superlative display.

The screen, a 28-inch touchscreen LCD monitor, is ‘the thinnest in the world’ according to Microsoft, and sits on a counterbalanced hinge that makes it easy to push down onto the desk, and start drawing on with a digital pen.

The monitor’s 4K+ resolution and ability to display more than one billion colors, as well as to show drawings and documents at 1:1 scale with their paper equivalents, is designed to give professionals the ability to see how their creations would look in the real world.

Sketching on the screen with the Surface Pen is made easier when the Studio is used with the newly released Surface Dial, a brushed silver knob that can be rotated to select a new color when drawing on the screen or to turn the image.

Why it matters

From the point of view of artists and designers, the Studio offers a high-end computer built around their creative needs, which does away with having to use a separate drawing tablet and computer.

Even if creatives ignore the Surface Studio, its release is good news, likely to prompt incumbents like Apple and Wacom to spec up and cut the prices of new machines — in particular for the iMac, which the Studio has been compared to many times, despite the iMac lacking a touchscreen.

By following up the immaculately designed Surface Book laptop with a striking machine like the Surface Studio, Microsoft also appears to be trying to establish itself as a competitor to Apple on the design front.

Who it is for

Broadly, the Studio seems to be aimed at anyone who draws or designs for a living.

In launch videos, the Studio was seen being used by artists, architects and product designers.

The multi-purpose nature of the Studio, a machine that combines a Windows desktop PC with the functionality of a separate digital drawing tablet, such as the Cintiq 27 QHD Touch, will likely make the $2,999 price tag easier to swallow among those in the creative industries.

Why you should get it

If you draw or design for a living there are plenty of reasons why you might want the Studio. For example, there’s the quality of the display and the ease with which the Surface Pen draws on the screen. Microsoft describes this experience as virtually as fluid as drawing on paper. Then there’s the Studio’s significant graphical processing power, the ability to view documents and drawings actual size on screen and the ease with which you can switch push down the monitor and begin drawing.

Why you shouldn’t get it

Despite the Studio’s looks, its high price makes it hard to recommend as a consumer purchase, particularly when an iMac with a higher resolution, and only very slightly smaller screen, will cost less money.

Even professional creators are unlikely to abandon their current expensive setup for a Studio, as Mikako Kitagawa, principal research analyst with Gartner, pointed out.

“An all-in-one device is not the most cost-effective device, as the users pay for both the computing unit and monitor at the same time,” she said.

“Creative professionals have already invested heavily in hardware and software. For instance, many professional illustrators use a high-end drawing tablet and high-resolution monitor at the same time.”

If those same professionals exclusively use macOS, as is the case in some creative outlets, then the high cost of switching to Windows will also be a deterrent, she said.

There is also Microsoft’s odd decision not to include the $99 Surface Dial with the Studio, despite the peripheral featuring so heavily in demos of the machine, and being particularly useful for tasks like changing colors while drawing with the Surface Pen.

How to get it

The Surface Studio is available to pre-order from Microsoft, with prices starting at $2,999 and shipping starting from 12 December. Microsoft has warned the machine will be available in limited quantities.

Tech specs:

$2,999: 1TB drive; Intel Core i5 CPU; 8GB RAM; 2GB GPU

$3,499: 1TB drive; Intel Core i7 CPU; 16GB RAM; 2GB GPU

$4,199: 2TB drive; Intel Core i7 CPU; 32GB RAM; 4GB GPU

Display: 28″ PixelSense Display; 4500 x 3000 resolution; 192 DPI; Color settings: Adobe sRGB, DCI-P3 and Vivid Color Profiles; Touch: 10-point multi-touch; Aspect ratio: 3:2 TB drive; Intel Core i5 CPU; 8GB RAM; 2GB GPU

Processor: Quad-core 6th Gen Intel Core i5 or i7

Graphics: NVIDIA GeForce GTX 965M 2GB GPU GDDR5 memory or NVIDIA GeForce GTX 980M 4GB GPU GDDR5 memory

Storage: 1TB or 2TB ‘rapid hybrid drive’

Memory: 8GB, 16GB, or 32GB RAM

Wireless: 802.11ac Wi-Fi; Bluetooth 4.0; Xbox Wireless built-in3

Dimensions: Display: 25.09 x 17.27 x 0.44 in (637.35 x 438.90 x 11.4 mm); Base: 9.84 x 8.66 x 1.26 in (250.00 x 220.00 x 32.20 mm)

Weight: 21.07 lbs max (9.56 kg)

Connections: 4 USB 3.0; Full-size SD card reader (SDXC compatible); Mini Displayport; 3.5mm headset jack; Compatible with Surface Dial onscreen interaction

Cameras: 5.0MP front-facing camera with 1080p HD video

Audio: Dual microphones; Stereo 2.1 speakers with Dolby Audio Premium

Buttons: Volume and power

Surface Pen

Surface Keyboard

Surface Mouse

Power cord with grip-release cable

Security: TPM chip for enterprise security; Enterprise-grade protection with Windows Hello face sign-in

Have questions?

Get answers from Microsofts Cloud Solutions Partner!
Call us at: 856-745-9990 or visit: https://southjerseytechies.net/

South Jersey Techies, LL C is a full Managed Web and Technology Services Company providing IT ServicesWebsite Design ServicesServer SupportNetwork ConsultingInternet PhonesCloud Solutions Provider and much more. Contact for More Information.

To read this article in its entirety click here.

Change the Processor Affinity setting in Windows 7 to gain a performance edge

Under specific circumstances and with careful tweaking, you can increase Windows 7’s performance using the Processor Affinity setting.

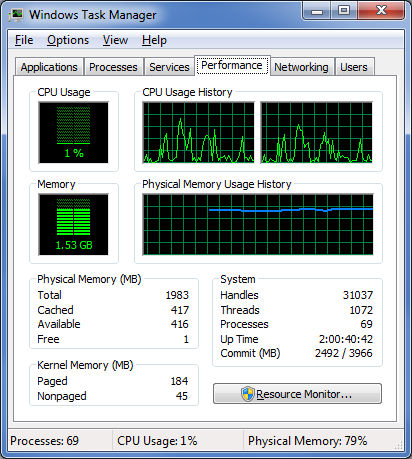
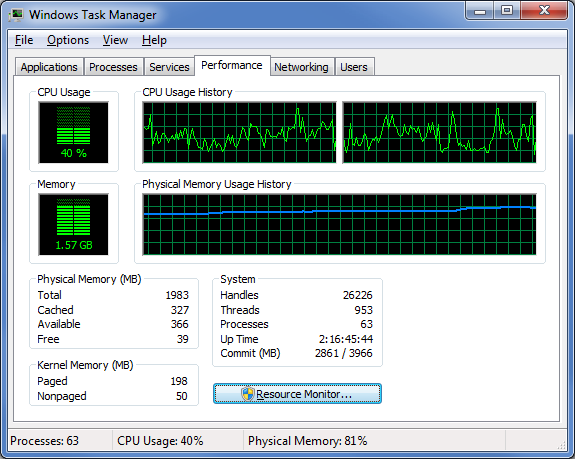
If you have a multi-core processor, chances are good that on the Performance tab in Windows Task Manager, you have noticed that the CPU Usage History graphs look about the same for each core, as shown in Figure A. The reason for this is that most applications you run these days have been designed with multi-core processors in mind and will work with the operating system to distribute their operations as evenly as possible across all the available cores.

Figure A

In most cases, you’ll notice that the CPU Usage History graphs look about the same for each core.

In most cases this even distribution provides you with the best performance possible. However, that’s not always going to be the case. For instance, older applications that were designed for single-core processors can behave irrationally — they may all of a sudden begin maxing out the CPU usage at 100 percent and appear to be locked up. In other circumstances, you might be able to achieve better overall performance from certain applications by configuring each of them to run on different processor cores.

Fortunately, Windows 7 allows you to configure applications to use only one, or several, of the processor cores in a multi-core system by using the Processor Affinity setting.

In this edition of the Windows Desktop Report, Iwe’ll show you two ways to change the Processor Affinity setting in Windows 7.

From Task Manager

Changing the Processor Affinity setting from within Task Manager is a pretty straightforward operation once you know how to do it. To launch Task Manger, you can use the keystroke combination [Ctrl] + [Shift] + [Esc] or you can simply right-click on the taskbar and select Task Manager from the context menu.

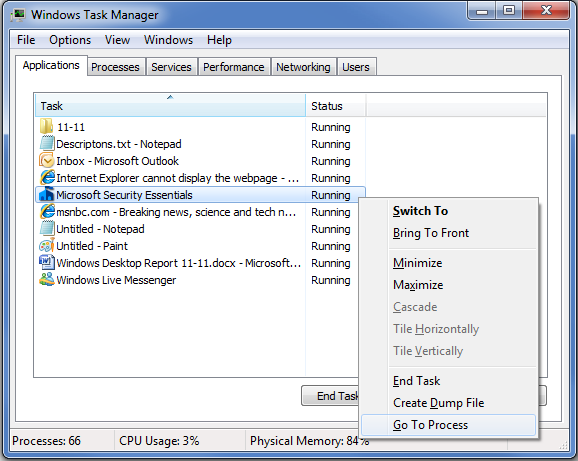
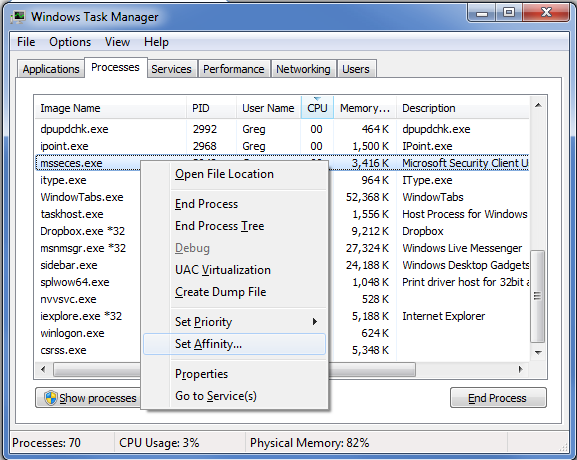
Once Task Manager is up and running, select the Applications tab, right-click on the application that you want to work with, and select the Go to Process command, as shown in Figure B. When you get to the Processes tab, right-click on the process and from that context menu, select the Set Affinity command, as shown in Figure C. (If the processes are jumping around, it may be hard to select the correct process, so you might just want to press the Application key or [Shift]+[F10].)

Figure B

Right-click on an application and select the Go to Process command.

Figure C

Right-click on the process and select the Set Affinity command.

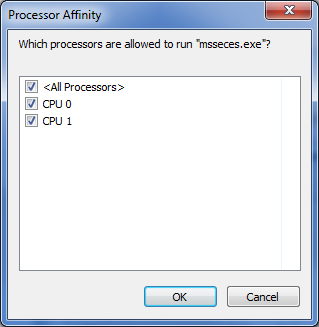
After you select the Set Affinity command, you’ll see the Processor Affinity dialog box shown in Figure D. As you can see, the default setting is All Processors, which in the case of my example system are CPU 0 and CPU 1. At this point, you can clear the All Processors check box and then select the CPU on which you want the process to run.

Figure D

The Processor Affinity dialog box allows you to choose which processor(s) you want to use.

An example

To take a look at the effects of using the Set Affinity command, we launched two applications: Microsoft Security Essentials and Disk Defragmenter. Next we used the Set Affinity command to assign Microsoft Security Essentials to CPU 0 and Disk Defragmenter to CPU 1. We then started each application running — Microsoft Security Essentials performing a full scan and Disk Defragmenter defragging a 500GB disk.

Once each application began working, they started sucking up CPU time, so we went to the Performance tab in Windows Task Manager to look at the CPU Usage History graphs. When we did, we could see that each graph was showing different measurements, as shown in Figure E.

Figure E

Each of the CPU Usage History graphs shows different measurements.

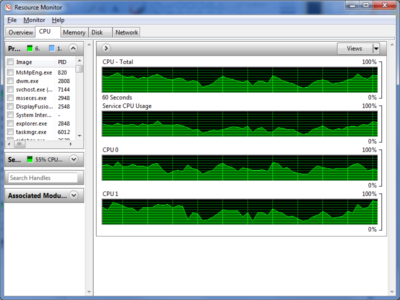
To specifically see how each CPU core was faring, we launched Resource Monitor and selected the CPU tab. Again, we could see that each CPU core was showing different usage measurements, as shown in Figure F.

Figure F

Resource Monitor’s CPU tab specifically identifies each CPU core and its usage.

Now, of course, my example combination is purely for the sake of showing each CPU handling a separate process. However, there are instances where running Microsoft Security Essentials on a separate CPU core would be beneficial.

From a shortcut

Now if you find that running an application on a specific CPU core works well, you might want to use it again in the future. If so, chances are that you won’t want to have to go through the Task Manager each time. Fortunately you can create a shortcut to launch an application with a specific affinity setting.

For example, to launch Disk Defragmenter so that it runs only on CPU 0, you would create a shortcut with the following command line:

C:\Windows\System32\cmd.exe /C start /affinity 1 dfrgui.exe

To launch Disk Defragmenter on CPU 1, you would create a shortcut with the following command line:

C:\Windows\System32\cmd.exe /C start /affinity 2 dfrgui.exe

The number that follows the start /affinity command is called the affinity mask and is defined as a hexadecimal number. However, the CPU core number can be calculated more easily using binary numbers. For instance, the command

C:\Windows\System32\cmd.exe /C start /affinity 3 dfrgui.exe

will launch Disk Defragmenter on both CPU 0 and CPU 1. If you convert 3 into a binary number you will get 0011. Under the affinity mask system, processors are numbered from the right to left beginning with 0 and since there are 1’s in the first two places, this indicates CPU 0 and CPU 1.

Suppose you have a Quad core processor. If so and you use an affinity mask of 4, that will convert into binary 0100, which indicates CPU 2. If you use an affinity mask of 9, that will convert into binary 1001, which indicates CPU 0 and CPU 3.

For more information on the start /affinity command, open a Command Prompt window and type the command

start /?

Have questions?

Get answers from Microsofts Cloud Solutions Partner!
Call us at: 856-745-9990 or visit: https://southjerseytechies.net/

South Jersey Techies, LL C is a full Managed Web and Technology Services Company providing IT Services, Website Design ServicesServer SupportNetwork ConsultingInternet PhonesCloud Solutions Provider and much more. Contact for More Information.

To read this article in its entirety click here.

Now Microsoft Office 365 tackles ‘fake CEO’ email spoofing attacks

Microsoft is rolling out a host of new email security features for Office 365 later this quarter, as it looks to thwart hackers and criminals.

‘Insider spoofing’ or faking the CEO’s email address to trick the CFO into transferring millions to criminal bank accounts is big business. Now Microsoft is using big data and reputation filters to try and squish the threat.

According to the FBI, between October 2013 and August 2015, 7,066 US businesses have fallen prey to ‘business email compromise’, netting criminals an estimated $747m.

Non-US victims lost a further $51m over the period, with the FBI estimating a 270 percent increase in identified victims since January 2015, when it first released figures about the threat category.

As Microsoft notes, when a corporate email domain is spoofed, it makes it hard for existing filters to identify the bogus email as malicious.

However, Microsoft reckons it has achieved a 500 percent improvement in counterfeit detection using a blend of big data, strong authentication checks, and reputation filters in Exchange Online Protection for Office 365.

It’s also rolling out new phishing and trust notifications to indicate whether an email is from a known sender or if a message is from an untrusted source, and therefore could be a phishing email.

The company is also promising a faster email experience as it vets attachments for malware and new tools to auto-correct messages that are mis-classified as spam. The aim is to boost defences without impairing end-user productivity.

Malicious email attachments remain a popular way for attackers to gain a foothold in an organization and, as RSA’s disastrous SecurID breach in 2011 showed, a little social engineering can go a long way to ensuring someone opens it.

Microsoft’s new attachment scanner, called Dynamic Delivery of Safe Attachments, looks to reduce delays as it checks attachments for potential threats.

Currently it captures suspicious looking attachments in a sandbox with a ‘detonation chamber’ where it analyses it for malware in a process takes five to seven minutes.

Microsoft hasn’t figured out a faster way to analyse the attachment, but instead of holding up the email as it conducts the scan, it will send the body of the email with a placeholder attachment. If the attachment is deemed safe, it will replace the placeholder and if not, the admin can filter out the attachment.

The feature is part of Microsoft’s Office 365 Exchange Online Protection and Advanced Threat Protection services.

The company is also tackling false-positive spam, or legitimate messages that are mis-identified as spam, and vice versa, with a new feature called Zero-hour Auto Purge, which allows admins to “change that verdict”.

“If a message is delivered to your inbox and later found to be spam, Zero-hour Auto Purge moves that message from the inbox to the spam folder; the reverse is true for messages misclassified as spam,” Microsoft notes.

Microsoft is testing this approach with 50 customers and says it will be rolled out for all Exchange Online Protection global clients in the first quarter of 2016.

Have questions?

Get help from IT Experts/Microsofts Cloud Solutions Partner
Call us at: 856-745-9990 or visit: https://southjerseytechies.net/

South Jersey Techies, LLC is a full Managed Web and Technology Services Company providing IT Services, Website Design ServicesServer SupportNetwork ConsultingInternet PhonesCloud Solutions Provider and much more. Contact for More Information.

To read this article in its entirety click here.

Microsoft’s latest Windows 10 ad annoys Chrome users with taskbar pop-ups

Ads on the Windows 10 taskbar aren’t just for Microsoft Edge anymore.

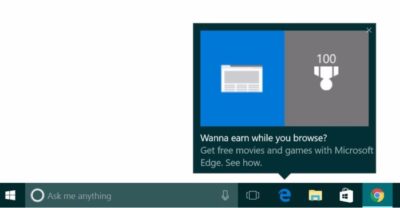
Microsoft’s aggressive advertising push inside Windows 10 is going beyond pop-ups for Microsoft Edge.

Myce recently spotted yet another pop-up ad on the taskbar in Windows 10. This time around Microsoft was advertising its extension for Chrome dubbed the Personal Shopping Assistant (Beta). The extension is a Microsoft Garage project that lets you compare prices across shopping sites.

Prior to the Chrome extension pop-up, Microsoft was advertising its rewards program for Microsoft Edge, which we spotted in early November. The earlier ad appeared to be targeted at people who didn’t use Edge that frequently.

A pop-up ad that promotes Windows 10’s Edge browser and Bing Rewards. The pop-up for the Chrome extension looks similar, as you can see on Myce.

The Chrome one, by comparison, is probably targeted at people who use Chrome as their default browser. Microsoft’s likely thinking that if people won’t stop using Chrome on Windows, at least they can use some Microsoft software while they’re doing it.

Microsoft told Thurrott.com that ads like the one for the Chrome extension are part of the company’s tests to provide, “new features and information that can help people enhance their Windows 10 experience.”

Tests or not, it’s unlikely that Microsoft will ever stop these taskbar ads even though users pay $100 or more for Windows. Thus far, Microsoft has advertised its own software and services.

The impact on you at home: If you want to make sure you don’t get pop-up ads on your taskbar you can turn them off. Open the Settings app and go to System > Notifications & Actions. On this screen under “Notifications” turn off Get tips, stricks, and suggestions as you use Windows. That’s not the only way Microsoft can advertise to you.

Have questions?

Get answers from Microsofts Cloud Solutions Partner!
Call us at: 856-745-9990 or visit: https://southjerseytechies.net/

South Jersey Techies, LL C is a full Managed Web and Technology Services Company providing IT Services, Website Design ServicesServer SupportNetwork ConsultingInternet PhonesCloud Solutions Provider and much more. Contact for More Information.

To read this article in its entirety click here.

Microsoft withdraws update causing Outlook to start in Safe Mode (with fix)

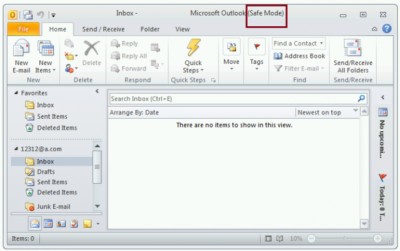
outlook-safe-mode

Microsoft has withdrawn the released Windows Update KB3114409 because it causes Outlook to start in Safe Mode. This loads the email client without customizations and plugins. Fortunately it can be easily fixed.

The patch was actually released to stop Outlook from starting in Safe Mode, but it appears something didn’t go the right way. Microsoft has decided to withdraw the update for now.

Users affected by the update can easily stop Outlook from starting in safe mode by uninstalling the KB3114409 update.

This can be done this way: Go to your Control Panel. Go to ‘Programs and Features’ and left click ‘View installed updates’. Find KB3114409. Once you’ve found the appropriate update, click ‘Uninstall’.

(Tip: copy/paste KB3114409 and enter it in the search field at the top right.)

After a reboot of the computer Outlook will no longer start in safe mode.

Have questions?

Get help from IT Experts/Microsofts Cloud Solutions Partner
Call us at: 856-745-9990 or visit: https://southjerseytechies.net/

South Jersey Techies, LLC is a full Managed Web and Technology Services Company providing IT Services, Website Design ServicesServer SupportNetwork ConsultingInternet PhonesCloud Solutions Provider and much more. Contact for More Information.

To read this article in its entirety click here.

Use multiple monitors with Windows 7’s Remote Desktop Connection

In Windows 7 you can connect to a remote computer and take full advantage of your local system’s multiple monitors. Here’s how.

If you’re using multiple monitors on your system setup and you regularly connect to other systems via Remote Desktop, you know how frustrating it is to go from a multiple-monitor display to a single-monitor display for your remote connection. If so, you’ll definitely want to learn how you can take advantage of multiple monitors in Microsoft Windows 7’s Remote Desktop Connection.

However, before going any further it is important to understand right off the bat that multiple-monitors support in Windows 7’s Remote Desktop is available only on Windows 7 Ultimate and Windows 7 Enterprise. (It is also available in Windows Server 2008 R2.) Furthermore, both the local and remote systems must be running one of the supported versions. For example, Windows 7 Ultimate is running on the local and Windows 7 Enterprise is running on the remote.

As long as you have the proper configuration, Windows 7 provides you with real multiple-monitor support as opposed to the monitor-spanning feature that was introduced in the previous version of Remote Desktop Connection. This means that in Windows 7 you can use this feature to connect to a remote computer and take full advantage of your local system’s multiple monitors on your remote system.

In this edition of the Windows Desktop Report, we’ll describe Windows 7’s Remote Desktop support for multiple monitors and show you how to configure it for connecting to other Windows 7 systems. we’ll also show you how to use Remote Desktop’s monitor-spanning feature when connecting to, and from, Windows versions that do not support the multiple-monitors feature.

What’s the difference?

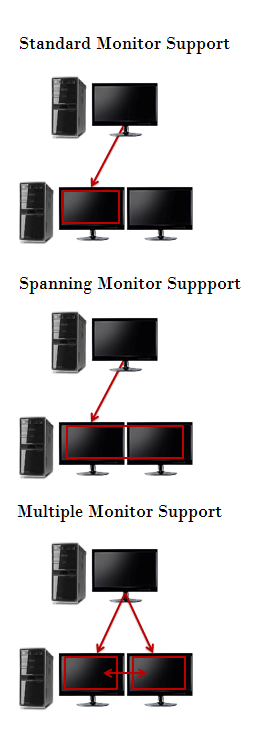
Before we get started, let’s take a moment to discuss the different types of Remote Desktop monitor configurations you can have when using a system with multiple monitors. In the standard type of connection, Remote Desktop displays the remote system in a window on one monitor. In a connection configured with the monitor-spanning feature, Remote Desktop displays the remote system in a window on one monitor but allows you to drag or span that window across multiple monitors. In a connection configured with the multiple-monitors feature, Remote Desktop makes the remote system behave as if it were physically connected to multiple monitors. Each of these configurations is illustrated in Figure A.

Figure A

There are three types of configurations you can use when using Remote Desktop on a system with multiple monitors.

Configuring a multiple-monitors connection

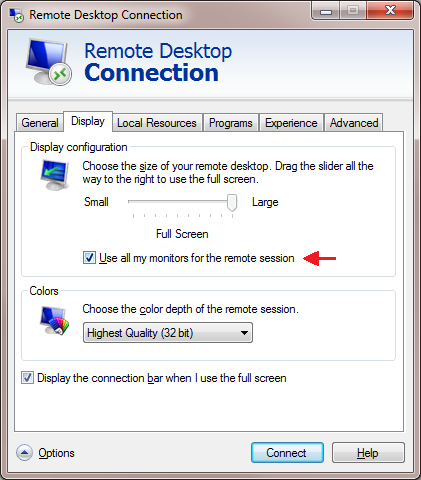
If you have the proper setup, configuring Windows 7’s Remote Desktop multiple-monitor feature is easy. To begin, Launch Remote Desktop Connection and select the system you want to connect to with multiple-monitor support from the Computer drop-down list. Then, click the Options button to expand the Remote Desktop Connection window so that you can see all the tabs. Next, choose the Display tab and select the Use All My Monitors for the Remote Session check box, as shown in Figure B. To complete the procedure, return to the General tab and click the Save button.

Figure B

Selecting the Use All My Monitors for the Remote Session check box is all that is needed to enable the multiple-monitor feature.

When you connect to the remote system, the remote system’s monitor will instantly fill your multiple monitors, just as if it were physically connected to the monitors.

Configuring a monitor-spanning connection

As mentioned, in a connection configured with the monitor-spanning feature, Remote Desktop allows you to drag or span the window across multiple monitors. However, there are a couple of caveats. First your multiple monitors must have the same screen resolution. Second, the monitors must be aligned, or positioned, side-by-side. Third, the combined screen resolution of your multiple monitors must be under 4096 x 2048.

To launch Remote Desktop Connection with monitor-spanning support, just click the Start button and type the following command in the Start Search box. (Alternatively, you can open a Command Prompt window and type the same command.)

Mstsc /span

When you do, you’ll see the standard Remote Desktop Connection dialog box, and you can launch the connection as you normally would. As soon as you make a connection, you’ll immediately see the desktop of the remote system spread across your multiple monitors. If you need to have access to both the local and remote desktops, you can reduce the size of the remote system’s desktop to only one monitor by clicking the Restore Down button on the Remote Desktop window. As a shortcut, you can also use the keystroke: [Ctrl][Alt][Break].

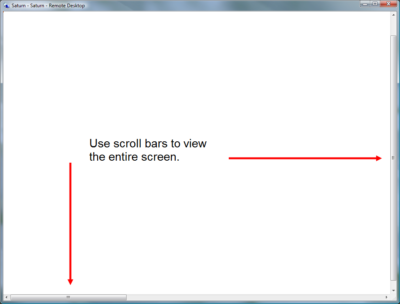
Once the window is on one monitor, you use click and drag to resize the window to completely cover a single monitor. Keep in mind that when you reduce the size of a spanned remote widow, it will display both horizontal and vertical scroll bars, as shown in Figure C, that you’ll have to use to see the entire screen. However, you can instantly span the window by clicking the Maximize button.

Figure C

When you resize the remote desktop’s spanned window, you’ll have to use scroll bars to view the entire screen.

Creating a shortcut

Of course, using a command line to launch your Remote Desktop connection isn’t the most convenient way to use the monitor-spanning feature. Chances are that you already have a Remote Desktop Connection RDP file saved on your desktop. If so, you can create a standard Windows shortcut that will incorporate both the special command line and your RDP file.

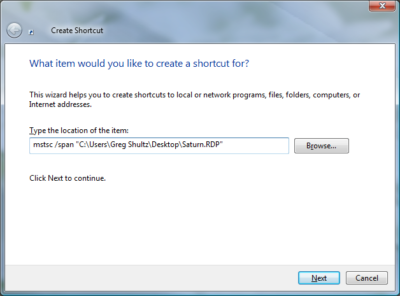
To begin, right-click anywhere on the desktop and then select New | Shortcut from the context menu. When you see the Create Shortcut wizard, just type mstsc /span and the path to the RDP file in the text box, as shown in Figure D. Be sure that you enclose the path to the RDP file in double quotes if the path has spaces in it. To continue, click Next and give the shortcut an appropriate name, such as Saturn – Remote Spanning, and then click Finish.

Figure D

You can create a standard Windows shortcut that will incorporate both the special command line and your RDP file.

You can now use this shortcut to launch your remote desktop connection and span the Remote Desktop window across all the available space on your multiple monitors. Of course, the spanned desktop won’t exactly behave like a multiple-monitor setup when you open multiple windows. As such you’ll have to use a little creative click-and-drag resizing to reposition the windows on the spanned desktop.

Have questions?

Get answers from Microsofts Cloud Solutions Partner!
Call us at: 856-745-9990 or visit: https://southjerseytechies.net/

South Jersey Techies, LL C is a full Managed Web and Technology Services Company providing IT Services, Website Design ServicesServer SupportNetwork ConsultingInternet PhonesCloud Solutions Provider and much more. Contact for More Information.

To read this article in its entirety click here.http://www.techrepublic.com/blog/windows-and-office/use-multiple-monitors-with-windows-7s-remote-desktop-connection/

Surface Book i7 vs. MacBook Pro: Fight!

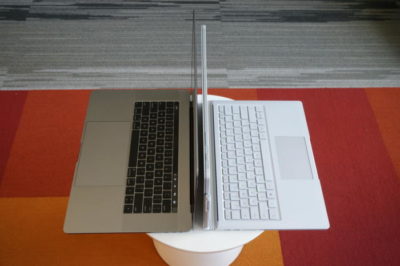
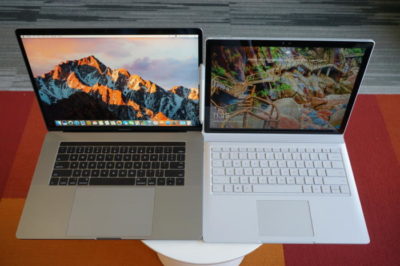
Now that Apple’s introduced the first major update to its MacBook Pro lineup in years, it’s time to square off the best of the best in Mac and PC laptops to see who currently prevails in this age-old rivalry. 
The contenders

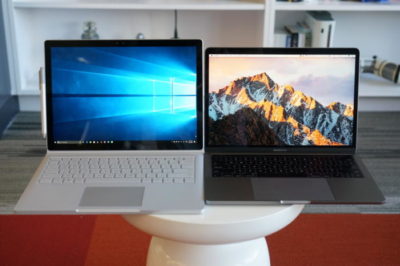
The newest Surface Book is a top-of-the-line model with a Core i7-6600U, a GeForce GTX 965M, 16GB of RAM, and a 1TB SSD. The updated product line varies from $2,400 to $3,300 (our model) in price. All three net you a 6th-gen Skylake dual-core Core i7 chip, and all three get you the same Performance Base with a GeForce GTX 965M. The only differences are in the size of the SSD and how much RAM you get. Only the SSD would affect performance significantly.

On the Apple side, the contender is a $2,400 MacBook Pro 15 with a quad-core Core i7-6700HQ, 16GB of LPDDR/2133, and a 256GB SSD. I also had partial access to two MacBook Pro 13’s. The first was the non-touch bar model with a Core i5-6360U, 8GB of LPDDR/1866, and a 256GB SSD ($1,500). The second was the Touch Bar version with a Core i5-6267U, 8GB of LPDDR/2133, and a 256GB SSD ($1,800).
Why this contest isn’t rigged

Let’s make it clear from the outset: This isn’t a direct comparison of the laptops based on cost, but an attempt to compare the performance of the new MacBook Pros to that of similar PC laptops.

For those who’ve noticed the considerable price delta between the Surface Book i7 and the 15-inch MacBook Pro, the stack of other PCs used in this comparison will help smooth out that line. You might argue that it’s silly to compare a $3,300 Surface Book i7 against an $1,800 MacBook Pro 13, or a $1,100 Dell XPS 13 against an $1,800 MacBook Pro 13, or a $1,400 Dell XPS 15 against a $2,400 MacBook Pro 15. But these are all real-world models that you’ll find in a store, rather than configurations contrived to hit a number. Price differences are just part of the comparison puzzle.

For the same reason, we’re not loading the same OS on all the laptops—no OSX on PCs, no Windows on Macs. Real people wouldn’t do that, and neither will we.
Cinebench R15 multi-threaded performance

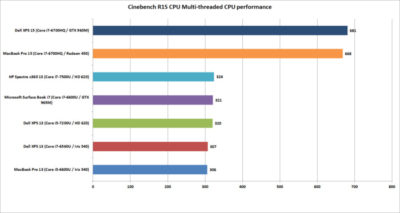
Our first test is Cinebench R15. This is a 3D rendering test based on Maxon’s Cinema4D engine. The test is heavily multi-threaded, and the more cores or threads you can throw at it, the better the performance. The test is is a pretty harsh reminder that if your tasks demand a quad-core, listen to them.

Between the two quad-cores, the Dell XPS 15 crosses the finish line first—but not by much. Let’s just call it mostly a tie.

Among the dual-cores, the Core i5-based MacBook Pro 13 is last, but not by much. It’s basically the same as the last-gen XPS 13 with a similar Core i7-6560U.

The surprise is where the Surface Book i7 finishes. Its 6th-gen CPU is hanging right with the 7th-generation Kaby Lake CPUs in the new HP Spectre x360 13 and the new Dell XPS 13.
Cinebench R15 single-threaded performance

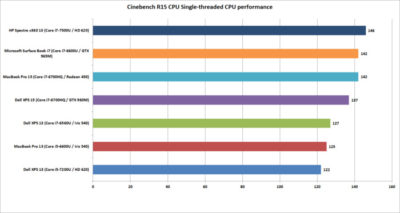
Cinebench R15 has an optional test that lets you measure the single-threaded performance. It’s a valuable way to gauge how fast a laptop will be in applications or tasks that don’t use all the cores available.

The surprise to many will be the result from the Dell XPS 13. Its 7th-generation Core i5 CPU could hang with the Core i7 chips on heavier loads, but on lighter loads, it ends up being last. That’s because Core i7 chips in laptops excel at short, “bursty” loads. Once you heat them up, the clock speeds crank back. When running a test in single-threaded mode, the Core i7’s advantage with short burst loads shows up big-time.

The real shocker is how the HP Spectre x360 with a 7th-gen CPU comes out the clear winner. The quad-core MacBook Pro 15 or Dell XPS 15 were expected to lead the pack, but nope. That Kaby Lake CPU is indeed pulling its weight.
Cinebench R15 OpenGL performance

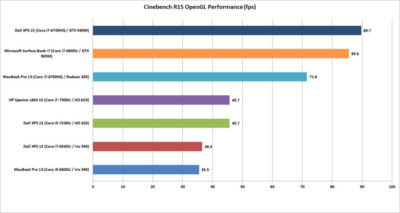
Our last Cinebench R15 test measures performance with OpenGL, a popular graphics API used for rendering professional CAD/CAM applications and a few games.

The results here break down into three bands. At the bottom is the new MacBook Pro 13 and an older Dell XPS 13 model. Both use Intel’s Skylake CPU and include “faster” Iris 540 graphics with 64MB of embedded DRAM inside the CPU. Both are nearly dead-even, which validates this test for comparing OSX to Windows 10 performance.

The second band up is a shocker to me. The pair of 7th-gen Kaby Lake laptops from Dell and HP are a good 25 percent faster than the 6th-gen Skylake laptops in OpenGL. The Iris 540 laptops were expected to come out in front. The results made us wonder whether this isn’t some driver optimization that Intel put into Kaby Lake but not Skylake.

The last band is the graphics performance of the discrete-GPU laptops. Unexpectedly, the GeForce GTX 960M in the XPS 15 finishes just ahead of the GTX 965M in the Surface Book i7. The MacBook Pro 15, with its Radeon Pro 450, finishes in a firm third place. Some MacBook Pro reviews have said the graphics don’t measure up in games, while in “work”-related tasks, they rules. So far, no one has seen that to be true.
GeekBench 4.01 multi-threaded performance

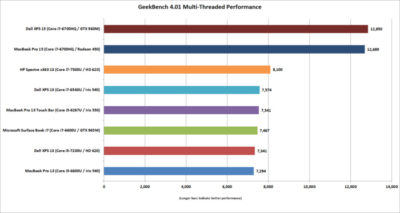
Another popular cross-platform benchmark is Primate Lab’s GeekBench. Experts may disdain its cross-platform results between ARM and x86. Within the same micro-architecture, however, it’s pretty kosher, especially when running the newest 4.01 version of the popular test. There is  also a score to report for the MacBook Pro 13 with Touch Bar

The first result we’ll look at is the multi-threaded performance. Like Cinebench R15, you can see the quad-core XPS 15 and MacBook Pro 15 step away from the dual-core laptops. It’s just more proof that if your tasks really need a quad-core chip, pay for it.

On the dual-cores, the redesigned HP Spectre x360 13 again shows the newest 7th-gen Core i7’s clock speed advantage over the Skylake models. The Surface Book i7 and MacBook Pro are pretty much dead-even. For MacBook Pro 13 fans that might be something to crow about, because we’re talking about a Core i5 MacBook Pro 13 vs. a Core i7 Surface Book.
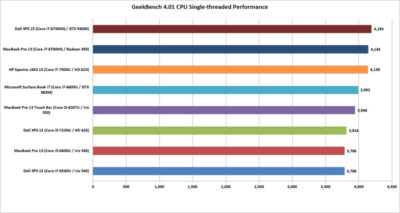
GeekBench 4.01 single-threaded performance

Moving on to the single-threaded performance in GeekBench 4.01, there are a few patterns we can discern. First, that 7th-gen Core i7 in the HP Spectre x360 13 is indeed faster in lighter loads, outpacing the Surface Book i7 and the Core i5-equipped MacBook Pro 13 with Touch Bar.

The Dell XPS 15 inches over the MacBook Pro 15, but the real takeaway is this: If you don’t do many multi-threaded tasks on your laptop, you don’t need a quad-core CPU.
GeekBench 4.01 OpenCL performance

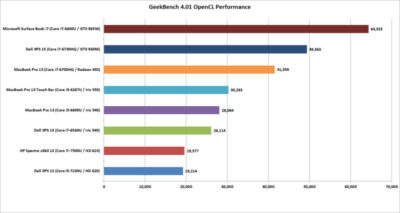
GeekBench also has an OpenCL test that simulates popular Computer Language tasks on a GPU that would normally be handled by the CPU.

The first takeaway: Unlike in the OpenGL performance tests, the older Iris 540 in the Skylake dual-cores is faster than the Kaby Lake integrated graphics for whatever tasks Prime Labs thinks best represent OpenCL.

The second takeaway: OpenCL loves fast GPUs. The Surface Book i7 and its GTX 965M run away with this test, and trash the MacBook Pro 13. For those who didn’t pony up for the MacBook Pro’s faster Radeon Pro 455 or 460 GPU, it’s hard to watch how thoroughly the the Surface Book i7 smokes the 450-equipped MacBook Pro. The Surface Book’s GTX 965M even makes a mockery of the GTX 960M in the XPS 15.
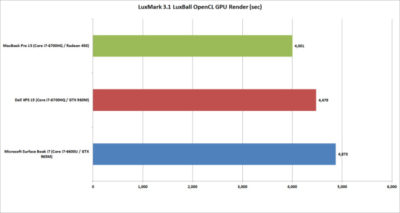
LuxMark 3.1 OpenCL GPU Render Performance

When you play the benchmarketing game, one truth that’s often overlooked is that no one test defines the entire category. You can’t take the results from Geek Bench 4.01 OpenCL and declare it representative of all OpenCL performance.

To balance Geek Bench 4.01, I also ran the free LuxMark 3.1 OpenCL test. This takes a scene and renders it using the LuxRender engine on the GPU (or CPU if you ask it to.)

The results put these GPUs a lot closer than the OpenCL numbers from Geek Bench 4.01 would have you believe. In the end, both the XPS 15 and Surface Book i7 again both clearly win. But would this be true if it were a Radeon 460 in the MacBook Pro 15? Probably not.
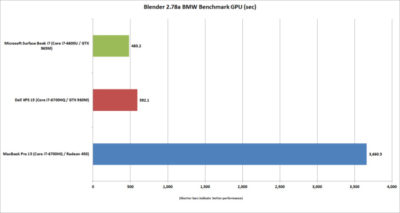
Blender 2.78 Performance

The last “work”-related graphics test we’ll run is Blender 2.78. This a free rendering application popular in a lot of indie movies. For a test render file, I used Mike Pan’s BMW Benchmark and set Blender to ray-trace the scene on the GPU rather than the CPU. The result is, frankly, beyond ugly. The Surface Book i7 finished in about eight minutes, and the XPS 15 took another two more minutes. The MacBook Pro 15 took more than an hour to complete the task.

This doesn’t mean the MacBook Pro 15’s Radeon Pro 450 is a dog. The other benchmarks should tell you that the Apple isn’t that bad in some tasks. Still, this kind of performance disparity indicates a serious problem at the OS or driver level, or something with this compile of Blender. Unless or until that mystery is solved, you’ll want to do your Blender renders on a PC laptop.
Tomb Raider performance

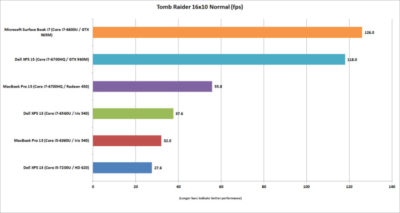
The last graphics test is Tomb Raider. It’s an older game available in both OSX and Windows and includes a built-in benchmark. While we could set the graphics settings the same on both platforms, we couldn’t quite sync the resolutions. Depending on the laptop, we could set the horizontal resolution at 1680-, 1650-, or 1600×1050 (the latter, for the Macs). The graphics setting on all of the laptops was Normal.

If you can’t bear to look, don’t: The Surface Book i7 and XPS 15 soundly thrashed the MacBook Pro 15. The Radeon Pro 460 would not make a difference here, either. If you want gaming performance at any decent levels, no surprise—buy a PC.
Battery life

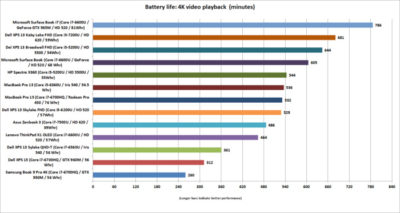
The final test is for all-important battery life. The same 4K-resolution were used, open-source Tears of Steel short video, looping continuously. On the Windows laptops, we used the Movies & TV player, and on OSX Sierra, we used QuickTime.

All of the laptops had their screens set at 250 to 260 nits in brightness. All laptops had the adaptive brightness setting turned off. All were tested with Wi-Fi disabled and with earbuds plugged into the analog ports. One thing to note: The Windows laptops are left in their default power settings, which means they use their last bits of battery life to shut off unused apps and slightly dim the screen. OSX was set not to dim the display on battery—otherwise, it immediately dims the screen once unplugged.

Our results on the pair of MacBook Pros were amazingly similar. Started both early in the morning and watched until they died in the early evening. Both were minutes apart.

Apple claims about 10 hours of run time in iTunes. We were pretty close in QuickTime at nearly 9 hours. The variance can be attributed to the video file and the settings the company uses.

For the MacBook Pro 15, that’s pretty impressive. The battery life for 15-inch laptops with quad-core CPUs, discrete graphics, and high-resolution screens tends to be mediocre. For example, look at the XPS 15 and its six hours of run time. (Dell offers an XPS 15 battery with about 50 percent more capacity—but it’s also heavier.)

Even worse is the Samsung Notebook 9 Pro, another quad-core laptop with the addition of a 4K screen. Ouch. Overall, I’d say the MacBook Pro 15 has decent battery life for a quad-core.

Moving to the MacBook Pro 13, the result is a little more nuanced. With roughly nine hours of run time, it compares well to some laptops, such as the XPS 13 with a QHD+ touchscreen. But there are a lot more PCs ahead of it. You know, like the Surface Book i7, which sets the bar at an amazing 13 hours of video run time. Other laptops with better video stamina include the newest XPS 13, HP’s redesigned Spectre x360 13, and even the older Surface Book. When you consider that all three are also generally faster, it’s not good.
The cost equation

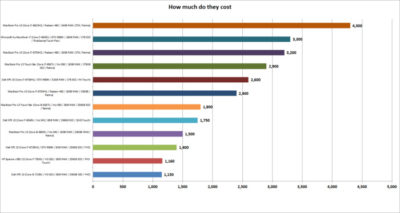
The most important question for users isn’t related to an obscure OpenCL benchmark but to how much these laptops cost. To help you understand just how much of a premium Apple and Microsoft are charging, I mapped out the cost of most of the laptops that appeared here, along with other configurations worth highlighting.

That top-spec Surface Book i7, formally known as Surface Book with Performance Base,  really pushes the boundaries of what people will pay for a dual-core laptop. To be fair, this is no ordinary laptop. It has a 1TB SSD and 16GB of RAM, plus pen support, a tablet mode, and probably class-leading GPU performance. But umm, yeah, 3,300 bucks.

Apple is no stranger to nose-bleed altitudes. When you throw a Core i7, 1TB SSD, and 16GB of RAM into the MacBook Pro 13 with Touch Bar, you’re looking at  $2,900. And you don’t even get the discrete GPU, touch, and tablet or pen support of the Surface Book. Apple’s most powerful MacBook Pro 15 tilts the meter all the way to $4,300. Granted, that’s with one of Intel’s priciest mobile CPUs and a whopping 2TB SSD, but that’s also the price of a modest used car.

Compared to a “normal” PC, both Microsoft and Apple give you a lot less performance for your cash. The Dell XPS 15, which pretty much aces the new MacBook Pro 15 except in battery life, is $1,400.

Take that Dell XPS 15 and load it up with a 1TB M.2 SSD, 32GB of RAM (which isn’t available on the MacBook Pro 15), a GTX 960M, 4K touchscreen, and a larger battery: $2,600. That’s only $200 more than what Apple charges for a machine with 16GB of RAM, a 256GB SSD, and the slowest Radeon Pro GPU.

You can do the same with the new HP Spectre x360 or Dell’s current XPS 13. Both give you a lot more value than either the MacBook Pro 13 or the MacBook Pro 13 Touch Bar.
Conclusion

Ten tests and one price comparison later, the PC wins. Again.

That’s no surprise. The MacBooks are caught in a tough spot—even if they were running higher-performance configurations. They’re both ultra-expensive compared to most PCs, and at the top-end, outclassed in GPU performance by Microsoft’s comparably expensive Surface Book i7.

It’s not all bad news for the Mac, though. The MacBook Pro 15’s battery life is impressive for a 15-inch laptop with a quad-core CPU and discrete GPU. Comparably powerful quad-core laptops we’ve seen can’t touch it in battery life. Even the MacBook Pro 13s do relatively well in battery life compared to a similar PC.

The problem for Apple and Mac fans is PC makers just don’t ever stand still. And as we know, Apple seemingly does that now with its Macs.

Have questions?

Get answers from Microsofts Cloud Solutions Partner!
Call us at: 856-745-9990 or visit: https://southjerseytechies.net/

South Jersey Techies, LL C is a full Managed Web and Technology Services Company providing IT Services, Website Design ServicesServer SupportNetwork ConsultingInternet PhonesCloud Solutions Provider and much more. Contact for More Information.

To read this article in its entirety click here.

 

Microsoft IIS: Disabling the SSL v3 Protocol


Depending on how your Windows servers are configured, you may need to disable SSL v3.

Note that older versions of Internet Explorer may not have the TLS protocol enabled by default. If you disable SSL versions 2.0 and 3.0, the older versions of Internet Explorer will need to enable the TLS protocol before they can connect to your site.

For a Simpler Way to Disable the SSL v3 Protocol:

DigiCert is not responsible for any complications or problems if you decide to use this .zip file to disable the SSL v3 protocol on your server.

  1. Log into your server as a user with Administrator privileges.
  2. Download DisableSSL3.zip, extract the .zip file contents, and then double-click DisableSSL3.reg.
  3. In the Registry Editor caution window, click Yes.
  4. Restart server.

If you prefer to do it yourself, follow the steps in the instruction below.

Microsoft IIS: How to Disable the SSL v3 Protocol

  1. Open the Registry Editor and run it as administrator.For example, in Windows 2012:
    1. On the Start screen type regedit.exe.
    2. Right-click on regedit.exe and click Run as administrator.
  2. In the Registry Editor window, go to:HKEY_LOCAL_MACHINE\SYSTEM\CurrentControlSet\Control\SecurityProviders\Schannel\Protocols\
  3. In the navigation tree, right-click on Protocols, and in the pop-up menu, click New > Key.
  4. Name the key, SSL 3.0.
  5. In the navigation tree, right-click on the new SSL 3.0 key that you just created, and in the pop-up menu, click New > Key.
  6. Name the key, Client.
  7. In the navigation tree, right-click on the new SSL 3.0 key again, and in the pop-up menu, click New > Key.
  8. Name the key, Server.
  9. In the navigation tree, under SSL 3.0, right-click on Client, and in the pop-up menu, click New > DWORD (32-bit) Value.
  10. Name the value DisabledByDefault.
  11. In the navigation tree, under SSL 3.0, select Client and then, in the right pane, double-click the DisabledByDefault DWORD value.Windows Registry Key
  12. In the Edit DWORD (32-bit) Value window, in the Value Data box change the value to 1 and then, click OK.
  13. In the navigation tree, under SSL 3.0, right-click on Server, and in the pop-up menu, click New > DWORD (32-bit) Value.
  14. Name the value Enabled.
  15. In the navigation tree, under SSL 3.0, select Server and then, in the right pane, double-click the Enabled DWORD value.
  16. In the Edit DWORD (32-bit) Value window, in the Value Data box leave the value at 0 and then, click OK.
  17. Restart your Windows server.You have successfully disabled the SSL v3 protocol.

For instructions about disabling browser support for the SSL v3 protocol, see Disabling Browser Support for the SSL 3.0.


Windows Server 2003 end of life guide

How to organize your migration from Windows Server 2003


Following on from end of support for Windows XP in April 2014, we are now rapidly approaching Windows Server 2003 end of life.

Despite Microsoft warning about end of life for Windows Server 2003 as early as April 2013, many organisations are yet to begin their migration away from the server platform. Worse still, many organisations and IT pros are unaware of the huge financial costs and security risks should they continue running Windows Server 2003 past the end of life date.

Reports from HP claim that more than 11 million systems are still running Windows Server 2003. With fewer than 240 days left until end of life, this a huge problem as the estimated time required to migrate a datacentre of 100 or more servers can range from a minimum of three months and upwards of 18 months.

If you own even one of those 11 million servers and you have yet to begin migration, you should be worried. Luck for you, the following guide will migrate you to a position of safety. We will cover the following:

• Windows Server 2003 End of Life date
• Understanding what end of support means for Windows Server 2003 and the associated impacts
• An outline of how to migrate Windows Server 2003
• Resources to aid migration

Windows Server 2003 End of Life date

According to the Microsoft Support Lifecyle section on 14 July 2015, Microsoft will end extended support on all versions of Windows Server 2003/R2.

Understanding what end of support means for Windows Server 2003

From then on, this means no more updates or patches from Microsoft, which can result a less secure and less stable infrastructure for your business. What this really means:

• Maintenance Costs – running legacy servers is expensive. Intrusion detection systems, advanced firewalls and network segmentation are required to protect a now vulnerable Windows Server 2003 platform. You will also have increasing cost from maintaining aging hardware. Current estimates in a TechNet post from Alex Fu place the cost of custom support post end of life at US$200,000 on average. In a Q&A with David Mayer, practice director of Microsoft Solutions for Insight Enterprises, he estimated a support cost of $1500 per server per year.

• No Updates – there will be no more updates to fix bugs, performance issues and security vulnerabilities. To put this into perspective, 2013 saw the release of 37 critical updates for Windows Server 2003/R2. Past the end of life date, these critical issues will remain unfixed leaving you open to cybersecurity dangers such as malicious attacks or electronic data loss.

• No Compliance – once support ends, your organisation will almost certainly fail to meet industry wide compliance standards. Regulations such as HIPAA, PCI, SOX & Dodd-Frank all require regulated industries to run on supported platforms. The impact is twofold: Non-compliance could result in the loss of business, while high transaction fees and penalties from non-compliance could dramatically increase the cost of doing business.

• Software and Hardware Compatibility Issues – new software and hardware devices will not be built to integrate with Windows Server 2003. Sticking with a legacy server means you will likely run into compatibility issues and may not be able to run new instances of software or communicate with the latest devices.

• No Safe Haven – without continued support from Microsoft, virtualized and physical instances of Windows Server 2003/R2 and Microsoft Small Business Server (SBS) 2003 will not pass a compliance audit.

How to migrate from Windows Server 2003

Do not underestimate the task that lies ahead. Migrating applications and server workloads is no easy task. Worryingly, a study by App Zero suggests that 62 per cent of organisations do not have a plan to upgrade or migrate, or even know that EOS is coming.

• Discover – first up is discovering and cataloguing all the software and workloads that are running on Windows Server 2003/R2 at present. Download the Microsoft Assessment and Planning toolkit as this will be a worthy support document.

• Assess – now you have a list it’s time to analyse and categorise all your applications and workloads based on type, criticality, complexity and risk. This helps you prioritise for migration as well as identify issues and opportunities.

• Target – in this step, you must choose a destination for each application and workload. This could be the perfect time to evolve your organisation to the next level and embrace the cloud. Microsoft offers a series of destinations for each application or workload which could include:

billionphotos-1008218 (1)

o Windows Server 2012 R2
o System Center 2012 R2 (Private Cloud)
o Microsoft Azure (Public Cloud)
o SQL Server 2014
o Office 365

• Migrate – now is the time choose a migration plan. Microsoft offers a fantastic Migration Planning Assistant which covers all four steps. Look for official Microsoft training courses to give you an in-depth understanding of the new platforms you are planning to migrate to.

Resources to aid migration

Due to the widespread requirement to migrate, there is a range of fantastic resources to aid migration. These include:

Microsoft Virtual Academy – arguably the largest and best collection of free self-study resources from Microsoft experts including videos, slide decks and self-assessments. Check out the section on migrating to Windows Server 2012, or the Microsoft zure JumpStart.

Windows Server 2003 Roles Migration Processdownload this document and turn it into an A3 poster, stick it on your wall and use it to visualise the whole process.

Microsoft Deployment Toolkitdownload this fantastic resource, which provides a collection of processes, tools and guidance for automating new desktop and server deployments.

Free Software Trials – Microsoft have a series of trials so you can check out the new software. Here they are:

Windows Server 2012 R2 trial
System Center 2012 R2 trial
Microsoft Azure one-month trial
Office 365 trial
SQL Server 2014 trial

Windows Server Migration Services – there are a series of organisations that offer assistance in migrating away from Windows Server 2003. Big players include:

• Dell
• RackSpace
• HP

Time is running out — start your migration away from Windows Server 2003 today. Fail to do so and you find yourself facing some organisation-crippling consequences

Have questions?

Our Business IT Server Migration Specialists in NJ, PA & DE are here to help.
Call us at: 856-745-9990 or visit: https://southjerseytechies.net/server-support/

South Jersey Techies, LLC is a full Managed Web and Technology Services Company providing IT Services, Website Design ServicesServer SupportNetwork ConsultingInternet PhonesCloud Solutions Provider and much more. Contact for More Information.

To read this article in its entirety click here.

CALL US NOW!