Back to Top

Tech, Web, Cloud & Cabling Services

Tag Archives: South Jersey Techies

South Jersey Techies tag

iOS 9 PPTP VPN Setup Tutorial

Manual Setup

Step 1

Start from the home screen. Go to “Settings“.


sjt-blog-iphone-vpn-01

Step 2

Go to “General“.


sjt-blog-iphone-vpn-02

Step 3

Then proceed to “VPN“. You may need to scroll down to find it.


sjt-blog-iphone-vpn-03

Step 4

Tap on “Add VPN Configuration…“.


sjt-blog-iphone-vpn-04

Step 5

Tap on “Type“.


sjt-blog-iphone-vpn-05

Step 6

Select “PPTP” by tapping on it.


sjt-blog-iphone-vpn-06

Step 7

Description” is the name of the connection, can be any as you like, we recommend StrongVPN.
Fill the “Server“, “Account” and “Password” fields.
Server” is your server address. It is not remote.sjtechies.com, that is just an example.
Account” and “Password”. Account is neither Test\jsmith nor your email.
Encryption Level” option must be set to “Auto“. “Send All Traffic” should be “ON“.
When the fields are filled up correctly, tap “Done“.


sjt-blog-iphone-vpn-07

Step 8

It will give you the warning about using the PPTP connection, which has some downsides.
Tap Save button. (Hint: If you want stronger encryption just use L2TP.)


sjt-blog-iphone-vpn-08

Step 9

Now connect by tapping the switch button to the right of VPN Status.
(If you have more than one VPN configuration listed, the one with a check next to it will be connected. You can tap on a vpn configuration name to select it, or tap on the ‘i’ to the right of the name if you need to update the settings.)


sjt-blog-iphone-vpn-09

Step 10

It will show you “Connecting…” status, wait while it connects.
When the VPN connection is established the status will be “Connected“. Also notice the “VPN” badge on the top bar.


sjt-blog-iphone-vpn-10

Step 11

To check if your IP address is changed successfully open the Safari browser and proceed to http://strongvpn.com/.

Have questions?

Get help from IT Experts/Microsofts Cloud Solutions Partner
Call us at: 856-745-9990 or visit: https://southjerseytechies.net/

South Jersey Techies, LLC is a full Managed Web and Technology Services Company providing IT Services, Website Design ServicesServer SupportNetwork ConsultingInternet PhonesCloud Solutions Provider and much more. Contact for More Information.

To read this article in its entirety click here.


If Microsoft can’t install Windows 10 on your PC, it’ll give you a new one

Terms and conditions apply, but if the company’s stores can’t perform a same-day upgrade on your Windows 10-compatible PC, it’ll give you a new Dell notebook.

Windows 10- SJTechies

As the free Windows 10 upgrade offer nears its end on July 29, Microsoft is pulling out all the stops to convince users to upgrade. It’s even willing to give you a new laptop.

As spotted, Microsoft retail stores are offering to install Windows 10 on any compatible machine for free. If the store’s technicians don’t complete the upgrade by the end of that business day, they’ll give you a free 15-inch Dell Inspiron notebook.

The offer runs between now and July 29.

There is, of course, plenty of fine print. The free installation offer only applies to a single PC that’s capable of running Windows 10 (If it isn’t, you may be eligible for a $150 credit toward a new PC). You also need to check in your computer by noon for the offer to be valid. It’s also limited only to the US and Canada, so customers of the Microsoft Store in Sydney are out of luck.

The story behind the story: This free PC offer is the latest in a series of highly aggressive moves Microsoft has made to get its users onto Windows 10. Its deceptive, malware like pop-ups in Windows 7 and 8.1 effectively trick users into installing Windows 10, whether they want to or not. Windows 10 spiked in market share in June, seemingly as a result of these forced updates, but the company has since admitted that it likely won’t hit its goal of having Windows 10 on one billion devices by mid-2018.

Have questions?

Get answers from Microsofts Cloud Solutions Partner!
Call us at: 856-745-9990 or visit: https://southjerseytechies.net/

South Jersey Techies, LL C is a full Managed Web and Technology Services Company providing IT Services, Website Design ServicesServer SupportNetwork ConsultingInternet PhonesCloud Solutions Provider and much more. Contact for More Information.

To read this article in its entirety click here.

Doomsday – Windows XP End of Life


XP

Takeaway:  Risks with staying with Windows XP after April 8, 2014.

Since being release worldwide on October 25, 2001, Windows XP has become one of the most popular versions of Windows.  OEM and retail sales of Windows XP ended in June 2008, while smaller OEMs continued to sell the Operating System until January of 2009.

On April 10, 2012, Microsoft officially announced that as of April 8, 2014 they will end extended support for Windows XP and Office 2003, after which no new bug fixes or patches will be issued.

Organizations may be taking a spontaneous risk and assume that Window’s XP’s prolonged life means major vulnerabilities have been acknowledged and dealt with.  If XP were secure, there still might be application-level vulnerabilities.  Even the ranges of security breaches are inadequate to persuade some organizations that are still using Windows XP to upgrade.  The dynamics that have safeguarded XP’s success are now working against the organizations that stuck by the operating system.

A major aspect attackers assess during their investigation is the operating system and the applications used within an organization.  With Microsoft ending their support, the vendors for applications running on it will most likely end support.

On the other hand, those preparing to continue using XP after the cut-off date, are going to be in a unpleasant situation trying to protect their intellectual property, but can take certain steps to limit exposure to risk.  There are specific technologies you could deploy that will permit you to remain using legacy systems.  Mitigating technologies like Host-Based Intrusion Protection will be able to identify that a vulnerability exists and make that vulnerability difficult/impossible to exploit by applying a virtual patch to those non-supported environments.

However, XP’s acceptance is down to the technology itself and an operating system format that people are content with.  The significant changes with Windows Vista, Windows 7 and especially Windows 8 are the reason people are resistant to change.

To protect and upgrade your home or business

 please contact us 856-745-9990 or click here.


10 Great Tools For A Budget

Takeaway: From diagnostic tools to antivirus to backup utilities, this list of freebies will help you do more with less.

If you’re trying to stretch a thin IT budget, you probably can’t afford a lot of pricey tools. Luckily, a number of highly useful tools are available for free. Some of them even work better and are more efficient than their costlier alternatives.

1: ComboFix

When the standard antivirus/malware software can’t seem to find the problem, ComboFix almost always does. It also looks for and removes most rootkits and Trojans. To use this tool, you must completely disable all antivirus solutions (and you should completely remove AVG). Caution: If ComboFix is not used properly, it can wreak havoc on the machine you’re trying to fix.

2: ProduKey

ProduKey will help you get product keys from installed applications so that when you need to migrate to a new machine, you can continue using those costly licenses. ProduKey will recover keys from more than 1,000 software titles, including Microsoft Office, Adobe, and Symantec. When you use this tool, you will have both the product ID and the product key; the ID is important because it will tell you which version of the software is installed.

3: Hiren’s BootCD

Hiren’s BootCD is a one-stop-shop Linux boot disk that can help you pull off a number of small miracles. Its tools include Antivir, ClamWin, ComboFix, Clonedisk, Image for Windows, BIOS Cracker, 7-Zip, Bulk Rename, Mini Windows XP, CCleaner, and Notepad++, among others. This single bootable disk could easily be the only tool you need.

4: Microsoft Security Essentials

Microsoft Security Essentials is one of the better free antivirus tools available. Its tagline, “The anti-annoying, anti-expensive, anti-virus program,” is true. When the firm I work with was looking for a new free solution, we tested Microsoft Security Essentials against AVG Free and Avast Free and found Microsoft Security Essentials to be superior, less intrusive, and less resource intensive.

Note: Microsoft Security Essentials can be used for free for up to 10 PCs. Beyond that, you can purchase the business version, System Center Endpoint Protection.

5: WinDirStat

WinDirStat is the program you need when you must know what is taking up the space on a hard drive. When C drives begin to fill up, performance degrades rapidly. It’s essential to have a tool to help you discern what is gobbling up the precious space on a machine, and WinDirStat is the foremost app for getting this information quickly.

6: CCleaner

CCleaner gets rid of temporary files and Windows Registry problems faster than any other tool. When a machine is having problems, this is almost always the tool I use first. CCleaner also helps ensure privacy by getting rid of traces left behind (such as cookies) by Web browsers.

Note: It is legal to use CCleaner Free for business use. However, CCleaner Business Editioncomes with a few more features (including one-click cleaning) than the free version.

7: Defraggler

Defraggler blows away the defragmenting application in all Windows operating systems. It’s faster, more reliable, and more flexible than the built-in tools. With Defraggler, you can defrag a single file or an entire drive. Defraggler supports NTFS and FAT32 systems.

8: 7-Zip

7-Zip is the best file archiver/compression tool (outside of Linux command-line tools). It’s open source and works on multiple platforms. Once you install it, you will find 7-Zip has Explorer support and a simple GUI tool that any level of user can manage.

9: SyncBack

SyncBack is a reliable, easy-to-use backup utility. No, you won’t be recovering from bare metal, but you can save your precious data. SyncBack can synchronize data to the same drive, a different drive or medium (CDRW, CompactFlash, etc.), an FTP server, a network, or a zip archive.

10: FileZilla

FileZilla reminds you that the cloud has not made FTP useless. There are plenty of reasons you might need FTP, so why not use one of the best and most cost effective FTP clients? And if you need an easy-to-use FTP server to slap up on your Windows machines, FileZilla has one.

Can’t Change Windows 7 Theme?

Can’t change the Windows 7 theme? Is your Windows 7 theme stuck on “classic”? If it is stuck, then you can try to apply a few fixes and see if if you can unstuck it! Often it is stuck, because your PC is configured to be optimized for best performance, rather than best appearance!


Windows

Overview

Configure PC for better Appearance
Start Windows 7 Themes Service
Problem: Themes Service Cannot Be Started

Use Visual Styles on Windows and Buttons

Often the reason why your Windows 7 theme could be stuck on classic is that your PC is configured to be optimized for better performance. I could imagine that some laptops are even pre-configured that way. Actually, it’s a good setting, but if you want a better appearance I can understand that it’s annoying to be stuck on “classic” theme. So, if you can’t change your Windows 7 theme, you might want to check your PC configuration first:

1. StepOpen the Control Panel

Control Panel


2.
Click on “System and Security”:

3. Step Click on “System”.

4. Step In the sidebar, click on “Advanced System Settings”:

5. Go to the tab “Advanced” and click on “Settings”:

System and Security


6. Step Scroll down the list, at the bottom double-check that the item “Use Visual Styles on Windows and Buttons” is checked. If this is not checked, your Windows 7 theme will be stuck on “classic” for a long time, because this completely disables your fancy visual Aero appearance.

Windows 7 Themes

This is also often the problem why people can’t seem to be able to active the Windows 7 Aero theme, because their PC is configured to be optimized for the best performance and not the best appearance.

Themes service is not started

If your Windows 7 themes service is not started your Windows 7 theme will be stuck on “classic”. You can’t change your Windows 7 theme when the theme service is disabled. So, let’s check if your themes service is up and running.

1. Step Click on “Start” and enter “services.msc” into the search field. Click on the item that appears.

2. Step Scroll down the list until you find the item “Themes” (or enter Themes while one item is selected)

3. StepYou will now see if the Themes service is running currently and what mode it is in (Automatic, Disabled, Manual):

If it’s currently “Disabled” or in “Manual” mode and not started, you have to start it manually and change the mode to “Automatic”.

4. StepDouble-click on “Themes” and from the dropdown select “Automatic”, click on “Start” and then on “Apply”.

Themes Properties

Have questions?

Microsoft’s Cloud Solutions Partner are here to help.
Call us at: 856-745-9990 or visit: http://southjerseytechies.net/

South Jersey Techies, LLC is a full Managed Web and Technology Services Company providing IT Services, Website Design ServicesServer SupportNetwork ConsultingInternet PhonesCloud Solutions Provider and much more. Contact for More Information.

To read this article in its entirety click here.


Windows 10 Privacy Settings Guide

Where do you draw the line on personal privacy? The right options are different for everyone. This guide shows the privacy settings that will help you to create the right balance of privacy and convenience in Windows 10.

Over the past year, We’ve read countless “privacy guides” for Windows 10. Most are well-intentioned, but they invariably take a simplistic approach to privacy: Just turn off every switch in the Privacy section of the Settings app.

If you do that, you’re not understanding the privacy landscape, which encompasses far more than just those settings. You’re also missing some important additional steps.

Windows 10 is a mix of software and services. With every session, a Windows 10 device exchanges a great deal of information with Microsoft’s servers. That’s neither unusual nor alarming. Microsoft’s chief rivals, Google and Apple, are also blending services into their software, with the goal of making your life easier and making that software more reliable.

So are other tech companies that you don’t think of as software companies: Amazon, with the Echo. Tesla, with its self-updating, software-driven cars. Your thermostat and your home security system.

There’s something profoundly satisfying about a service that anticipates your every move, reminding you when to leave for an appointment to arrive on time, or to pick up flowers for your anniversary tomorrow. Your digital personal assistant, whether it’s Siri or Cortana or Alexa or Google, needs to be able to see your calendar and contacts to make that magic happen.

But when that sort of personal attention goes too far, it “crosses the creepy line,” to use a phrase that Eric Schmidt probably regrets uttering when he was Google’s CEO.

The thing about that line is that it’s drawn in a different place for everyone. There are people who are thrilled at the idea that their PC or mobile device is so familiar with their actions that it can anticipate what they’ll do next. I know others who would like to build a virtual Faraday cage around their computing hardware so that none of their personal details can escape.

Both of those viewpoints, and everything in between, are perfectly valid. That’s why the software and services we use are loaded with switches and dials designed to help you take control of their potential privacy impact.

In this post, We’ll walk you through the big privacy questions for Windows 10, with enough context to help you decide which settings are right for you.

Note that this guide assumes you are using Windows 10 on a personal PC or one in your small business. If you are in an enterprise setting, or if you are in a regulated industry, you should seek professional assistance to ensure that you’re meeting proper standards.

Let’s start with the part of your PC that has the biggest impact on your personal privacy.

THE NETWORK

No one knows more about your online identity than your Internet service provider. Every packet you send or receive from anywhere online goes through their servers. When you travel and connect to Wi-Fi networks that are under the control of others, the owners of those networks can see every connection you make and can intercept their contents.

Regardless of the platform you use, that’s why it’s important you use encrypted connections for any kind of sensitive communications. Using a virtual private network whenever possible is an excellent best practice.

Windows 10 does offer one obscure option that can help protect third parties from tracking your movements based on your connections to Wi-Fi networks. (Note that this feature requires support from your Wi-Fi adapter, so if you don’t see this option, the most likely explanation is that your hardware doesn’t support it.) Under Settings > Network & Internet > Wi-Fi, turn the Use random hardware addresses setting to On.

windowsprivacy02

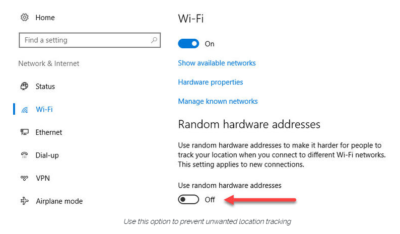
That step keeps third parties from matching your Wi-Fi adapter’s hardware address with your personal information, making it more difficult to track your location.

THE BROWSER

Countless third-party ad networks and analytics companies use cookies and other tracking technology to record your movements around the web and to correlate your online activities with your offline identity.

The result is a digital fingerprint that can be extraordinarily detailed and, unfortunately, outside of your ability to change.

To limit the amount of information that those ad and analytics companies know about you from your web browsing, consider third-party anti-tracking software such as Abine’s Blur, which is available for every web browser except Microsoft Edge. (That lack of solid support for add-ons is one reason I can’t yet recommend Edge as a full-time browser for most Windows 10 users.)

Another privacy product worth considering is Ghostery, although some are suspicious of this browser extension because of its uncomfortably close ties to the online advertising industry.

Ad-blocking software can also provide some privacy protection as a side-effect of performing its basic function. Here, too, watch out for close ties between some ad-blocking add-ins and the third-party trackers they supposedly protect you from.

Note that none of these steps is unique to Windows 10. Anti-tracking software is typically a browser add-in and works with most popular browsers.

THE OPERATING SYSTEM

With those two big, platform-independent factors out of the way, we can now turn to Windows 10 itself. When you use a Windows 10 device, it is capable of sharing the following types of information with Microsoft’s servers:

Your location

Windows 10 can determine your location to help with actions like automatically setting your current time zone. It can also record a location history on a per-device basis. Go to Settings > Privacy > Location to control the following:

  • Location on/off?Use the master switch at the top of this page to disable all location features for all users of the current device.
  • Location service on/off?If location is on for Windows, you can still turn it off for your user account here.
  • General location?This allows you to set a city, zip code, or region so that apps can deliver relevant content.
  • Default location?Click Set default to open the Maps app and specify the location you want Windows to use when a more precise location is not available.
  • Location history?Click Clear to erase the saved history for a Windows 10 device.

If location is on, a list at the bottom of the Settings > Privacy > Location page allows you to disable access to that data on a per-app basis.

Your input

If you enable Cortana, Windows 10 uploads some info from your devices, such as your calendar, contacts, and location and browsing history, so that Cortana can make personalized recommendations. If you don’t want any accounts on your PC to use Cortana, follow the steps in this article to disable the feature completely: Turn off Cortana completely.

Windows 10 uses some feedback from the way you type, write, and speak to improve performance for you and as a way to improve the overall platform. This isn’t keystroke logging; rather, the operating system uses a very small amount of information. A separate feature uses your speech and writing history to make better suggestions in Windows and Cortana.

You can control this collection with two sets of controls:

Under Settings > Privacy > General, click Info about how I write and turn it off so that your typos aren’t used to improve things like the built-in spell checker.

Under Settings > Privacy > Speech, inking, & typing, under the Getting to know you heading, click Stop getting to know me to turn off personalization.

To clear previously saved information associated with your Microsoft account, click the first link under the Manage cloud info heading. That takes you to this Bing Personalization page, which includes this prominent button:

windows-privacy01

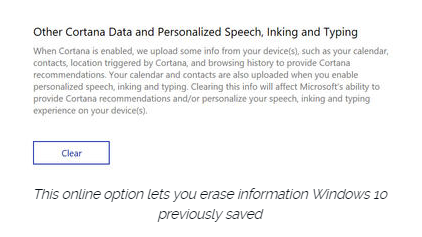
Click Clear to remove that saved information from the cloud.

Files and settings

When you sign in with a Microsoft account, you have the option to save files to the cloud using OneDrive. Windows 10 also syncs some settings to OneDrive, allowing you to have the same desktop background, saved passwords, and other personalized settings when you sign in with that account on multiple PCs.

If you use a local account, of course, none of your settings are synced. If you use a Microsoft account, you can turn off syncing completely or remove certain settings from the sync list by going to Settings > Accounts > Sync Your Settings.

OneDrive is an opt-in service. If you don’t sign in, it does nothing. You can’t save files to OneDrive accidentally, and no files are uploaded without your explicit permission, which you can revoke any time. To disable OneDrive for all users on your PC, follow these instructions: Shut down OneDrive completely.

Telemetry

Microsoft, like all modern software companies, uses feedback from its installed base to identify problems and improve performance. In Windows 10, this feedback mechanism produces diagnostics data (aka telemetry) that is uploaded to Microsoft at regular intervals. The data is anonymized and is not used to create a profile of you.

The default telemetry setting for all consumer and small business versions of Windows 10 is Full, which means that the uploaded data also includes details (also anonymized) about app usage. If you are concerned about possible inadvertent leakage of personal information, I recommend that you go to Settings > Privacy > Feedback & diagnostics and change the Diagnostic and usage data setting to Basic.

THE APPS

Although the number of subcategories under the Privacy heading in Settings seems daunting, most of them govern access to your information by Windows Store apps. That set of apps includes those that are preinstalled (Mail, Calendar, Groove Music, Photos, and so on) as well as those you acquire from the Store.

Most of the categories offer a single on-off switch at the top, which you can use to disable all access to that feature by all apps. If you leave the feature enabled, you can use a list of apps at the bottom of the page to enable or disable access on a per-app basis.

This capability works the same with the following categories: Camera, Microphone, Notifications, Account Info, Call History, and Radios. The Other Devices category lets apps automatically share and sync info with wireless devices that aren’t explicitly paired with your PC. Use the Background Apps category to specify which apps are allowed to work in the background.

If Location is enabled, you have the option to disable location access on a per-app basis and to disable Geofencing.

The Contacts, Calendar, Email, and Messaging categories allow you to control which apps can have access to these features. If you want to share content from an app using email or messaging, this option has to be on for that app. Note that Mail and Calendar, People, and Phone always have access to your contacts; Mail and Calendar are always allowed to access and send email and always have access to your calendar.

Finally, one horribly misunderstood setting is available under Settings > Privacy > General. Advertising ID controls whether Microsoft serves personalized ads to ad-supported apps. If you turn this option off, you still get ads, but they’re not personalized. In any case, your information is not shared with advertisers.

Have questions?

Get answers from Microsofts Cloud Solutions Partner!
Call us at: 856-745-9990 or visit: https://southjerseytechies.net/

South Jersey Techies, LL C is a full Managed Web and Technology Services Company providing IT Services, Website Design ServicesServer SupportNetwork ConsultingInternet PhonesCloud Solutions Provider and much more. Contact for More Information.

To read this article in its entirety click here.

Undo Windows 10 Upgrade: Win7/8 Guide

It’s now possible for your computer to be updated to Windows 10 without your explicit content.

Windows10-7
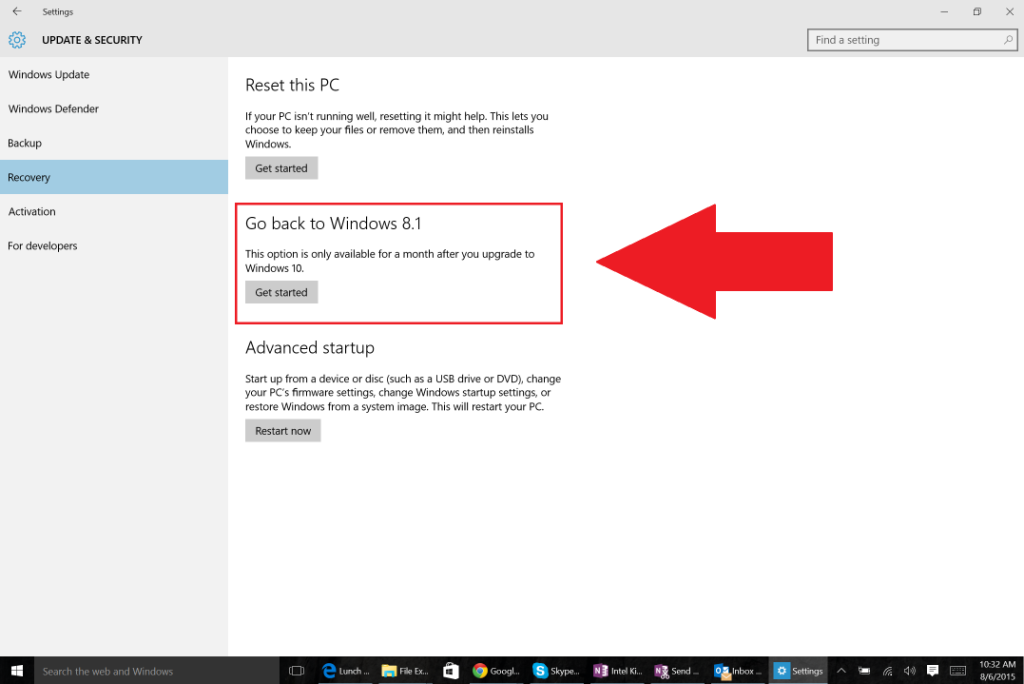
Microsoft’s putting away the carrots and breaking out the sticks in its quest to migrate 1 billion users to Windows 10 over the next couple of years.

After pushing out the free upgrade as a Recommended update to Windows 7 and 8 users earlier this year—which means that you downloaded the initial installation bits if you use the default Windows Update, like most people should—Microsoft changed its nagging pop-up prompt in an insidious way over the past week. For the past six months, the “Get Windows 10” pop-up asked permission to start an update, but lacked a “No thanks” option, so the only way to avoid it was to close the window by pressing the in the upper-right hand corner. Now, the pop-up says “We will upgrade you at this time,” and pressing the X counts as consent. You need to click a small, easily missed link in the pop-up to cancel the upgrade, instead.

It’s a nasty bait-and-switch after months of using an incessant pop-up—which can’t be disabled without the help of registry hacks and other advanced tricks—that wore down users, encouraging them to simply X out of the irritant when it appeared each and every time they opened their computer. Worse, it’s now possible for your computer to be updated to Windows 10 without your explicit content.

Judging by the hundreds of comments on Reddit, Twitter,PCWorld, my inbox, and other places across the web in response to the situation, a lot of people are finding themselves upgrading unintentionally. And, well, a lot of them are pissed.

Fortunately, it’s easy to roll your PC back to Windows 7 or 8 after installing Windows 10.

How to reverse a Windows 10 upgrade

The easiest time to say “No” is during the initial setup process. If you decline Windows 10’s end user license agreement, it’ll bring you back to your older operating system.

But what if it’s too late for that?

RestoreWindows7

You’re allowed to roll back to your previous Windows version for 30 days after upgrading to Windows 10. Simply open the Start menu and head to Settings > Update & Security > Recovery. If you’re eligible to downgrade, you’ll see an option that says “Go back to Windows 7” or “Go back to Windows 8.1,” depending on which operating system you upgraded from. Simply click the Get started button and go along for the ride.

Once you’ve returned to your previous version of Windows, you need to tinker with it to perfect your setup once again. In particular, you may need to reinstall some programs, and don’t forget to use your Windows 7 password rather than your Windows 10 password if you created a Microsoft Account for the new operating system during the set-up process.

Stop it from happening again

Once you’ve upgraded a PC to Windows 10, you’ll always be able to do so again in the future. But if you aren’t enticed by Windows 10’s best features and more subtle awesome tweaks—a feeling I completely understand after a non-consensual upgrade—you can turn to a pair of helpful tools to disable the Windows 10 upgrade prompts from returning.

GWX Control Panel was the first anti-Windows 10 pop-up tool on the block, and it works marvelously, though its complicated user interface is full of granular options and may turn off some people. Never10 by noted security researcher performs the same basic task in a much simpler way. Either program does the trick.

GWX Control Panel and Never10 will also prevent your computer from being upgraded to Windows 10 if it hasn’t yet. Installing one of those is a much better option than disabling Windows Updates completely to avoid Microsoft’s pestering, as disabling patches can leave you vulnerable to new security flaws.

Now for the good news: Microsoft says it plans to phase out the GWX pop-up once it starts charging for the Windows 10 upgrade in July. Fingers crossed.

Have questions?

Get answers from Microsofts Cloud Solutions Partner!
Call us at: 856-745-9990 or visit: https://southjerseytechies.net/

South Jersey Techies, LL C is a full Managed Web and Technology Services Company providing IT Services, Website Design ServicesServer SupportNetwork ConsultingInternet PhonesCloud Solutions Provider and much more. Contact for More Information.

To read this article in its entirety click here.

Office 365 Activation: How to Fix

Imagine you are a customer of Microsoft’s Office 365 service, including a subscription to the Office desktop applications like Word, Excel and Outlook.

One day you click on the shortcut for Word, but instead of opening, it just shows a “Starting” splash screen which never progresses.

Being smart, you try to start Word in safe mode by holding down the Ctrl key, but the exact same thing happens.

Annoying, when you want to do your work. What is going on?

We took a look at a case like this. Two things you should do (after the usual reboot):

1. Look in the event viewer. Here, we found a clue that the issue is related to software activation, specifically Event 2011 “Office Subscription Licensing exception”:

2. For all things related to Office licensing, open a command prompt, go to (for example) C:\Program Files (x86)\Microsoft Office\Office16, and type:

cscript ospp.vbs /dstatus

In this case we got the following:

This told us that Windows thinks TWO product keys for Office are installed. One has expired, the other is fine.

The guilty party may (or may not) be the trial version of Office typically pre-installed with a new PC. Or it could be a consequence of changing your Office 365 subscription. Neither would be the fault of the user, who is fully licensed and has done nothing other than follow Microsoft’s normal procedures for installing Office 365.

Solution: we reinstalled Office from the Office 365 portal, and attempted to remove the dud product key with:

cscript ospp.vbs /unpkey:<Last five characters of product key>

as explained here. All is well for the moment.

Activation and subscription license checking is for the benefit of the vendor, not the user, and should never get in the way like this.

Further, cannot Microsoft find some way of informing the user when this happens, and not have Word simply hang on starting? How difficult is it to check for licensing and activation issues, and throw up a message?

CALL US NOW!