

5 things to do before giving an old iPhone or iPad to your kid

Don’t hand over an aging iOS device to your eager youngster before doing a little kid-proofing first.
Like it or not, little kids love iPhones and iPads. They love to look at them, they love to tap and swipe the screen, they love playing iPhone games, and most of all, they love watching videos on them. (“Curious George” is my daughter’s favorite—for this week at least.) Giving your little ones a hand-me-down iOS device is an easy way to satisfy their desire for a screen of their own—my kid is the proud owner of an iPhone 3GS and a third-generation iPad. That said, you shouldn’t hand over your old iPhone or iPad without doing some kid-proofing first. Read on for five ways to prep an aging iPhone or iPad for your youngster, from wiping your data and setting up a child’s iCloud account to blocking web access and keeping her from racking up in-app charges on your credit card.
Wipe your old data
Before you hand over your old iPhone to your kids, you’ll want to make sure any and all of your personal data has been wiped clean. The best way to do so is to perform a “factory” reset, which wipes the iPhone’s storage and returns it to its factory settings.

Make sure to back up and then wipe your data before handing over your old iPhone to your child.
Naturally, you should first make sure you’ve backed up any old iPhone or iPad data you want to preserve. You may already have taken care of this step if you’ve previously upgraded to a new iPhone or iPad and restored your data from iCloud. If not, tap Settings, tap your iCloud profile, then tap iCloud > Backup > Back Up Now. You can also back up your old iPhone or iPad by connecting it to your Mac or PC and syncing it with iTunes.
Once you’re satisfied that your data is safe and sound, go ahead and wipe the device. Tap Settings > General > Reset > Erase All Content and Settings. Once the reset is complete, your old iPhone or iPad will return to its factory settings, just like the day it came out of the box.
Create a child’s iCloud account
While it may seem a little soon to, say, create an Apple ID for a toddler, take it from me: it won’t be long before your onesie-clad cutie is walking, talking and pleading for an iPhone upgrade—and when that happens, it’ll be easier to migrate her data and apps if she already has her own iCloud account.
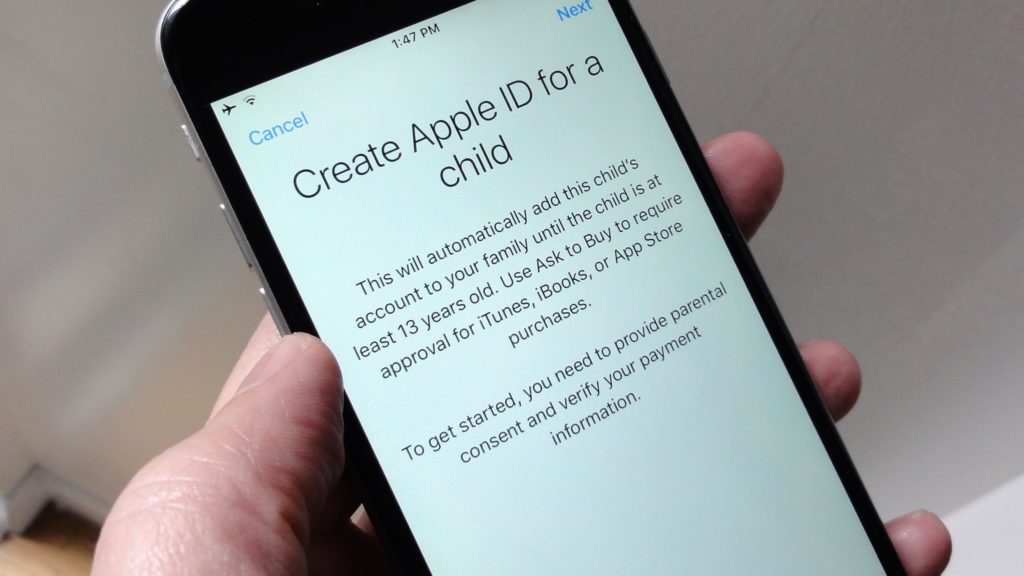
Just because your child is under 13 doesn’t mean she can’t have her own iCloud account and Apple ID.
Even if your kid is younger than 13 years old, she can still have her own iCloud account and Apple ID. All you need to do is create the account under iOS’s “Family Sharing” umbrella. With her iCloud account, your child will be able to sign in to an old iPhone or iPad, download apps, and even purchase items from the App Store—only with your approval, of course.
Also, keep in mind that just because she has an iCloud account, your daughter or son won’t be able to start web surfing, tweeting, or posting selfies on Instagram without your say-so. (More on iOS’s parental controls in a moment.)
You can create a child’s iCloud account directly on your own iPhone or iPad. Just tap Settings, tap your iCloud username, then tap Family Sharing > Add Family Member > Create an Apple ID for a child.
You’ll need to enter your kid’s birthday, agree to some disclosures and legalese, choose a payment method for App Store purchases (which, again, you can control and/or block), then choose an Apple ID username and password.
By default, your kid’s new iCloud account won’t let her make App Store purchases without your consent. To double-check the “Ask to Buy” setting, tap Settings, tap your iCloud account name, then tap Family Sharing and your kid’s name.
Control what your kid can—and can’t—do on her iPhone or iPad
Once you’ve got your old iPhone or iPad set up with your child’s new iCloud account, it’s time to make some decisions on which iOS features will be fair game for your kid, and which will be off-limits.

Don’t want your child surfing the web or snapping photos on her hand-me-down iPhone? You can block those activities in iOS’s Restrictions settings.
Tap Settings > General > Restrictions > Enable Restrictions, then create a Restrictions passcode.
Next, scroll down and disable all the iOS features that you’d rather your kid not mess with. You’ll probably want to disable Safari and the iTunes store right away. You may also want to block your child from installing apps, and if you don’t want your little one snapping a million photos of their crib, you might want to nix the Camera app, too.
In the “Allowed Content” section, make sure to disable in-app purchases, as well as block music with explicit music and any grown-up movies, TV shows and books.
In the Privacy section, you can control which apps can access location services, contacts, the microphone, and more on your kid’s iPhone.
At the bottom of the Restrictions screen, you can also disable access to multiplayer games, friend adding, and screen recording for any Game Center-ready games.
Hide Settings, Mail, and other Apple apps
Even after you’ve thoroughly managed all of iOS’s Restrictions settings, you may still see some home-screen icons on your kid’s iPhone or iPad that you’d rather she not mess with. For example, the Settings icon should probably stay out of her hands, as well as the Mail app, Game Center, and the App Store.
You can hide the Mail, App Store, and other Apple apps in a folder, preferably on its own home screen in the back.
Here’s what I did before I gave my daughter my old iPhone: I hid all those various Apple apps in a “Hidden” folder in the very last iOS home screen. To create a home screen folder, drag one app icon on top of another, name the folder, then start dragging other app icons into the newly created folder.
Naturally, older kids who are a bit more iOS savvy may quickly sniff out the “Hidden” folder. My five-year-old, for example, knows exactly where I’ve tucked away the Settings icon, but she doesn’t really care—probably because tapping Settings won’t get her any closer to Curious George.
Turn on Airplane mode
One way to make sure your little one doesn’t wander into a grown-up corner of the Internet on her iPhone is to cut off Internet access altogether, and the easiest way to do that is to turn on Airplane mode. (Of course, you can kiss Airplane mode goodbye once your children start clamoring for the streaming PBS Kids video app, which they’ll do once they hit about 3 or so.)
Just tap Settings, then flip on the Airplane Mode switch.
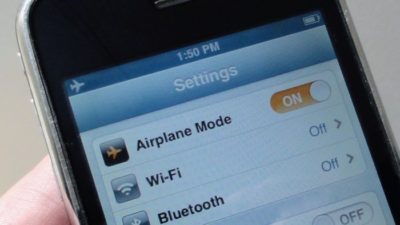
Turning on Airplane mode is an easy way to keep tiny iPhone users off the Internet.
If your old iPhone or iPad is running on iOS 6 or later, you may also want to disable home-screen and in-app access to Control Center, the flip-up control panel that includes an Airplane Mode button, To do so, tap Settings > Control Center, then switch off the Access on Lock Screen and Access Within Apps settings. That won’t completely disable Control Center, but at least it’ll make it a tad more challenging to find.
Have questions?
Get answers from Microsofts Cloud Solutions Partner!
Call us at: 856-745-9990 or visit: https://southjerseytechies.net/
South Jersey Techies, LL C is a full Managed Web and Technology Services Company providing IT Services, Website Design Services, Server Support, Network Consulting, Internet Phones, Cloud Solutions Provider and much more. Contact for More Information.
To read this article in its entirety click here.