Back to Top

Tech, Web, Cloud & Cabling Services

Category: Tips & Info

Tips & Info Category

Maximize Your Windows 7 Experience

If you’re one of the many business users who has not upgraded their computer to Windows 10, there are still resources to boost your experience. Here are 10 tips for getting the most out of the OS.

Windows 10 faced a controversial roll-out, with privacy concerns, bugs, and other issues plaguing many users. And as of August 2016, just 1% of business machines had upgraded to Windows 10, according to a study from Softchoice. Instead, 91% of the machines were operating with Windows 7—an 18% increase over the same period of time in 2015.

“It seems businesses don’t see an urgent need to move operating systems, so long as their cloud-based applications are still running fine on Windows 7,” Softchoice’s Microsoft director Craig McQueen wrote in a press release at the time. “In addition to the security benefits, I think once organizations grasp the user benefits—such as touch and Cortana—we will start to see a boost in adoption.”

While experts predict Windows 10 deployments will pick up this year, it’s important for those still using Windows 7 for business to get the most out of their machines. Here are 10  articles with Windows 7 tips that will help enterprise users operate the machines more effectively.

1. 10 ways to speed up Windows 7

While Windows 7 generally performs well, over time, the system can slow down and require some care to get it back up to speed. The OS also contains certain features that users can take advantage of to improve overall performance. Here, we outline 10 steps business users can take to enhance the performance of your Windows 7 system.

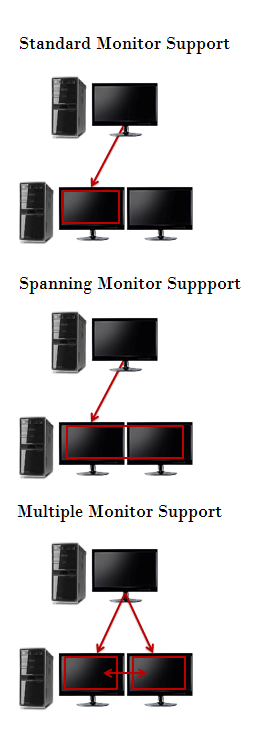
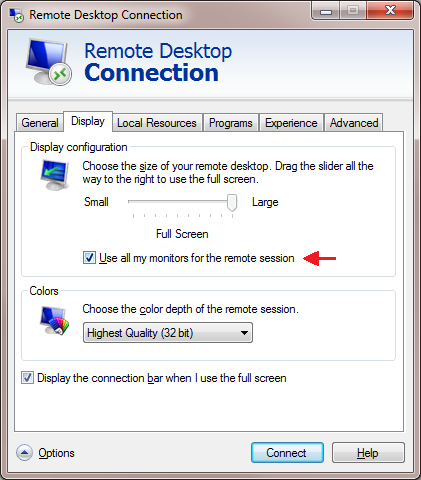
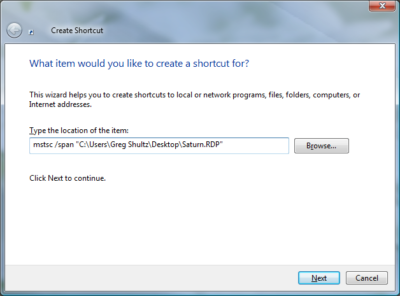
2. Use multiple monitors with Windows 7’s Remote Desktop Connection

Windows 7 allows users to connect to a remote computer and utilize the local system’s multiple monitors. Here is a step by step advice on how to configure and operate multiple monitors using Windows 7’s Remote Desktop Connection, as well as how to connect to and from Windows versions that do not support this feature.

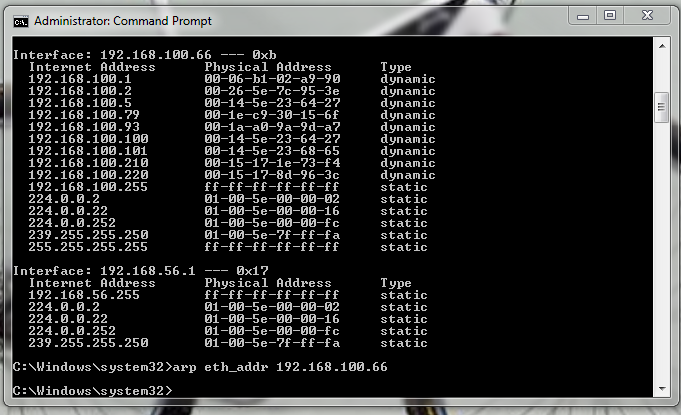
3. Quick Tips: Flush the ARP cache in Windows 7

The Address Resolution Protocol (ARP) cache is an important part of IP networking on any OS, as it links Ethernet addressing to hardware addressing. Newly mapped addresses are saved in an ARP cache, which is usually fine, but can sometimes cause issues with internet connections and web page loading times. Here, are the necessary steps to clear the ARP cache, and how to manage it going forward.

4. 10+ Windows 7 services you may not need

While every version of Windows includes a core set of system services, business users can disable some that are not necessary in order to improve performance and security. In this article, we highlight 13 services that users can disable if they so choose on Windows 7 systems that will likely not have any impact on business operations, including IP Helper, offline files, and Network Access Protection.

5. 10 Windows 7 commands every administrator should know

IT staff who troubleshoot Windows 7 problems often have to dive into the command line. Here, are 10 fundamental Windows 7 commands that are useful for IT administrators, including System File Checker, File Signature Verification, and Driverquery.

6. Modifying the Windows 7 boot loader with the Boot Configuration Data Editor tool

In Windows Vista and later versions of Windows, the bootloader was moved from boot.ini to a utility called BCDEdit. This article walks users through how to modify the boot config data using this tool.

7. Change and customize Windows 7’s Logon screen wallpaper

Changing and customizing the Windows 7 Logon screen wallpaper is easy once you know the steps, as Microsoft built the ability to change the wallpaper right into the OS, as opposed to needing any third-party software. Here, we offer a tutorial on doing so.

8. Change the Processor Affinity setting in Windows 7 to gain a performance edge

Most applications have been designed for multi-core processors, and work with an OS to distribute their operations evenly across cores to enhance performance. However, you can sometimes achieve better overall performance from certain applications by configuring them to run on different processor cores, which Windows 7 allows via the Processor Affinity setting. In this article, we explain two ways to change the Processor Affinity setting in Windows 7.

9. Use Windows 7 Event Viewer to track down issues that cause slower boot times

Experiencing a slow Windows 7 boot time? You can use Windows 7’s Event View to investigate the source of the problem. The Event Viewer includes a category of event logs called Applications and Services Logs, which track key elements of the OS. Here, we explain how it is possible to find out how long it took to boot up your system every time, since the day Windows 7 was first installed, along with instances where boot time slowed down, all through these logs.

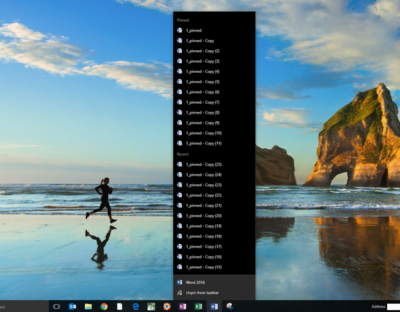
10. Tag your files for easier searches in Windows 7

This article, walks users through how to tag files to make them searchable via the Search filters built into Windows Explorer’s Search box in Windows 7. It’s possible to do this easily from many applications while saving a file. The ability to more easily find files is a boon for business users who want to enhance their productivity.

Have questions?

Get answers from Microsofts Cloud Solutions Partner!
Call us at: 856-745-9990 or visit: https://southjerseytechies.net/

South Jersey Techies, LL C is a full Managed Web and Technology Services Company providing IT Services, Website Design ServicesServer SupportNetwork ConsultingInternet PhonesCloud Solutions Provider and much more. Contact for More Information.

To read this article in its entirety click here.

Windows 7 Remote Desktop Connection

In Windows 7 you can connect to a remote computer and take full advantage of your local system’s multiple monitors. Here’s how.

If you’re using multiple monitors on your system setup and you regularly connect to other systems via Remote Desktop, you know how frustrating it is to go from a multiple-monitor display to a single-monitor display for your remote connection. If so, you’ll definitely want to learn how you can take advantage of multiple monitors in Microsoft Windows 7’s Remote Desktop Connection.

However, before going any further it is important to understand right off the bat that multiple-monitors support in Windows 7’s Remote Desktop is available only on Windows 7 Ultimate and Windows 7 Enterprise. (It is also available in Windows Server 2008 R2.) Furthermore, both the local and remote systems must be running one of the supported versions. For example, Windows 7 Ultimate is running on the local and Windows 7 Enterprise is running on the remote.

As long as you have the proper configuration, Windows 7 provides you with real multiple-monitor support as opposed to the monitor-spanning feature that was introduced in the previous version of Remote Desktop Connection. This means that in Windows 7 you can use this feature to connect to a remote computer and take full advantage of your local system’s multiple monitors on your remote system.

In this edition of the Windows Desktop Report, we’ll describe Windows 7’s Remote Desktop support for multiple monitors and show you how to configure it for connecting to other Windows 7 systems. we’ll also show you how to use Remote Desktop’s monitor-spanning feature when connecting to, and from, Windows versions that do not support the multiple-monitors feature.

What’s the difference?

Before we get started, let’s take a moment to discuss the different types of Remote Desktop monitor configurations you can have when using a system with multiple monitors. In the standard type of connection, Remote Desktop displays the remote system in a window on one monitor. In a connection configured with the monitor-spanning feature, Remote Desktop displays the remote system in a window on one monitor but allows you to drag or span that window across multiple monitors. In a connection configured with the multiple-monitors feature, Remote Desktop makes the remote system behave as if it were physically connected to multiple monitors. Each of these configurations is illustrated in Figure A.

Figure A

There are three types of configurations you can use when using Remote Desktop on a system with multiple monitors.

Configuring a multiple-monitors connection

If you have the proper setup, configuring Windows 7’s Remote Desktop multiple-monitor feature is easy. To begin, Launch Remote Desktop Connection and select the system you want to connect to with multiple-monitor support from the Computer drop-down list. Then, click the Options button to expand the Remote Desktop Connection window so that you can see all the tabs. Next, choose the Display tab and select the Use All My Monitors for the Remote Session check box, as shown in Figure B. To complete the procedure, return to the General tab and click the Save button.

Figure B

Selecting the Use All My Monitors for the Remote Session check box is all that is needed to enable the multiple-monitor feature.

When you connect to the remote system, the remote system’s monitor will instantly fill your multiple monitors, just as if it were physically connected to the monitors.

Configuring a monitor-spanning connection

As mentioned, in a connection configured with the monitor-spanning feature, Remote Desktop allows you to drag or span the window across multiple monitors. However, there are a couple of caveats. First your multiple monitors must have the same screen resolution. Second, the monitors must be aligned, or positioned, side-by-side. Third, the combined screen resolution of your multiple monitors must be under 4096 x 2048.

To launch Remote Desktop Connection with monitor-spanning support, just click the Start button and type the following command in the Start Search box. (Alternatively, you can open a Command Prompt window and type the same command.)

Mstsc /span

When you do, you’ll see the standard Remote Desktop Connection dialog box, and you can launch the connection as you normally would. As soon as you make a connection, you’ll immediately see the desktop of the remote system spread across your multiple monitors. If you need to have access to both the local and remote desktops, you can reduce the size of the remote system’s desktop to only one monitor by clicking the Restore Down button on the Remote Desktop window. As a shortcut, you can also use the keystroke: [Ctrl][Alt][Break].

Once the window is on one monitor, you use click and drag to resize the window to completely cover a single monitor. Keep in mind that when you reduce the size of a spanned remote widow, it will display both horizontal and vertical scroll bars, as shown in Figure C, that you’ll have to use to see the entire screen. However, you can instantly span the window by clicking the Maximize button.

Figure C

When you resize the remote desktop’s spanned window, you’ll have to use scroll bars to view the entire screen.

Creating a shortcut

Of course, using a command line to launch your Remote Desktop connection isn’t the most convenient way to use the monitor-spanning feature. Chances are that you already have a Remote Desktop Connection RDP file saved on your desktop. If so, you can create a standard Windows shortcut that will incorporate both the special command line and your RDP file.

To begin, right-click anywhere on the desktop and then select New | Shortcut from the context menu. When you see the Create Shortcut wizard, just type mstsc /span and the path to the RDP file in the text box, as shown in Figure D. Be sure that you enclose the path to the RDP file in double quotes if the path has spaces in it. To continue, click Next and give the shortcut an appropriate name, such as Saturn – Remote Spanning, and then click Finish.

Figure D

You can create a standard Windows shortcut that will incorporate both the special command line and your RDP file.

You can now use this shortcut to launch your remote desktop connection and span the Remote Desktop window across all the available space on your multiple monitors. Of course, the spanned desktop won’t exactly behave like a multiple-monitor setup when you open multiple windows. As such you’ll have to use a little creative click-and-drag resizing to reposition the windows on the spanned desktop.

Have questions?

Get answers from Microsofts Cloud Solutions Partner!
Call us at: 856-745-9990 or visit: https://southjerseytechies.net/

South Jersey Techies, LL C is a full Managed Web and Technology Services Company providing IT Services, Website Design ServicesServer SupportNetwork ConsultingInternet PhonesCloud Solutions Provider and much more. Contact for More Information.

To read this article in its entirety click here.http://www.techrepublic.com/blog/windows-and-office/use-multiple-monitors-with-windows-7s-remote-desktop-connection/

Emergency Fixes for Windows Server, VPN bugs

Microsoft has released emergency out-of-band (OOB) updates to address multiple issues caused by Windows Updates issued during the January 2022 Patch Tuesday.

January 2022 Patch Tuesday

This update addresses issues related to VPN connectivity, Windows Server Domain Controllers restarting, Virtual Machines start failures, and ReFS-formatted removable media failing to mount.

All OOB updates released are available for download on the Microsoft Update Catalog, and some of them can also be installed directly through Windows Update as optional updates. You will have to manually check for updates if you want to install the emergency fixes through Windows Update because they are optional updates and will not install automatically.

Windows 10 – KB5010793
Details Here

Option 1: Run Windows Update, KB5010793 will appear under optional download.

Option 2: Download the patch from there: Microsoft Update Catalog
Please download the matching Windows 10 Version.

Windows 11 – KB5010795 or KB5008353 (may vary based on Windows Edition)
Details Here

Option 1: Run Windows Update, KB5010795 will appear under optional download. Select and install.

Option 2: Download the patch from there: Microsoft Update Catalog

If you have any questions, please call us at (856) 745-9990.


If you’ve ever owned a PC with a DVD drive, you may get a $10 settlement

Don’t expect your money anytime soon, however.

DVD drives may be a thing of the past, but the past could pay you $10 via a proposed settlement from a class-action suit.

If you purchased a DVD-ROM, DVD-RW or combination drive between April, 2003 and December 31, 2008, a collection of DVD drive manufacturers have tentatively agreed to pay you $10 per drive, whether you purchased the drive as part of a PC or by itself. You’ll simply need to visit the claim site and testify (under penalty of perjury) that you indeed purchased those drives within the given time period, and live in one of the 23 states (plus the District of Columbia) covered by the suit. The deadline to file is July 1.

Why this matters: Though the optical drive market continues to decrease—“the physical disk format is somewhat obsolete in the era of content streaming,” IDC wrote last year—that wasn’t the case fourteen years ago, when virtually all software was distributed via DVD-ROM. Fortunately, the settlement site isn’t asking for proof of purchase yet, but it reserves the right to do so. Filing a claim can take literally seconds, but don’t hold your breath—you’ll probably receive compensation, but there’s no guarantee.

The wheels of justice turn slowly

Simply put, a group of 23 plaintiffs sued virtually every DVD drive manufacturer, alleging that they collectively conspired to keep drive prices higher than they normally would be, in violation of antitrust laws. Though the defendants denied they did anything wrong, several—Hitachi-LG, Panasonic, NEC, and Sony—settled and agreed to pay a collective total of $124.5 million into four separate settlement funds.

(Note that only DVD drives for PCs are covered; a DVD player, such as the one gathering dust in your living room, isn’t.)

If you do submit a claim, however, the chances of receiving your settlement soon are slim. That’s because seventeen more defendants, including various subsidiaries of BenQ, Philips, Samsung, TEAC, and Pioneer, have yet to settle, and the suit will continue until all of the claims are resolved.

“Because other defendants remain in this litigation, the plaintiffs are proposing that distribution of the settlement funds not occur at this time,” the settlement site reads. “This is to save the expenses associated with distribution.”

In fact, the settlement hearing to finally approve the Hitachi-LG-Panasonic-NEC-Sony agreement will be held on December 8. After that, payments may begin—which means that you’ll probably receive your $10 or less a year from now. Yes, less: Payments will be “up to” $10 per drive, according to the claims site.

You should probably treat the settlement like one of those “print out your own rebate” slips from the turn of the century. Even under the best of circumstances, chances are you’ll have totally forgotten about your $10 windfall by the time the check arrives.

Have questions?

Get answers from Microsofts Cloud Solutions Partner!
Call us at: 856-745-9990 or visit: https://southjerseytechies.net/

South Jersey Techies, LL C is a full Managed Web and Technology Services Company providing IT Services, Website Design ServicesServer SupportNetwork ConsultingInternet PhonesCloud Solutions Provider and much more. Contact for More Information.

To read this article in its entirety click here.

The 15 most frightening data breaches

data breaches


Ashley Madison (2015)

All data breaches are scary, but some just have that extra scream factor.

In arguably the most embarrassing data breach of the bunch, a group calling itself “The Impact Team” stole 37 million records from adultery website Ashley Madison, including many records that customers had paid to have deleted.

Virtually all of the company’s data was stolen in the hack, including records that suggest most female accounts on the site are fake, and that the company used female chat bots to trick men into spending money.

LivingSocial (2013)

Daily deals company LivingSocial had its network compromised in 2013, with hackers stealing roughly 50 million names, email addresses, birthdays, and encrypted passwords from its SQL database.

Sony PlayStation Network (2011)

Game over, man. In April 2011, hackers raided Sony’s PlayStation Network (PSN) service, stealing personally identifiable information from more than 77 million gamers.

Sony was further criticized for delaying the release of public information about the theft and for storing customer data in an unencrypted form.

The attack took Sony’s PSN out of service for 23 days.

Internal Revenue Service (2015)

Nigerian scammers pilfered more than $50 million from the U.S. Treasury via an embarrassingly simple 2015 hack of the Internal Revenue Service website.

Information scraped from previous data hacks was used to steal Americans’ identities and request copies of past tax returns on the IRS website. The crooks then filed new tax returns with falsified data, requesting big refunds.

The hack caused massive nightmares for the estimated 334,000 people whose records were stolen before the IRS shut down the transcript request service.

Target (2013)

Hackers installed point-of-sale malware on Target’s computer network sometime in 2013, resulting in the theft of more than 70 million customer records. Stolen data included payment card numbers, expiration dates, and CVV codes.

The retailer reached out to affected customers by offering free data monitoring (standard practice) and a 10% off discount on a future shopping trip. But it was too little, too late; same-store sales slid in the quarter following the hack.

Anthem (2015)

Anthem, the United States’ second largest for-profit health insurer, disclosed in February 2015 that it had lost 78.8 million unencrypted customer records to criminals. Names, social security numbers, email addresses, and income data was stolen.

The rare piece of good news: Financial and medical records were not affected.

Adobe (2013)

Adobe revealed in October 2013 that hackers had stolen 38 million active customer IDs and passwords, forcing the company to send out a wave of password reset warnings.

Weeks after, the news got worse for the company: The thieves also made off with the source code for its popular Adobe Photoshop software.

eBay (2014)

Talk about an inside job: In 2004, online auction house eBay suffered the largest hack in U.S. history, losing 145 million login credentials to a hacker using an internal eBay corporate account.

Names, email and street addresses, phone numbers, and birth dates were compromised, but thankfully, passwords were stored in encrypted form.

Home Depot (2014)

In September 2014, Home Depot admitted that it fell prey to hackers who installed antivirus-evading malware on its self-checkout registers. An estimated 56 million sets of customer payment card data were stolen in the attack.

The company’s losses related to the event are expected to top $1 billion when all of the lawsuits are finally settled. Only $100 million of that will be covered by insurance.

JP Morgan Chase (2014)

The September 2014 breach of JP Morgan Chase proved that even the largest U.S. banks are vulnerable to data theft. Online banking login details were not stolen, but crooks did get their hands on 76 million sets of names, emails, addresses, and phone numbers of bank customers, creating serious phishing concerns.

A group of Russian hackers is believed to be responsible for the attack.

PNI Digital Media (2015)

PNI Digital Media, the company that handles online photo printing for CVS, Walgreens, Rite Aid, Costco, and many more national chains, lost an unknown number of customer records to hackers in 2015.

Given that the company boasted more than 18 million transactions in 2014, it’s likely that this breach affected tens of millions of Americans.

Heartland (2008)

Credit and debit card processing firm Heartland Payment Systems became one of the largest data breach victims in U.S. history when hackers compromised more than 130 million accounts in 2008.

The criminal ring involved in the Heartland data theft was also found to be responsible for the 2005 hack of TJX Companies involving 94 million records.

TJX Companies (2005)

In a 2005 scheme dubbed “Operation Get Rich or Die Tryin,” a group of hackers used an unsecured Wi-Fi network at a Marshalls store to break into parent TJX Companies’ computer system and steal 94 million customer records, including payment card data.

Albert Gonzalez, the ringleader of the hack, is serving a 20-year sentence in Leavenworth.

U.S. Office of Personnel Management (2015)

Earlier this year, the United States Office of Personnel Management admitted that hackers had taken 21.5 million records belonging to those who had undergone government background checks or otherwise applied for federal employment. The hackers stole a wealth of sensitive data, including security clearance information and fingerprint data belonging to secret agents.

The Washington Post reported that the attack is believed to have originated in China.

Zappos (2012)

In January 2012, online shoe retailer Zappos stated that cybercriminals had stolen data of 24 million customers, including names, addresses, and the last four digits of their payment cards.

After the announcement, Zappos had to disconnect its phone lines to keep upset customers from calling in and overloading its phone system.

Have questions?

Get help from IT Experts/Microsofts Cloud Solutions Partner
Call us at: 856-745-9990 or visit: https://southjerseytechies.net/

South Jersey Techies, LLC is a full Managed Web and Technology Services Company providing IT Services, Website Design ServicesServer SupportNetwork ConsultingInternet PhonesCloud Solutions Provider and much more. Contact for More Information.

To read this article in its entirety click here.

Simple steps to stay on top of your mobile data usage

Apps not required

Businessman in suit, jacket,shirt, tie, using his smart phone

Who said you needed to install something to control your mobile data use? Your iOS and Android devices come with all the tools you need to stay below your data cap. It takes a few taps to turn them on and configure them, which is exactly what we’re going to help you with.

Easy in Android

MobileDataUsage2

Tracking and limiting your data usage is easy on an Android device. There are a number of options available to stop yourself from going over the data limit.

The simplest solution is to activate two options under the Data Usage menu in your phone’s Settings app: Limit Mobile Data Usage and Alert Me About Data Usage. Toggle these two switches to on and your phone will turn off cell data once you reach a certain point, as well as warn you when you start getting close. Adjusting those thresholds is as simple as dragging a little line up or down.

Control data use per app

MobileDataUsage3

Scroll a bit further down in the Data Usage menu and you’ll find a list of apps sorted by how much mobile data they use. Click on one of those apps and you’ll see a few more options. Toggling Restrict Background Data on will stop the app from doing anything in the background, unless you’re connected to Wi-Fi.

App-specific options

MobileDataUsage4

Turning the Background Data Restriction on brings you face to face with a popup warning you that doing so might mess with the app’s performance. It also directs you to the View App Settings button, where you can change the settings right in the app.

In my experience going into the app hasn’t been necessary—just toggle the data restriction option on, but know that your weather, email, Twitter feed, and other apps that require a constant connection might not update without your telling them to (provided you’re not on Wi-Fi).

Other Android tips

MobileDataUsage-5

There are two other nifty things you can do on Android to save data: use the Chrome Data Saver and store frequently used Google Maps locations offline.

Chrome Data Saver is turned on by opening Settings in Chrome. Swipe down to the bottom of the menu and you’ll see Data Saver. Open that menu and turn it on—that’s it! Data Saver compresses incoming web traffic to save space, and it really doesn’t have that much effect on your experience.

Google Maps offline

MobileDataUsage6

Storing map data offline is a good idea whether you want to save data or not. It makes your commute smoother, and longer trips will never leave you without a map in unfamiliar territory. It’s easy to do, too.

Open the menu in Google Maps. You’ll see Offline Areas right in the first few options—that’s what you want to select. From there click the plus sign and you’ll see a map highlighted with a blue circle. Pinch to zoom in or out, tap download, and it will download anything inside the square.

Managing data on an iPhone

MobileDataUsage-7

iOS users aren’t nearly as fortunate as Android users when it comes to built-in data capping options. There are still a few ways to track and limit your data use, but if you’re hoping for an Android-like option that terminates data once you near your cap you’re out of luck.

Controlling background data

MobileDataUsage8

It’s simple to disable background app data in iOS. Open up the Settings app, and tap Cellular. Once you’re there, scroll down a bit and you’ll see a list of every single app you have installed. Tap to turn off the ones you want to stop from using cell data—that’s it!

App-specific options

MobileDataUsage-9

Disabling background use is one thing, but you can save even more data by tweaking options specifically to different apps. In the Settings app, scroll down a bit to see a list of all the apps you have installed. Tap one and you’ll see a list of app-specific options.

You can turn off cellular data for an app, background refresh, and location services, all which will eat up your data bit by bit.

Disable Wi-Fi Assist
MobileDataUsage-10

iOS devices have the option to hop to their cell networks when Wi-Fi signal is weak. Disabling this can save you a bit of data, but it’s all dependent on how often you have to deal with weak Wi-Fi.

You’ll find the toggle for Wi-Fi Assist at the bottom of the Cellular page.

Good luck saving that data

Mobile payment

Seven or eight gigs might seem like a lot, but constant travel, mobile gaming, and video streaming can eat that up before you know it. Hopefully some of these options will help save you megs and bucks!

Have questions?

Get answers from Microsofts Cloud Solutions Partner!
Call us at: 856-745-9990 or visit: https://southjerseytechies.net/

South Jersey Techies, LL C is a full Managed Web and Technology Services Company providing IT Services, Website Design ServicesServer SupportNetwork ConsultingInternet PhonesCloud Solutions Provider and much more. Contact for More Information.

To read this article in its entirety click here.

Preparing Your IT Network For A Severe Storm

South Jersey Techies wanted to provide you with some suggested preparations to safely secure your workstations and networks from any storm damage.

Suggestions for Storm Preparations in Your Office:

  • Time to do backups of all data: Make back-ups of all data processing software, files, records, etc.  and transport back-ups off-site, via disk, USB drive or in the cloud.
  • Document the layout: Get all of the network addresses, the router and firewall configurations.
  • Shut off all sensitive electrical equipment, such as computers.
  • Ideally all electronic devices should be unplugged or plugged into surge protectors.
  • Review inside storage arrangements and relocate all important materials and equipment to safe areas away from windows.
  • Update call lists and contact info: All key personnel need to register their updated cell numbers, home email addresses, and physical addresses.
  • Leave before you need to: Don’t get stuck in traffic, airports, train stations and in queues. Give yourself ample time.

If you need your data backed up or are unsure as to the last time a backup occurred, please contact our Support Team.  We are here to help ensure that your data is safe and that you are able to be up and operating as soon as the storm passes. Our Support Team can be reached at (856) 745-9990 or by emailing us at support@sjtechies.com.

Suggestions for Storm Preparations in Your Home:

  • Monitor National Weather Service forecasts at http://weather.gov .
  • Bring outdoor objects, such as lawn furniture, garbage cans and other loose items, inside the house or tie them down securely.
  • Make backups of computer data (consider storing in the cloud or on a USB drive), keep computers or other sensitive electronic devises plugged into a surge protector or unplug entirely.
  • If you have a sump pump for your basement, make sure it’s working.
  • If the power goes off, unplug appliances like refrigerators and freezers and sensitive electronic equipment like TVs and computers so that they won’t overload when power is restored.
  • Keep family supplies on hand, such as:
    • Water, one gallon per day, per person
    • Food, non-perishable food (keep a manual can opener handy) and pet supplies, if needed
    • Medications, contact lenses, glasses and first aid kit
    • Batteries, flashlights and battery operated radios
  • Keep cell phones charged while possible, and if possible, have extra charged cell phone batteries.
  • Keep copies of any important documents either scanned or digitally saved on a USB drive, off-site or in a plastic bag.
  • Car filled up with gas; keep some water, food, first aid kits, contacts, blankets and pet supplies in the car as well.

If you have any issues or questions, please feel free to contact our support team by email at support@sjtechies.com or telephone at (856) 745-9990.

Microsoft announced Attack Simulator for Office 365 Threat Intelligence


Admins can send simulated phishing and attack emails to find security and training weaknesses.

A few weeks ago, Microsoft released a public preview for Attack Simulator for Office 365 Threat Intelligence. On April 17th Microsoft announced that Attack Simulator is now generally available. Attack Simulator for Office 365 Threat Intelligence is available to all Office 365 E5 or Office 365 Threat Intelligence customers.

With Attack Simulator, customers can launch simulated attacks on their end users, determine how end users behave in the event of an attack, and update policies and ensure that appropriate security tools are in place to protect the organization from threats.  The GA of Attack Simulator adds a new HTML editor so realistic looking HTML emails can be sent in simulations of spear-phishing.  Also, two spear-phishing templates are available for immediate use in the spear phishing simulation.

Attack Simulator includes the three attack scenarios from our public preview.

Display Name Spear Phishing Attack: Phishing is the generic term for socially engineered attacks designed to harvest credentials or personally identifiable information (PII). Spear phishing is a subset of this phishing and is more targeted, often aimed at a specific group, individual, or organization.  These attacks are customized and tend to leverage a sender name that generates trust with the recipient.

Password Spray Attack: To prevent bad actors from constantly guessing the passwords of user accounts, often there are account lockout policies.  For example, an account will lockout after a certain number of bad passwords are guessed for a user.  However, if you were to take a single password and try it against every single account in an organization, it would not trigger any lockouts.  The password spray attack leverages commonly used passwords and targets many accounts in an organization with the hope that one of the account holder uses a common password that allows a hacker to enter the account and take control of it.  From this compromised account, a hacker can launch more attacks by assuming the identity of account holder.

Brute Force Password Attack: This type of attack consists of a hacker trying many passwords or passphrases with the hope of eventually guessing correctly. The attacker systematically checks all possible passwords and passphrases until the correct one is found.


This video demonstrates how Attack Simulator can help organizations educate users to become more secure from cyber threats.  With Attack Simulator, admins can train all their end users, and especially those who are attacked most often.  This proactive training is a powerful way to ensure that your organization can prevent the impact from advanced threats.  Over the coming months, more threat simulations will be added to Attack Simulator so organizations can simulate the most prevalent threat types from the modern threat landscape.

Experience the benefits of Attack Simulator for Office 365 Threat Intelligence by beginning an Office 365 E5 trial today.  Also, learn more about how Microsoft leverages threat intelligence and the value of threat intelligence.

Quick Tips: Flush the ARP cache in Windows 7

Here’s how to clear the Address Resolution Protocol cache and how to manage that cache with a few command switches.

The Address Resolution Protocol (ARP) cache is a crucial component of IP networking on any operating system. What ARP does is link Ethernet addressing (IP addressing) to hardware addressing (MAC addressing). Without this system, a machine could not communicate to the outside world as one addressing scheme could not communicate with the other.

The ARP Cache is a collection of ARP entries (mostly dynamic) that are created when a hostname is resolved to an IP address and then an IP address is resolved to a MAC address (so the computer can effectively communicate with the IP address).

When this happens, the PC will store that newly mapped address in the ARP cache, and it will stay there until the ARP cache entry timeout expires. This isn’t usually a problem, but sometimes a bad ARP entry can cause issues with Internet connections and Web page loading. When this occurs, one step that can be taken toward resolution is to clear the ARP cache. Yes, this means the ARP cache has to be rebuilt, which means a little more work for the PC, but that cache will rebuild fairly quickly.

Clearing the ARP cache is done completely through the command line, so stretch out those fingers and get ready to type. After we show you how to clear the ARP cache, we will show you how to manage that cache with a few command switches.

Flush the cache

Step 1: Open the command prompt

Click Start and then type “cmd” (no quotes) in the search dialog box, but don’t hit Enter yet. Right-click the cmd.exe icon and select Run as Administrator (Figure A). After answering the UAC, the terminal window will open offering up the command prompt.

Figure A

If the icon is already pinned in the Start menu, entering cmd is not necessary.

Step 2: Run the commands

The first command to run is

arp -a

This command will display all your ARP entries (Figure B). Naturally the -a option is not the only option available. The arp command also allows for the following switches:

-d Delete an IP address (arp -d 192.168.100.10)
-d -a Delete all entries in the ARP table
-s Add an entry to the ARP table (arp -s ADDRESS MAC_ADDRESS – Where ADDRESS is the address to be added and MAC_ADDRESS is the MAC address of the machine)

Figure B

Here you see the arp cache for two different interfaces on a single machine.

To flush the entire cache, issue the following command:

netsh interface ip delete arpcache

The above command will flush the entire ARP cache on your system. Now as soon as network connections are made, the ARP cache will begin to repopulate.

Verify the flush

Once you have flushed the ARP cache, make sure to issue the command arp -a to see if the cache has, in fact, been flushed. If it does not flush, it could be the system is a victim of a Windows bug caused when Routing and Remote Services is enabled. This is a simple bug to fix:

1.           Click Start | Control Panel.

2.           Click Administrative Tools.

3.           Click Computer Management.

4.           Double-click Services and Applications.

5.           Double-click Services.

6.           Scroll down to Routing and Remote Services.

7.           Double-click Routing and Remote Services.

8.           Set the Startup Type to Disable.

9.           Make sure the service is stopped.

Now try flushing the ARP cache again. It should work this time.

Troubleshooting

It is also possible to troubleshoot network connections using the ARP cache. For example, it is important to look out for invalid ARP entries that go to a MAC address of 00-00-00-00-00-00. If one such entry shows up, make sure to delete it from the cache using the -d switch. Say you have an ARP entry that looks like:

224.0.0.24           00-00-00-00-00-00 static

In order to delete this entry, use the arp command like so:

arp -d 224.0.0.24

And that invalid entry will be gone.

Final thoughts

There are so many ways to troubleshoot networking connections. Flushing the ARP cache is just one of those methods that is rarely thought of, but when all else fails this might be the last-gasp effort that makes you the hero of the day.

Have questions?

Get answers from Microsofts Cloud Solutions Partner!
Call us at: 856-745-9990 or visit: https://southjerseytechies.net/

South Jersey Techies, LL C is a full Managed Web and Technology Services Company providing IT Services, Website Design ServicesServer SupportNetwork ConsultingInternet PhonesCloud Solutions Provider and much more. Contact for More Information.

To read this article in its entirety click here.

Windows 10 hack: How to beef up your jump lists to show more pinned items

The Windows 10 jump lists feature offers a convenient way to start your apps–but there’s no easy way to increase the size of the list. Here’s a hack for that.

giphy

Microsoft Windows 10 gives users several choices when it comes to how and where to start their applications. Some people use the desktop exclusively and some swear by the Start Menu, while others, prefer the pinned lists that hang off the icons on the Taskbar.

However, there is one small problem with the Taskbar pinned list in Windows 10—by default, there is a 12-slot limit.

Windows 7 allowed users to extend that number with a simple change to a configuration setting. But that feature is currently missing in Windows 10 for reasons no one has been able to explain. The workaround involves editing the Windows Registry file.

Standard disclaimer: Incorrectly editing the Windows Registry file could break your computer. Create a Restore Point before making any changes.

Jump listItems

Figure A shows an example of the default jump list hanging off the Word icon in a typical Windows 10 Taskbar. Note that there are 26 copies of the example file, but only 12 are listed in the pinned section. This is despite the fact that I have actually pinned them all, which is why the Recent section is fully populated.

Figure A

addpinnedlist

To increase the number of pinned items displayed, we’ll have to change the maximum number of jump list items associated with a particular key in the Windows Registry file.

Press Windows key + R or right-click the Start Menu icon and navigate to the Run command to open the Run prompt (Figure B). Type regedit into the box and click OK.

Figure B

addpinnedlist1

Navigate to this set of keys in the Windows Registry:

HKEY_CURRENT_USER\SOFTWARE\Microsoft\Windows\CurrentVersion\Explorer\Advanced

Look through the list in the right-hand pane until you find this DWORD: JumpListItems_Maximum

In case, the JumpListItems_Maximum DWORD is not there, create it.

Right-click the JumpListItems_Maximum DWORD and select Modify. Click the Decimal radio button and change the number to a value that works for you. As you can see in (Figure C).

Figure C

addpinnedlist2

To complete the change, you may need to restart your computer. You should now be able to see the number of pinned items you specified (Figure D).

Figure D

addpinnedlist4

Have questions?

Get answers from Microsofts Cloud Solutions Partner!
Call us at: 856-745-9990 or visit: https://southjerseytechies.net/

South Jersey Techies, LL C is a full Managed Web and Technology Services Company providing IT Services, Website Design ServicesServer SupportNetwork ConsultingInternet PhonesCloud Solutions Provider and much more. Contact for More Information.

To read this article in its entirety click here.

CALL US NOW!