Back to Top

Tech, Web, Cloud & Cabling Services

Category: Tips & Info

Tips & Info Category

ActiveSync Limits – Exchange 2010 SP1

es10sp1

Exchange 2010 Service Pack 1 restricts the number of ActiveSync devices (=EAS PartnerShips) by setting the default to allow up to only 10 devices.  This default helps eliminate resources from being monopolized.

Limiting ActiveSync devices is for the new feature “Throttling” which manages Exchange performance. Throttling enforces bandwidth limits by tracking consumed resources per user.

Run command in cmdlet to adjust ActiveSync limits:

 Set-ThrottlingPolicy –EASMaxDevices # –Identity DefaultThrottlingPolicy_hex_string

  • Change # to the number of devices.
  • Run  Get-ThrottlingPolicy to find out the hex_string identity.


Features the iPhone Could Use

Untitled2

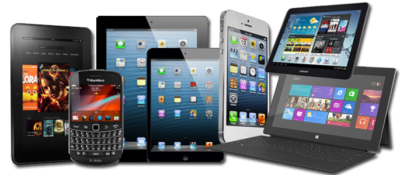
iPhone 5 is the fastest, thinnest and lightest iPhone;  nevertheless many features remain absent that are provided by Apple’s competitors. 

NFS Built-In

Apple prefers to use Passbook system instead of Near Field Communication (NFC).  Passbook is not capable of performing all tasks that NFC can handle such as the ability to beam content by touching devices or send money via PayPal wirelessly.

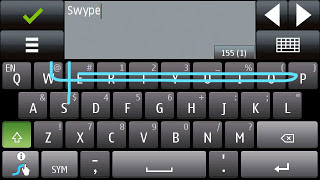
Swypeswype-symbian

“Swype is a faster and easier way to input text on any screen.”

Swype gives your phone the capability to input text by sliding your finger from letter to letter accross the screen.  Only Android smartphones offer this input ability.

SD Cards

iPhone’s are not built to extend device storage using external SD Cards, Micro SD Cards or Mini SD Cards.

Storage

Many iPhone user’s have replaced their iPod’s with their smartphone.  The storage capacity for an iPhone (64GB) versus an iPod Classic (160GB) is not comparable. 

USB

iPhones have never used a standard USB cable to sync.  Currently, iPhone 5 uses a new MicroDock connection that will not allow older sync cables to connect without a specific adapter.

Micro HDMIUntitled3

Android devices have a Micro-HDMI port for retrieving video from your phone. iPhone 5 requires a special adapter or an Apple TV to retrieve video.

Changing the Battery

Although, iPhone 5 provides a stronger battery, some users require more power but replacing an iPhone battery is challenging.  To replace the battery it requires a special screw driver and special tools to lift the screen 90°.

Battery Life

While the iPhone 5’s battery is larger that the iPhone 4S, it produces the same battery life because of the bigger screen and power to run 4G LTE.

Implementing BYOD

BYOD

Bring-Your-Own-Device (BYOD) is permitting employees to bring personal devices (laptops, tablets, and smart phones) to their workplace, and use those devices to access company information and applications.

Create a Private App Store

Designing a private App Store provides the ability to manage custom and purchased apps.  Businesses can manage apps by pushing mandatory apps, approving recommended apps and blocking rouge or unrelated apps.

Policy Compliance

Policies ensure security, productivity, protection of resources and reduce risks.  Implementing a location-based service (LBS) such as Geo-Fencing and GPS will set limitations on access to data based on location.

Strong Security

There are many layers of security for a BYOD environment.  Device enrollment can be a one-time passcode and/or Active Directory credentials.  Applying user profiles will distribute policies, restrictions and Apps based on logical groups (department/location/device type).  Other types of security are tracking device locations, Remote Lock, Complete Wipe and Corporate Wipe.

Track Usage

Usage thresholds can be monitored based on talk, text, data and roaming for each user.  Setting up alerts and reports for misuse, excessive bandwidth, additional charges and security exposures will help track usage appropriately. 

Banning Rouge Devices

Compromised devices such as “jail broken” iPhone or a rooted Android should be restricted from accessing enterprise data and resources.  Compromised devices are susceptible to virus attacks.

For more information on Mobile Device Management

Contact us at 856-745-9990 or click here.


10 Ways to Survive a System Outage

Fact: Something is broken – you need to get to work.

toolbox1.  Stay calm.

Remaining calm is the best strategy to surviving a system outage and keeping your focus on the current task.  Also, remaining calm will produce less emotional and techinical errors in a workplace.  

2.  Notify all users.

Proactively preparing for a system outage would include creating a Notification Plan based on different scenarios.  Using company e-mail, instant messaging, have a Co-Worker announce the outage or put a sign up saying “System is down.  Working on it now!”.

3.  Recruit a “buffer” to answer any questions.

After the initial notification, users will have many questions.  It would be ideal to recruit someone who is available to answers those questions, especially ETA questions.

4.  Be polite and understanding.

Remember to be polite and understanding when it comes to upset users.  In Step 1, keeping your focus on the current task to avoid making errors, also try to avoid “play-by-play” status updates.

5.  Documentation.

Always document each step of the recovery process.  Start with the initial problem or outage, followed by what you find, what commands you used, what errors you received and all attempts to fix the outage.  Lastly, document the steps that resolved the outage.

6.  Present the facts.

During the resolution process and the aftermath, always remain honest and present the facts.  If you caused the problem or outage, do not try to cover it up because it will complicate the process of resolving the outage.

7. Take your time.

Although, time is of the essense when system is down, take your time while troubleshooting.  If you are not sure what will resolve the problem, taking your time and implementing different solutions at a steady pace will allow you to narrow down the exact problem and resolution.

8.  Call Support.

Having product support is an essential tool for IT departments.  Calling support and submitting a ticket may consist of being on hold, waiting for a call back and sometimes an onsite visit can be a smart business decision.

9.  Stay positive.

Staying positive and continue building a knowledge of system events will prepare you for problem situations.  Having strong work relationships with co-workers will be useful for emergency situations.

10.  Be Prepared.

To be prepared for every system problem is almost impossible.  Continue building a knowledge of your environment is the strongest way to prepare for problem situations, previously mentioned in Step 9.


Windows 8 – Access Windows XP Apps

Client Hyper-V is a virtualization tool that comes with Windows 8 Professional and Windows 8 Enterprise.  Using Client Hyper-V can run Windows XP applications on a Windows 8 machine.  This tool requires that your system has a minimum of 4GB of RAM, 64-bit CPU that supports Second Level Address Translation (SLAT).  Also, the key virtualization feature must be enabled prior to setup.
6388488-620-290

Step 1 – Getting Started with Windows 8 Client Hyper-V

Step 2 – Installing Client Hyper-V

Step 3 – Create a Virtual Switch

Step 4 – Create a Virtual XP Machine

Step 5 – Setup USB Access

Step 6 – Install RemoteApp Tool

Step 1 – Getting Started

Launch and verify System Information:

  • To access the Apps Search page:  [Windows] + Q keystroke.
  • In the text box type msinfo32 and click msinfo32.exe.
  • Scroll to the bottom of the right panel and the following values are set to Yes:  (If the Second Level Address Translation Extensions or the Data Execution Protection values are set to No, then you will not be able to use Windows 8’s Client Hyper-V.)
      1. Hyper-V – VM Monitor Mode Extensions
      2. Hyper-V – Second Level Address Translation Extensions
      3. Hyper-V – Virtualization Enables in Firmware
      4. Hyper-V – Data Execution Protection.

Enabling Virtualization through Setup Utility

    • Before the operating system loads, boot into your Setup Utility.
    • Select Computer Setup (If applicable)
    • Scroll to Security drop-down menu and select System Security.

  • Enable Virtualization Technology.
  • Save Changes and Exit.

Go to Step 2 – Installing Client Hyper-V.

Step 2 – Install Client Hyper-V

    • To access the Programs and Features tool:  [Windows] + X keystroke.
    • Select Turn Windows Features on or off (located in the left panel).
    • Select the Hyper-V box.

  • Click OK.  After Installation there will be a prompt to Restart the system.

Go to Step 3 – Create a Virtual Switch.

Step 3 – Create a Virtual Switch

For a VM to connect to your network or Internet, the VM must be connected to a Virtual Switch.

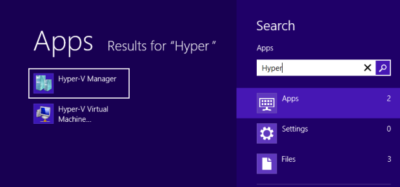
  • Open Hyper-V Manager (Start Screen)
  • In the Actions Pane, select Virtual Switch Manager.
  • Choose the type of Virtual Switch you would like to create:  External*, Internal and Private
    1. External:  Connection with entire network and Internet.
    2. Internal:  Connection with “Host” machine network connection only.
    3. Private:  Connection with other virtual machines only.
  • After selecting the type, another window will open where you can Name the switch and add the Description.
  • Click OK.  Then click Yes to “Apply Networking Changes”.

In a typical Client Hyper-V Configuration, you will not use the following settings:

    • “Enable virtual LAN identification for management operating system in the VLAN ID” check box.
    • Extensions (Located under the Virtual Switch on the left panel).

  • MAC Address Range (Global Network Settings on the left panel).

Go to Step 4 – Create a Virtual XP Machine.

Step 4 – Create a Virtual XP Machine

  • Open Hyper-V Manager (Start Screen)
  • In the Actions Pane, select New and then Virtual Machine…
  • Before You Begin window, click Next.
  • Specify Name and Location window, you can name your VM and where you would like to save it, then click Next.
  • Assign Memory window, type the amount of memory you would like to allocate for the VM (8MB – 1804MB), then click Next.
  • Configure Networking window, click Next.
  • Connect Virtual Hard Disk window, you can Create a virtual hard disk, Use an existing virtual hard disk or Attach a virtual hard disk later, then click Next.
  • Installation Options window, you can Install the OS laterInstall an OS from a boot CD/DVD or ISOInstall OS from boot floppy disk or Install OS from a netowrk-based installation server.
  • Then click Next to view the Summary or click Finish to complete the setup.

Setting up the Networking settings for an XP machine requires additional steps.

  • Open Hyper-V Manager (Start Screen)
  • In the Actions Pane, select Settings…
  • Select Legacy Network Adapter in the “Add Hardware” section, then click Add.
  • In the “Legacy Network Adapter” section, select the Virtual Switch you created in the last step.
  • Click Apply and then OK.

Installation:

    • Insert the Windows XP CD into the computer.
    • Open Hyper-V Manager (Start Screen)
    • Select your VM and then in the Actions Pane, select Connect.
    • Click the Green Power Button.

  • Once Windows XP Installation appears, follow all of the installation steps.

Go to Step 5 – Setup USB Access.

Step 5 – Setup USB Access

Client Hyper-V does not support USB access.  Setting up a Remote Desktop Connection allows the XP Virtual Machine to access USB devices while also providing a full screen display and better performance.  For Remote Desktop Connection to work the Host and Client machines must be setup on the same Workgroup.

Host Machine Setup:

      • To access the System window:  [Windows] + [Break] keystroke.
      • From this window, you can change your Computer Name and the Workgroup name.
      • Restart machine.

Client Machine Setup:

      • Open Hyper-V Manager (Start Screen)
      • Select your VM and then in the Actions Pane, select Connect.
      • Click the Green Power Button.
      • To access the System window:  [Windows] + [Break] keystroke.
      • Select the Remote tab, check the box to “Allow users to connect remotely to this computer“.
      • Click Apply and OK.
      • Select Computer Name tab, you can change your Computer Name and the Workgroup name.
      • Restart machine.

Setting up initial remote connection:

    • Acccess the App Search Page on the Host Machine:  [Windows] + Q keystroke.
    • In the text box type Remote and click Remote Desktop Connection.
    • Remote Desktop Connection window, click the Show Options button.
    • Type:  Windows XP System name and Windows XP User name, then click Save As and assign a Connection name.
    • Select the Local Resources tab, in the Local devices and resources section, click More.
    • Select all the devices you would like access to, and then click OK.
    • Return to the General Tab and click Save.

  • Select Connect.
  • After logging in you can install XP drivers, install a printer and access Host machine files.

Go to Step 6 – Install RemoteApp Tool.

Step 6 – RemoteApp Tool

RemoteApp tool can directly access Windows XP applications from Windows 8.

Install RemoteApp Update

  • Open Hyper-V Manager (Start Screen)
  • Select your VM and then in the Actions Pane, select Connect.
  • Open IE, go to Microsoft Download Center, and search for Enable Remote App.
  • Select “Update for Windows XP SP3 to enable RemoteApp” and click Download.
  • Follow instructions to install RemoteApp, select Finish.  After Installation there will be a prompt to Restart the system.

Modify the Registry

  • Open Run [Windows] + R keystroke.
  • In the text box type Regedit to open Registry Editor.
  • Go to:  HKEY_LOCAL_MACHINE\SOFTWARE\Microsoft\Windows NT\CurrentVersion\Terminal Server\TSAppAllowList
  • In TSAppAllowList, select fDisabledAllowList, change the value from 0 to 1.
  • Click OK.

File Path to EXE for Programs (For each Application)

  • Locate the application shortcut.
  • Right click on it.
  • Select the Properties.
  • In the Properties dialog box, select the Find Target button.
  • Copy the path and executable file name.
  • Log off but keep the Virtual Machine running.

Customize RDP File (Saved in Step 5)

  • Navigate to your RDP file and copy/paste a copy of the file.
  • Rename the copy to an *Application*.rdp.  (Example:  Outlook.RDP)
  • Open the file using Notepad and make the following changes:
    • Locate:
      • remoteapplicationmode:i:0
      • alternate shell:s:
    • Change to:
      • remoteapplicationmode:i:1
      • alternate shell:s:rdpinit.exe
    •   Add:
      • disableremoteappcapscheck:i:1
      • remoteapplicationname:s:{Application Name}
      • remoteapplicationprogram:s:{Path to executable file}
  • Select File and Save.

Return to Step 1 – Getting Started with Windows 8 Client Hyper-V.


Tips to Troubleshoot Outlook

microsoft-outlook

Microsoft Outlook can connectivity issue with Microsoft Exchange.  Troubleshooting and fixing these issues can range from a simple reboot to creating a new mail profile.

Restart Outlook and/or Computer

Many connectivity problems with Outlook can be resolved by simply restarting Outlook and/or the Computer.

  1. Restart Outlook.
  2. After restarting Outlook, verify connectivity.
  3. If there are still connectivity problems, restart Computer.
  4. Once computer is up and running, verify connectivity in Outlook.

Outlook3

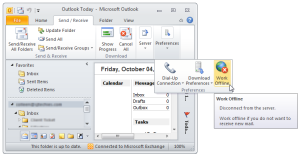
Offline Mode

 Outlook 2010 and newer:

  1. Click the Send/Receive tab.
  2. Locate the Work Offline button.
  3. Click the Offline button. 

Outlook 2007 and older:

  1. Click File Menu.
  2. Uncheck the Offline box.

At the bottom of your Outlook Window there will be a “Trying to Connect” prompt.  If  Outlook is “Connected” the problem is solved.

Rebuild PST or OST File

OST File

  1. Close Outlook.
  2. Open the Control Panel.
  3. Select Mail icon.
  4. In the next window, click Data Files.
  5. Locate your data file, select and click Open File Location.
  6. Locate the data file using Windows Explorer.
  7. Rename the file extension from .OST to .OLD
  8. Close these windows and open Outlook

PST File

  1. Search for scanpst.exe using Windows Explorer.
  2. Double click scanpst.exe to run the application.
  3. In the next window, click Browse.
  4. Locate your .pst file.
  5. Click Start.
  6. Scanpst will scan the data file eight times.  
  7. If the scan finds errors, there will be a prompt to repair. For backup purposes, check the Make Backup Of Scanned File Before Repairing box.
  8. Click Repair.
  9. Close these windows and open Outlook

outlook2

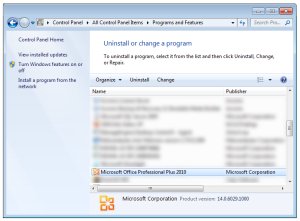
Repair Software Install

  1. Open Control Panel.
  2. Click Programs and Features.
  3. Scroll down and highlight the Microsoft Office installation.
  4. Click Change.
  5. Select Repair.
  6. Click Continue.
  7. Allow the repair to complete.
  8. Reboot your computer. 

outlook

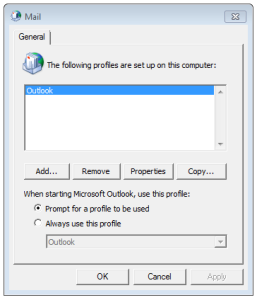
Recreate Mail Profile

  1. Open Control Panel.
  2. Click Mail.
  3. Select Show Profiles.
  4. Click Add.
  5. Name the new profile.
  6. Follow the steps for the Outlook Account Setup Wizard.
  7. Verify the new profile and set as the default or delete old profile. 


New Security Threat: CryptoWall


crypt

In October of last year news broke about a new form of malware called Cryptolocker. This malware posed a particularly large threat to many business users and led to many quick and important security updates. Now, almost a year later, it appears that the second version of this – CryptoWall – has been released and is beginning to infect users.

What is Crypto malware?

Crypto malware is a type of trojan horse that when installed onto computers or devices, holds the data and system hostage. This is done by locking valuable or important files with a strong encryption. You then see a pop-up open informing you that you have a set amount of time to pay for a key which will unlock the encryption. If you don’t pay before the deadline, your files are deleted.

When this malware surfaced last year, many users were understandably more than a little worried and took strong precautions to ensure they did not get infected. Despite these efforts, it really didn’t go away until earlier this year, when security experts introduced a number of online portals that can un-encrypt files affected by Cryptolocker, essentially neutralizing the threat, until now that is. A recently updated version is threatening users once again.

Cryptolocker 2.0, aka. CryptoWall

Possibly because of efforts by security firms to neutralize the Cryptolocker threat, the various developers of the malware have come back with an improved version, CryptoWall and it is a threat that all businesses should be aware of.

With CryptoWall, the transmission and infection methods remain the same as they did with the first version: It is most commonly found in zipped folders and PDF files sent over email. Most emails with the malware are disguised as invoices, bills, complaints, and other business messages that we are likely to open.

The developers did however make some “improvements” to the malware that make it more difficult to deal with for most users. These changes include:

  • Unique IDs are used for payment: These are addresses used to verify that the payment is unique and from one person only. If the address is used by another user, payment will now be rejected. This is different from the first version where one person who paid could share the unlock code with other infected users.
  • CryptoWall can securely delete files: In the older version of this threat, files were deleted if the ransom wasn’t paid, but they could be recovered easily. In the new version the encryption has increased security which ensures the file is deleted. This leaves you with either the option of paying the ransom or retrieving the file from a backup.
  • Payment servers can’t be blocked: With CryptoLocker, when authorities and security experts found the addresses of the servers that accepted payments they were able to add these to blacklists, thus ensuring no traffic would come from, or go to, these servers again. Essentially, this made it impossible for the malware to actually work. Now, it has been found that the developers are using their own servers and gateways which essentially makes them much, much more difficult to find and ban.

How do I prevent my systems and devices from being infected?

Unlike other viruses and malware, CryptoWall doesn’t go after passwords or account names, so the usual changing of your passwords won’t really help. The best ways to prevent this from getting onto your systems is:

  • Don’t open any suspicious attachments – Look at each and every email attachment that comes into your inbox. If you spot anything that looks odd, such as say a spelling mistake in the name, or a long string of characters together, then it is best to avoid opening it.
  • Don’t open emails from unknown sources – Be extra careful about emails from unknown sources, especially ones that say they provide business oriented information e.g., bank statements from banks you don’t have an account with or bills from a utilities company you don’t use. Chances are high that they contain some form of malware.

CALL US NOW!