Back to Top

Tech, Web, Cloud & Cabling Services

Category: Software

Software Category

Office 365: New capabilities for iPad and iPhone

New features make Office and OneDrive the best place to work on iPad and iPhone

More and more, people around the world are working on the go, changing locations and devices as they create and collaborate with others throughout their day. As they work across their PCs, Macs and mobile devices, they expect an uncompromising experience that is familiar yet optimized for the device they are using.

Microsoft is committed to providing best in class experiences on all devices, and today, we are proud to share with you a set of new Office capabilities across Word, Excel, PowerPoint, and OneDrive on iOS that will delight and make iPad and iPhone users more productive than ever before.

Real-time co-authoring in Word, Excel, and PowerPoint on iOS – We live in a world where we’re often collaborating with multiple people in different locations and Office 365 provides the broadest and deepest toolkit for collaboration between individuals, teams, and entire organizations. Using real-time co-authoring, colleagues, friends, and family can contribute to and edit documents simultaneously in the Word, Excel and PowerPoint iOS apps. This allows you to know who else is working with you in a document, see where they’re working, and view changes automatically within seconds. The co-authoring experiences are also available in Office Online and the latest versions of Word, Excel and PowerPoint on the PC and Mac, all made possible by storing your documents in OneDrive or SharePoint.

Drag and drop files anywhere with OneDrive – Sometimes your files can get scattered between different folders or even services and applications. Now it’s easier than ever to organize and rearrange your files. You can drag files in between folders in OneDrive and, if your teammates use SharePoint to work together, you can even drag OneDrive files to a SharePoint site giving them immediate access. On iPad, you can also drag files from other apps, such as iMessage, into your OneDrive and drag files out of your OneDrive to other apps.

Drag and drop content between Word, Excel, PowerPoint, and OneDrive on iPad – One of the most common and powerful tasks when creating content is pulling in text, photos, graphs, and other objects from different sources. Now you can pull in content with ease on your iPad with drag and drop support in Office and OneDrive. Easily drag and drop objects from OneDrive or from one Office app to another.

OneDrive Files app support – Today we’re also announcing native support for the Files app in iOS 11. OneDrive integration with the Files app allows you to access, upload, edit, and save your content to OneDrive or SharePoint from apps that support Files app integration. You can also tag and favorite your OneDrive and SharePoint files from within the Files app.

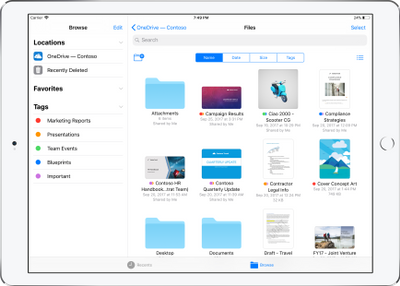
OneDrive redesigned to find the files that matter – The OneDrive iOS app has been redesigned from the ground up with a new layout that uses your screen space more efficiently allowing you to find your files faster. It’s easier to scan across file names, see the information that matters to you, and sort files how you want. New metadata is visible in the list view, so you can easily identify new files and files that have been shared.

Universal link support for shared files – Being able to seamlessly share and securely access files is essential for teamwork. Previously when you received a link to a shared file, you would be directed to a browser and prompted to re-authenticate. Today, we are announcing universal link support, which will open the document directly in the Word, Excel, or PowerPoint iOS apps. Further, if you don’t have a supporting application for the file, you’ll be directed to the OneDrive app to preview the file.

Preview 130+ file types in your OneDrive app – You and the people you work with use a variety of different file formats, but when you’re on your mobile device you might not have access to the native applications for those files. Now, the OneDrive iOS app creates crisp thumbnails and supports large previews of over 130 file types, including Adobe Photoshop and Illustrator, RAW, 3D objects, and high-precision DICOM images. OneDrive lets you open, view, and share all of your files without leaving the app.

New accessibility features for Word, Excel and PowerPoint on iOS 11
The VoiceOver rotor in iOS improves navigation and the accessibility of content. For example, you can use the built-in rotor on iOS to navigate line-by-line or word-by-word and change the speed at which VoiceOver speaks. The new Office-specific rotors also let people with vision impairments navigate more efficiently in Word across tables and links, slides in PowerPoint, and sheets in Excel.

Users can also leverage larger text options in accessibility settings to modify the text size in the core Office apps. Visit the support pages for Excel, Word, and PowerPoint to learn more.

You can use take advantage of these new capabilities in the coming days by updating the Word, Excel, PowerPoint, and OneDrive apps in the Apple App Store.

Save Face at Work with Outlook


1. Save face with MailtipsHave you ever hit “Reply All” to an email when you didn’t mean to? Or sent important information to someone and never gotten a response, only to learn later their email address was invalid? Microsoft Exchange 2010 and MailTips, a new Microsoft Outlook 2010 feature, can help prevent embarrassing mistakes, save you time, and alleviate frustration.Learn more: Turn on or off MailTips
2. Share your scheduleYou can share your calendar with others on a Microsoft Exchange Server—with permission, of course. Or you can publish your default Outlook 2010 to the web, which can allow more people to view it. If you publish your calendar to the web, you don’t have to have an Exchange account, and anyone can see it, even if they don’t have an Exchange account, either.Learn more: Introduction to calendar sharing
3. Stop repeating yourselfDo you do a lot of the same things over and over with emails? Like frequently move messages to a specific folder that you’ve set up? Or often forward messages to your team? Quick Steps in Outlook 2010 can help by turning commands and procedures that you use most often into one click actions.Learn more: Automate common or repetitive tasks with Quick Steps
4. Get in on the conversation—and manage itAt work you may often have conversations over email, where several people are weighing in on important issues. Have you ever missed someone’s response in one of these email conversations? Now you can see your email within the context of the conversation, with Conversation View. See the overall conversation, including your responses, find the most recent response, and easily figure out the message that is most important to you.Learn more: View email messages by conversation
5. Get in on the conversation—and ignore itMaybe you are no longer needed in an ongoing email conversation—or maybe the subject matter is no longer important to you. Whatever the reason, you can prevent additional responses from appearing in your inbox. The Ignore command moves the whole conversation and any future messages that arrive in the conversation to the Deleted Items folder.Learn more: Ignore all email messages in a conversation
6. Let colleagues know when you aren’t aroundIf you’re going to be heading out on vacation or even just away for the day, you can let your colleagues know your schedule and when they can expect to hear from you again. Customize automatic responses to emails you receive whenever you are unavailable.Learn more: Automatically reply to email messages with an Exchange account.
7. Protect what you sendIt’s easy to communicate with pretty much anyone via email. But there are times when you don’t want email you send to be forwarded to others, or printed out, or copied. You can use Information Rights Management (IRM) to help prevent sensitive email from being read, printed, forwarded, or copied by unauthorized people.Learn more: Introduction to IRM for email messages
8. Have it all in one place—and hear it, tooWith Unified Messaging (UM), you can receive email, voice, and fax messages in your Outlook Inbox. If you have an Exchange Server 2010 account, you can get Voice Mail Preview, which delivers both a recording and text that’s been created from the voice recording using automatic speech recognition.Learn more: Introduction to Microsoft Exchange Unified Messaging
9. Contact info is at your fingertipsThanks to the Microsoft Outlook Global Address List (GAL), you no longer have to keep your contacts’ information stored on your computer–where it takes up space and gets out of date before you can manually update it. The Global Address List (GAL) tracks it all for you: phone numbers, building location, email addresses, and more.
10. Make sure they get itNeed to make sure your boss reads an email that you send her? Want to get your team to vote on their favorite restaurant for your team outing? You can add many different types of tracking to your email messages, including delivery and read receipts, voting buttons and follow-up actions.Learn more: Add tracking to email messages
11. Meet anywhere, anytimeGrab them for a meeting–just once or every week–find a meeting room, and even schedule meetings in a different time zone. Clicking the New Meeting button gives you access to everything you need to set up meetings with one or many.Learn more: Schedule a meeting with other people
12. Let someone else mind your calendarYou need to hand over your scheduling responsibilities to someone else—for just a bit, or for a good while. Or maybe you need to manage someone else’s schedule. The Delegate Access feature in Outlook lets meeting requests be received, accepted, and even sent for you by someone else.Learn more: Delegate access: Let someone else mind your calendar
13. Check email from any computerDon’t worry about dragging your laptop with you everywhere you go anymore: You can access your email from any computer connected to the Internet using any major web browser—even if it doesn’t have Microsoft Outlook on it. Outlook Web App (OWA) is a web-based version of Outlook that lets you access and send email, manage your calendar, and more.Learn more: Outlook Web App in Exchange 2010
14. It’s on your phone!Did we say forget about dragging your laptop with you? Well, forget about even needing to have a computer—Windows Phone 7 automatically comes with Office Mobile so you can check and send email, update your calendar, and keep on top of all that you need to.Learn more: Office Mobile site
15. No more extra gearIt used to be that when you were outside of your organization’s firewall, like when you were working from home or traveling, you’d need to log in to Outlook using a virtual private network (VPN) connection, which often required a smartcard or special tokens. Now Outlook offers Outlook Anywhere, an alternative to VPN connections that lets you use Outlook just as you normally do at your organization, without the need for special connections or hardware.Learn more: Use Outlook Anywhere to connect to your Exchange Server without a VPN

Surface Pro

ms_surface_proThe Surface by Microsoft is a crossover between a laptop and a tablet. The Surface Pro is a business tablet that has a detachable keyboard, stylus and a kickstand. Putting the Surface Pro above other tablets is the aptitude to run Microsoft Office programs including Word, Excel and PowerPoint.

Microsoft released a television commercial for the Surface Pro, “The Vibe”, starring Daniel ‘Cloud’ Campos from the original Surface Commercial.  This enthusiastic campaign includes professional dancers as “business people” showing the capabilities of the Surface Pro. Similar to Windows 8, Metro “Modern” UI; the commercial has the same ambiance.

According to IDC, Microsoft has finally made its way to the Top 5 for Tablets. In the first quarter of 2013, Microsoft has 1.8% Market Share. Unlike the first quarter of 2013, Microsoft has 0% Market Share. Also, ASUS moved up from #4 to #3, knocking Amazon down a space.

TopFiveTabletVendors


Which Cell Phone is Right for You?

There are so many choices these days when it comes to choosing a new cellphone or smartphone. Believe it or not there are now utilities out there that can help you make an educated decision based on your answers to a handful of questions. WWW.TopTenREVIEWS.com has a great Mobile Phone Configuration that can guide you in the direction to your perfect phone match. Click Here to be directed to their site to try out this very helpful utility.

Set Up Microsoft Exchange E-Mail on iPhone

Set Up Microsoft Exchange E-Mail on an Apple iPhone, iPad, or iPod Touch3

You can set up Exchange e-mail on an Apple iPhone, iPad, or iPod Touch. When you set up an Exchange account on your device, you’ll be able to access and synchronize your e-mail, calendar, and contacts. If you have a different device, or if you want to connect using POP or IMAP.

How do I set up Microsoft Exchange e-mail on an Apple iPhone, iPad, or iPod Touch?


  1. Tap Settings > Mail, Contacts, Calendars > Add Account.
  2. Tap Microsoft Exchange.
  3. You don’t need to enter anything in the Domain box. Enter the information requested in the Email,Username, and Password boxes. You need to enter your full e-mail address in the Email and Usernameboxes (for example, tony@contoso.com).
  4. Tap Next on the upper-right corner of the screen. Your iPhone will try to find the settings it needs to set up your account. Go to step 7 if your iPhone finds your settings.
  5. If your iPhone can’t find your settings, you’ll need to manually look up your Exchange ActiveSync server name. For instructions for how to determine your Exchange ActiveSync server name, see the Finding My Server Name section below.
  6. In the Server box, enter your server name, and then tap Next.
  7. Choose the type of information you want to synchronize between your account and your device, and then touch Save. By default, Mail, Contacts, and Calendar information are synchronized.
    Caution:
    If you’re prompted to create a passcode, tap Continue and enter a numeric passcode. If you don’t set up a passcode, you can’t view your e-mail account on your iPhone. You can set up a passcode later in iPhone Settings.

Finding My Server Name


If your email program isn’t able to automatically find your Exchange ActiveSync server name, you may need to look it up.

  1. Sign in to your e-mail account using Outlook Web App. For help signing in, see How to Sign In to Outlook Web App.
  2. If you’re connecting to an Exchange mailbox, your Exchange ActiveSync server name is contained in the address bar in your browser when you are signed in to Outlook Web App, but without the leadinghttps:// and without the trailing /owa. For example, if the address you use to access Outlook Web App is https://mail.contoso.com/owa, your Exchange ActiveSync server name is mail.contoso.com.
  3. If you’re unable to connect to your mailbox using the information earlier in this section, you can try using the server name value that you can view in Outlook Web App options. Do the following:
    1. In Outlook Web App, click Options > See All Options > Account > My Account > Settings for POP, IMAP, and SMTP access.
      Note:
      Although you’re not setting up a POP3 account, you will use this value to determine your Exchange ActiveSync server name.
    2. Under POP setting, view the value for Server name.
    3. Try setting up your email using the server name listed on your options page. For example if the value for Server name under POP setting is mail.contoso.com, try using mail.contoso.com as your Exchange server name.

What else do I need to know?

  • If you’re prompted to create a passcode and don’t create one, you won’t be able to send and receive e-mail.

Ten Top Microsoft Office Tips

The ten most popular Microsoft Office tips

Takeaway:  Susan Harkins lists ten most popular Office tips published in the Windows and Office Blog, and the now inactive Office Blog.MS_Office_2007_Logo.svg

When considering tips to share, think about ease-of-use and efficiency. A few naturally rise to the top as your favorites. For your commemoration, here are 10 of 2012’s most popular posts from both the Office Blog, which was deactivated in mid-2012, and the current Windows and Office Blog. Thank you for reading, and thank you for sharing your thoughts and enhancements with one another throughout the year.

1: A quick Word trick for typing text into a scanned document

The response to this limited technique surprised me. It’s something only a few will use, but if you’re one of those few, it can be a big help! I was pleasantly surprised at the positive response it received and the way readers enhanced the technique.

2: Use Word macros to save your place in a document

These two short macros make quick work of bookmarking work areas in a Word document. When the built-in navigation techniques just don’t get the job done for you, consider these macros or one of the alternative methods that readers shared.

3: A quick and dirty way to compare columns of Excel data

This quick Go To comparison solution is great for a one-time task. Comparing Excel data is a common task, and I receive frequent questions for solutions. This solution is a great one to add to your bag of tricks.

4: Demystify Excel’s PivotTable feature with this simple method

Sometimes a great tip doesn’t offer a specific solution, but rather guides you to using a feature more efficiently and effectively. Users tend to ignore Excel’s pivot table feature because they don’t really understand it – hence this blog post offers some quick insight into how to use this feature without mind-bending tricks.

5: Create a dynamic Excel chart and make your own dashboard

This blog post is one of my favorites. I enjoyed sharing the technique, but more than that, I loved the way the readers jumped in to help one another with a step I accidentally omitted in the instructions. TechRepublic readers rock!

6: A quick Excel keyboard trick for selecting large ranges

This technique uses Go To ([F5]) in an unusual way – to anchor two cells, creating a range. The ensuing conversation shared a number of great selection tips!

7: Three tips for rounding Excel time values

Using the right function can help you round up your rounding woes. Excel offers three rounding functions and knowing them all will round out your skills nicely. (Okay, I promise to stop that.)

8: Three things you must do when you inherit an Excel workbook

I review a lot of workbooks, so this blog was one of my favorites to write. In my experience, performing these three quick tasks when inheriting a workbook can speed up your troubleshooting time. Fortunately, it sparked some insightful conversation into what others do.

9: Launch Word with the most recently used document

Reader response sometimes surprises me, as it did for this easy technique. I hadn’t expected so many great alternatives from the readers.

10: Run a list of rolling credits at the end of your PowerPoint presentation

I’m glad a PowerPoint technique made the top list, but it wasn’t because the readers loved my technique. Mostly, the conversation centered on the typo I missed, and then my lack of proper contrition for said typo. It was fun while it lasted.

10 ways to control your inbox in Outlook 2010

You can prevail in the seemingly endless battle against email chaos — it’s just a matter of knowing which Outlook tools to use and how to set them up to fit your needs.
When oh when oh when will we ever feel that we are back in control of our Inboxes? It seems that the faster technology moves, the more mail pours in on us from all sides. We get messages from colleagues and peers, from family and friends, from causes and social media sites. Much of this stuff we need to know, of course. But it doesn’t need to take up permanent residence in our Inboxes. Here are some practical ways to use Outlook 2010 features to bring your Inbox back under control.
1: Use Conversation view
Conversation view is a new feature in Outlook 2010 that threads together all e-mail messages in a particular conversation among two or more people. The conversation includes sent and received messages so that you can easily see the whole conversation at a glance. Turn on Conversation view by clicking the View tab and clicking Conversations. Choose Show Messages In Conversations to get started. You can also set other options, such as Always Expand Conversations, in the Conversations list to set up the conversation display the way you want it.
2: Ignore threads that annoy you
Have you ever been cc’d on a conversation that made your eyes roll up in your head? Or perhaps two team members are debating the use of the serial comma and you really have other things you need to focus on today. You can ignore a conversation and remove yourself from receiving further posts in that particular thread. Click the last message in the thread you want to ignore. Then, in the Home tab, click Ignore in the Delete group. A message box appears telling you what to expect. Click Ignore Conversation to complete the job.
You can opt out of future messages in conversations that leave you cold.
3: Automate message management with Quick Steps
Quick Steps are a new feature in Outlook 2010 that enables you to automate mail management tasks with a single click of the mouse. You can use the Quick Steps that come with the program — Add To Calendar, To Manager, Done, Team E-mail, and Reply & Delete — to instantly send messages where they need to go. You can also create your own Quick Steps by clicking the More button in the Quick Steps gallery and choosing Create New.
4: Build your junk mail file
This may seem like a no-brainer, but it is important to right-click any junk message you receive, point to Junk, and click Block Sender. Over time, this creates quite a file of spammers and other unwanted senders you can immediately cut right out of your Inbox real estate. Nice.
5: Make your peace with AutoArchive
Those of us who like to have quick access to important messages may not be too comfortable letting Outlook wrap old messages up in a bundle and tuck them away in an archive file on our computers or the company server. But if you’re game, AutoArchive can help you keep your Inbox uncluttered. By default, AutoArchive is turned off. You can enable the feature and tailor your settings by clicking the Folder tab and clicking AutoArchive Settings in the Properties group. In the AutoArchive tab, select the Archive This Folder Using These Settings option and enter the age of items you want to archive, where you want the older items stored, and whether you want the removed items to be deleted from your Inbox. After you make your choices, click OK to save the changes.
Out with the old and in with the new with AutoArchive.
6: Who makes the rules around here?
Sometimes rules aren’t such a bad idea, especially if you manage huge volumes of email and you need to organize what you receive by client, project, or contact. You can easily create rules that file your messages for you so that you can read them in detail when you get a chance or put your fingers on the one you need quickly when you go searching for it. Start by clicking the message from the sender you want to create a rule to manage. Then, click Rules in the Move group of the Home tab and choose Create Rule. Enter the desired conditions (Who is the message from? What’s in the subject line?) and choose what you want Outlook to do with it. Click OK to create the rule, and Outlook will start carrying out your wishes with the very next email message you receive.
7: Get rid of those invitations
Outlook includes a number of options that make it easy for you to tailor how mail behaves after you receive it. Some messages you really don’t need to leave in your Inbox forever. Case in point: meeting invitations. You can tell Outlook to automatically delete any message you respond to by displaying the Outlook Options dialog box (click File, click Options, and click the Mail tab). Scroll down to the Send Messages area and click the Delete Meeting Requests and Notifications From Inbox After Receiving check box. Click OK to save the change.
8: Clean everything up
So do you have a clean Inbox? One where you can go directly to a message you’re looking for without a lot of searching and scrolling? Do you organize your messages by folder and discard the ones you don’t need right away? I thought so. Me neither.
Outlook includes a few cleanup features that can help you create some breathing room in your Inbox once again. The tool gives you three choices for the item you want to clean up. You can clean up the selected conversation, clean up the current folder, or clean up folders and subfolders (which means everything). When you click the tool, Outlook lets you know that it’s going to delete redundant messages and put them in your Deleted Items folder. You can change that by clicking Settings and entering the settings you’re most comfortable with. Click OK to clean up your selection and gain a little more room for incoming mail.
9: Search smart using filters
People shy away from Outlook filters because they think they are too much trouble to use properly. But actually, the opposite is true. If you consider the time you spend pushing PgDn and scanning the various messages looking for that one you need, you know that any tool that helps you cut to the chase is a good thing. The filters in Outlook help you find messages that meet specific criteria. For example, you can instantly display only messages that have attachments, messages you sent to a specific person, messages with the word “petunia” in the body of the message, and so on. Once you create this focused subset of messages, you can do what you like with them — delete them, put them in a folder that won’t clog up your Inbox, or print them and hang them on your cubicle wall (but why?). You’ll find the filters in the Filter E-mail tool in the Find group of the Home tab. You can click More Filters to display the Search Tools contextual tab so that you can see all the filters together in convenient spot.
10: Combine and conquer
Okay so it may seem counterintuitive, but it actually saves you time to bring all your different Web-based email accounts into Outlook 2010. You can easily set up your accounts by clicking the File tab and choosing Add Account in the top of the center column in the Info tab of Backstage view. Follow the prompts to get the email working properly. This will create a new email folder for your Web-based account. So anytime you check email (or Outlook does it automatically), all accounts are checked and you never have to go out to the various sites, enter your email address and password, and do the checking yourself. Yes, it could give you more messages to deal with. But after reading through the other nine tips in this article, you have a handle on how to do that, right?

Popular Tools in Excel 2013

Excel 2013 has easy access tools that generate professional-looking results quickly.  There are several new features with the new version that should not be overlooked.

Flash Fill

Flash Fill identifies and adapts to basic formatting to automatically input your data.  This tool performs several tasks such as merging information from multiple columns, adding formatting to current column and fixing anomalies with data.  Flash Fill will recognize and apply the selected format to your data but if data differs from row to row, it will not format correctly.

EFF1

Recommended Charts

rcRecommended Charts identifies data guides the user to choose the best chart type for their data.  The main objective of using a chart is to highlight your work in a significant way.

      1. Open the Excel Spreadsheet needed to create a chart.
      2. Select the Insert Tab.
      3. Select the Recommended Charts button to see suggested charts.

Recommended PivotTables

rptRecommended PivotTables are interactive tables that can analyze data, compare data and detect patterns/relationships.  In previous versions, PivotTables were too complex.

      1. Open the Excel Spreadsheet needed to create a table.
      2. Select the Insert Tab.
      3. Select the Recommended Charts PivotTables to see suggested tables. 

Quick Analysis

Quick Analysis is an additional way to generate a chart for data. To generate a chart to highlight your work in a significant way, select the data and click the Quick Analysis Icon.

Untitled

Timelines

Timelines let you filter through PivotTables, similar to a slicer.  The timeline will be embedded alongside the Pivot Table.

  1. Select the PivotTable.
  2. Click the contextual Analyze Tab.
  3. Select Insert Timeline (in the Filter Group).
  4. Then select OK.
  5. In the upper-right corner you can select years, quarters, months or days.

Excel_New_Ftrs.FigE

Cloud Support

Cloud Support by Microsoft allows users to save Excel files to SkyDrive or SharePoint site.  Saving to SkyDrive or a SharePoint site allows users to review and edit files from any device with an Office 365 subscription.

Apps for Excel

appsMicrosoft offers Apps for Excel to enhance what you can do with Excel.  Categories for Apps include Content Management, Financial Management, Productivity, Workflow and Process Management and many more. 

Present Online

Present Online is a way to share workbooks and allows others to update it.  Present Online requires the installation of Lync (if you have Office Professional Plus; Lync is already installed).

  1. Sign into Lync.
  2. Open all workbooks you need to share. (Close workbooks you do not want to share).
  3. In Excel, click the File Tab.
  4. In the left pane, choose Share.
  5. Click Present Online.
  6. Click Present.
  7. Select a Lync meeting or create a new one.
  8. Click OK.


Save Your Place In Word With Macros

Save your place in word a document using macros!

Takeaway: Use these two simple Word macros to temporarily bookmark a spot you want to return to later.

Large documents offer a few navigating challenges, especially when you need to jump back and forth between two areas. You could split the document, but that splits the screen and that might not be the right solution for you. Or, you could use any of the normal navigation tools and shortcuts, but it’s easy to get lost that way. Using VBA, you can insert a bookmark that acts as a placeholder. Then, when you’re ready to return, a single quick click is all that’s required.

This technique requires two quick macros, which follow:

Public Sub InsertBookmark ()

‘Insert bookmark for srz.

Call Bookmarks.Add(“srz”, Selection.Range)

End Sub

Public Sub ReturnToBookmark ()

‘Return to previously inserted bookmark.

ActiveDocument. Bookmarks(“srz”).Range.Select

End Sub

To add the macros, press [Alt]+[F11] to launch the Visual Basic Editor (VBE). In the Project Explorer, find ThisDocument for the current document. Then, enter the two sub procedures shown above.

Next, return to the document and add the macros to the Quick Access Toolbar (QAT), as follows:

  1. From the QAT dropdown, choose More Commands.
  2. From the Choose Commands From dropdown, choose Macros.
  3. In the list on the left, find InsertBookmark.
  4. Click Add to add the macro to the list of commands on the right.
  5. With the macro still selected, click Modify.
  6. In the resulting dialog, enter Mark in the Display Name control, and click OK. You could also change the macro’s display icon.
  7. Repeat steps 3 through 6 to add ReturnToBookmark to the list on the right and add the display name, Return.
  8. Click OK.
In Word 2003, drag the macros to the toolbar as follows:


  1. Launch the Customize dialog box by double-clicking a toolbar or menu or by choosing Customize from the Tools menu.
  2. Click the Commands tab.
  3. Choose Macros from the Categories list.
  4. Find InsertBookmark in the Commands list and drag it to the toolbar.
  5. Find Return ToBookmark and drag it to the toolbar.
  6. Click Close.
Using the macros is simple. 

South Jersey Techies – Managed Services for Businesses

If you’re  tired of the break and fix relationship you have with technology, and would  like a proactive approach for keeping your business running smoothly…

Managed Services

South Jersey Techies, LLC offers complete Flat Rate IT management solutions that take the hassle out  of managing and maintaining your critical IT systems. We’ll customize a managed services support  plan that is tailored to your environment and meets and exceeds the specific  needs for your technology management and support.

What is Managed IT Services?

Managed IT Services is a new solution to an old problem. Instead of the traditional pay to fix a problem as it happens, you pay one  consistent monthly price and your computers, servers and network are  continuously and proactively kept running efficiently.

Automate IT Actions

Automate | Cut Costs | Boost Profits

Being more productive and proactive brings more success in your business. Automation is the key to increase productivity. Maximize  your IT budget and staff by offloading routine IT functions to South Jersey Techies, LLC.

South Jersey Techies, LLC is  always working to provide you with the tools you need to control cost, maintain  continuity, and manage change in your evolving business environment.

Cut Operational Cost

Our  Managed Services enable you to focus more on your business while South Jersey Techies, LLC  proactively manages and monitors your data, security and voice networks.

South Jersey Techies automates your repeated activities such as updating antivirus definitions, upgrading Internet Explorer, installing software, executing scripts, etc. and helps you to concentrate on things that offer more value to your business.

Automation drives to cut down operational costs and achieve higher profits. Our Operations Center will proactively monitor the desktops, servers and applications for availability and performance and reduce down times of business critical applications.


CALL US NOW!