Back to Top

Tech, Web, Cloud & Cabling Services

Author Archives: Website Admin

Stay Organized With Easy Access to Online Calendars

Calendar

Stay organized and in control with 24/7 access  with Personal or Group Online Calendar.

Never forget an appointment, birthday or anniversary again. Now it’s easy to keep track of family activities, events and important dates. Need help at the office? Personal and Group Online Calendar makes it a snap to share your calendar, projects and files so all your employees are informed and up to date. Find times when everyone is available to meet, manage company resources, and much more!

Overview

  • Easy, 24/7 Access – Access your online calendar anytime, anywhere you have an Internet connection.
  • Password Protect – Keep personal information and details of your calendar private and secure.
  • Upload Files – Share files with group members or individuals invited to an event.
  • Event Reminder – Schedule automatic reminder messages via email or pop-up notification.
  • Task Management – Create and manage your own personal “To Do” list – or keep track of business projects. Set start and end dates and track tasks to completion.
  • Task Sharing – For projects that require work from multiple people, Task Sharing keeps everyone “up to speed” on project status.
  • Email Integration – Send and receive meeting requests and easily add them to your Microsoft Outlook calendar.
  • NEW! Integrate with popular 3rd party calendars – Easily add your events to Google Calendar, iCal or even your iPhone calendar.
  • Email Invitation – Invite individuals to attend meetings or events.
  • Print Options – Choose from multiple print formats for your schedule: daily, weekly, monthly and more!
  • Schedule Resources – No more wasting time tracking down available meeting rooms or other equipment like laptops and projectors.
  • Check User Availability – Easily see when others in your group have free time.
  • Administrator Control – Delegate control by choosing which members have full administrative access to all Group Calendars.
  • Time Zones – Supports 547 Time Zones.
  • Holidays – Automatically add major holidays to your personal calendar. Choose from 14 holiday collections suited to various countries and nationalities – or create and customize your own favorite days!

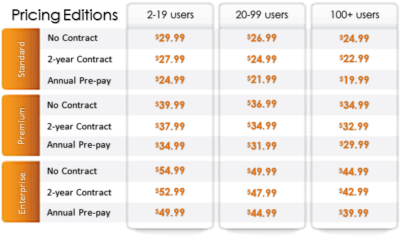
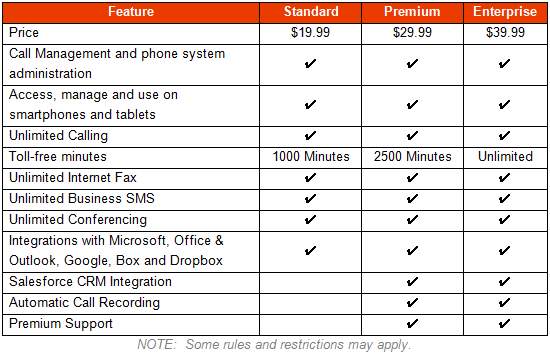
3 Online Calendar Plans To Choose From

Online Calendar Plan

Call (888) 505-1532 to get started now

Pros and Cons of Web Hosting for Data Storage

Web hosting for data storage can offer several advantages.

Web hosting for online storage was once a high-priced option. Now, with the cost of web hosting dropping, many companies are offering what’s come to be called cloud storage: Web-based third-party data storage. Your data is stored on on a network of servers that are owned and maintained by other companies and housed on their sites rather than at your home or place of business.

Backups

Lost laptops and damaged hard drives are less of a disaster if you make regular backups, and having a Web storage system in place can make this easier. You can even automate your backups so that copies of your data are made regularly without you needing to do anything.

Data Loss

While the backup services they offer can be very useful, cloud hosting firms can lose data just like any other company. Firms can suffer fires, thefts, server malfunctions and other incidents that could result in data loss. They can also go out of business, potentially taking your valuable data with them if you don’t have any other copies.

Ease Of Access

Ease of access is one of the main selling points of cloud storage. You can access your data from any computer with an Internet connection, making it easier to work off-site or from multiple different locations. People working on the same project from different physical sites can easily access and share information.

Security Risks

The downside of easier access for you or your staff is that unauthorized access is potentially easier, too. Your information may be less secure than it would be if you restricted it to physical media. Unless you encrypt your data so that it can only be read by authorized personnel, your data is only as secure as your hosting company’s systems. This is a particular concern if you want to store sensitive information such as your clients’ personal details.

Space And Resources

Storage space is generally less of an issue for private individuals, but if your organization handles a lot of data, storage and servers can take up a lot of space. If you have a great deal of storage equipment it can require dedicated climate-controlled rooms. Factors such as insulation and cooling systems mean these may be costly to construct. Increased power consumption can also mean increased costs. There’s also the headache of maintenance and technical support; you may have to take on extra staff, or you might find that your current IT staff have less time available for other duties. If your needs vary, with heavier demand at some times than at others, the lack of flexibility can mean waste. Using online storage and third-party servers allows you to save valuable space and leave the maintenance to a dedicated firm’s (hopefully) expert staff. Cloud storage can also help keep costs down because most companies only charge you for what you use in terms of space and bandwidth.

Cloud Storage Costs

Inevitably your Web-based storage space comes with a price tag—one that gets larger as your needs increase. The more data you store and the more bandwidth you use to upload and download your data from the hosting company’s servers, the more you’ll have to pay. If your storage needs are fairly predictable, it may be more cost-effective to set up your own on-site storage systems.

Call (888) 505-1532 to get started now

4 WAYS TO SPEED UP YOUR PC

Speed Up Computer

How to make a computer faster: 4 ways to speed up your PC

By following a few simple guidelines, you can maintain your computer, help increase your PC speed, and help keep it running smoothly. This article discusses how to use the tools installed on your computer, plus a few safe and free downloads, to help make your computer faster, maintain your computer efficiently, and help safeguard your privacy when you’re online.

Note: Some of the tools mentioned in this article require you to be logged on as an administrator. If you aren’t logged on as an administrator, you can only change settings that apply to your user account.

1. Remove spyware, and help protect your computer from viruses

Spyware collects personal information without letting you know and without asking for permission. From the websites you visit to user names and passwords, spyware can put you and your confidential information at risk. In addition to privacy concerns, spyware can hamper your computer’s performance. To combat spyware, you might want to consider using Malwarebytes. This scan is a free service that helps check for and remove viruses. You should also download Microsoft Security Essentials for free to help guard your system in the future from viruses, spyware, adware, and other malicious software (also known as malware). Microsoft Security Essentials acts as a spyware removal tool and includes automatic updates to help keep your system protected from emerging threats.

2. Free up disk space

The Disk Cleanup tool helps you to free up space on your hard disk to improve the performance of your computer. The tool identifies files that you can safely delete and then enables you to choose whether you want to delete some or all of the identified files.

Use Disk Cleanup to:

– Remove temporary Internet files.
– Delete downloaded program files, such as Microsoft ActiveX controls and Java applets.
– Empty the Recycle Bin.
– Remove Windows temporary files, such as error reports.
– Delete optional Windows components that you don’t use.
– Delete installed programs that you no longer use.
– Remove unused restore points and shadow copies from System Restore.

Tip: Typically, temporary Internet files take the most amount of space because the browser caches each page you visit for faster access later.

To use Disk Cleanup:

Windows 7 users

1. Click Start, click All Programs, click Accessories, click System Tools, and then click Disk Cleanup. If several drives are available, you might be prompted to specify which drive you want to clean.

2. When Disk Cleanup has calculated how much space you can free up, in the Disk Cleanup for dialog box, scroll through the content of the Files to delete list.

3.  Clear the check boxes for files that you don’t want to delete, and then click OK.

4.  When prompted to confirm that you want to delete the specified files, click Yes.

After a few minutes, the process completes and the Disk Cleanup dialog box closes, leaving your computer cleaner, performing better, and potentially increasing your PC speed.  For more options, such as cleaning up System Restore and Shadow copy files, under Description, click Clean up system files, and then click the More Options tab.

Windows Vista users

1. In the Start menu, click All Programs, click Accessories, click System Tools, and then click Disk Cleanup.

2. In the Disk Cleanup Options dialog box, choose whether you want to clean up your own files only or all of the files on the computer.

3. If the Disk Cleanup: Drive Selection dialog box appears, select the hard disk drive that you want to clean up, and then click OK.

4. Click the Disk Cleanup tab, and then select the check boxes for the files you want to delete.

5. When you finish selecting the files you want to delete, click OK, and then, to confirm the operation, click Delete files. Disk Cleanup then removes all unnecessary files from your computer. This may take a few minutes.

The More Options tab is available when you choose to clean files from all users on the computer.

Windows XP users

1.  Click Start, point to All Programs, point to Accessories, point to System Tools, and then click Disk Cleanup. If several drives are available, you might be prompted to specify which drive you want to clean.

2.  In the Disk Cleanup for dialog box, scroll through the content of the Files to delete list.

3.  Clear the check boxes for files that you don’t want to delete, and then click OK.

4.  When prompted to confirm that you want to delete the specified files, click Yes.

After a few minutes, the process completes and the Disk Cleanup dialog box closes, leaving your computer cleaner and potentially performing better.

3. Speed up access to data

Disk fragmentation slows the overall performance of your system. When files are fragmented, the computer must search the hard disk as a file is opened (to piece it back together). The response time can be significantly longer.

Disk Defragmenter (sometimes shortened to Defrag by users) is a Windows utility that consolidates fragmented files and folders on your computer’s hard disk so that each occupies a single space on the disk. With your files stored neatly end to end, without fragmentation, reading and writing to the disk speeds up.

When to run Disk Defragmenter
In addition to running Disk Defragmenter at regular intervals (weekly is optimal), there are other times you should run it, too, such as when:

– You add a large number of files.
– Your free disk space totals 15 percent or less.
– You install new programs or a new version of the Windows operating system.

To use Disk Defragmenter:

Windows 7 users

1. Click Start, click All Programs, click Accessories, click System Tools, and then click Disk Defragmenter.


2. In the Disk Defragmenter dialog box, click the drives that you want to defragment, and then click the Analyze disk button. After the disk is analyzed, a dialog box appears, letting you know whether you should defragment the analyzed drives.

Tip: You should analyze a volume before defragmenting it to get an estimate of how long the defragmentation process will take.

3.  To defragment the selected drive or drives, click the Defragment disk button. In the Current status area, under the Progress column, you can monitor the process as it happens. After the defragmentation is complete, Disk Defragmenter displays the results.

4.  To display detailed information about the defragmented disk or partition, click View Report.

5.  To close the View Report dialog box, click Close.

6.  You can also schedule the Disk Defragmenter to run automatically. (Your computer might even be set up this way by default.) Under Schedule, it reads Scheduled defragmentation is turned on and then displays the time of day and frequency of defragmentation. If you want to turn off automatic defragmentation or to change the time or frequency, click Configure schedule (or Turn on Schedule, if it is not currently configured to run automatically). Change the settings, and then click OK.

7.  To close the Disk Defragmenter utility, on the title bar of the window, click the Close button.

Windows Vista users

1.  Open Disk Defragmenter: Click the Start button, click All Programs, click Accessories, click System Tools, and then click Disk Defragmenter. If you are prompted for an administrator password or confirmation, type the password or provide confirmation.

2.  In the Disk Defragmenter dialog box, click the drives that you want to defragment and then click the Analyze diskbutton. After the disk is analyzed, a dialog box appears letting you know whether you should defragment the analyzed drives.

Tip: You should analyze a volume before defragmenting it to get an estimate of how long the defragmentation process will take.

3.  To defragment the selected drive or drives, click the Defragment disk button. In the Current status area, under the Progress column, you can monitor the process as it happens. After the defragmentation is complete, Disk Defragmenter displays the results.

4.  To display detailed information about the defragmented disk or partition, click View Report.

5.  To close the View Report dialog box, click Close.

6.  You can also schedule the Disk Defragmenter to run automatically. (Your computer might be set up this way by default.) Click Modify schedule….

7.  In the Disk Defragmenter: Modify Schedule dialog box, choose how often, which day, and at what time of day you want defragmentation to occur, and then click OK.

8.  Click OK again.

Windows XP users

1.  Click Start, point to All Programs, point to Accessories, point to System Tools, and then click Disk Defragmenter.

2.  In the Disk Defragmenter dialog box, click the drives that you want to defragment and then click the Analyze button. After the disk is analyzed, a dialog box appears, letting you know whether you should defragment the analyzed drives.

Tip: You should analyze a volume before defragmenting it to get an estimate of how long the defragmentation process will take.

3.  To defragment the selected drive or drives, click the Defragment button. Note:In Windows Vista, there is no graphical user interface to demonstrate the progress—but your hard drive is still being defragmented.  After the defragmentation is complete, Disk Defragmenter displays the results.

4.  To display detailed information about the defragmented disk or partition, click View Report.

5.  To close the View Report dialog box, click Close.

6.  To close the Disk Defragmenter utility, on the title bar of the window, click the Close button.

Running Disk Cleanup and Disk Defragmenter on a regular basis is a proven way to help keep your computer running quickly and efficiently. If you’d like to learn how to schedule these tools and others to run automatically, please read Speed up your PC: Automate your computer maintenance schedule.

4. Detect and repair disk errors

In addition to running Disk Cleanup and Disk Defragmenter to optimize the performance of your computer, you can check the integrity of the files stored on your hard disk by running the Error Checking utility.

As you use your hard drive, it can develop bad sectors. Bad sectors slow down hard disk performance and sometimes make data writing (such as file saving) difficult or even impossible. The Error Checking utility scans the hard drive for bad sectors and scans for file system errors to see whether certain files or folders are misplaced.

If you use your computer daily, you should run this utility once a week to help prevent data loss.

Run the Error Checking utility:

1.  Close all open files.

2.  Click Start, and then click Computer.

3.  In the Computer window (My Computer in Windows XP), right-click the hard disk you want to search for bad sectors, and then click Properties.

4.  In the Properties dialog box, click the Tools tab.

5.  Click the Check Now button.

6.  In the Check Disk dialog box (called Error-checking in Windows 7), select the Scan for and attempt recovery of bad sectors check box, and then click Start.

7.  If bad sectors are found, choose to fix them.

Tip: Only select the “Automatically fix file system errors” check box if you think that your disk contains bad sectors.

To see the original article in its entirety click here.

Set Up Exchange E-Mail on an Android Mobile Phone

Set Up Exchange E-Mail on an Android Mobile PhoneWindows_Start_Button

You can set up e-mail using an Exchange account on an Android mobile phone. If you have a different phone, see Mobile Phone Setup Reference. If you are having trouble connecting your device after following these steps, see “What else to I need to know?” at the end of this Help topic.

How do I set up Exchange ActiveSync on an Android mobile phone?


  1. From the Applications menu, select Email. This application may be named Mail on some versions of Android.
  2. Type your full e-mail address, for example tony@contoso.com, and your password, and then select Next.
  3. Select Exchange account. This option may be named Exchange ActiveSync on some versions of Android.
  4. Enter the following account information and select Next.
    • Domain\Username   Type your full e-mail address in this box. If Domain and Username are separate text boxes in your version of Android, leave the Domain box empty and type your full e-mail address in the Username box.
      Note:
      On some versions of Android, you need to use the domain\username format. For example, if your e-mail address is tony@contoso.com, type contoso.com\tony@contoso.com. Your username is your full e-mail address.
    • Password   Use the password that you use to access your account.
    • Exchange Server   Use the address of your Exchange server. To find this address, see “Finding the Server Name” later in this topic.
  5. As soon as your phone verifies the server settings, the Account Options screen displays. The options available depend on the version of Android on your device. The options may include the following:
    • Email checking frequency   The default value is Automatic (push). When you select this option, e-mail messages will be sent to your phone as they arrive. We recommend only selecting this option if you have an unlimited data plan.
    • Amount to synchronize   This is the amount of mail you want to keep on your mobile phone. You can choose from several length options, including One day, Three days, and One week.
    • Notify me when email arrives   If you select this option, your mobile phone will notify you when you receive a new e-mail message.
    • Sync contacts from this account   If you select this option, your contacts will be synchronized between your phone and your account.
  6. Select Next and then type a name for this account and the name you want displayed when you send e-mail to others. Select Done to complete the e-mail setup and start using your account.
    Tip:
    You may need to wait ten-to-fifteen minutes after you set up your account before you can send or receive e-mail.

Finding the Server Name


If your email program isn’t able to automatically find your Exchange ActiveSync server name, you may need to look it up.

  1. Sign in to your e-mail account using Outlook Web App.
  2. If you’re connecting to an Exchange mailbox, your Exchange ActiveSync server name is contained in the address bar in your browser when you are signed in to Outlook Web App, but without the leadinghttps:// and without the trailing /owa. For example, if the address you use to access Outlook Web App is https://mail.contoso.com/owa, your Exchange ActiveSync server name is mail.contoso.com.
  3. If you’re unable to connect to your mailbox using the information earlier in this section, you can try using the server name value that you can view in Outlook Web App options. Do the following:
    1. In Outlook Web App, click Options > See All Options > Account > My Account > Settings for POP, IMAP, and SMTP access.
      Note:
      Although you’re not setting up a POP3 account, you will use this value to determine your Exchange ActiveSync server name.
    2. Under POP setting, view the value for Server name.
    3. Try setting up your email using the server name listed on your options page. For example if the value for Server name under POP setting is mail.contoso.com, try using mail.contoso.com as your Exchange server name.

What else do I need to know?

  • If your e-mail account is the type that requires registration, you must register it the first time you sign in to Outlook Web App. Connecting to your e-mail account through a mobile phone will fail if you haven’t registered your account through Outlook Web App. After you sign in to your account, sign out. Then try to connect using your mobile phone. For more information about how to sign in to your account using Outlook Web App, see How to Sign In to Outlook Web App. If you have trouble signing in, see FAQs: Sign-in and Password Issues or contact the person who manages your e-mail account.

Hassman Research Institute

Website Design – Hassman Research Institute

The Website Design team of South Jersey Techies has been constantly working on developing great looking websites using the latest web technologies. The most recent website developed by our team is for Hassman Research Institute in Berlin, NJ.


Hassman Research Institute


Have questions?

Our Web Design team is here to help, call us at: 856-745-9990 or visit: https://southjerseytechies.net

South Jersey Techies, LLC is a full Managed Web and IT Services Company located in Marlton, NJ providing IT ServicesManaged IT Services, Website Design ServicesServer SupportIT ConsultingVoIP PhonesCloud Solutions Provider and much more. Contact Us Today.

Website Design – Event Medical Staffing Solutions

The Website Design team of South Jersey Techies has been constantly working on developing great looking websites using the latest web technologies. The most recent website developed by our team is for Event Medical Staffing Solutions in Sharon Hill, PA.

Event Medical Staffing Solutions (EMSS) has a nationwide network of emergency medical professionals focusing on special events, sporting events, construction sites, medical escort services and the television and film industry.

Event Medical Staffing Solutions specialize in on-site medical needs for any duration at any location, and any type of event. They have teams on standby 24/7 to respond to your last minute needs.


Have questions?

Our Web Design team is here to help
Call us at: 856-745-9990 or visit: https://southjerseytechies.net

South Jersey Techies, LLC is a full Managed Web and IT Services Company located in Marlton, NJ providing IT ServicesManaged IT Services, Website Design ServicesServer SupportIT ConsultingVoIP PhonesCloud Solutions Provider and much more. Contact Us Today.

Apple iOS 7

FINALiOS7.2

Apple iOS 7 is expected to be released this Fall for both, iPhone and iPad users.  Apple created a simple and more useful experience with iOS 7 that includes many new features.

Control Center

Control Center allows access to common controls and apps from any screen with just one swipe.  Controls included are turning on/off Wi-Fi, turning on/off Bluetooth and adjusting the display brightness.  Apps included are Camera, Flashlight, Calculator and many more.

Notification Center

Notification Center allows you to view new messages, mail, to-dos and missed calls from any screen with just one swipe.  The Notification Center has a new feature called Today.  Today allows you to view everything for “Today” including weather, appointments and local traffic.  Also, this feature gives you a glance at Tomorrow. 

Multitasking

Multitasking is smart way to switch between apps quickly.  To access “Multitasking” press the “Home” button twice.  Multitasking with iOS 7 is more efficient because it learns how you use your apps.  If you check a specific app every day at the same time, your app will be waiting for you.

AirDrop

AirDrop allows you to easily share photos, videos, contacts with the app and a Share button.  AirDrop transfers are encrypted and use Wi-Fi or Bluetooth to share data securely.

Siri

Siri has a redesigned user interface with a new sound and many new capabilities.  Siri has a more natural sounding voice (female/male) and is easier to understand.  Siri’s great new look fades on top of your screen.  Additionally, Siri can answer questions using Bing and Wikipedia, control iTunes radio, return phone calls, play voicemails and many more.

Mail

Mail has a redesigned user interface with many new features and controls.  New features  include the ability to view PDF comments and annotations, add/reorganize the mailbox list, and Mac and PC users with Microsoft Exchange 2010 can also now sync notes.


ABC Host Sandy Relief “Day of Giving”

Sandy Relief: ABC’s “Day of Giving” Will Include Dancing With the Stars, Jimmy Kimmel and More

ABC is giving back.

Today Monday, November 5, 2012, the ABC Network is hosting a “Day of Giving” across the network, which will encourage their viewers to help those impacted by Hurricane Sandy.

ABC’s programming, ranging from Good Morning America in the morning to Dancing With the Stars in the evening, will engage viewers with the relief efforts for Hurricane Sandy.

While Dancing With the Stars is planning to personalize sections of Monday night’s performance show with “Day of Giving” messaging (by including stories of how several of the show’s dancers were impacted by the storm), Good Morning America will kick off the “Day of Giving” by dedicating the 8 a.m. hour to raising money, followed by Live with Kelly and Michael, which will integrate the message into their Halloween episode. (It was postponed due to the storm.)

Next, The View‘s ladies and The Chew will discuss the “Day of Giving” and encourage the audience to donate to the American Red Cross Relief efforts. Katie Couric will engage Katieviewers in the relief efforts as well.

Rounding out the “Day of Giving” will be Nightline, which will devote time to the message and the impact of Hurricane Sandy, and Jimmy Kimmel Live, which will encourage viewers to give to the American Red Cross.

“The effects of Hurricane Sandy have impacted millions of people across the entire North East, including many of our co-workers, friends and families. This unprecedented devastation demanded an unprecedented response, so our team came up with the ‘Day of Giving,” Anne Sweeney, co-chair, Disney Media Networks and president, Disney-ABC Television Group, said in a statement. “This coordinated effort between network and syndicated programming spanning News, Daytime, Primetime and Late-Night will reach tens of millions of viewers with a specific call to action…to do what Americans do best, and pull together in support of those who are suffering. I’m incredibly proud of the team and all of our programs for this amazing response.”

Earlier in the day, ABC announced that it will donate $2 million to Hurricane Sandy relief and rebuilding efforts. ABC will donate $1 million to the American Red Cross for immediate, critical assistance, and another $1 million will be designated for organizations working on rebuilding efforts.

Would you like to help? Text REDCROSS to 90999 ($10 donation) or visit http://redcross.org

To View Full Article Click Here

Second Generation Surface Tablets

mss2_1

Microsoft has offically announced that the release date for the second generation surface tablets, Surface 2 and Surface Pro 2, will be October 22, 2013.  Pre-order for Surface 2 and Surface Pro 2 is available.

Both new Surface tablets will have a dual-angle kickstand and multiple connectivity options such as Bluetooth 4.0, Wi-Fi 802.11, USB 3.0, micro-SD expansion and HD video-out port.

The new Type and Touch Covers will be released with both tablets.  Both Covers include backlighting and additional sensors.  Also, Microsoft has designed a Power cover that is designed to add additional battery life to both Tablets.

mss21

The Surface 2 has a 10.6 Clear Type Full HD (1920×1080) Display and will run Windows RT 8.1 Operating System on an nVidia Tegra 4 Processor. The Surface Pro 2 has two storage options including, 32 GB and 64 GB.  Surface 2 is priced at $449.

sur2

Pre-order a Surface 2 Tablet.

mss22

The Surface Pro 2 has a 10.6 Clear Type Full HD (1920×1080) Display and will run Windows 8.1 Pro Operating System on an Intel Core i5 Processor. The Surface Pro 2 has multiple storage options including 64 GB, 128 GB, 256 GB and 512 GB.  Surface Pro 2 is priced at $899.  

surp2

Pre-order a Surface Pro 2 Tablet.

Surface Pro

ms_surface_proThe Surface by Microsoft is a crossover between a laptop and a tablet. The Surface Pro is a business tablet that has a detachable keyboard, stylus and a kickstand. Putting the Surface Pro above other tablets is the aptitude to run Microsoft Office programs including Word, Excel and PowerPoint.

Microsoft released a television commercial for the Surface Pro, “The Vibe”, starring Daniel ‘Cloud’ Campos from the original Surface Commercial.  This enthusiastic campaign includes professional dancers as “business people” showing the capabilities of the Surface Pro. Similar to Windows 8, Metro “Modern” UI; the commercial has the same ambiance.

According to IDC, Microsoft has finally made its way to the Top 5 for Tablets. In the first quarter of 2013, Microsoft has 1.8% Market Share. Unlike the first quarter of 2013, Microsoft has 0% Market Share. Also, ASUS moved up from #4 to #3, knocking Amazon down a space.

TopFiveTabletVendors


CALL US NOW!