Replicated Folder Offline in DFSR

We recently had an issue with and Active Directory DFSR – The replicated folder has been offline for too long at Site error for a Windows Server Standard 2016 single Domain Controller environment.

Event ID 4012 – DFSR – The DFS Replication service stopped replication on the folder with the following local path: C:\Windows\SYSVOL\domain. This server has been disconnected from other partners for 149 days, which is longer than the time allowed by the MaxOfflineTimeInDays parameter (###). DFS Replication considers the data in this folder to be stale, and this server will not replicate the folder until this error is corrected.

To resume replication of this folder, use the DFS Management snap-in to remove this server from the replication group, and then add it back to the group. This causes the server to perform an initial synchronization task, which replaces the stale data with fresh data from other members of the replication group. .

Summary


Consider the following scenario:

You want to force the non-authoritative synchronization of SYSVOL on a domain controller. In the File Replication Service (FRS), this was controlled through the D2 and D4 data values for the Burflags registry values, but these values do not exist for the Distributed File System Replication (DFSR) service. You cannot use the DFS Management snap-in (Dfsmgmt.msc) or the Dfsradmin.exe command-line tool to achieve this. Unlike custom DFSR replicated folders, SYSVOL is intentionally protected from any editing through its management interfaces to prevent accidents.

How to perform a non-authoritative synchronization of DFSR-replicated SYSVOL (like “D2” for FRS)

  1. In the ADSIEDIT.MSC tool modify the following distinguished name (DN) value and attribute on each of the domain controllers that you want to make non-authoritative:CN=SYSVOL Subscription,CN=Domain System Volume,CN=DFSR-LocalSettings,CN=<the server name>,OU=Domain Controllers,DC=<domain>msDFSR-Enabled=FALSE
  2. Force Active Directory replication throughout the domain.
  3. Run the following command from an elevated command prompt on the same servers that you set as non-authoritative:DFSRDIAG POLLAD
  4. You will see Event ID 4114 in the DFSR event log indicating SYSVOL is no longer being replicated.
  5. On the same DN from Step 1, set:msDFSR-Enabled=TRUE
  6. Force Active Directory replication throughout the domain.
  7. Run the following command from an elevated command prompt on the same servers that you set as non-authoritative:DFSRDIAG POLLAD
  8. You will see Event ID 4614 and 4604 in the DFSR event log indicating SYSVOL has been initialized. That domain controller has now done a “D2” of SYSVOL.

More Information


If setting the authoritative flag on one DC, you must non-authoritatively synchronizeall other DCs in the domain. Otherwise you will see conflicts on DCs, originating from any DCs where you did not set auth/non-auth and restarted the DFSR service.For example, if all logon scripts were accidentally deleted and a manual copy of them was placed back on the PDC Emulator role holder, making that server authoritative and all other servers non-authoritative would guarantee success and prevent conflicts.

If making any DC authoritative, the PDC Emulator as authoritative is preferable, since its SYSVOL contents are usually most up to date.

The use of the authoritative flag is only necessary if you need to force synchronization of all DCs. If only repairing one DC, simply make it non-authoritative and do not touch other servers.

This article is designed with a 2-DC environment in mind, for simplicity of description. If you had more than one affected DC, expand the steps to includeALL of those as well. It also assumes you have the ability to restore data that was deleted, overwritten, damaged, etc. previously if this is a disaster recovery scenario on all DCs in the domain.

Have any questions?

Call us at: 856-745-9990 or visit: https://southjerseytechies.net/

South Jersey Techies, LLC is a full Managed Web and Technology Services Company providing IT Services, Website Design Services, Server Support, Network Consulting, Internet Phones, Cloud Solutions Provider and much more. Contact for More Information.

To read this article in its entirety click here.

KB4090913: Windows 10 Device Fix

We have had a number of users that were unable to use their keyboard or mouse on their Windows 10 computer. Microsoft released an update that addresses the issue yesterday.

Addresses an issue in which some USB devices and onboard devices, such as a built-in laptop camera, keyboard, or mouse, stop working. This may occur when the Windows Update servicing stack incorrectly skips installing the newer version of some critical drivers in the cumulative update and uninstalls the currently active drivers during maintenance.

Known issues in this update


Symptom

Workaround

Windows Update History reports that KB4054517 failed to install because of error 0x80070643.

Even though the update was successfully installed, Windows Update incorrectly reports that the update failed to install. Select Check for Updates to verify that there are no additional updates available. You can also type About your PC in the search box on the taskbar to verify that your device is using the expected OS build. Microsoft is working on a resolution and will provide an update in an upcoming release.

Because of an issue that affects some versions of antivirus software, this fix applies only to computers on which the antivirus ISV updated the ALLOW REGKEY.

Contact your antivirus manufacturer to verify that their software is compatible and that they have set the following REGKEY on the computer: Key=”HKEY_LOCAL_MACHINE”Subkey=”SOFTWARE\Microsoft\Windows\CurrentVersion\QualityCompat” Value Name=”cadca5fe-87d3-4b96-b7fb-a231484277cc” Type=”REG_DWORD” Data=”0x00000000″

After installing this update, some devices may fail to start, and return INACCESSIBLE_BOOT_DEVICE. This issue occurs when the windows update servicing stack incorrectly skips installing the newer version of some critical drivers in the cumulative update and uninstalls the currently active drivers during maintenance.

Microsoft is working on a resolution and will provide an update in an upcoming release. Workaround steps are available in KB4075150.

Because of an AD FS server issue that causes the WID AD FS database to become unusable after a restart, the AD FS service may fail to start.

There is no way to undo the database corruption. To return your AD FS server to a functional state, you must restore it from a backup.

How to get this update


This update will be downloaded and installed automatically from Windows Update. To get the stand-alone package for this update, go to the Microsoft Update Catalog website.

File information

For a list of the files that are provided in this update, download the file information for cumulative update 4090913.

Have any questions?

Call us at: 856-745-9990 or visit: https://southjerseytechies.net/

South Jersey Techies, LLC is a full Managed Web and Technology Services Company providing IT Services, Website Design Services, Server Support, Network Consulting, Internet Phones, Cloud Solutions Provider and much more. Contact for More Information.

To read this article in its entirety click here.

Access Control Panel in Windows 10

Microsoft is phasing out the traditional Control Panel with the Windows 10 Creators Update, but with a few tweaks you can still access it. Mark Kaelin explains how.


Microsoft has been slowly and methodically rolling out the Windows 10 Creators Update to customers throughout 2017. If you are one of the lucky ones to receive the update already, you have likely noticed more than a few changes to how Windows 10 looks and works. Some of the changes are good, some are a little annoying.

One of the changes Microsoft implemented in the Windows 10 Creators Update that I don’t like is the removal of the traditional Control Panel from the Win+X menu—that’s the menu you see displayed when you right-click the Start button from the Desktop interface (Figure A). Microsoft is migrating the interface for configuring the operating system to the new Settings screen, but some of us, especially IT pros who have been doing this for a long time, prefer the old Control Panel interface


Fortunately, the old Control Panel is still available; it is just lurking in the background. We can bring it back to the forefront with a few clicks, tweaks, and tricks, and this tutorial will show you how they work.

First, what you can’t do

The commands for the Win+X menu are located in this file folder, as shown in Figure B:

C:\Users\USERNAME\AppData\Local|Microsoft\Windows\WinX

But you can’t just add a shortcut to the Control Panel executable to one of those Group folders and expect to see it show up in the Win+X menu. The special links within the Win+X menu system are protected with a special hash calculation, which greatly complicates any attempt to edit its contents.

To add the Control Panel back to the Win+X menu you will have to use a link with the hash already included. In general, that means acquiring a link from a version of Windows that is not the Creators Update. It is possible with the help of a third-party app, but it is complicated, convoluted, and not really necessary.

If you want to go through the process, you can check out this website for the details. But before you do, I have some simple solutions that might work better for you.

Now, what you can and should do

For those of us who want to keep things simple, here are a couple of ways to access the traditional Control Panel in Microsoft Windows 10 Creators Update.

1. Search for it

If you just want to access the control panel occasionally and not add more icons to your desktop, the simplest way to access the Control Panel is by typing control panel in the Cortana search box. Control Panel should be the first entry in the search results (Figure C). You can left-click the link to start the app or right-click it and add the link to the Start Menu or to your Taskbar for easy future access.

Adding the Control Panel to the Start Menu is handy if you are using a touch screen interface. Adding it to the Taskbar works well if you find yourself accessing configuration settings on a regular basis.

2. Add to Desktop

There are two ways to add the Control Panel to your Desktop. The first way is fairly obvious: Right-click an empty area on your Desktop and create a new shortcut that points to the Control Panel executable located here:

C:\Windows\System32

But you can also add the Control Panel icon to your Desktop through the Personalization screen. Right-click the Start button to open the Win+X menu and click the Settings menu item. Click the Personalization icon to open the next screen and drill down to the Themes screen. Scroll down until you see the Desktop Icon Settings item under the Related Settings area and click it. A dialog box will pop open and you can check the Control Panel radio button to add that link to your Desktop (Figure D). Click OK and the icon will be added as a primary system link on your Desktop.

Have questions?

Get answers from Microsofts Cloud Solutions Partner!
Call us at: 856-745-9990 or visit: https://southjerseytechies.net/

South Jersey Techies, LL C is a full Managed Web and Technology Services Company providing IT Services, Website Design Services, Server Support, Network Consulting, Internet Phones, Cloud Solutions Provider and much more. Contact for More Information.

To read this article in its entirety click here.

Maximize Your Windows 7 Experience

If you’re one of the many business users who has not upgraded their computer to Windows 10, there are still resources to boost your experience. Here are 10 tips for getting the most out of the OS.

Windows 10 faced a controversial roll-out, with privacy concerns, bugs, and other issues plaguing many users. And as of August 2016, just 1% of business machines had upgraded to Windows 10, according to a study from Softchoice. Instead, 91% of the machines were operating with Windows 7—an 18% increase over the same period of time in 2015.

“It seems businesses don’t see an urgent need to move operating systems, so long as their cloud-based applications are still running fine on Windows 7,” Softchoice’s Microsoft director Craig McQueen wrote in a press release at the time. “In addition to the security benefits, I think once organizations grasp the user benefits—such as touch and Cortana—we will start to see a boost in adoption.”

While experts predict Windows 10 deployments will pick up this year, it’s important for those still using Windows 7 for business to get the most out of their machines. Here are 10  articles with Windows 7 tips that will help enterprise users operate the machines more effectively.

1. 10 ways to speed up Windows 7

While Windows 7 generally performs well, over time, the system can slow down and require some care to get it back up to speed. The OS also contains certain features that users can take advantage of to improve overall performance. Here, we outline 10 steps business users can take to enhance the performance of your Windows 7 system.

2. Use multiple monitors with Windows 7’s Remote Desktop Connection

Windows 7 allows users to connect to a remote computer and utilize the local system’s multiple monitors. Here is a step by step advice on how to configure and operate multiple monitors using Windows 7’s Remote Desktop Connection, as well as how to connect to and from Windows versions that do not support this feature.

3. Quick Tips: Flush the ARP cache in Windows 7

The Address Resolution Protocol (ARP) cache is an important part of IP networking on any OS, as it links Ethernet addressing to hardware addressing. Newly mapped addresses are saved in an ARP cache, which is usually fine, but can sometimes cause issues with internet connections and web page loading times. Here, are the necessary steps to clear the ARP cache, and how to manage it going forward.

4. 10+ Windows 7 services you may not need

While every version of Windows includes a core set of system services, business users can disable some that are not necessary in order to improve performance and security. In this article, we highlight 13 services that users can disable if they so choose on Windows 7 systems that will likely not have any impact on business operations, including IP Helper, offline files, and Network Access Protection.

5. 10 Windows 7 commands every administrator should know

IT staff who troubleshoot Windows 7 problems often have to dive into the command line. Here, are 10 fundamental Windows 7 commands that are useful for IT administrators, including System File Checker, File Signature Verification, and Driverquery.

6. Modifying the Windows 7 boot loader with the Boot Configuration Data Editor tool

In Windows Vista and later versions of Windows, the bootloader was moved from boot.ini to a utility called BCDEdit. This article walks users through how to modify the boot config data using this tool.

7. Change and customize Windows 7’s Logon screen wallpaper

Changing and customizing the Windows 7 Logon screen wallpaper is easy once you know the steps, as Microsoft built the ability to change the wallpaper right into the OS, as opposed to needing any third-party software. Here, we offer a tutorial on doing so.

8. Change the Processor Affinity setting in Windows 7 to gain a performance edge

Most applications have been designed for multi-core processors, and work with an OS to distribute their operations evenly across cores to enhance performance. However, you can sometimes achieve better overall performance from certain applications by configuring them to run on different processor cores, which Windows 7 allows via the Processor Affinity setting. In this article, we explain two ways to change the Processor Affinity setting in Windows 7.

9. Use Windows 7 Event Viewer to track down issues that cause slower boot times

Experiencing a slow Windows 7 boot time? You can use Windows 7’s Event View to investigate the source of the problem. The Event Viewer includes a category of event logs called Applications and Services Logs, which track key elements of the OS. Here, we explain how it is possible to find out how long it took to boot up your system every time, since the day Windows 7 was first installed, along with instances where boot time slowed down, all through these logs.

10. Tag your files for easier searches in Windows 7

This article, walks users through how to tag files to make them searchable via the Search filters built into Windows Explorer’s Search box in Windows 7. It’s possible to do this easily from many applications while saving a file. The ability to more easily find files is a boon for business users who want to enhance their productivity.

Have questions?

Get answers from Microsofts Cloud Solutions Partner!
Call us at: 856-745-9990 or visit: https://southjerseytechies.net/

South Jersey Techies, LL C is a full Managed Web and Technology Services Company providing IT Services, Website Design Services, Server Support, Network Consulting, Internet Phones, Cloud Solutions Provider and much more. Contact for More Information.

To read this article in its entirety click here.

Change the Processor Affinity setting in Windows 7 to gain a performance edge

Under specific circumstances and with careful tweaking, you can increase Windows 7’s performance using the Processor Affinity setting.

If you have a multi-core processor, chances are good that on the Performance tab in Windows Task Manager, you have noticed that the CPU Usage History graphs look about the same for each core, as shown in Figure A. The reason for this is that most applications you run these days have been designed with multi-core processors in mind and will work with the operating system to distribute their operations as evenly as possible across all the available cores.

Figure A
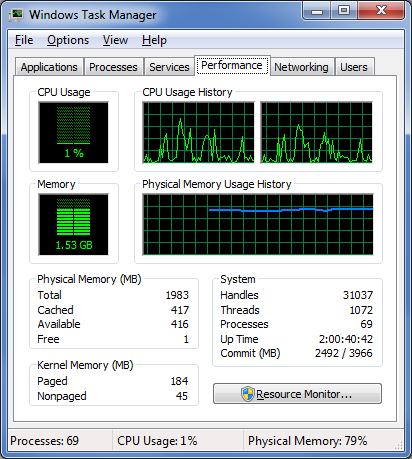
In most cases, you’ll notice that the CPU Usage History graphs look about the same for each core.

In most cases this even distribution provides you with the best performance possible. However, that’s not always going to be the case. For instance, older applications that were designed for single-core processors can behave irrationally — they may all of a sudden begin maxing out the CPU usage at 100 percent and appear to be locked up. In other circumstances, you might be able to achieve better overall performance from certain applications by configuring each of them to run on different processor cores.

Fortunately, Windows 7 allows you to configure applications to use only one, or several, of the processor cores in a multi-core system by using the Processor Affinity setting.

In this edition of the Windows Desktop Report, Iwe’ll show you two ways to change the Processor Affinity setting in Windows 7.

From Task Manager

Changing the Processor Affinity setting from within Task Manager is a pretty straightforward operation once you know how to do it. To launch Task Manger, you can use the keystroke combination [Ctrl] + [Shift] + [Esc] or you can simply right-click on the taskbar and select Task Manager from the context menu.

Once Task Manager is up and running, select the Applications tab, right-click on the application that you want to work with, and select the Go to Process command, as shown in Figure B. When you get to the Processes tab, right-click on the process and from that context menu, select the Set Affinity command, as shown in Figure C. (If the processes are jumping around, it may be hard to select the correct process, so you might just want to press the Application key or [Shift]+[F10].)

Figure B
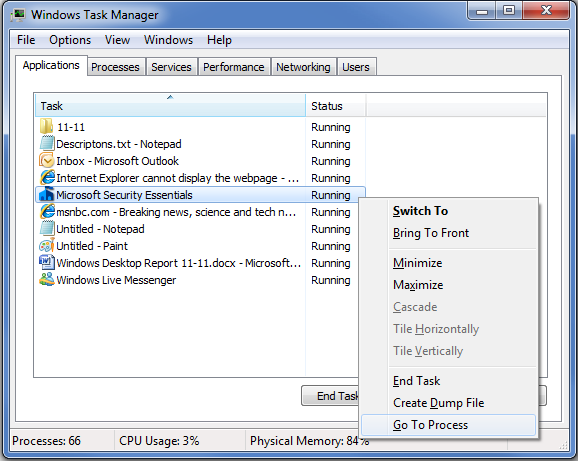
Right-click on an application and select the Go to Process command.

Figure C
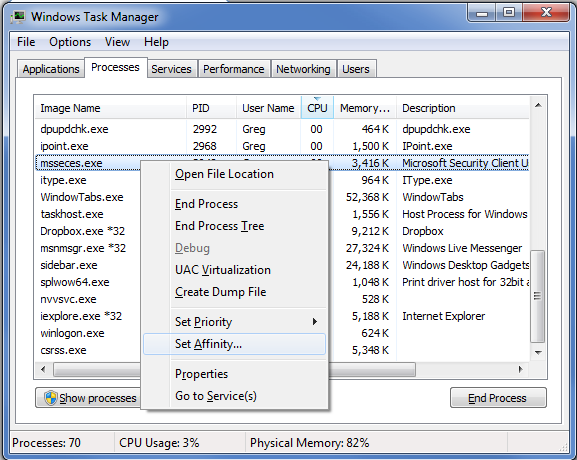
Right-click on the process and select the Set Affinity command.

After you select the Set Affinity command, you’ll see the Processor Affinity dialog box shown in Figure D. As you can see, the default setting is All Processors, which in the case of my example system are CPU 0 and CPU 1. At this point, you can clear the All Processors check box and then select the CPU on which you want the process to run.

Figure D
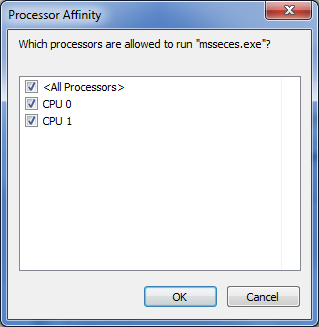
The Processor Affinity dialog box allows you to choose which processor(s) you want to use.

An example

To take a look at the effects of using the Set Affinity command, we launched two applications: Microsoft Security Essentials and Disk Defragmenter. Next we used the Set Affinity command to assign Microsoft Security Essentials to CPU 0 and Disk Defragmenter to CPU 1. We then started each application running — Microsoft Security Essentials performing a full scan and Disk Defragmenter defragging a 500GB disk.

Once each application began working, they started sucking up CPU time, so we went to the Performance tab in Windows Task Manager to look at the CPU Usage History graphs. When we did, we could see that each graph was showing different measurements, as shown in Figure E.

Figure E
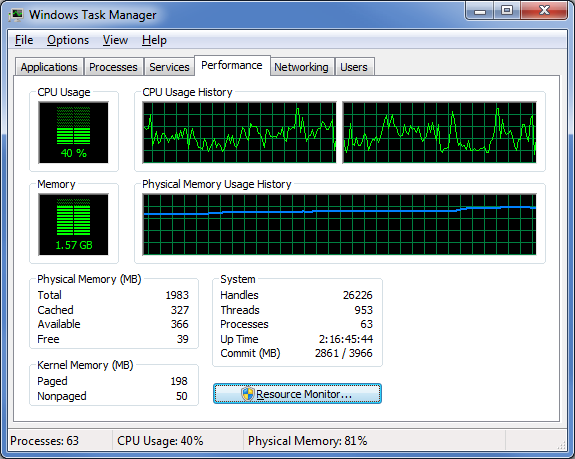
Each of the CPU Usage History graphs shows different measurements.

To specifically see how each CPU core was faring, we launched Resource Monitor and selected the CPU tab. Again, we could see that each CPU core was showing different usage measurements, as shown in Figure F.

Figure F
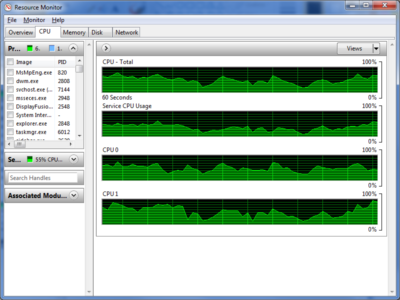
Resource Monitor’s CPU tab specifically identifies each CPU core and its usage.

Now, of course, my example combination is purely for the sake of showing each CPU handling a separate process. However, there are instances where running Microsoft Security Essentials on a separate CPU core would be beneficial.

From a shortcut

Now if you find that running an application on a specific CPU core works well, you might want to use it again in the future. If so, chances are that you won’t want to have to go through the Task Manager each time. Fortunately you can create a shortcut to launch an application with a specific affinity setting.

For example, to launch Disk Defragmenter so that it runs only on CPU 0, you would create a shortcut with the following command line:

C:\Windows\System32\cmd.exe /C start /affinity 1 dfrgui.exe

To launch Disk Defragmenter on CPU 1, you would create a shortcut with the following command line:

C:\Windows\System32\cmd.exe /C start /affinity 2 dfrgui.exe

The number that follows the start /affinity command is called the affinity mask and is defined as a hexadecimal number. However, the CPU core number can be calculated more easily using binary numbers. For instance, the command

C:\Windows\System32\cmd.exe /C start /affinity 3 dfrgui.exe

will launch Disk Defragmenter on both CPU 0 and CPU 1. If you convert 3 into a binary number you will get 0011. Under the affinity mask system, processors are numbered from the right to left beginning with 0 and since there are 1’s in the first two places, this indicates CPU 0 and CPU 1.

Suppose you have a Quad core processor. If so and you use an affinity mask of 4, that will convert into binary 0100, which indicates CPU 2. If you use an affinity mask of 9, that will convert into binary 1001, which indicates CPU 0 and CPU 3.

For more information on the start /affinity command, open a Command Prompt window and type the command

start /?

Have questions?

Get answers from Microsofts Cloud Solutions Partner!
Call us at: 856-745-9990 or visit: https://southjerseytechies.net/

South Jersey Techies, LL C is a full Managed Web and Technology Services Company providing IT Services, Website Design Services, Server Support, Network Consulting, Internet Phones, Cloud Solutions Provider and much more. Contact for More Information.

To read this article in its entirety click here.

10 Windows 7 Commands Admins Need

The command line is often the best place to resolve Windows 7 desktop problems. These basic commands will help speed your troubleshooting tasks.

PC troubleshooting is becoming less common in larger organizations, but consultants and techs in smaller shops still have to get their hands dirty identifying and fixing desktop problems. Oftentimes, troubleshooting Windows 7 means delving into the command line. Here are 10 fundamental Windows 7 commands you might find helpful.

1: System File Checker

Malicious software will often attempt to replace core system files with modified versions in an effort to take control of the system. The System File Checker can be used to verify the integrity of the Windows system files. If any of the files are found to be missing or corrupt, they will be replaced. You can run the System File Checker by using this command:

sfc /scannow

2: File Signature Verification

One way to verify the integrity of a system is to make sure that all the system files are digitally signed. You can accomplish this with the File Signature Verification tool. This tool is launched from the command line but uses a GUI interface. It will tell you which system files are signed and which aren’t. As a rule, all the system files should be digitally signed, although some hardware vendors don’t sign driver files. The command used to launch the File Signature Verification tool is:

sigverif

3: Driverquery

Incorrect device drivers can lead to any number of system problems. If you want to see which drivers are installed on a Windows 7 system, you can do so by running the driverquery tool. This simple command-line tool provides information about each driver that is being used. The command is:

driverquery

If you need a bit more information, you can append the -v switch. Another option is to append the -si switch, which causes the tool to display signature information for the drivers. Here’s how they look:

driverquery -v
driverquery -si

4: Nslookup

The nslookup tool can help you to verify that DNS name resolution is working correctly. When you run nslookup against a host name, the tool will show you how the name was resolved, as well as which DNS server was used during the lookup. This tool can be extremely helpful when troubleshooting problems related to legacy DNS records that still exist but that are no longer correct.

To use this tool, just enter the nslookup command, followed by the name of the host you want to resolve. For example:

nslookup dc1.contoso.com

5: Ping

Ping is probably the simplest of all diagnostic commands. It’s used to verify basic TCP/IP connectivity to a network host. To use it, simply enter the command, followed by the name or IP address of the host you want to test. For example:

ping 192.168.1.1

Keep in mind that this command will work only if Internet Control Message Protocol (ICMP) traffic is allowed to pass between the two machines. If at any point a firewall is blocking ICMP traffic, the ping will fail.

6: Pathping

Ping does a good job of telling you whether two machines can communicate with one another over TCP/IP, but if a ping does fail, you won’t receive any information regarding the nature of the failure. This is where the pathping utility comes in.

Pathping is designed for environments in which one or more routers exist between hosts. It sends a series of packets to each router that’s in the path to the destination host in an effort to determine whether the router is performing slowly or dropping packets. At its simplest, the syntax for pathping is identical to that of the ping command (although there are some optional switches you can use). The command looks like this:

pathping 192.168.1.1

7: Ipconfig

The ipconfig command is used to view or modify a computer’s IP addresses. For example, if you wanted to view a Windows 7 system’s full IP configuration, you could use the following command:

ipconfig /all

Assuming that the system has acquired its IP address from a DHCP server, you can use the ipconfig command to release and then renew the IP address. Doing so involves using the following commands:

ipconfig /release
ipconfig /renew

Another handy thing you can do with ipconfig is flush the DNS resolver cache. This can be helpful when a system is resolving DNS addresses incorrectly. You can flush the DNS cache by using this command:

ipconfig /flushdns

8: Repair-bde

If a drive that is encrypted with BitLocker has problems, you can sometimes recover the data using a utility called repair-bde. To use this command, you will need a destination drive to which the recovered data can be written, as well as your BitLocker recovery key or recovery password. The basic syntax for this command is:

repair-bde <source> <destination> -rk | rp <source>

You must specify the source drive, the destination drive, and either the rk (recovery key) or the rp (recovery password) switch, along with the path to the recovery key or the recovery password. Here are two examples of how to use this utility:

repair-bde c: d: -rk e:\recovery.bek
repair-bde c: d: -rp 111111-111111-111111-111111-111111-111111

9: Tasklist

The tasklist command is designed to provide information about the tasks that are running on a Windows 7 system. At its most basic, you can enter the following command:

tasklist

The tasklist command has numerous optional switches, but there are a couple I want to mention. One is the -m switch, which causes tasklist to display all the DLL modules associated with a task. The other is the -svc switch, which lists the services that support each task. Here’s how they look:

tasklist -m
tasklist -svc

10: Taskkill

The taskkill command terminates a task, either by name (which is referred to as the image name) or by process ID. The syntax for this command is simple. You must follow the taskkill command with -pid (process ID) or -im (image name) and the name or process ID of the task that you want to terminate. Here are two examples of how this command works:

taskkill -pid 4104
taskkill -im iexplore.exe

Have questions?

Get answers from Microsofts Cloud Solutions Partner!
Call us at: 856-745-9990 or visit: https://southjerseytechies.net/

South Jersey Techies, LL C is a full Managed Web and Technology Services Company providing IT Services, Website Design Services, Server Support, Network Consulting, Internet Phones, Cloud Solutions Provider and much more. Contact for More Information.

To read this article in its entirety click here.

CALL US NOW!