Back to Top

Tech, Web, Cloud & Cabling Services

Category: Tips & Info

Tips & Info Category

Microsoft’s latest Windows 10 ad annoys Chrome users with taskbar pop-ups

Ads on the Windows 10 taskbar aren’t just for Microsoft Edge anymore.

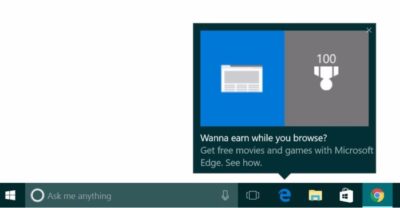
Microsoft’s aggressive advertising push inside Windows 10 is going beyond pop-ups for Microsoft Edge.

Myce recently spotted yet another pop-up ad on the taskbar in Windows 10. This time around Microsoft was advertising its extension for Chrome dubbed the Personal Shopping Assistant (Beta). The extension is a Microsoft Garage project that lets you compare prices across shopping sites.

Prior to the Chrome extension pop-up, Microsoft was advertising its rewards program for Microsoft Edge, which we spotted in early November. The earlier ad appeared to be targeted at people who didn’t use Edge that frequently.

A pop-up ad that promotes Windows 10’s Edge browser and Bing Rewards. The pop-up for the Chrome extension looks similar, as you can see on Myce.

The Chrome one, by comparison, is probably targeted at people who use Chrome as their default browser. Microsoft’s likely thinking that if people won’t stop using Chrome on Windows, at least they can use some Microsoft software while they’re doing it.

Microsoft told Thurrott.com that ads like the one for the Chrome extension are part of the company’s tests to provide, “new features and information that can help people enhance their Windows 10 experience.”

Tests or not, it’s unlikely that Microsoft will ever stop these taskbar ads even though users pay $100 or more for Windows. Thus far, Microsoft has advertised its own software and services.

The impact on you at home: If you want to make sure you don’t get pop-up ads on your taskbar you can turn them off. Open the Settings app and go to System > Notifications & Actions. On this screen under “Notifications” turn off Get tips, stricks, and suggestions as you use Windows. That’s not the only way Microsoft can advertise to you.

Have questions?

Get answers from Microsofts Cloud Solutions Partner!
Call us at: 856-745-9990 or visit: https://southjerseytechies.net/

South Jersey Techies, LL C is a full Managed Web and Technology Services Company providing IT Services, Website Design ServicesServer SupportNetwork ConsultingInternet PhonesCloud Solutions Provider and much more. Contact for More Information.

To read this article in its entirety click here.

Organize your intranet with SharePoint hub sites

New SharePoint hub sites make organizing and connecting your intranet easy. 

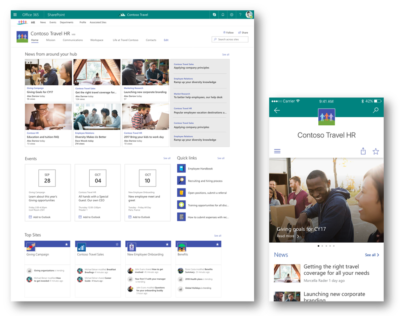
As business goals and team structures evolve, so too must your sites and the content that lives within them. Ideas must flourish and grow, not become rigid or stale. SharePoint hub sites bring flexible, dynamic building blocks to your company intranet – connecting collaboration and communication. Associating sites together in a hub site enhances discovery and engagement with content, while creating a complete and consistent representation of your project, department or region.

Microsoft first disclosed SharePoint hub sites during Ignite 2017. And recently they announced that they are now rolling out to Targeted Release customers in Office 365. Microsoft encouraged by early adopter feedback, can’t wait for every customer to use and adopt them.

SharePoint hub sites bring the following new capabilities to you and your intranet:

  • Cross-site navigation – increase visibility of and navigation among associated sites
  • Content rollup – read aggregated news and discover related site activities
  • Consistent look-and-feel – establish a common theme to improve visitor awareness of connected sites
  • Scoped search – focus on finding content that resides within the hub site’s associated sites

Hub sites support good governance, giving admins a growth framework to maintain relationships between sites over time. They are easy for admins to establish and bring efficiencies for people who work inside and across the sites on a day-to-day basis. And when managing change within the business, it is easy to move a site from one hub site to another.


Getting started with SharePoint hub sites in Office 365

You can convert an existing communication site or modern team time into a hub site, or you can start with a brand-new modern site. We recommend selecting a communication site as the hub site. You can associate multiple team sites and communication sites to model and promote an intranet that reflects the way your people organize. It is easy for admins to create one or more hub sites. After a hub site is created, approved site owners can associate existing team sites and communication sites with the hub site.


Use the SharePoint Online Management Shell to establish your hub sites

Admins, you are the enablers. And the SharePoint Online Management Shell (aka, PowerShell for SharePoint in Office 365) is your enabling tool of choice.

The PowerShell cmdlet you’ll want to get most familiar with is: Register-SPOHubSite https://contoso.sharepoint.com/sites/HR (where HR URL is the full-path address of the existing site that you want to convert into a hub site). You then will assign a unique security group to designate approved site owners that can associate sites to this new hub. You simply create a mail-enabled security group and add the users. You then run an additional PowerShell command to give that group permissions to associate their sites to the hub site.

Note: You must be a SharePoint administrator or above in Office 365 to create SharePoint hub sites. Site owners, however, can associate a SharePoint site with a hub site that already exists.

Learn more how admins create and manage hub sites.


Associating a site under a hub site

Once a hub site is established, it’s then a two-click process to associate to the hub site.

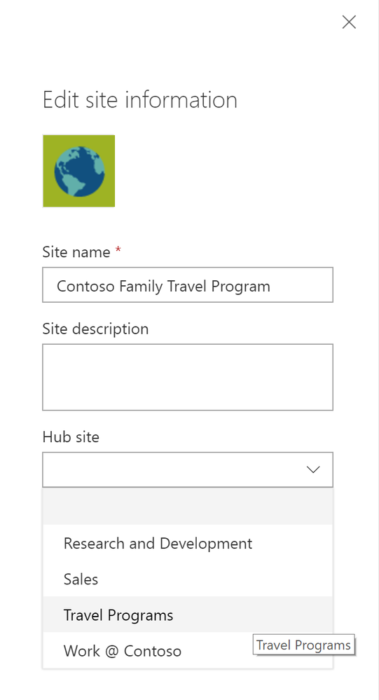
As the site owner, go to the site you want to have associated to the hub site. Click Settings (gear icon) > Site information > hub site association and select the desired hub.  You’ll only see the hubs you have permission to associate to. And then click Save. You will see the hub navigation appear above. The site itself will inherit the hub theme, and news and activities will begin to flow up to the hub site home page – along with a search crawl of content for any site associated to the hub site. And at any time, per a reorg or change in business direction, you can easily move sites between hub sites. This is the power of a dynamic intranet, one that can change and adapt with the ebb and flow of your ever-changing business landscape. Note: individual sites can only be associated to one hub site at a time.

Note: Sites associated with a SharePoint hub site don’t inherit the permissions of the hub site or any other sites associated with it. Each site, including the hub site, will retain their current permission settings. And as easy as it is to associate a site to a hub site, you, too, can dissaciate from one.

Learn more how to associate and dissociate your sites to and from hub sites.


Design your layout and choose you theme

Once the hub site has been established, you’ll then want to further set it up and refine it for that organization — so the hub site carries the right name and logo, the preferred navigation elements, a preferred theme, and the desired layout for news, sites and highlighted content. And all will re-flow and present beautifully within the SharePoint mobile apps.

The SharePoint mobile apps will display hub sites, and their pages, news, and content, with smooth navigation between associated sites and the scoped search experience. Find what you need on the go and get going! Install or update the SharePoint mobile app today: aka.ms/getSPmobile.

5 Tips to Keep You Cyber-Safe this Buying Season

With more consumers spending money online, sales will rise, but so will the risk of exposure to some sort of scam or cyber-crime right alongside those fabulous deals.

Black Friday and Cyber Monday may mark the high points of the holiday shopping season, but they are by no means the end of it. In a still struggling economy, with everyone searching for value, consumers will encounter technology deals that might seem too good to be true.

As reported by the Dow Jones newswires, online shopping may well top $1 billion dollars on a single day this year. With more and more consumers willing to spend money online, sales will rise, but so will the risk of exposure to some sort of scam or cyber-crime right alongside those fabulous deals.

So, how can you avoid being taken advantage of?

There are many ways to keep yourself, your privacy, and your money safe this holiday season. But, as the countdown to Christmas grows shorter, many of us abandon our common sense in the desperate pursuit of that one great gift or that one fantastic deal.

Therein lies the problem. The number one way to guard against online scams is to employ some common sense.
For example, many of us will go to extreme lengths to save a few dollars. This often includes venturing off the ‘beaten path’ and looking outside the major retailers on online auction or classified sites such as E-Bay or Craigslist, which the Better Business Bureau has cautioned against. While many of the deals offered on such sites are perfectly legitimate, the likelihood of stumbling into a scam is far greater on these sorts of sites.

Tip #1 — If a deal seems too great, it probably is, especially if it’s from an individual user or a ‘minor’ retailer. Be suspicious of any deal or sale that you can’t believe is real. Maybe you’ve found the best buy of the season, but it’s more likely that you’ve stumbled into a scam set up to defraud you and steal your money or information.
It’s also important to remember that anyone you do business with online knows more about Internet commerce — and its dangers — than you do.

An excellent Tip #2 is to do some research about any online vendor you’re considering making a purchase from. Some vendors believe quality customer service goes hand in hand with turning a profit. Others, however, such as Vitaly Borker, seem to value their bottom line over the satisfaction of their customers.

As reported in the New York Times and on Cnet.com, Borker took advantage of loopholes in credit card policies to refuse refunds and threaten customers. Only when he was in danger of being cut off by Visa and MasterCard did Borker begin meeting his customer’s needs.

Some simple research might have tipped customers off that Borker’s website was one to be avoided.

As heinous as Borker’s actions may seem, they do bring to light Tip #3 for the online shopper: understand your credit cards. Borker and other merchants like him, were able to take advantage of customers because of the rules set up by the credit cards those customers use.

With credit card purchases being the dominant form of online shopping, it’s vital that consumers know the policies of the cards they use and what recourse they have should those policies be abused.

Tip #4 — Consumers would also be wise to investigate other forms of payment, such as PayPal or Bill Me Later, a PayPal service. While alternative methods may not offer the convenience of credit cards, they may provide more security against potential scams and those who know how to abuse the system.

Regardless of where and when you shop online, Tip #5 applies: be cautious. The Internet can be a dangerous place at the best of times. During the often stressful and expensive holiday season the dangers increase exponentially.

Be wary every time you shop online and help to make sure this time remains a time of giving, and not of taking.

To read the original article in it’s entirety please Click Here

11 awesome back-to-school gadgets for students

Whether you’re just starting high school or about to graduate college, our list of essential gear for students will ensure that you have a productive—and fun—school year.

SchoolGadgets1

New school year, new school gear

With classes back in session (or about to begin), hopefully you already have everything from your back-to-school list. Laptop? Check. The perfect bag for said laptop? Check. Schedule and text books? Check and check. Though your laptop and books are, of course, your school lifeline, there are some other gadgets you can add to your list to make your life easier. From practical picks (mice, keyboards, hard drives) to streaming sticks (hey, it’s all about that work/life balance!), our gear guide is full of recommendations designed to aid you in all the demands of student life.

SchoolGadgets2

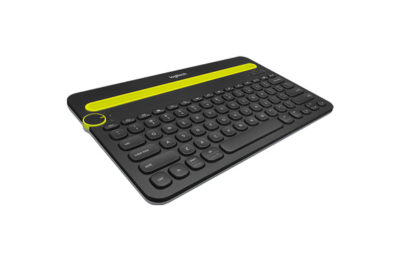
Logitech K480 Bluetooth Multi-Device Keyboard

Your standard laptop keyboard is fine, but a wireless Bluetooth keyboard that you can sync with your mobile devices might be more comfortable for serious study work.Logitech’s K480 ($50 MSRP, $30 on Amazon) can be connected to three devices at once on any platform—Mac, PC, iOS, or Android—with familiar shortcut keys for all. It also has a handy groove at the top to prop up your phone or tablet.

SchoolGadgets3

Logitech MX Master

Your laptop’s trackpad, however, is not going to cut it for extended use—you’ll be much more comfortable with a mouse. The MX Master ($100 MSRP, $70 on Amazon), also by Logitech, has customizable buttons, supports trackpad gestures, and is comfortable to use. It’s a wireless mouse; pick between Bluetooth or 2.4GHz radio frequency to connect.

SchoolGadgets4

Bose QuietComfort 35 wireless headphones

A good pair of noise-cancelling headphones is a must—something to block out roommates (If you have them) or excess library/coffee shop sounds as you’re cranking out your midterm paper. Bose’s QuietComfort 35 ($349.95 MSRP, same price onAmazon) is a pricey pair, but worth it—they’re wireless, so they won’t get in the way as you’re moving about. There’s no way to disable the noise-cancelling feature, but that’s okay—they run for 20 hours on a single charge. While the audio quality varies, the noise-cancelling feature is second to none.

SchoolGadgets5

Altec Lansing Mini Life Jacket 3

You’ll want a great-sounding Bluetooth speaker, but one that’s easy to schlep around from party to party, and one that won’t die if it gets into an accident with a red cup.Altec Lansing’s Mini Life Jacket 3 ($100 MSRP, same price on Best Buy) has a rugged exterior that’s also waterproof—it can survive a dunk for up to 30 minutes—so it’s up for the challenge. We were impressed with its good fidelity and sound quality, and loved that it comes with a hardware kit for you to mount the speaker on your bike as you cruise around campus. And at $100, it’s priced for students, too.

SchoolGadgets6

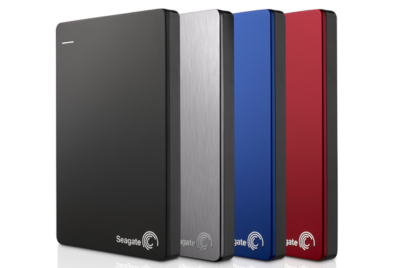
Seagate Backup Plus Slim Portable

A hard drive may not be the most exciting thing on our list, but it’s the most practical—you’ll need something to back up your hard work just in case your laptop crashes.Seagate’s Backup Plus Slim Portable ($50 to $90 MSRP, same price on Amazon) will do just that. It’s compact, comes in a variety of capacities, and is available in four different colors and finishes.

SchoolGadgets7

Fitbit Alta

A smartwatch or fitness tracker is a must-have for maintaining your work-study balance. If you’re looking for a device that handles your push notifications, reminders, and more, then go with an all-around smartwatch that’s an extension of your phone. For iPhone users, that’s easy—go with the Apple Watch ($299 MSRP and up, available at the Apple Store). For Android users, we like the Huawei Watch ($350 MSRP and up, $299 and up on Amazon) for its style, features, and customizable options.

If it’s just the fitness stuff you’re after, you can’t go wrong with the Fitbit Alta ($129.95 MSRP, $119 on Amazon). This sleek activity tracker monitors your workouts, steps, and sleep automatically, and pairs it all within the Fitbit app on your phone (it’s compatible with both iOS and Android phones) so that you can keep an eye on your habits. Reminding yourself to stay active in between study sessions has never been so easy.

SchoolGadgets8

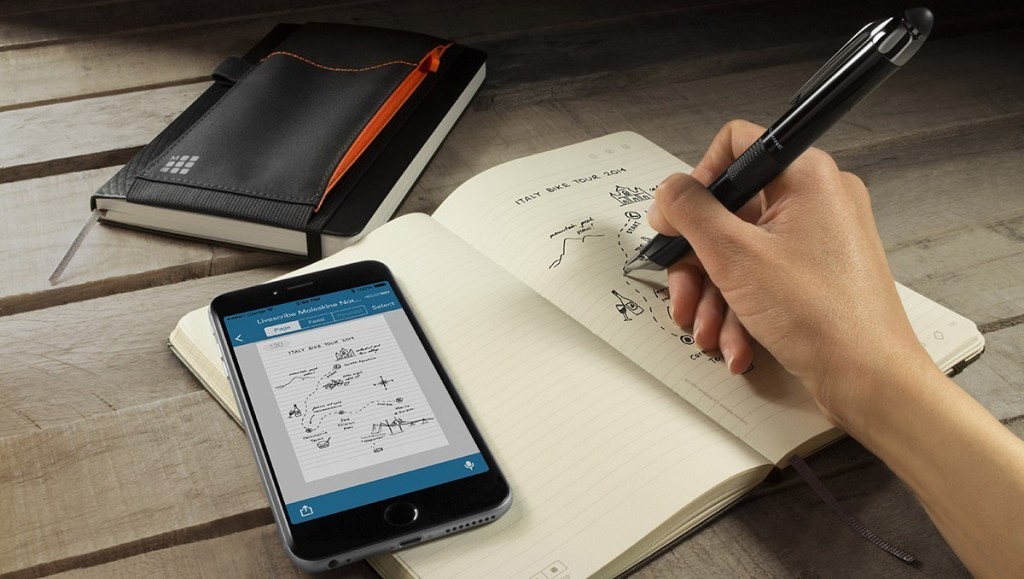
Livescribe 3

Spend one lecture with the Livescribe 3 Smartpen ($150 MSRP, $138.84 on Amazon) and corresponding app for your smartphone, and you’ll never want to go back to a regular old Bic. As you write in the Livescribe’s specialty notebooks, the smartpen sends a digital copy of your hand-written notes to your phone via Bluetooth, so you can access them at any time. It can also record audio notes through the Livescribe app on your smartphone, which get linked to your hand-written notes. When reviewing notes later, tap any word to hear what your professor was saying at that moment. If you’ve left yourself a doodle, abbreviation, or mnemonic device, tapping that word will bring you right back to the lecture. The pen itself can last 14 hours on a single charge.

SchoolGadgets9

Roku Streaming Stick

Your dorm may include a cable hookup for your TV, but it won’t play well with your Netflix subscription. The solution? Roku’s Streaming Stick ($50 MSRP, $39.01 onAmazon) a thumb-sized device that plugs into your TV or monitor’s HDMI port that streams web-based content—Netflix, Hulu, HBO Now, and more. It’s fast, has a dedicated remote, and is compatible with most of the major streaming content players.

SchoolGadgets10

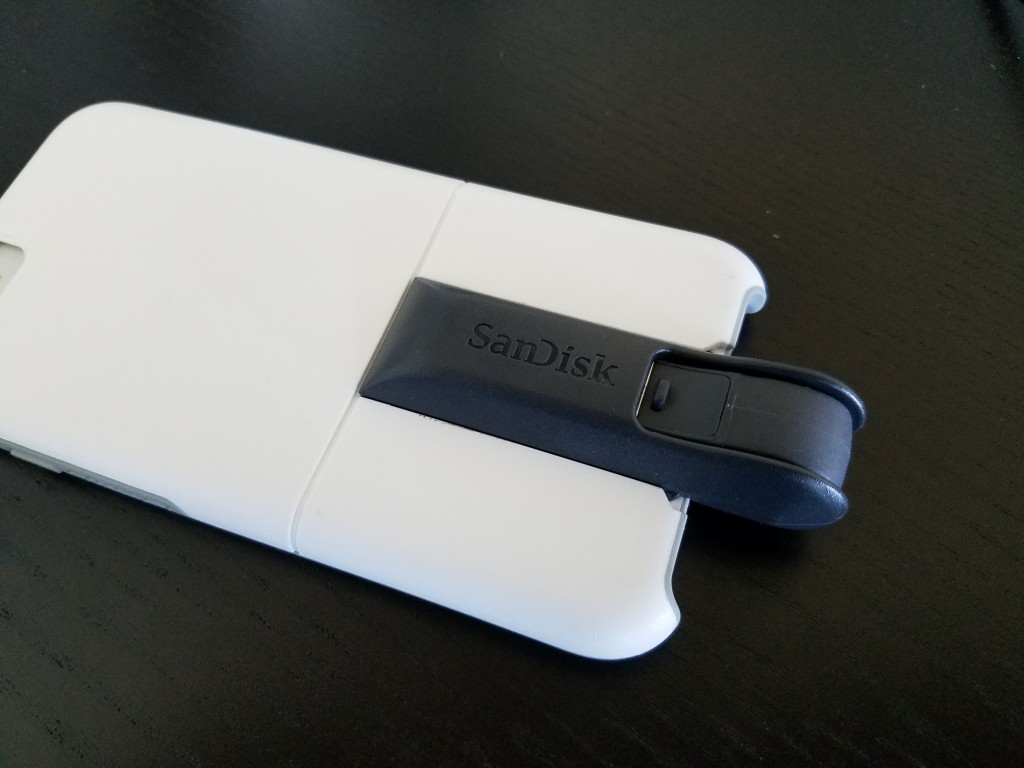
OtterBox Universe Case System

Some school days, you never know what kind of gear you’ll need. Will your smartphone make it through the day without needing a recharge? Will you want to snap a picture of something being presented during lecture? What if you need to quickly transfer a file to a classmate?

OtterBox’s Universe Case System ($49.95 MSRP for the base, modules are extra; $44.95 on Amazon) has extra add-ons that can help you do all of those things. This system consists of various accessory modules that you can attach to your iPhone via its protective case—so you can snap on a battery pack ($50 on Amazon), a flash drive (64GB for $60 on Amazon), a tripod ($30 on Amazon), and more in a pinch.

SchoolGadgets11

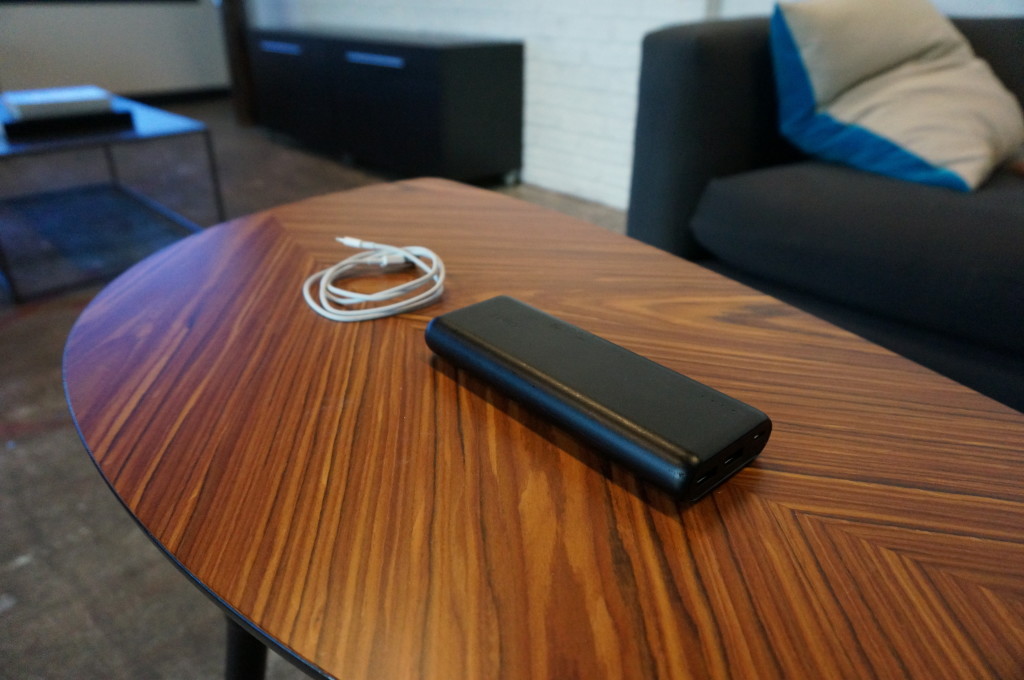
Anker PowerCore 20100

A one-device battery pack might not cut it—you may want a dedicated battery pack for a long school day, to power up your tablet or other gear besides your phone. Anker’s PowerCore 20100 ($80 MSRP, $43 on Amazon) is small, light, and powerful, with two USB ports to charge two devices at once. Its whopping 20,000mAh battery can charge your phone seven times, or your iPad mini (or other small tablet) twice.

SchoolGadgets12

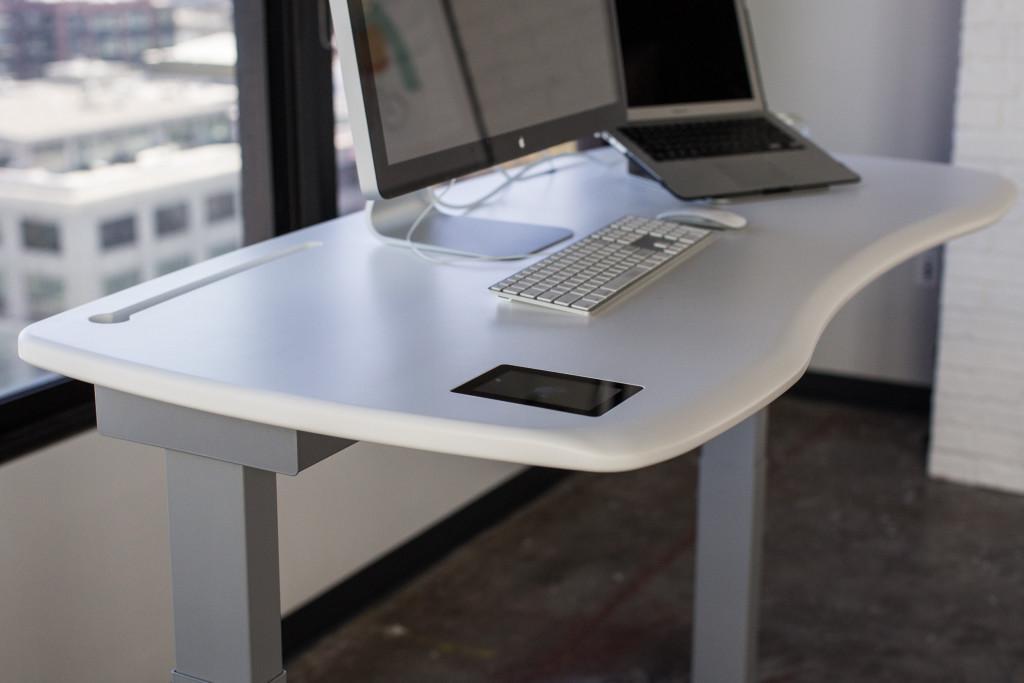
Stir Kinetic Desk M1

Standing desks are still having a moment in the health-tech spotlight, so if you’re considering a splurge on a new desk setup, dream big with Stir’s Kinetic Desk M1 ($2,990 MSRP, same price on Amazon). This smart desk is a well-built, comfortable workstation that smoothly adjusts between sitting and standing positions set to your preferences. You can tell the desk how often you’d like to stand up, and it will gently “nudge” you into your standing position by slightly raising up to coax you to move. The future is here, and this desk is proof.

Don’t have an extra $3,000 lying around? Grovemade’s Desk Collection (pictured in first slide) will keep your desk organized—and make it look like a million bucks for a fraction of the cost.

Have questions?

Get answers from Microsofts Cloud Solutions Partner!
Call us at: 856-745-9990 or visit: https://southjerseytechies.net/

South Jersey Techies, LL C is a full Managed Web and Technology Services Company providing IT Services, Website Design ServicesServer SupportNetwork ConsultingInternet PhonesCloud Solutions Provider and much more. Contact for More Information.

To read this article in its entirety click here.

Surface Book pre-orders sold out at Microsoft’s online store

If you were still thinking about placing an order for a new Microsoft Surface Book, then you will have to look somewhere other than the Microsoft store.

surfacebook

While there doesn’t seem to be a massive supply issue with the new Apple iPhone 6s smartphone, in the past we have seen Apple products sell out quickly and deliveries move from days, to weeks, to months. It seems that Microsoft’s new Surface Book may be generating more interest than planned.

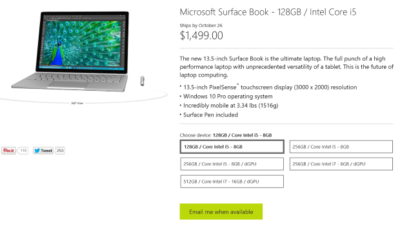
Last night I went to the online Microsoft Store to place an order for a base model Surface Book. I found that the only available status when choosing that model was, “Email me when available.” I jumped through the other four models and discovered the same thing. It seems Microsoft is sold out of pre-order stock for all models at its online store.

We reached out to Microsoft to try to find out more about stock status and when buyers could expect to place pre-orders. I also asked if there will be units in Microsoft retail stores on launch day, 26 October. Given that units are sold out online, we may even see people queue up for possible stock in stores.

A Microsoft spokesperson provided the following statement, “We’ve seen strong demand for Surface Book and have sold out of pre-order supply for October 26 availability. We will have limited quantities of Surface Book available in store on October 26 and will be updating online availability with new product ship dates soon.”

UPDATE: Microsoft updated its store and is no allowing customers to pre-order the five Surface Book variations. What you will find instead of an email me when available button is updated delivery expectations, ranging from five to six weeks for three models and seven to eight weeks for two models.

While I was disappointed that I couldn’t purchase a Surface Book through Microsoft directly, I found that Best Buy and Amazon will also be selling this new computer. Best Buy did not appear to be taking pre-orders, but I was able to purchase the Intel Core i5, 8GB, 128GB model from Amazon for $1,499.

The Amazon website does not appear to carry the 256GB i5 without dGPU or 256GB i7 models. The 256GB i5 with dGPU looks to be the only other model available for pre-order. The 512GB i7 model is on the site as an option, but redirects you to the Microsoft Store for purchase and it’s not avaialable there.

Have questions?

Get help from IT Experts/Microsofts Cloud Solutions Partner
Call us at: 856-745-9990 or visit: https://southjerseytechies.net/

South Jersey Techies, LLC is a full Managed Web and Technology Services Company providing IT Services, Website Design ServicesServer SupportNetwork ConsultingInternet PhonesCloud Solutions Provider and much more. Contact for More Information.

To read this article in its entirety click here.

South Jersey Techies

Shark Tank host, Barbara Corcoran loses $388,700 in phishing scam

Barbara Corcoran of ABC’s “Shark Tank” has lost nearly $400,000 in a phishing scam this week. Corcoran told “People” that she was tricked as a result of an email scheme sent to her team.

The high-powered businesswoman told People that she received a scam invoice approving a real estate renovation, but she didn’t think twice about verifying it because she invests in real estate. It was only until her bookkeeper caught Corcoran’s assistant’s email was misspelled by 1 letter and it was later found to be the address used by the scammer.

“I was upset at first, but then remembered it was only money,” Corcoran told the magazine.

Corcoran’s assistant Emily Burke told CNN Business that the “Shark Tank” star wouldn’t provide any additional comment “at the advisement of her attorneys until the authorities are done investigating.”

However, Corcoran tweeted: “Lesson learned: Be careful when you wire money!” with a link to a TMZ story.

In addition to being an investor and a judge on the hit ABC show, Corcoran formerly owned the global real estate agency that shares her name. She sold it for $66 million in 2001.

Corcoran fell for a phishing scam. It’s common, too: Nearly 30,000 people reported being a victim of that type of scam last year. Together they reported nearly $50 million in losses, according to the FBI’s 2018 Internet Crime Report.

Phishing attacks are common methods of stealing usernames, passwords and money. Hackers pretend to be a trustworthy source to convince you to share personal data. To be safe, it’s important to make sure the sender is authentic before clicking on a link. Google has rolled out security protections that warns people of potential unsafe emails.

If you or your team have any questions or concerns please contact support at (856) 745-9990.


If you’ve ever owned a PC with a DVD drive, you may get a $10 settlement

Don’t expect your money anytime soon, however.

DVD drives may be a thing of the past, but the past could pay you $10 via a proposed settlement from a class-action suit.

If you purchased a DVD-ROM, DVD-RW or combination drive between April, 2003 and December 31, 2008, a collection of DVD drive manufacturers have tentatively agreed to pay you $10 per drive, whether you purchased the drive as part of a PC or by itself. You’ll simply need to visit the claim site and testify (under penalty of perjury) that you indeed purchased those drives within the given time period, and live in one of the 23 states (plus the District of Columbia) covered by the suit. The deadline to file is July 1.

Why this matters: Though the optical drive market continues to decrease—“the physical disk format is somewhat obsolete in the era of content streaming,” IDC wrote last year—that wasn’t the case fourteen years ago, when virtually all software was distributed via DVD-ROM. Fortunately, the settlement site isn’t asking for proof of purchase yet, but it reserves the right to do so. Filing a claim can take literally seconds, but don’t hold your breath—you’ll probably receive compensation, but there’s no guarantee.

The wheels of justice turn slowly

Simply put, a group of 23 plaintiffs sued virtually every DVD drive manufacturer, alleging that they collectively conspired to keep drive prices higher than they normally would be, in violation of antitrust laws. Though the defendants denied they did anything wrong, several—Hitachi-LG, Panasonic, NEC, and Sony—settled and agreed to pay a collective total of $124.5 million into four separate settlement funds.

(Note that only DVD drives for PCs are covered; a DVD player, such as the one gathering dust in your living room, isn’t.)

If you do submit a claim, however, the chances of receiving your settlement soon are slim. That’s because seventeen more defendants, including various subsidiaries of BenQ, Philips, Samsung, TEAC, and Pioneer, have yet to settle, and the suit will continue until all of the claims are resolved.

“Because other defendants remain in this litigation, the plaintiffs are proposing that distribution of the settlement funds not occur at this time,” the settlement site reads. “This is to save the expenses associated with distribution.”

In fact, the settlement hearing to finally approve the Hitachi-LG-Panasonic-NEC-Sony agreement will be held on December 8. After that, payments may begin—which means that you’ll probably receive your $10 or less a year from now. Yes, less: Payments will be “up to” $10 per drive, according to the claims site.

You should probably treat the settlement like one of those “print out your own rebate” slips from the turn of the century. Even under the best of circumstances, chances are you’ll have totally forgotten about your $10 windfall by the time the check arrives.

Have questions?

Get answers from Microsofts Cloud Solutions Partner!
Call us at: 856-745-9990 or visit: https://southjerseytechies.net/

South Jersey Techies, LL C is a full Managed Web and Technology Services Company providing IT Services, Website Design ServicesServer SupportNetwork ConsultingInternet PhonesCloud Solutions Provider and much more. Contact for More Information.

To read this article in its entirety click here.

Microsoft teases Windows 10’s sleek new look for the future

“Project Neon” will give your Windows 10 PC a fresh coat of paint later in 2017.

Microsoft’s planning a sleek visual refresh for Windows 10, and the company quietly teased its first official glimpse of what’s coming in the future during the Windows Developer Day keynote on Wednesday.

There aren’t many details being shared about “Project Neon” right now—as the refresh was called in earlier leaks—but the new visual look will focus on animations and transitions. The basic concept is “to add fluidity, animation, and blur to apps and the operating system,” as first reported by Windows Central. The new design language also hopes to make it easier for developers to create attractive apps.

The design refresh should extend to all Windows 10 devices including PCs and tablets, HoloLens, Xbox, and the few surviving Windows Phones, according to Windows Central.

Twitter user Tom Hounsell shared a clean version of Microsoft’s first look at Windows 10’s forthcoming design tweaks. The image shown on the livestream had large text overlaid on top of the screenshot.

As you can see, this isn’t a huge change, but the visual refresh gives Windows 10 a sleeker, more modern feel. The taskbar icons look a little more dynamic and bolder. Cortana is using the icon instead of the search box, though it’s not clear if this will be the default look. The clock on the taskbar is also bolder, and the usual notification area icons including the Action Center are notably absent. The open Groove Music window itself looks more polished and Aero-esque as well, with no title bar to be seen—just unobtrusive options in the app’s upper-right corner.

The impact on you at home: Windows Central says that some of the code for Project Neon is already available in recent Insider Preview builds of Windows 10; however, it’s unlikely the visual refresh will be ready in time for the massive Creators Update this spring. Microsoft is expected to share more information about Neon during the Build conference in May. The Creators Update is expected to roll out in late March or early April, followed by a second major update later in 2017.

Have questions?

Get answers from Microsofts Cloud Solutions Partner!
Call us at: 856-745-9990 or visit: https://southjerseytechies.net/

South Jersey Techies, LL C is a full Managed Web and Technology Services Company providing IT Services, Website Design ServicesServer SupportNetwork ConsultingInternet PhonesCloud Solutions Provider and much more. Contact for More Information.

To read this article in its entirety click here.

Use multiple monitors with Windows 7’s Remote Desktop Connection

In Windows 7 you can connect to a remote computer and take full advantage of your local system’s multiple monitors. Here’s how.
If you’re using multiple monitors on your system setup and you regularly connect to other systems via Remote Desktop, you know how frustrating it is to go from a multiple-monitor display to a single-monitor display for your remote connection. If so, you’ll definitely want to learn how you can take advantage of multiple monitors in Microsoft Windows 7’s Remote Desktop Connection.

However, before going any further it is important to understand right off the bat that multiple-monitors support in Windows 7’s Remote Desktop is available only on Windows 7 Ultimate and Windows 7 Enterprise. (It is also available in Windows Server 2008 R2.) Furthermore, both the local and remote systems must be running one of the supported versions. For example, Windows 7 Ultimate is running on the local and Windows 7 Enterprise is running on the remote.

As long as you have the proper configuration, Windows 7 provides you with real multiple-monitor support as opposed to the monitor-spanning feature that was introduced in the previous version of Remote Desktop Connection. This means that in Windows 7 you can use this feature to connect to a remote computer and take full advantage of your local system’s multiple monitors on your remote system.

In this edition of the Windows Desktop Report, we’ll describe Windows 7’s Remote Desktop support for multiple monitors and show you how to configure it for connecting to other Windows 7 systems. we’ll also show you how to use Remote Desktop’s monitor-spanning feature when connecting to, and from, Windows versions that do not support the multiple-monitors feature.

What’s the difference?

Before we get started, let’s take a moment to discuss the different types of Remote Desktop monitor configurations you can have when using a system with multiple monitors. In the standard type of connection, Remote Desktop displays the remote system in a window on one monitor. In a connection configured with the monitor-spanning feature, Remote Desktop displays the remote system in a window on one monitor but allows you to drag or span that window across multiple monitors. In a connection configured with the multiple-monitors feature, Remote Desktop makes the remote system behave as if it were physically connected to multiple monitors. Each of these configurations is illustrated in Figure A.

Figure A
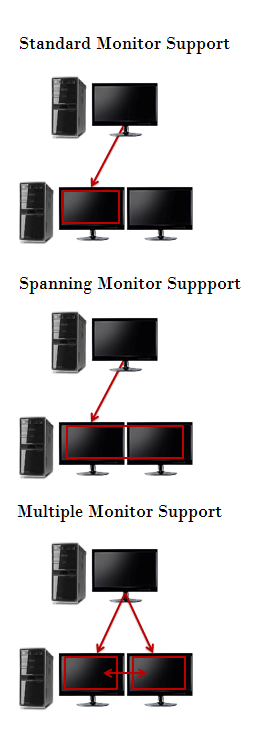
There are three types of configurations you can use when using Remote Desktop on a system with multiple monitors.

Configuring a multiple-monitors connection

If you have the proper setup, configuring Windows 7’s Remote Desktop multiple-monitor feature is easy. To begin, Launch Remote Desktop Connection and select the system you want to connect to with multiple-monitor support from the Computer drop-down list. Then, click the Options button to expand the Remote Desktop Connection window so that you can see all the tabs. Next, choose the Display tab and select the Use All My Monitors for the Remote Session check box, as shown in Figure B. To complete the procedure, return to the General tab and click the Save button.

Figure B
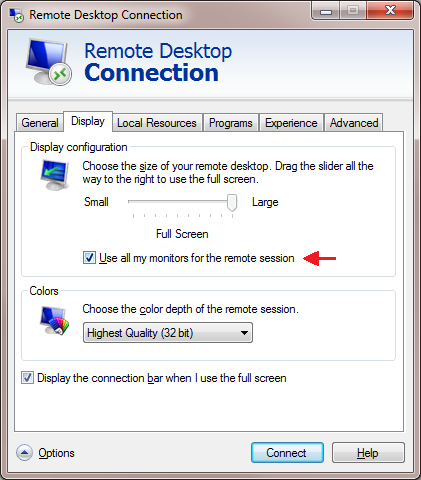
Selecting the Use All My Monitors for the Remote Session check box is all that is needed to enable the multiple-monitor feature.

When you connect to the remote system, the remote system’s monitor will instantly fill your multiple monitors, just as if it were physically connected to the monitors.

Configuring a monitor-spanning connection

As mentioned, in a connection configured with the monitor-spanning feature, Remote Desktop allows you to drag or span the window across multiple monitors. However, there are a couple of caveats. First your multiple monitors must have the same screen resolution. Second, the monitors must be aligned, or positioned, side-by-side. Third, the combined screen resolution of your multiple monitors must be under 4096 x 2048.

To launch Remote Desktop Connection with monitor-spanning support, just click the Start button and type the following command in the Start Search box. (Alternatively, you can open a Command Prompt window and type the same command.)

Mstsc /span

When you do, you’ll see the standard Remote Desktop Connection dialog box, and you can launch the connection as you normally would. As soon as you make a connection, you’ll immediately see the desktop of the remote system spread across your multiple monitors. If you need to have access to both the local and remote desktops, you can reduce the size of the remote system’s desktop to only one monitor by clicking the Restore Down button on the Remote Desktop window. As a shortcut, you can also use the keystroke: [Ctrl][Alt][Break].

Once the window is on one monitor, you use click and drag to resize the window to completely cover a single monitor. Keep in mind that when you reduce the size of a spanned remote widow, it will display both horizontal and vertical scroll bars, as shown in Figure C, that you’ll have to use to see the entire screen. However, you can instantly span the window by clicking the Maximize button.

Figure C
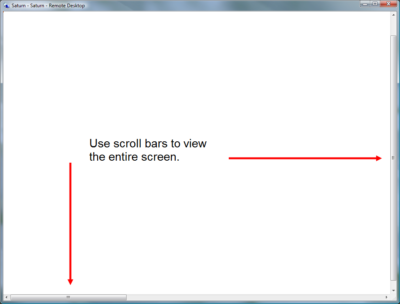
When you resize the remote desktop’s spanned window, you’ll have to use scroll bars to view the entire screen.

Creating a shortcut

Of course, using a command line to launch your Remote Desktop connection isn’t the most convenient way to use the monitor-spanning feature. Chances are that you already have a Remote Desktop Connection RDP file saved on your desktop. If so, you can create a standard Windows shortcut that will incorporate both the special command line and your RDP file.

To begin, right-click anywhere on the desktop and then select New | Shortcut from the context menu. When you see the Create Shortcut wizard, just type mstsc /span and the path to the RDP file in the text box, as shown in Figure D. Be sure that you enclose the path to the RDP file in double quotes if the path has spaces in it. To continue, click Next and give the shortcut an appropriate name, such as Saturn – Remote Spanning, and then click Finish.

Figure D
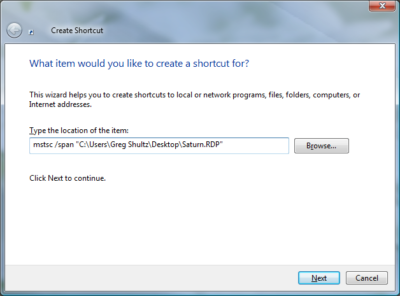
You can create a standard Windows shortcut that will incorporate both the special command line and your RDP file.

You can now use this shortcut to launch your remote desktop connection and span the Remote Desktop window across all the available space on your multiple monitors. Of course, the spanned desktop won’t exactly behave like a multiple-monitor setup when you open multiple windows. As such you’ll have to use a little creative click-and-drag resizing to reposition the windows on the spanned desktop.

Have questions?

Get answers from Microsofts Cloud Solutions Partner!
Call us at: 856-745-9990 or visit: https://southjerseytechies.net/

South Jersey Techies, LL C is a full Managed Web and Technology Services Company providing IT Services, Website Design ServicesServer SupportNetwork ConsultingInternet PhonesCloud Solutions Provider and much more. Contact for More Information.

To read this article in its entirety click here.http://www.techrepublic.com/blog/windows-and-office/use-multiple-monitors-with-windows-7s-remote-desktop-connection/

Microsoft IIS: Disabling the SSL v3 Protocol


Depending on how your Windows servers are configured, you may need to disable SSL v3.

Note that older versions of Internet Explorer may not have the TLS protocol enabled by default. If you disable SSL versions 2.0 and 3.0, the older versions of Internet Explorer will need to enable the TLS protocol before they can connect to your site.

For a Simpler Way to Disable the SSL v3 Protocol:

DigiCert is not responsible for any complications or problems if you decide to use this .zip file to disable the SSL v3 protocol on your server.

  1. Log into your server as a user with Administrator privileges.
  2. Download DisableSSL3.zip, extract the .zip file contents, and then double-click DisableSSL3.reg.
  3. In the Registry Editor caution window, click Yes.
  4. Restart server.

If you prefer to do it yourself, follow the steps in the instruction below.

Microsoft IIS: How to Disable the SSL v3 Protocol

  1. Open the Registry Editor and run it as administrator.For example, in Windows 2012:
    1. On the Start screen type regedit.exe.
    2. Right-click on regedit.exe and click Run as administrator.
  2. In the Registry Editor window, go to:HKEY_LOCAL_MACHINE\SYSTEM\CurrentControlSet\Control\SecurityProviders\Schannel\Protocols\
  3. In the navigation tree, right-click on Protocols, and in the pop-up menu, click New > Key.
  4. Name the key, SSL 3.0.
  5. In the navigation tree, right-click on the new SSL 3.0 key that you just created, and in the pop-up menu, click New > Key.
  6. Name the key, Client.
  7. In the navigation tree, right-click on the new SSL 3.0 key again, and in the pop-up menu, click New > Key.
  8. Name the key, Server.
  9. In the navigation tree, under SSL 3.0, right-click on Client, and in the pop-up menu, click New > DWORD (32-bit) Value.
  10. Name the value DisabledByDefault.
  11. In the navigation tree, under SSL 3.0, select Client and then, in the right pane, double-click the DisabledByDefault DWORD value.Windows Registry Key
  12. In the Edit DWORD (32-bit) Value window, in the Value Data box change the value to 1 and then, click OK.
  13. In the navigation tree, under SSL 3.0, right-click on Server, and in the pop-up menu, click New > DWORD (32-bit) Value.
  14. Name the value Enabled.
  15. In the navigation tree, under SSL 3.0, select Server and then, in the right pane, double-click the Enabled DWORD value.
  16. In the Edit DWORD (32-bit) Value window, in the Value Data box leave the value at 0 and then, click OK.
  17. Restart your Windows server.You have successfully disabled the SSL v3 protocol.

For instructions about disabling browser support for the SSL v3 protocol, see Disabling Browser Support for the SSL 3.0.


CALL US NOW!