Everything you need to know about the Surface Studio, Microsoft’s new all-in-one PC designed to tempt professional artists and designers over to Windows.
The Surface Studio is an all-in-one PC with premium specs, designed to wow professional artists, designers, architects and other creatives.
While the $2,999 price tag will deter most consumers, Microsoft seems to be targeting the Studio at design professionals, who would otherwise be using Apple Macs alongside specialist devices like Wacom’s Cintiq drawing tablet.
The Studio is a machine with a lot to recommend it, but one that could still be a leap too far for creatives already heavily invested in alternative tech.
Executive summary
- What it is: The Surface Studio is a high-end, all-in-one PC aimed at being a drafting table and canvas for creatives.
- Why it matters: The machine marks Microsoft’s first venture into designing desktop PCs and may put pressure on Apple and other manufacturers to crank up specs on competing machines.
- Who it is for: Artists, designers, architects — creative professionals who want a machine that shows off their work at its best.
- Why you should get it: For its super sleek, razor-sharp display that lets users draw straight onto the screen.
- Why you shouldn’t get it: The price is too high or you’re a professional already heavily invested in alternative software and hardware.
- How to get it: Pre-order online, although stock is limited according to Microsoft
What it is
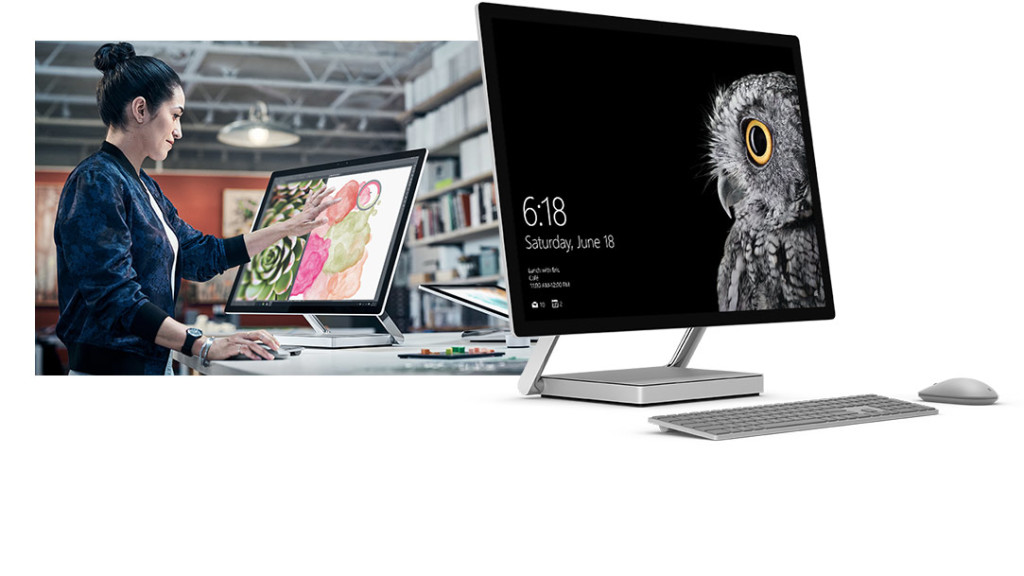
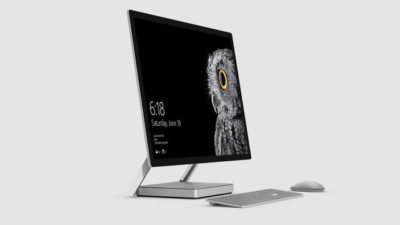
An all-in-one, Windows 10 PC designed to dazzle users with its superlative display.
The screen, a 28-inch touchscreen LCD monitor, is ‘the thinnest in the world’ according to Microsoft, and sits on a counterbalanced hinge that makes it easy to push down onto the desk, and start drawing on with a digital pen.
The monitor’s 4K+ resolution and ability to display more than one billion colors, as well as to show drawings and documents at 1:1 scale with their paper equivalents, is designed to give professionals the ability to see how their creations would look in the real world.
Sketching on the screen with the Surface Pen is made easier when the Studio is used with the newly released Surface Dial, a brushed silver knob that can be rotated to select a new color when drawing on the screen or to turn the image.
Why it matters
From the point of view of artists and designers, the Studio offers a high-end computer built around their creative needs, which does away with having to use a separate drawing tablet and computer.
Even if creatives ignore the Surface Studio, its release is good news, likely to prompt incumbents like Apple and Wacom to spec up and cut the prices of new machines — in particular for the iMac, which the Studio has been compared to many times, despite the iMac lacking a touchscreen.
By following up the immaculately designed Surface Book laptop with a striking machine like the Surface Studio, Microsoft also appears to be trying to establish itself as a competitor to Apple on the design front.
Who it is for
Broadly, the Studio seems to be aimed at anyone who draws or designs for a living.
In launch videos, the Studio was seen being used by artists, architects and product designers.
The multi-purpose nature of the Studio, a machine that combines a Windows desktop PC with the functionality of a separate digital drawing tablet, such as the Cintiq 27 QHD Touch, will likely make the $2,999 price tag easier to swallow among those in the creative industries.
Why you should get it
If you draw or design for a living there are plenty of reasons why you might want the Studio. For example, there’s the quality of the display and the ease with which the Surface Pen draws on the screen. Microsoft describes this experience as virtually as fluid as drawing on paper. Then there’s the Studio’s significant graphical processing power, the ability to view documents and drawings actual size on screen and the ease with which you can switch push down the monitor and begin drawing.
Why you shouldn’t get it
Despite the Studio’s looks, its high price makes it hard to recommend as a consumer purchase, particularly when an iMac with a higher resolution, and only very slightly smaller screen, will cost less money.
Even professional creators are unlikely to abandon their current expensive setup for a Studio, as Mikako Kitagawa, principal research analyst with Gartner, pointed out.
“An all-in-one device is not the most cost-effective device, as the users pay for both the computing unit and monitor at the same time,” she said.
“Creative professionals have already invested heavily in hardware and software. For instance, many professional illustrators use a high-end drawing tablet and high-resolution monitor at the same time.”
If those same professionals exclusively use macOS, as is the case in some creative outlets, then the high cost of switching to Windows will also be a deterrent, she said.
There is also Microsoft’s odd decision not to include the $99 Surface Dial with the Studio, despite the peripheral featuring so heavily in demos of the machine, and being particularly useful for tasks like changing colors while drawing with the Surface Pen.
How to get it
The Surface Studio is available to pre-order from Microsoft, with prices starting at $2,999 and shipping starting from 12 December. Microsoft has warned the machine will be available in limited quantities.
Tech specs:
$2,999: 1TB drive; Intel Core i5 CPU; 8GB RAM; 2GB GPU
$3,499: 1TB drive; Intel Core i7 CPU; 16GB RAM; 2GB GPU
$4,199: 2TB drive; Intel Core i7 CPU; 32GB RAM; 4GB GPU
Display: 28″ PixelSense Display; 4500 x 3000 resolution; 192 DPI; Color settings: Adobe sRGB, DCI-P3 and Vivid Color Profiles; Touch: 10-point multi-touch; Aspect ratio: 3:2 TB drive; Intel Core i5 CPU; 8GB RAM; 2GB GPU
Processor: Quad-core 6th Gen Intel Core i5 or i7
Graphics: NVIDIA GeForce GTX 965M 2GB GPU GDDR5 memory or NVIDIA GeForce GTX 980M 4GB GPU GDDR5 memory
Storage: 1TB or 2TB ‘rapid hybrid drive’
Memory: 8GB, 16GB, or 32GB RAM
Wireless: 802.11ac Wi-Fi; Bluetooth 4.0; Xbox Wireless built-in3
Dimensions: Display: 25.09 x 17.27 x 0.44 in (637.35 x 438.90 x 11.4 mm); Base: 9.84 x 8.66 x 1.26 in (250.00 x 220.00 x 32.20 mm)
Weight: 21.07 lbs max (9.56 kg)
Connections: 4 USB 3.0; Full-size SD card reader (SDXC compatible); Mini Displayport; 3.5mm headset jack; Compatible with Surface Dial onscreen interaction
Cameras: 5.0MP front-facing camera with 1080p HD video
Audio: Dual microphones; Stereo 2.1 speakers with Dolby Audio Premium
Buttons: Volume and power
Surface Pen
Surface Keyboard
Surface Mouse
Power cord with grip-release cable
Security: TPM chip for enterprise security; Enterprise-grade protection with Windows Hello face sign-in
Have questions?
Get answers from Microsofts Cloud Solutions Partner!
Call us at: 856-745-9990 or visit: https://southjerseytechies.net/
South Jersey Techies, LL C is a full Managed Web and Technology Services Company providing IT Services, Website Design Services, Server Support, Network Consulting, Internet Phones, Cloud Solutions Provider and much more. Contact for More Information.
To read this article in its entirety click here.


 Despite notable advancements in speech-recognition technology and voice input, and the popularity of tablets, the humble PC continues to be the workhorse device of choice for many workers around the world. And whether you’re an office-bound professional slouched behind a desktop PC, or a globetrotting executives armed with the latest ultrabook, the “physical” hardware keyboard continues to play a crucial role in productivity.The last thing you want in the heat of the moment is to fumble around for a mouse or have to take multiple steps to complete a task that could be done with a quick keyboard shortcut. Of course, learning and remembering such shortcuts can be hard work, and you’ll need to take some time to find the appropriate shortcuts for you.We’re here to assist. This list of valuable Windows keyboard shortcuts will help you work smarter and faster.