Back to Top

Tech, Web, Cloud & Cabling Services

Category: Microsoft

Windows 7 Remote Desktop Connection

In Windows 7 you can connect to a remote computer and take full advantage of your local system’s multiple monitors. Here’s how.

If you’re using multiple monitors on your system setup and you regularly connect to other systems via Remote Desktop, you know how frustrating it is to go from a multiple-monitor display to a single-monitor display for your remote connection. If so, you’ll definitely want to learn how you can take advantage of multiple monitors in Microsoft Windows 7’s Remote Desktop Connection.

However, before going any further it is important to understand right off the bat that multiple-monitors support in Windows 7’s Remote Desktop is available only on Windows 7 Ultimate and Windows 7 Enterprise. (It is also available in Windows Server 2008 R2.) Furthermore, both the local and remote systems must be running one of the supported versions. For example, Windows 7 Ultimate is running on the local and Windows 7 Enterprise is running on the remote.

As long as you have the proper configuration, Windows 7 provides you with real multiple-monitor support as opposed to the monitor-spanning feature that was introduced in the previous version of Remote Desktop Connection. This means that in Windows 7 you can use this feature to connect to a remote computer and take full advantage of your local system’s multiple monitors on your remote system.

In this edition of the Windows Desktop Report, we’ll describe Windows 7’s Remote Desktop support for multiple monitors and show you how to configure it for connecting to other Windows 7 systems. we’ll also show you how to use Remote Desktop’s monitor-spanning feature when connecting to, and from, Windows versions that do not support the multiple-monitors feature.

What’s the difference?

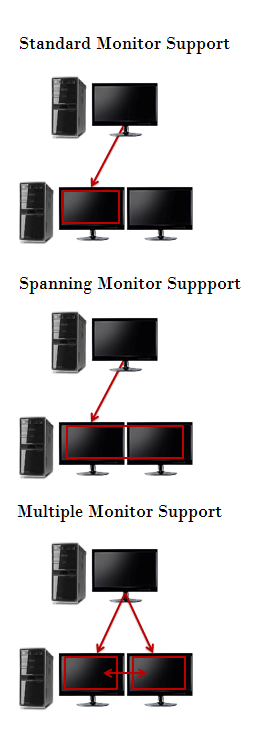
Before we get started, let’s take a moment to discuss the different types of Remote Desktop monitor configurations you can have when using a system with multiple monitors. In the standard type of connection, Remote Desktop displays the remote system in a window on one monitor. In a connection configured with the monitor-spanning feature, Remote Desktop displays the remote system in a window on one monitor but allows you to drag or span that window across multiple monitors. In a connection configured with the multiple-monitors feature, Remote Desktop makes the remote system behave as if it were physically connected to multiple monitors. Each of these configurations is illustrated in Figure A.

Figure A

There are three types of configurations you can use when using Remote Desktop on a system with multiple monitors.

Configuring a multiple-monitors connection

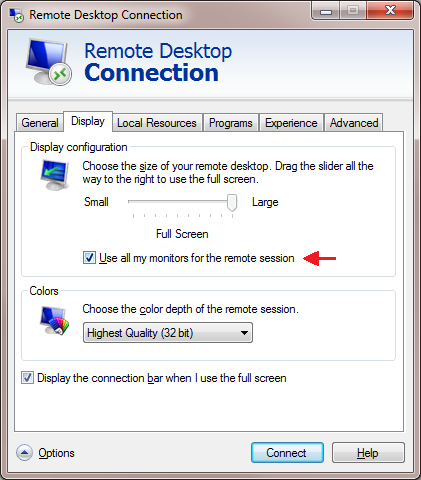
If you have the proper setup, configuring Windows 7’s Remote Desktop multiple-monitor feature is easy. To begin, Launch Remote Desktop Connection and select the system you want to connect to with multiple-monitor support from the Computer drop-down list. Then, click the Options button to expand the Remote Desktop Connection window so that you can see all the tabs. Next, choose the Display tab and select the Use All My Monitors for the Remote Session check box, as shown in Figure B. To complete the procedure, return to the General tab and click the Save button.

Figure B

Selecting the Use All My Monitors for the Remote Session check box is all that is needed to enable the multiple-monitor feature.

When you connect to the remote system, the remote system’s monitor will instantly fill your multiple monitors, just as if it were physically connected to the monitors.

Configuring a monitor-spanning connection

As mentioned, in a connection configured with the monitor-spanning feature, Remote Desktop allows you to drag or span the window across multiple monitors. However, there are a couple of caveats. First your multiple monitors must have the same screen resolution. Second, the monitors must be aligned, or positioned, side-by-side. Third, the combined screen resolution of your multiple monitors must be under 4096 x 2048.

To launch Remote Desktop Connection with monitor-spanning support, just click the Start button and type the following command in the Start Search box. (Alternatively, you can open a Command Prompt window and type the same command.)

Mstsc /span

When you do, you’ll see the standard Remote Desktop Connection dialog box, and you can launch the connection as you normally would. As soon as you make a connection, you’ll immediately see the desktop of the remote system spread across your multiple monitors. If you need to have access to both the local and remote desktops, you can reduce the size of the remote system’s desktop to only one monitor by clicking the Restore Down button on the Remote Desktop window. As a shortcut, you can also use the keystroke: [Ctrl][Alt][Break].

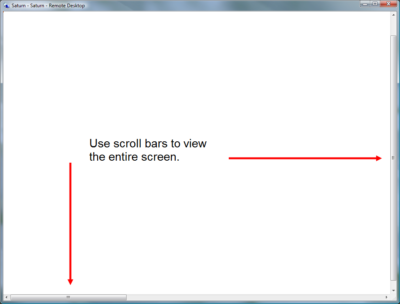
Once the window is on one monitor, you use click and drag to resize the window to completely cover a single monitor. Keep in mind that when you reduce the size of a spanned remote widow, it will display both horizontal and vertical scroll bars, as shown in Figure C, that you’ll have to use to see the entire screen. However, you can instantly span the window by clicking the Maximize button.

Figure C

When you resize the remote desktop’s spanned window, you’ll have to use scroll bars to view the entire screen.

Creating a shortcut

Of course, using a command line to launch your Remote Desktop connection isn’t the most convenient way to use the monitor-spanning feature. Chances are that you already have a Remote Desktop Connection RDP file saved on your desktop. If so, you can create a standard Windows shortcut that will incorporate both the special command line and your RDP file.

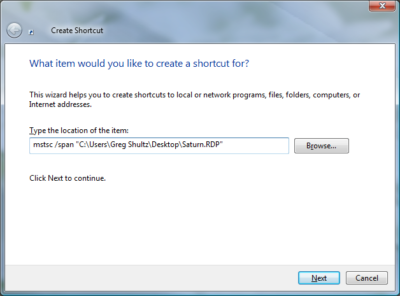
To begin, right-click anywhere on the desktop and then select New | Shortcut from the context menu. When you see the Create Shortcut wizard, just type mstsc /span and the path to the RDP file in the text box, as shown in Figure D. Be sure that you enclose the path to the RDP file in double quotes if the path has spaces in it. To continue, click Next and give the shortcut an appropriate name, such as Saturn – Remote Spanning, and then click Finish.

Figure D

You can create a standard Windows shortcut that will incorporate both the special command line and your RDP file.

You can now use this shortcut to launch your remote desktop connection and span the Remote Desktop window across all the available space on your multiple monitors. Of course, the spanned desktop won’t exactly behave like a multiple-monitor setup when you open multiple windows. As such you’ll have to use a little creative click-and-drag resizing to reposition the windows on the spanned desktop.

Have questions?

Get answers from Microsofts Cloud Solutions Partner!
Call us at: 856-745-9990 or visit: https://southjerseytechies.net/

South Jersey Techies, LL C is a full Managed Web and Technology Services Company providing IT Services, Website Design ServicesServer SupportNetwork ConsultingInternet PhonesCloud Solutions Provider and much more. Contact for More Information.

To read this article in its entirety click here.http://www.techrepublic.com/blog/windows-and-office/use-multiple-monitors-with-windows-7s-remote-desktop-connection/

Emergency Fixes for Windows Server, VPN bugs

Microsoft has released emergency out-of-band (OOB) updates to address multiple issues caused by Windows Updates issued during the January 2022 Patch Tuesday.

January 2022 Patch Tuesday

This update addresses issues related to VPN connectivity, Windows Server Domain Controllers restarting, Virtual Machines start failures, and ReFS-formatted removable media failing to mount.

All OOB updates released are available for download on the Microsoft Update Catalog, and some of them can also be installed directly through Windows Update as optional updates. You will have to manually check for updates if you want to install the emergency fixes through Windows Update because they are optional updates and will not install automatically.

Windows 10 – KB5010793
Details Here

Option 1: Run Windows Update, KB5010793 will appear under optional download.

Option 2: Download the patch from there: Microsoft Update Catalog
Please download the matching Windows 10 Version.

Windows 11 – KB5010795 or KB5008353 (may vary based on Windows Edition)
Details Here

Option 1: Run Windows Update, KB5010795 will appear under optional download. Select and install.

Option 2: Download the patch from there: Microsoft Update Catalog

If you have any questions, please call us at (856) 745-9990.


Microsoft announced Attack Simulator for Office 365 Threat Intelligence


Admins can send simulated phishing and attack emails to find security and training weaknesses.

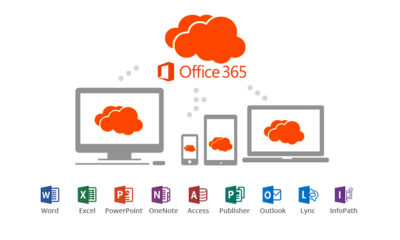
A few weeks ago, Microsoft released a public preview for Attack Simulator for Office 365 Threat Intelligence. On April 17th Microsoft announced that Attack Simulator is now generally available. Attack Simulator for Office 365 Threat Intelligence is available to all Office 365 E5 or Office 365 Threat Intelligence customers.

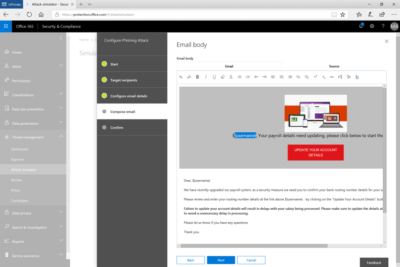
With Attack Simulator, customers can launch simulated attacks on their end users, determine how end users behave in the event of an attack, and update policies and ensure that appropriate security tools are in place to protect the organization from threats.  The GA of Attack Simulator adds a new HTML editor so realistic looking HTML emails can be sent in simulations of spear-phishing.  Also, two spear-phishing templates are available for immediate use in the spear phishing simulation.

Attack Simulator includes the three attack scenarios from our public preview.

Display Name Spear Phishing Attack: Phishing is the generic term for socially engineered attacks designed to harvest credentials or personally identifiable information (PII). Spear phishing is a subset of this phishing and is more targeted, often aimed at a specific group, individual, or organization.  These attacks are customized and tend to leverage a sender name that generates trust with the recipient.

Password Spray Attack: To prevent bad actors from constantly guessing the passwords of user accounts, often there are account lockout policies.  For example, an account will lockout after a certain number of bad passwords are guessed for a user.  However, if you were to take a single password and try it against every single account in an organization, it would not trigger any lockouts.  The password spray attack leverages commonly used passwords and targets many accounts in an organization with the hope that one of the account holder uses a common password that allows a hacker to enter the account and take control of it.  From this compromised account, a hacker can launch more attacks by assuming the identity of account holder.

Brute Force Password Attack: This type of attack consists of a hacker trying many passwords or passphrases with the hope of eventually guessing correctly. The attacker systematically checks all possible passwords and passphrases until the correct one is found.


This video demonstrates how Attack Simulator can help organizations educate users to become more secure from cyber threats.  With Attack Simulator, admins can train all their end users, and especially those who are attacked most often.  This proactive training is a powerful way to ensure that your organization can prevent the impact from advanced threats.  Over the coming months, more threat simulations will be added to Attack Simulator so organizations can simulate the most prevalent threat types from the modern threat landscape.

Experience the benefits of Attack Simulator for Office 365 Threat Intelligence by beginning an Office 365 E5 trial today.  Also, learn more about how Microsoft leverages threat intelligence and the value of threat intelligence.

Quick Tips: Flush the ARP cache in Windows 7

Here’s how to clear the Address Resolution Protocol cache and how to manage that cache with a few command switches.

The Address Resolution Protocol (ARP) cache is a crucial component of IP networking on any operating system. What ARP does is link Ethernet addressing (IP addressing) to hardware addressing (MAC addressing). Without this system, a machine could not communicate to the outside world as one addressing scheme could not communicate with the other.

The ARP Cache is a collection of ARP entries (mostly dynamic) that are created when a hostname is resolved to an IP address and then an IP address is resolved to a MAC address (so the computer can effectively communicate with the IP address).

When this happens, the PC will store that newly mapped address in the ARP cache, and it will stay there until the ARP cache entry timeout expires. This isn’t usually a problem, but sometimes a bad ARP entry can cause issues with Internet connections and Web page loading. When this occurs, one step that can be taken toward resolution is to clear the ARP cache. Yes, this means the ARP cache has to be rebuilt, which means a little more work for the PC, but that cache will rebuild fairly quickly.

Clearing the ARP cache is done completely through the command line, so stretch out those fingers and get ready to type. After we show you how to clear the ARP cache, we will show you how to manage that cache with a few command switches.

Flush the cache

Step 1: Open the command prompt

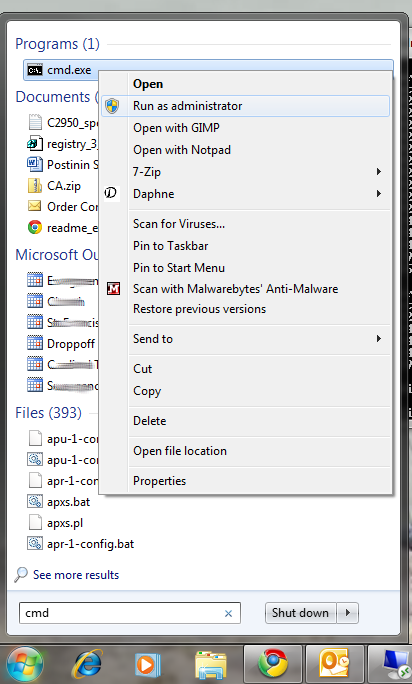
Click Start and then type “cmd” (no quotes) in the search dialog box, but don’t hit Enter yet. Right-click the cmd.exe icon and select Run as Administrator (Figure A). After answering the UAC, the terminal window will open offering up the command prompt.

Figure A

If the icon is already pinned in the Start menu, entering cmd is not necessary.

Step 2: Run the commands

The first command to run is

arp -a

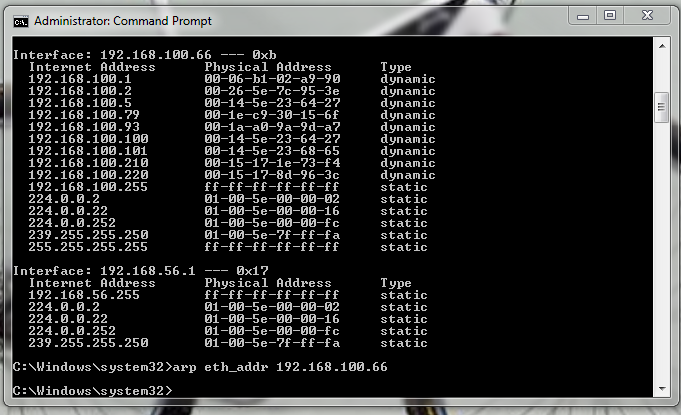
This command will display all your ARP entries (Figure B). Naturally the -a option is not the only option available. The arp command also allows for the following switches:

-d Delete an IP address (arp -d 192.168.100.10)
-d -a Delete all entries in the ARP table
-s Add an entry to the ARP table (arp -s ADDRESS MAC_ADDRESS – Where ADDRESS is the address to be added and MAC_ADDRESS is the MAC address of the machine)

Figure B

Here you see the arp cache for two different interfaces on a single machine.

To flush the entire cache, issue the following command:

netsh interface ip delete arpcache

The above command will flush the entire ARP cache on your system. Now as soon as network connections are made, the ARP cache will begin to repopulate.

Verify the flush

Once you have flushed the ARP cache, make sure to issue the command arp -a to see if the cache has, in fact, been flushed. If it does not flush, it could be the system is a victim of a Windows bug caused when Routing and Remote Services is enabled. This is a simple bug to fix:

1.           Click Start | Control Panel.

2.           Click Administrative Tools.

3.           Click Computer Management.

4.           Double-click Services and Applications.

5.           Double-click Services.

6.           Scroll down to Routing and Remote Services.

7.           Double-click Routing and Remote Services.

8.           Set the Startup Type to Disable.

9.           Make sure the service is stopped.

Now try flushing the ARP cache again. It should work this time.

Troubleshooting

It is also possible to troubleshoot network connections using the ARP cache. For example, it is important to look out for invalid ARP entries that go to a MAC address of 00-00-00-00-00-00. If one such entry shows up, make sure to delete it from the cache using the -d switch. Say you have an ARP entry that looks like:

224.0.0.24           00-00-00-00-00-00 static

In order to delete this entry, use the arp command like so:

arp -d 224.0.0.24

And that invalid entry will be gone.

Final thoughts

There are so many ways to troubleshoot networking connections. Flushing the ARP cache is just one of those methods that is rarely thought of, but when all else fails this might be the last-gasp effort that makes you the hero of the day.

Have questions?

Get answers from Microsofts Cloud Solutions Partner!
Call us at: 856-745-9990 or visit: https://southjerseytechies.net/

South Jersey Techies, LL C is a full Managed Web and Technology Services Company providing IT Services, Website Design ServicesServer SupportNetwork ConsultingInternet PhonesCloud Solutions Provider and much more. Contact for More Information.

To read this article in its entirety click here.

Use Windows 7 Event Viewer to track down issues that cause slower boot times

Here’s how to use some of the new features in Windows 7’s Event Viewer to investigate a slow boot time.

Overview

Windows 7’s Event Viewer includes a new category of event logs called Applications and Services Logs, which includes a whole host of subcategories that track key elements of the operating system. The majority of these subcategories contain an event log type called Operational that is designed to track events that can be used for analyzing and diagnosing problems. (Other event log types that can be found in these subcategories are Admin, Analytic, and Debug; however, describing them is beyond the scope of this article.)

Now, within the operating system section is a subcategory titled Diagnostic-Performance with an Operational log that contains a set of a Task Category called Boot Performance Monitoring. The Event IDs in this category are 100 through 110. By investigating all the Event ID 100 events, you will be able to find out exactly how long it took to boot up your system every time since the day you installed Windows 7. By investigating all the Event ID 101 thru 110 events, you will be able to identify all instances where boot time slowed down.

Getting started

You can find and launch Event Viewer by opening the Control Panel, accessing the System and Security category, selecting the Administrative Tools item, and double-clicking the Event Viewer icon. However, you can also simply click the Start button, type Event in the Start Search box, and press Enter once Event Viewer appears and the top of the results display.

Creating a Custom View

Once you have Event Viewer up and running, you can, of course, drill down through the Applications and Services Logs and locate the Diagnostic-Performance Operational log and begin manually looking through the events recorded in the log. However, you can save yourself time and energy by taking advantage of the new Custom View feature, which is essentially a filter that you can create and save.

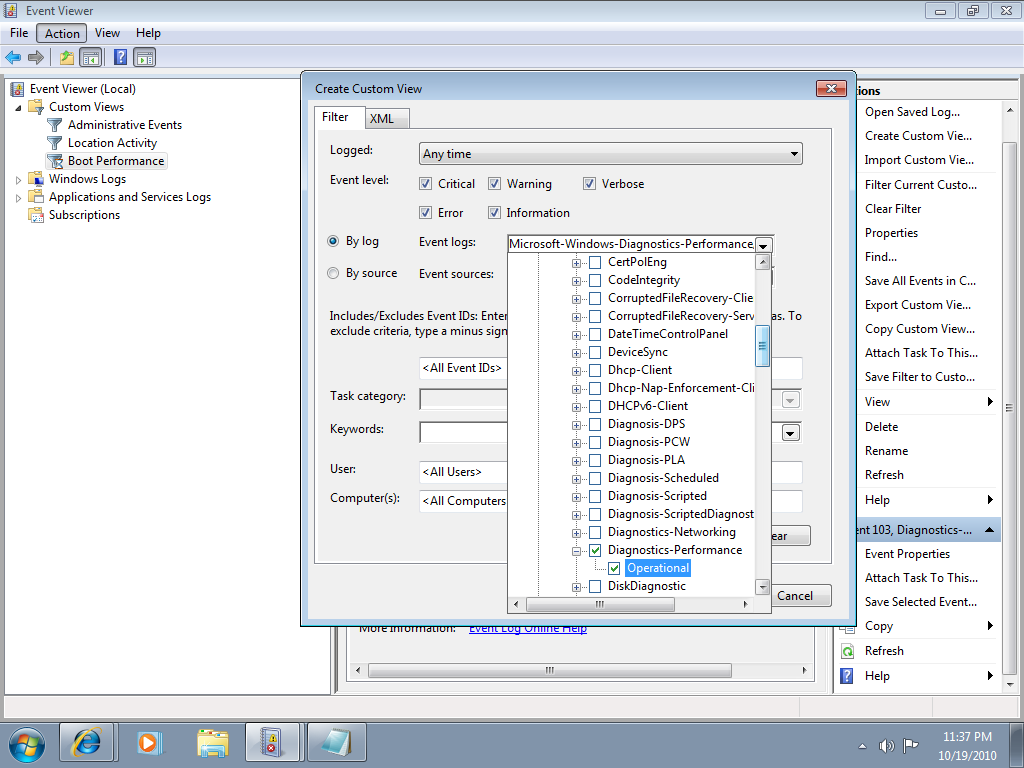
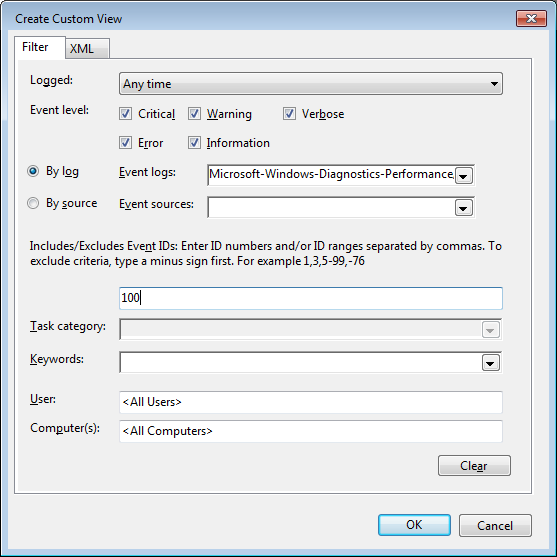
To do so, pull down the Action menu and select the Create Custom View command. When you see the Create Custom View dialog box, leave the Logged option set at the default value of Any Time and select all the Event level check boxes. Next, select the By Log option button, if it is not already selected, and click the dropdown arrow. Then, drill down through the tree following the path: Applications and Services Logs | Microsoft | Windows | Diagnostics-Performance. When you open the Diagnostics-Performance branch, select the Operational check box, as shown in Figure A.

Figure A

When you get to the Diagnostics-Performance branch, select the Operational check box.

To continue, type 100 in the Includes/Excludes Event IDs box, as shown in Figure B, and then click OK.

Figure B

Event ID 100 records how long it takes to boot up your system.

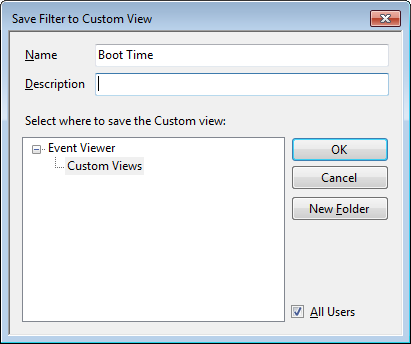
When you see the Save Filter to Custom View dialog box, enter a name, as shown in Figure C, and click OK.

Figure C

To save the filter as a Custom View, simply provide an appropriate name, such as Boot Time.

You’ll now repeat these steps and create another Custom View, and this time, you’ll type 101-110 in the Includes/Excludes Event IDs box and name it Boot Degradation.

Investigating Boot Time

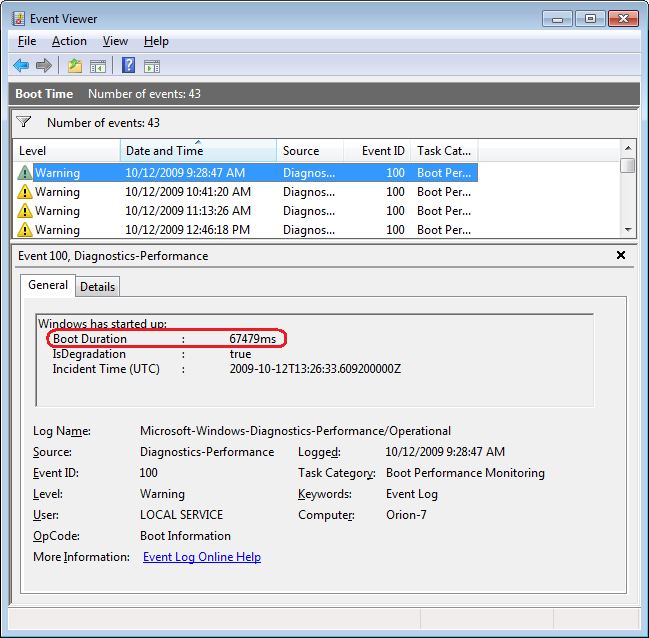
To investigate your Windows 7 system’s boot time, select Boot Time in the Custom Views tree and then sort the Date and Time column in ascending order. When you do, you’ll see a complete history of every time you have booted your system since the day you installed Windows 7. In Figure D, you can see that we have hidden the Console Tree and the Action Pane to focus on the events.

Figure D

By sorting the Date and Time column in ascending order, you’ll see a complete history of every time you have booted your system since the day you installed Windows 7.

As you can see, the first recorded Boot Time on my sample system was 67479 milliseconds in October 2009. Dividing by 1,000 tells me that it took around 67 seconds to boot up. Of course, this was the first time, and a lot was going on right after installation. For example, drivers were being installed, startup programs were being initialized, and the SuperFetch cache was being built. By December 2009 the average boot time was around 37 seconds.

In any case, by using the Boot Time Custom View, you can scroll through every boot time recorded on your system. Of course, keep in mind that there will be normal occurrences that may lengthen the boot time, such as when updates, drivers, and software is installed.

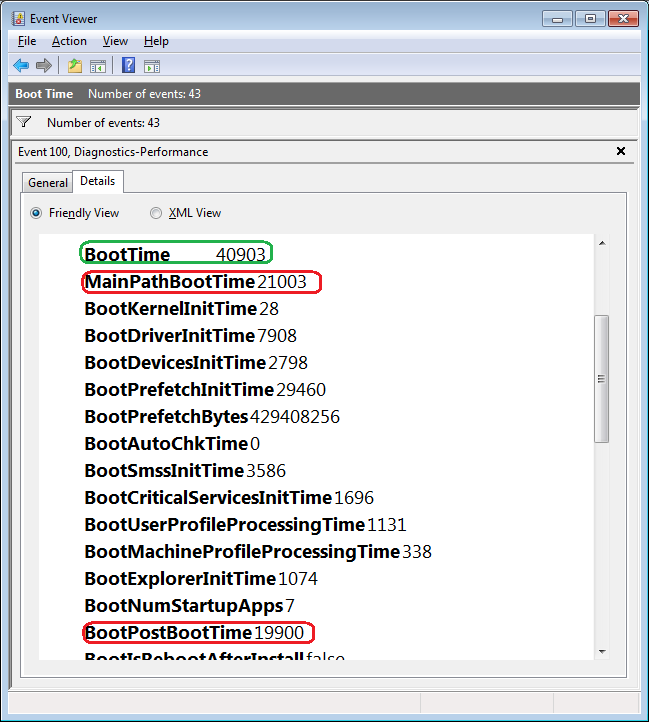
Now, if you click the Details tab, you’ll see the entire boot process broken down in an incredible amount of detail, as shown in Figure E. (You can find more information about the boot process in the “Windows On/Off Transition Performance Analysis” white paper.) However, for the purposes of tracking the boot time, we can focus on just three of the values listed on the Details tab.

Figure E

The Details tab contains an incredible amount of detail on the boot time.

MainPathBootTime

MainPathBootTime represents the amount of time that elapses between the time the animated Windows logo first appears on the screen and the time that the desktop appears. Keep in mind that even though the system is usable at this point, Windows is still working in the background loading low-priority tasks.

BootPostBootTime

BootPostBootTime represents the amount of time that elapses between the time that the desktop appears and the time that you can actually begin using the system.

BootTime

Of course, BootTime is the same value that on the General tab is called Boot Duration. This number is the sum of MainPathBootTime and BootPostBootTime. Something that we didn’t tell you before is that Microsoft indicates that your actual boot time is about 10 seconds less that the recorded BootTime. The reason is that it usually takes about 10 seconds for the system to reach an 80-percent idle measurement at which time the BootPostBootTime measurement is recorded.

Investigating Boot Degradation

To investigate instances that cause Windows 7 system’s boot time to slow down, select Boot Degradation in the Custom Views tree and then sort Event ID column in ascending order. Each Event ID, 101 through 110, represents a different type of situation that causes degradation of the boot time.

While there are ten different Event IDs here, not all of them occur on all systems and under all circumstances. As such, I’ll focus on the most common ones that we have encountered and explain some possible solutions.

Event ID 101

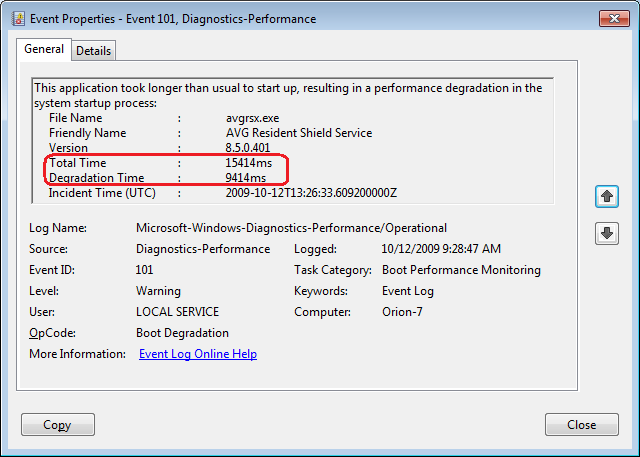
Event ID 101 indicates that an application took longer than usual to start up. This is typically the result of an update of some sort. As you can see in Figure F, the AVG Resident Shield Service took longer than usual to start up right after an update to the virus database. If you look at the details, you can see that it took about 15 seconds for the application to load (Total Time), and that is about 9 seconds longer than it normally takes (Degradation Time).

Figure F

Event ID 101 indicates that an application took longer than usual to start up.

An occasional degradation is pretty normal; however, if you find that a particular application is being reported on a regular basis or has a large degradation time, chances are that there is a problem of some sort. As such, you may want to look for an updated version, uninstall and reinstall the application, uninstall and stop using the application, or maybe find an alternative.

(In the case of my friend’s Windows 7 system, there were several applications that were identified by Event ID 101 as the cause of his system slowdown. Uninstalling them was the solution, and he is currently seeking alternatives.)

Event ID 102

Event ID 102 indicates that a driver took longer to initialize. Again, this could be the result of an update. However, if it occurs regularly for a certain driver or has a large degradation time, you should definitely look in to a newer version of the driver. If a new version is not available, you should uninstall and reinstall the driver.

Event ID 103

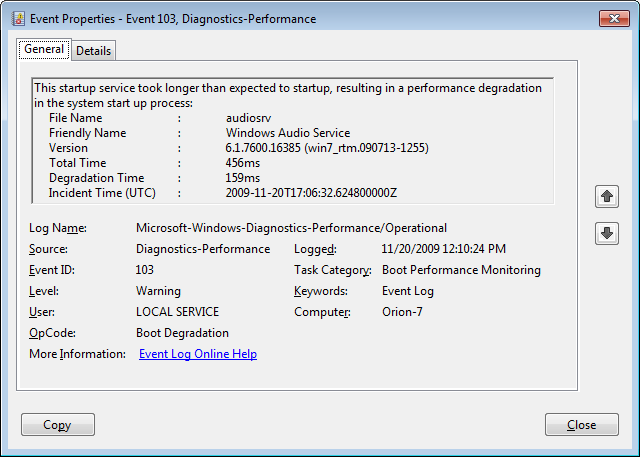
Event ID 103 indicates that a service took longer than expected to start up, as shown in Figure G.

Figure G

Event ID 103 indicates that a service took longer than expected to start up.

Services can occasionally take longer to start up, but they shouldn’t do so on a regular basis. If you encounter a service that is regularly having problems, you can go to the Services tool and experiment with changing the Startup type to Automatic (Delayed Start) or Manual.

Event ID 106

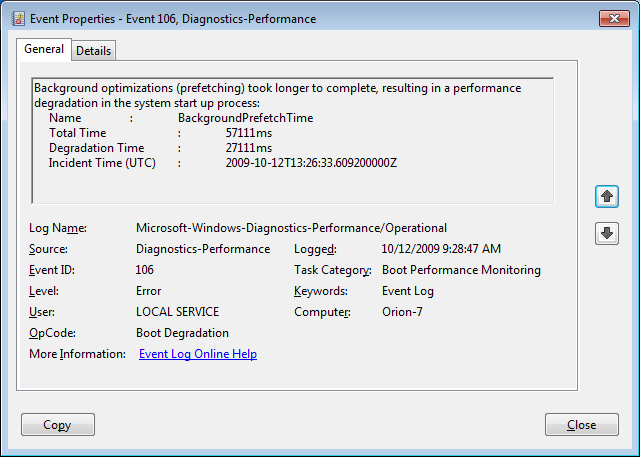
Event ID 106 indicates that a background optimization operation took longer to complete. On all the Windows 7 systems that we investigated, this event identified the BackgroundPrefetchTime as the culprit, as shown in Figure H. Since the Prefetch cache is a work in progress, this should not really represent a problem.

Figure H

Event ID 106 indicates that a background optimization operation took longer to complete.

If you encounter regular or long degradation times related to Prefetch, you may want to investigate clearing this cache and allowing the operating system to rebuild it from scratch. However bear in mind that doing so can be tricky and instructions on doing so are beyond the scope of this article.

Event ID 109

Event ID 109 indicates that a device took longer to initialize. Again, if this is happening occasionally, there shouldn’t be anything to worry about. But if it is occurring regularly, you should make sure that you regularly back up your hard disk and begin investigating replacing the device in question.

Have questions?

Get answers from Microsofts Cloud Solutions Partner!
Call us at: 856-745-9990 or visit: https://southjerseytechies.net/

South Jersey Techies, LL C is a full Managed Web and Technology Services Company providing IT Services, Website Design ServicesServer SupportNetwork ConsultingInternet PhonesCloud Solutions Provider and much more. Contact for More Information.

To read this article in its entirety click here.

Modifying the Windows 7 boot loader with the Boot Configuration Data Editor tool

In Windows Vista and later versions of Windows, the bootloader was moved from boot.ini to a utility called BCDEdit. Here’s how to modify the boot config data with the new tool.

Sometimes dual-booting a system is a handy way to test new software, a new operating system, or an application that needs to be run in a specific version of Windows. Other reasons to dual-boot might include replication of a client environment.

Windows handles dual-booting by using boot.ini to display a menu of bootable choices or partitions found on the current system. In Windows Vista and later versions of Windows, the bootloader was moved from boot.ini to a utility called BCDEdit.

Recently, we decided we could make better use of some disk space that we had set aside to create a bootable VHD for Windows Server 2008 R2. There was no data other than the OS installation contained within the file because we had used it only to prepare a blog post about booting from Virtual Hard Disks. To free up the space, we deleted the VHD.

Note: Always make sure to back up any data that you want to keep before deleting or modifying partitions on VHDs. Your changes could make the partition unbootable.

Once we had the VHD removed, we thought Windows would be smart enough to clean up the boot loader, but we were not so lucky. We had Windows 7 set as the primary OS, so we were not without a system.

We started looking around for boot.ini and was directed toward the Boot Configuration Data Editor (BCDEdit) as the utility to use when editing boot loader information in Windows 7 (and in Vista too).

To begin, open the Start menu, select All Programs, and then choose Accessories. Right-click on Command Prompt and select Run As Administrator. Once in the command window, type bcdedit. This will return the current running configuration of your boot loader, showing any and all items that can boot on this system.

In this example, we decided to remove the entry for my Windows 2008 R2 installation, as we wouldn’t need it for the time being. To remove an entry, you will need to know the Boot Loader Identifier (found in curly braces in Figure A).

Figure A

we copied the whole list into Notepad and then selected and copied just the ID, braces included.

Removing an entry from the Boot Loader

One simple command got the Windows Server 2008 R2 entry out of the boot loader. At the command prompt, enter the following:

Bcdedit /delete {boot loader identifier}

Press Enter, and the Boot Configuration Data Editor (BCDEdit) will remove the entry for the ID you specified and display a message when finished. When Windows starts, the only choice available in the boot menu should be the current Windows installation.

Warning: Be careful when editing the boot configuration data. If you mistakenly remove the current instance of Windows, you may render your computer unbootable.

Have questions?

Get answers from Microsofts Cloud Solutions Partner!
Call us at: 856-745-9990 or visit: https://southjerseytechies.net/

South Jersey Techies, LL C is a full Managed Web and Technology Services Company providing IT Services, Website Design ServicesServer SupportNetwork ConsultingInternet PhonesCloud Solutions Provider and much more. Contact for More Information.

To read this article in its entirety click here.
What did Microsoft get right in 2016?

2016 was a very good year for Microsoft in terms of decision making. Here is a  list of five things the company got right.

Since its inception way back in the ancient epoch known as the 1970s, Microsoft has often been ridiculed for making mistakes. Whether it was for bad business strategies, poor products, or unscrupulous practices, Microsoft seemed to bring out the passionate ire in many people.

But what often gets overlooked is what Microsoft does right each year. And by just about any measurement, 2016 was a remarkable year for the company. Under the leadership of Satya Nadella, Microsoft has changed its business strategy to reflect what it describes as a mobile-first, cloud-first business world. And in 2016, that strategy began show results.

Here, in no particular order, are five things Microsoft got right in 2016.

1. Windows 10 Anniversary Update

To mark the one-year anniversary of Windows 10, Microsoft released a large patch it dubbed the Windows 10 Anniversary Update. Okay, so Microsoft is not very clever in naming things. But the patch itself was well received. It included new security measures, new program features, Microsoft Edge browser extensions, and advanced support for digital pens, among many other enhancements. If you were already using Windows 10, the Anniversary Update was a must.

2. Surface Studio

While not its primary business, Microsoft has been developing some noteworthy pieces of hardware the past few years and in 2016, the company generated a large amount of buzz with the release of the Surface Studio. This elegant computer combines the best of the desktop, laptop, and tablet to create a unique and innovative platform perfect for artists, designers, and other creative people. With data visualization becoming ever more important, Microsoft may have invented the perfect tool for the big data generation.

3. Microsoft Office 365

I have been wondering aloud if it is a bit too much, but there can be no doubt that with the dozens of program and feature updates released in 2016, Microsoft Office 365 is the alpha and omega of productivity software. Rather than trying to name all of the new features, it would be best to concentrate on the underlying theme: collaboration. Whether it is Yammer, Skype for Business, or the intelligent cloud, Microsoft is concentrating on features necessary for success in a collaborative environment.

4. LinkedIn

In 2016, Microsoft made several acquisitions of both companies and their technologies. Perhaps the most high-profile of these acquisitions was LinkedIn. Despite all of its efforts to create a collaboration platform with Office 365, the one thing Microsoft needed was a social networking component. LinkedIn gives the company a jump start toward establishing a social networking presence that can compete with the likes of Twitter and Facebook. It will be interesting to see what Microsoft does with this acquisition.

5. IoT, AI, and machine learning

While we may live in a mobile-first, cloud-first world right now, the future may very well revolve around the Internet of Things (IoT), artificial intelligence, and machine learning. To its credit, Microsoft sees the potential of these technologies and has taken steps to get ahead of the curve. In terms of recent history, getting ahead of the curve is not something Microsoft has done very well, so it is difficult to know where the research will lead, but it should prove to be worth watching closely.

Despite what some people may tell you, Microsoft does do some things right. In fact, for the most part, the company does more things right than it does wrong. In 2016, Microsoft did many things right and consumers and businesses have been the beneficiaries. Let’s hope Microsoft can continue the trend in 2017.

Have questions?

Get answers from Microsofts Cloud Solutions Partner!
Call us at: 856-745-9990 or visit: https://southjerseytechies.net/

South Jersey Techies, LL C is a full Managed Web and Technology Services Company providing IT Services, Website Design ServicesServer SupportNetwork ConsultingInternet PhonesCloud Solutions Provider and much more. Contact for More Information.

To read this article in its entirety click here.
Here’s how Microsoft will integrate LinkedIn into its products

Microsoft’s massive $26.2 billion acquisition of LinkedIn finally closed, and CEO Satya Nadella explained how the companies will begin working together.

Microsoft’s $26.2 billion purchase of professional networking site LinkedIn officially came to a close on Thursday, after the deal was approved by regulators. Following the close, Microsoft CEO Satya Nadella penned a blog post on LinkedIn detailing how the website would begin integrating with Microsoft’s products.

For starters, LinkedIn identity and network capabilities will be coming to Microsoft Outlook, and to the Office suite in general, the post stated. Additionally, LinkedIn notifications will be available to users in the Windows action center as well.

Since LinkedIn is known as a digital CV of sorts, Microsoft will enable LinkedIn members who draft a résumé in Word to directly update their LinkedIn profile page, and more easily search for and apply to relevant job postings, the post said.

One of the potentially troubling integrations is “extending the reach of Sponsored Content across Microsoft properties,” as Nadella wrote on his blog. Whether that means that users will begin seeing ads in their Office apps remains to be seen, but it sets the stage for a potentially tricky user experience.

Enterprise LinkedIn Lookup will soon be powered by Active Directory and Office 365, which could make it easier for employees to connect with one another. Nadella’s blog post also noted that LinkedIn Learning will be made available across the Office 365 and Windows ecosystem, giving Microsoft shops access to new forms of training and continued learning that could prove valuable to their employees.

Additionally, Nadella wrote that the two companies would begin developing a business news desk across their existing ecosystem of content, and for MSN.com. Sales Navigator and Dynamics 365 will also be integrated in hopes of improving social selling capabilities.

Since the acquisition was first announced, it’s been fairly clear that data was the driving force behind the deal. The two companies had non-overlapping, complementary data graphs, and these integrations show just the first steps that Microsoft is taking to leverage LinkedIn’s data, along with its own, to build out a more holistic ecosystem of business technologies and services.

Current LinkedIn CEO Jeff Weiner will continue to lead the company after the acquisition, and theNew York Times reported that roughly 10,000 LinkedIn employees will join Microsoft.

The 3 big takeaways for readers

  1. Microsoft closed its $26.2 billion acquisition of social networking site LinkedIn on Thursday, with Microsoft CEO Satya Nadella outlining how the two companies will merge.
  2. LinkedIn features and services will be coming to Outlook, Office 365, Dynamics 365, and even MSN.com, with LinkedIn search getting a boost from Active Directory.
  3. The deal has always been about data, and the integrations are just the start of how the two companies will merge their individual data graphs.

Have questions?

Get answers from Microsofts Cloud Solutions Partner!
Call us at: 856-745-9990 or visit: https://southjerseytechies.net/

South Jersey Techies, LL C is a full Managed Web and Technology Services Company providing IT Services, Website Design ServicesServer SupportNetwork ConsultingInternet PhonesCloud Solutions Provider and much more. Contact for More Information.

Windows 10: The top 10 features headed your way in 2017

A look at the most significant changes due to hit Microsoft’s evolving OS in the coming year.

Microsoft has made many promises about what Windows 10 will do, and while some have materialized, others still remain ambitions.

As a perpetual work-in-progress, Windows 10 continues to accrue new features, as Windows catches up with Microsoft’s vision of it being an OS that runs anywhere, syncs with the cloud and has an intelligent assistant at its core.

While Windows 10 will be buffed up by the arrival of the Windows 10 Creators Update early next year, 2017 as a whole will see the OS undergo significant changes, some of which are long-awaited. Here’s what to look out for.

Windows 10 phones edge closer to replacing desktop PCs

Microsoft has long pushed the idea that Windows 10 on phones will be so powerful, it’ll be akin to carrying a full PC in your pocket, courtesy of the OS’ Continuum feature.

“With Continuum for phones, we believe that any screen can be your PC,” Joe Belfiore, Microsoft’s corporate VP of the operating systems group, told the Microsoft Build Developer Conference in 2015, going on to add:

“Imagine the effect this could have on mobile first countries, where individuals could be as effective with the phone that they’re buying.”

Today the reality of using Continuum on Windows 10 falls somewhat short of Belfiore’s future-gazing. While a select Windows 10 phones, such as the Lumia 950, can be hooked up to mouse, keyboard and monitor and used as a Windows desktop there are significant limitations. Only one fullscreen app can be used at a time, legacy Windows apps won’t run on existing handsets and even Universal Windows Platform apps need to explicitly support Continuum.

However, in addition to the possibility of legacy apps running on smartphones, see below, various improvements to Continuum are due to land with the Creators Update in early 2017.

These include support for more PC features, such as running multiple Windows side-by-side on the desktop, pinning apps to the Taskbar and hitting the Windows button to bring up the search box. Other improvements include the ability to keep your phone in your pocket and have it connect wirelessly to a docking station and to independently customize the Windows Start screen on the phone display and on a PC monitor.

Running classic Windows software on your phone

This one’s a rumor but based on solid foundations, and with the potential to transform Windows 10’s appeal on mobile if correct.

The big fly in the ointment when it comes to using Windows 10’s Continuum feature to run a phone as a PC is that Windows 10 phones only run Universal Windows Platform apps. This incompatibility means that widely-used Windows apps from desktop PCs can’t be used on handsets.

However, by sniffing around inside Windows 10’s code, users have uncovered signs that Microsoft is working on bringing these apps to Windows phones.

The code in question suggests that Microsoft is building an emulator that would allow desktop x86 apps to work on the ARM64-based handsets.

As reported by ZDNet’s Mary Jo Foley last month, Twitter user WalkingCat found a reference to what he termed “Windows’s hybrid x86-on-ARM64 tech” in Windows’ codebase, which also referenced the term, “CHPE.”

The clue chimed with Foley, who said her sources had told her that Windows 10 will gain this x86 on ARM64 emulation capability, but not until Fall 2017.

Foley guesses that C stands for Cobalt, the codename for x86 emulation on ARM, and that HP relates to the tech giant HP, which has been working with Microsoft on its the HP Elite x3 Windows Phone, a Windows 10 handset that can serve as a desktop PC via Continuum.

Microsoft certainly has good reasons for wanting such emulation to work. If Windows 10 phones could run as Windows desktops with full support for legacy apps, without having to resort to remote desktop software, Windows 10 phones could suddenly be far more appealing to business.

Return of OneDrive placeholders

Since the launch of Windows 10, many users have been petitioning Microsoft to reintroduce placeholders to the OS’ built-in OneDrive cloud storage service.

In Windows 8.1, placeholders, also called smart files, let users see all of their files stored on OneDrive, whether those files were stored on the device or not.

This feature was removed from Windows 10 but is now due to be bought back in Windows 10 File Explorer when browsing OneDrive. The returning feature will work in a similar fashion to Windows 8.1’s placeholders, showing users files both stored locally and on OneDrive, allowing them to download files and folders to the device and keep them in sync with OneDrive.

Orchestrate Windows apps using Linux tools

Microsoft recently updated Windows 10 to let users run a range of Linux tools from inside the OSand seems committed to continuing to improve support for Linux command-line software in Windows.

In Windows 10, Ubuntu/Linux software runs on top of the Windows Subsystem for Linux (WSL). Users run Linux software and issue commands at the command line via the Bash shell.

Microsoft is working to increase the range of commands that can be run via the shell but perhaps the most significant change on the horizon is increased interoperability between the Bash and Windows environments. Effectively this will let developers call Windows applications from within Bash — allowing them to write a Bash script to automate a complex build that includes Windows applications — and to invoke Bash applications from Windows PowerShell.

These changes will be generally available in Windows 10 after the Creators Update early next year.

Easy communication with friends and family

Next year’s Creators Update will boost Windows 10’s social credentials, with a series of changes to make it simpler to stay in touch and share content with friends and family.

The Windows MyPeople feature will allow users to pin their favorite contacts to the right-hand side of Windows taskbar. Clicking on a pinned contact’s face brings up email or Skype messages from only that person and files can be dragged files to that person’s face for quick sharing. Informal check-ins also become easier, with the Shoulder Taps feature allowing pinned contacts to send friends animated emojis and other clipart, which pop up above that contact’s face on the taskbar.

Focusing Windows around virtual and augmented reality

Microsoft plans to put 3D and virtual reality at the heart of Windows 10, as it bets on the success of low-cost headsets due out next year.

Acer, Asus, Dell, HP and Lenovo will release virtual reality head-mounted displays, with prices starting from $299.

Some of these headsets will be released in March, to coincide with the release of the Windows 10 Creators Update, which will include various tools to simplify the creation and sharing of 3D content, including a new version of Microsoft Paint.

In a demo earlier this year, Microsoft showed how Windows 10 could work on virtual reality headsets, demonstrating a mock-up of a virtual space with a large TV screen and virtual shelves stocked with apps and 3D models, and with the Edge browser appearing as a large window in the wearer’s view.

Another demo, this time using the far more expensive Microsoft HoloLens, showed Microsoft’s Edge browser as a window in the user’s vision, from which the demoer dropped actual-sized 3D models of stools from the furniture site Houzz around the room, in order to see what they looked like in real life.

Allowing Windows to function in this way is Windows Holographic, a variant of the Microsoft OS that provides a platform for virtual and augmented reality headsets to run Universal Windows Platform apps.

More detail on Microsoft’s VR and AR plans are expected this week at the WinHEC conference in China.

Better battery life

Windows 10 PCs and tablets should have better battery life after the Creators Update lands in March, thanks to changes to how the OS is patched.

The steady stream of updates isn’t going to slow down but they are going to suck up less bandwidth and reduce strain on phone and laptop batteries.

Download sizes for major updates will be cut by about 35 percent and battery life of Windows 10 mobile devices will improve, due to each device spending less time checking for updates.

The improvements will stem from Windows 10’s new Unified Update Platform, already used for Windows 10 on phones, which only updates each device with the files it needs, rather than delivering all updates to date, and doesn’t rely so heavily on the user’s device to process update data.

Windows Defender Application Guard

Coming to Windows 10 Enterprise users early next year, Windows Defender Application Guard is designed to help protect firms against online threats.

The new safeguard will add container-based isolation to Windows 10’s Edge browser.

Application Guard will ensure that when Edge accesses a website not designated as trusted, the browser will be launched inside a container, a virtualized environment isolated from the rest of the Windows OS.

If the site tries to download and run malicious code on the device, that code remains within the container, unable to permanently compromise the Windows device or the wider network, and disappears when the browser session shuts down.

Unlike the software-based sandboxes that are offered by other browsers, Microsoft says that Application Guard provides a hardware-based container that offers greater protection to the device.

Other enterprise-focused changes in the forthcoming Creators Update include improvements to Windows Defender Advanced Threat Protection’s ability to detect and respond to network attacks, an upgrade to the Windows Analytics dashboard to display additional information about the composition of IT estates, a new tool for in-place UEFI conversion, and a mobile application management feature for protecting data on employees’ personal devices.

Home Hub

Rather than building hardware to challenge voice-controlled virtual assistants such as Amazon Echo and Google Home, it seems as if Microsoft is working on transforming Windows 10 into what it calls a Home Hub.

Evidence of this shift comes from a Windows Central interview with unnamed sources. These sources claim that Home Hub will turn Windows into a shared computing environment for the home, allowing family members to more easily share calendars, apps and services.

A future-gazing Microsoft video from 2013, dug out by ZDNet’s Mary Jo Foley, shows how this system might eventually work. In it, family members share access to photos, apps and calendars on a screen attached to a wall and interact with computers around the home, for example scanning carrots to find appropriate recipes. Adding credence to the Home Hub rumor are references to Home Hub being a shared family account in Windows 10, as discovered by Twitter user WalkingCat.

ZDNet’s Foley also references a recent Microsoft job posting for a software engineer in the Windows and Devices Group, which is seeking someone to expand Windows’ “family” credentials.

According to the ad, this engineer will play a critical role in helping families to “share pictures, videos, applications, games, and other purchases easily” and to “communicate freely and stay in touch” using Windows 10.

Blue light reduction

One more unconfirmed new feature appears to be aimed at helping Windows 10 users get a good night’s sleep.

Being exposed to blue light from computer screens late at night can supposedly disrupt the body’s sleep cycle.

To counter this disturbance, Windows 10 already has f.lux software that reduces blue light emitted by screens close to bedtime.

But it seems that Microsoft may be working on its own feature to address the issue.

Twitter user Core has discovered references to “BlueLightReduction” hidden within early builds of the OS being tested under the Windows Insider Program, a setting which appears as if would be toggled from Windows 10’s Action Center.

Have questions?

Get answers from Microsofts Cloud Solutions Partner!
Call us at: 856-745-9990 or visit: https://southjerseytechies.net/

South Jersey Techies, LL C is a full Managed Web and Technology Services Company providing IT Services, Website Design ServicesServer SupportNetwork ConsultingInternet PhonesCloud Solutions Provider and much more. Contact for More Information.

To read this article in its entirety click here.
Windows 10 Anniversary Update: Watch out for these nasty surprises

A major update to Windows 10 is being rolled out. These are the gotchas that are catching out early users.

windows-10-anniversary-update

Windows 10 users are getting the first major update to the operating system in just under a year, with the release of the Anniversary Update.

But alongside the new features and fixes are some more unwelcome changes, ranging from less control for users to frozen machines.

Here are the main gotchas to look out for, as well as some fixes.

Less time to change your mind

With the arrival of the Anniversary Update, those upgrading to Windows 10 from Windows 7 or 8 have less time to switch back to the earlier OS.

Prior to the Anniversary Update, Windows 10 users had 30 days during which they could choose to reset their machine and restore their original OS. However, following the update Microsoft has reduced this period to 10 days.

Microsoft claims it reduced the period after noticing that most users who chose to switch back did so within a few days of upgrading, adding the change will free storage space on users’ machines.

The reduction also coincides with the end of period during which Windows 7 and 8 users could upgrade to Windows 10 for free – meaning those now paying $120 or more to upgrade will likely be less keen to switch back.

Frozen computers and broken systems

When you update software there is always risk that something will break, and that’s exactly what seems to be happening for some who have received the Windows 10 Anniversary Update.

The most common complaint seems to be that the update causes the computer to lock-up soon after loading the desktop.

In response to the problem, Microsoft has been advising users to run Windows 10’s Maintenance Troubleshooter and if that doesn’t work, to perform a clean boot of the system.

Meanwhile, users are reporting the most reliable fix has been to roll back to an earlier build of Windows 10.

Another repeated complaint is that Microsoft’s virtual assistant Cortana is missing from the Task Bar, replaced instead with a search box. In affected systems, Cortana also seems to be disabled inside the Edge web browser.

Some users of Avast and McAfee anti-virus – both widely used products – are also reporting problems after the upgrade, as are gamers trying to use Xbox One controllers.

Cortana is more difficult to get rid of

If you’re not a fan of Microsoft’s virtual assistant Cortana then prepare to dislike the Anniversary Update.

Following the update, it is no longer possible to turn off Cortana from the virtual assistant’s in-built Settings menu.

Instead, if users want to ditch Cortana they will need access to specific admin tools or to edit the registry.

Users can also minimise the information that Cortana collects, although thisdoes require altering various settings.

Harder for admins to block ads

Another less welcome change is that Windows 10 Pro users lose the ability to use admin tools to block ads.

Prior to the update, admins could edit Group Policy settings to stop ads for apps showing in the Start menu and on the lock screen.

However, Windows 10 Pro users will lose that ability, and, following the update, disabling these ads via Group Policy settings will only be available to those running Windows 10 Enterprise, Windows 10 Pro Education, or Windows 10 Education editions.

Individual users should be able to turn off many of these ads by disabling Windows 10 tips, tricks, and suggestions and Windows Store suggestions in the Settings app, however.

Following the Windows 10 Anniversary Update, new installs of Windows 10 will show double the number of ads for Windows Store apps in the Start Menu. Some users have also reported a possible increase in the number of ads shown on the lock screen following the update.

Have questions?

Get answers from Microsofts Cloud Solutions Partner!
Call us at: 856-745-9990 or visit: https://southjerseytechies.net/

South Jersey Techies, LL C is a full Managed Web and Technology Services Company providing IT Services, Website Design ServicesServer SupportNetwork ConsultingInternet PhonesCloud Solutions Provider and much more. Contact for More Information.
CALL US NOW!