Back to Top

Tech, Web, Cloud & Cabling Services

Category: PCs

Hardware / PCs Category

Microsoft’s latest Windows 10 ad annoys Chrome users with taskbar pop-ups

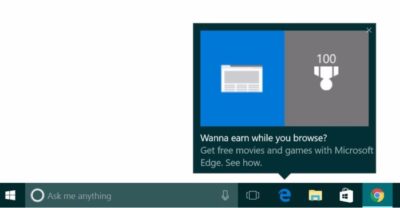
Ads on the Windows 10 taskbar aren’t just for Microsoft Edge anymore.

Microsoft’s aggressive advertising push inside Windows 10 is going beyond pop-ups for Microsoft Edge.

Myce recently spotted yet another pop-up ad on the taskbar in Windows 10. This time around Microsoft was advertising its extension for Chrome dubbed the Personal Shopping Assistant (Beta). The extension is a Microsoft Garage project that lets you compare prices across shopping sites.

Prior to the Chrome extension pop-up, Microsoft was advertising its rewards program for Microsoft Edge, which we spotted in early November. The earlier ad appeared to be targeted at people who didn’t use Edge that frequently.

A pop-up ad that promotes Windows 10’s Edge browser and Bing Rewards. The pop-up for the Chrome extension looks similar, as you can see on Myce.

The Chrome one, by comparison, is probably targeted at people who use Chrome as their default browser. Microsoft’s likely thinking that if people won’t stop using Chrome on Windows, at least they can use some Microsoft software while they’re doing it.

Microsoft told Thurrott.com that ads like the one for the Chrome extension are part of the company’s tests to provide, “new features and information that can help people enhance their Windows 10 experience.”

Tests or not, it’s unlikely that Microsoft will ever stop these taskbar ads even though users pay $100 or more for Windows. Thus far, Microsoft has advertised its own software and services.

The impact on you at home: If you want to make sure you don’t get pop-up ads on your taskbar you can turn them off. Open the Settings app and go to System > Notifications & Actions. On this screen under “Notifications” turn off Get tips, stricks, and suggestions as you use Windows. That’s not the only way Microsoft can advertise to you.

Have questions?

Get answers from Microsofts Cloud Solutions Partner!
Call us at: 856-745-9990 or visit: https://southjerseytechies.net/

South Jersey Techies, LL C is a full Managed Web and Technology Services Company providing IT Services, Website Design ServicesServer SupportNetwork ConsultingInternet PhonesCloud Solutions Provider and much more. Contact for More Information.

To read this article in its entirety click here.

11 awesome back-to-school gadgets for students

Whether you’re just starting high school or about to graduate college, our list of essential gear for students will ensure that you have a productive—and fun—school year.

SchoolGadgets1

New school year, new school gear

With classes back in session (or about to begin), hopefully you already have everything from your back-to-school list. Laptop? Check. The perfect bag for said laptop? Check. Schedule and text books? Check and check. Though your laptop and books are, of course, your school lifeline, there are some other gadgets you can add to your list to make your life easier. From practical picks (mice, keyboards, hard drives) to streaming sticks (hey, it’s all about that work/life balance!), our gear guide is full of recommendations designed to aid you in all the demands of student life.

SchoolGadgets2

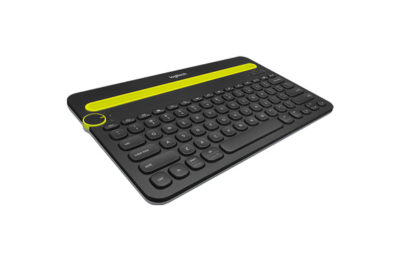
Logitech K480 Bluetooth Multi-Device Keyboard

Your standard laptop keyboard is fine, but a wireless Bluetooth keyboard that you can sync with your mobile devices might be more comfortable for serious study work.Logitech’s K480 ($50 MSRP, $30 on Amazon) can be connected to three devices at once on any platform—Mac, PC, iOS, or Android—with familiar shortcut keys for all. It also has a handy groove at the top to prop up your phone or tablet.

SchoolGadgets3

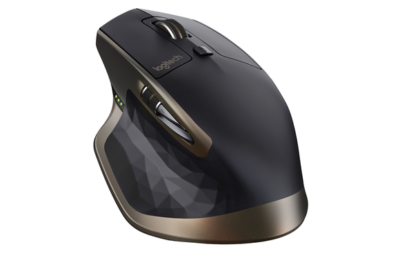
Logitech MX Master

Your laptop’s trackpad, however, is not going to cut it for extended use—you’ll be much more comfortable with a mouse. The MX Master ($100 MSRP, $70 on Amazon), also by Logitech, has customizable buttons, supports trackpad gestures, and is comfortable to use. It’s a wireless mouse; pick between Bluetooth or 2.4GHz radio frequency to connect.

SchoolGadgets4

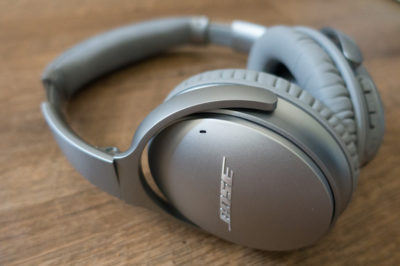
Bose QuietComfort 35 wireless headphones

A good pair of noise-cancelling headphones is a must—something to block out roommates (If you have them) or excess library/coffee shop sounds as you’re cranking out your midterm paper. Bose’s QuietComfort 35 ($349.95 MSRP, same price onAmazon) is a pricey pair, but worth it—they’re wireless, so they won’t get in the way as you’re moving about. There’s no way to disable the noise-cancelling feature, but that’s okay—they run for 20 hours on a single charge. While the audio quality varies, the noise-cancelling feature is second to none.

SchoolGadgets5

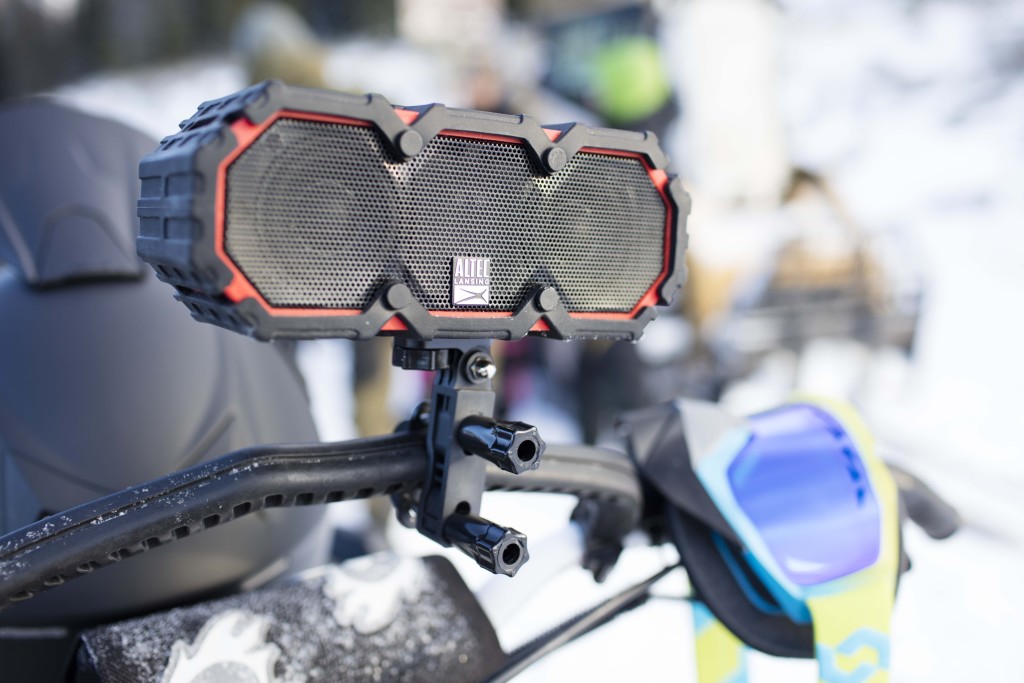
Altec Lansing Mini Life Jacket 3

You’ll want a great-sounding Bluetooth speaker, but one that’s easy to schlep around from party to party, and one that won’t die if it gets into an accident with a red cup.Altec Lansing’s Mini Life Jacket 3 ($100 MSRP, same price on Best Buy) has a rugged exterior that’s also waterproof—it can survive a dunk for up to 30 minutes—so it’s up for the challenge. We were impressed with its good fidelity and sound quality, and loved that it comes with a hardware kit for you to mount the speaker on your bike as you cruise around campus. And at $100, it’s priced for students, too.

SchoolGadgets6

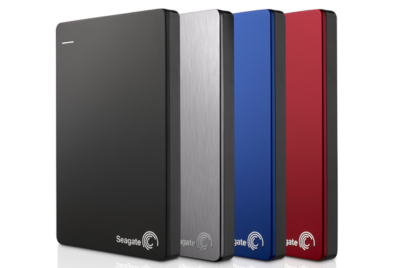
Seagate Backup Plus Slim Portable

A hard drive may not be the most exciting thing on our list, but it’s the most practical—you’ll need something to back up your hard work just in case your laptop crashes.Seagate’s Backup Plus Slim Portable ($50 to $90 MSRP, same price on Amazon) will do just that. It’s compact, comes in a variety of capacities, and is available in four different colors and finishes.

SchoolGadgets7

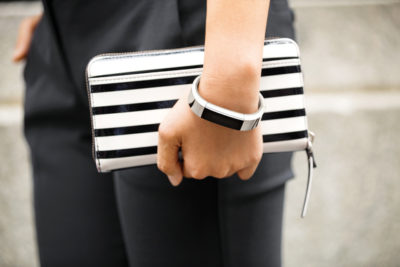
Fitbit Alta

A smartwatch or fitness tracker is a must-have for maintaining your work-study balance. If you’re looking for a device that handles your push notifications, reminders, and more, then go with an all-around smartwatch that’s an extension of your phone. For iPhone users, that’s easy—go with the Apple Watch ($299 MSRP and up, available at the Apple Store). For Android users, we like the Huawei Watch ($350 MSRP and up, $299 and up on Amazon) for its style, features, and customizable options.

If it’s just the fitness stuff you’re after, you can’t go wrong with the Fitbit Alta ($129.95 MSRP, $119 on Amazon). This sleek activity tracker monitors your workouts, steps, and sleep automatically, and pairs it all within the Fitbit app on your phone (it’s compatible with both iOS and Android phones) so that you can keep an eye on your habits. Reminding yourself to stay active in between study sessions has never been so easy.

SchoolGadgets8

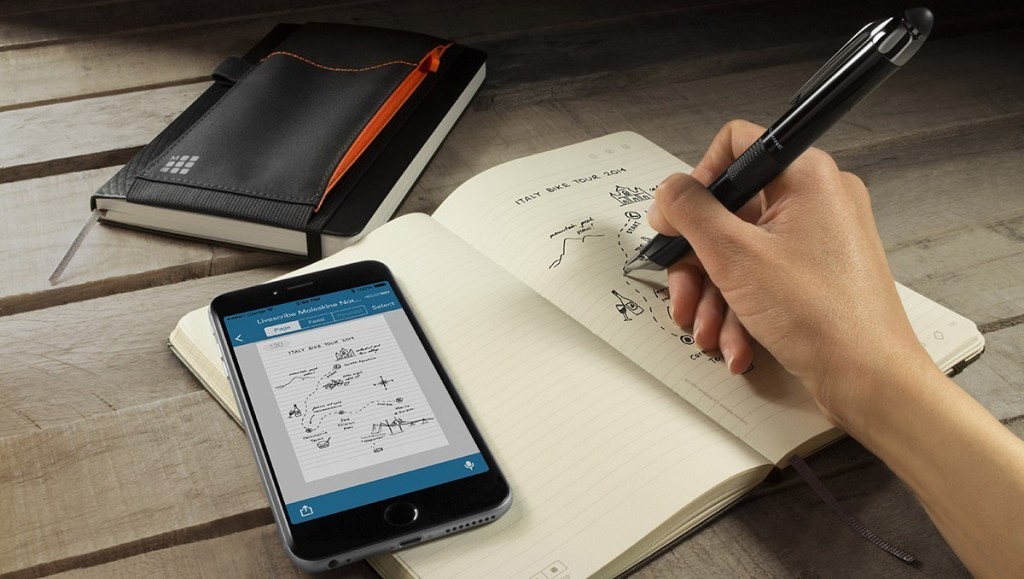
Livescribe 3

Spend one lecture with the Livescribe 3 Smartpen ($150 MSRP, $138.84 on Amazon) and corresponding app for your smartphone, and you’ll never want to go back to a regular old Bic. As you write in the Livescribe’s specialty notebooks, the smartpen sends a digital copy of your hand-written notes to your phone via Bluetooth, so you can access them at any time. It can also record audio notes through the Livescribe app on your smartphone, which get linked to your hand-written notes. When reviewing notes later, tap any word to hear what your professor was saying at that moment. If you’ve left yourself a doodle, abbreviation, or mnemonic device, tapping that word will bring you right back to the lecture. The pen itself can last 14 hours on a single charge.

SchoolGadgets9

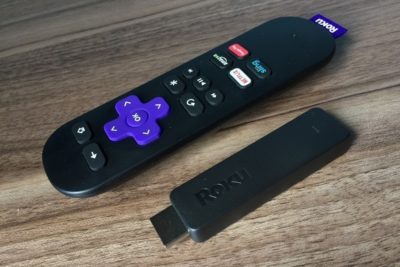
Roku Streaming Stick

Your dorm may include a cable hookup for your TV, but it won’t play well with your Netflix subscription. The solution? Roku’s Streaming Stick ($50 MSRP, $39.01 onAmazon) a thumb-sized device that plugs into your TV or monitor’s HDMI port that streams web-based content—Netflix, Hulu, HBO Now, and more. It’s fast, has a dedicated remote, and is compatible with most of the major streaming content players.

SchoolGadgets10

OtterBox Universe Case System

Some school days, you never know what kind of gear you’ll need. Will your smartphone make it through the day without needing a recharge? Will you want to snap a picture of something being presented during lecture? What if you need to quickly transfer a file to a classmate?

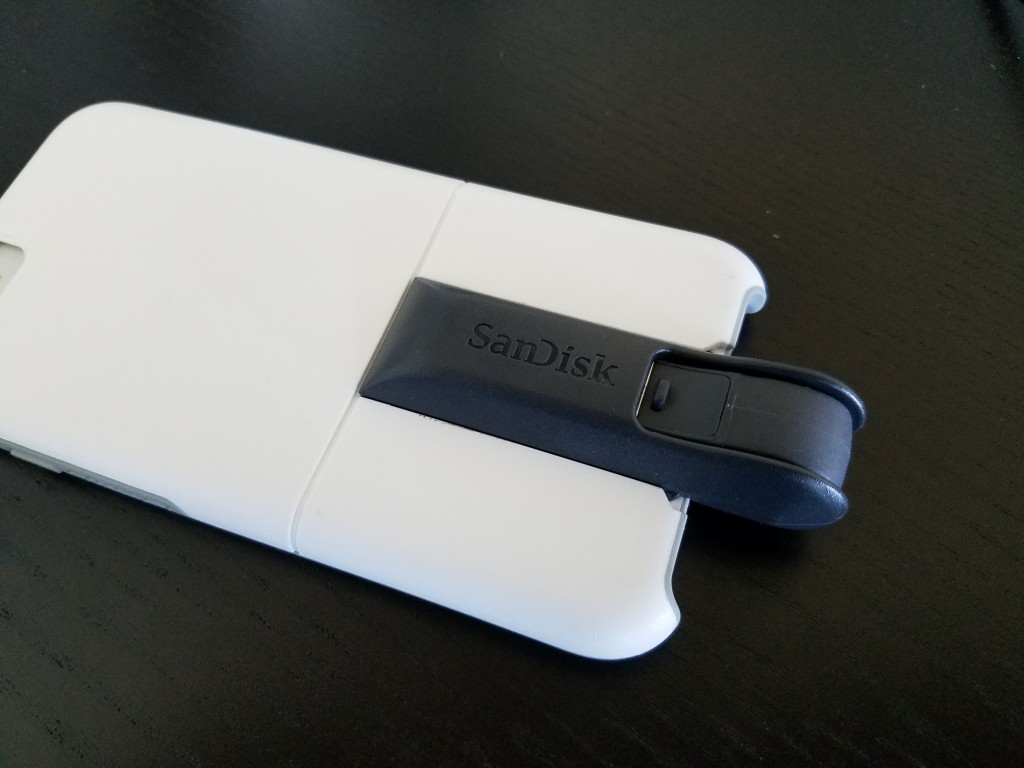
OtterBox’s Universe Case System ($49.95 MSRP for the base, modules are extra; $44.95 on Amazon) has extra add-ons that can help you do all of those things. This system consists of various accessory modules that you can attach to your iPhone via its protective case—so you can snap on a battery pack ($50 on Amazon), a flash drive (64GB for $60 on Amazon), a tripod ($30 on Amazon), and more in a pinch.

SchoolGadgets11

Anker PowerCore 20100

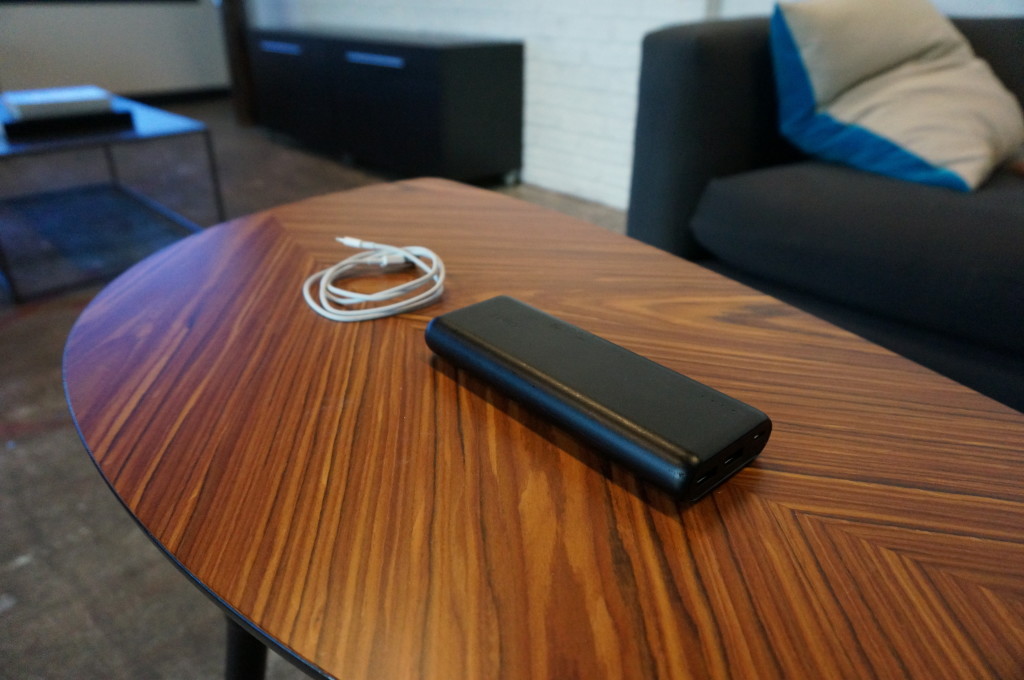
A one-device battery pack might not cut it—you may want a dedicated battery pack for a long school day, to power up your tablet or other gear besides your phone. Anker’s PowerCore 20100 ($80 MSRP, $43 on Amazon) is small, light, and powerful, with two USB ports to charge two devices at once. Its whopping 20,000mAh battery can charge your phone seven times, or your iPad mini (or other small tablet) twice.

SchoolGadgets12

Stir Kinetic Desk M1

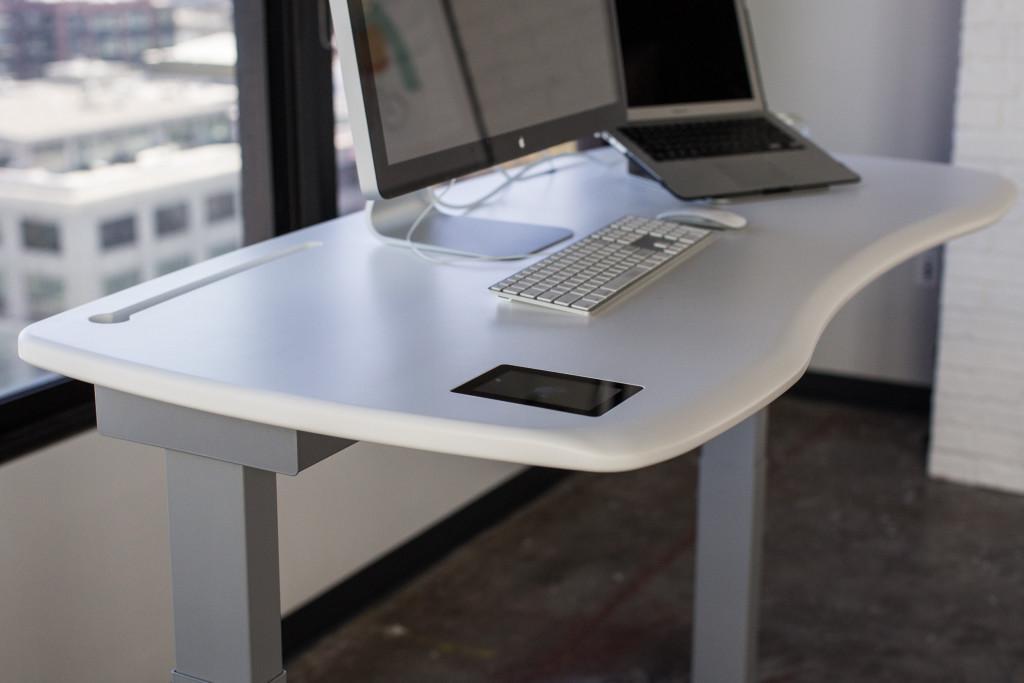
Standing desks are still having a moment in the health-tech spotlight, so if you’re considering a splurge on a new desk setup, dream big with Stir’s Kinetic Desk M1 ($2,990 MSRP, same price on Amazon). This smart desk is a well-built, comfortable workstation that smoothly adjusts between sitting and standing positions set to your preferences. You can tell the desk how often you’d like to stand up, and it will gently “nudge” you into your standing position by slightly raising up to coax you to move. The future is here, and this desk is proof.

Don’t have an extra $3,000 lying around? Grovemade’s Desk Collection (pictured in first slide) will keep your desk organized—and make it look like a million bucks for a fraction of the cost.

Have questions?

Get answers from Microsofts Cloud Solutions Partner!
Call us at: 856-745-9990 or visit: https://southjerseytechies.net/

South Jersey Techies, LL C is a full Managed Web and Technology Services Company providing IT Services, Website Design ServicesServer SupportNetwork ConsultingInternet PhonesCloud Solutions Provider and much more. Contact for More Information.

To read this article in its entirety click here.

Use multiple monitors with Windows 7’s Remote Desktop Connection

In Windows 7 you can connect to a remote computer and take full advantage of your local system’s multiple monitors. Here’s how.

If you’re using multiple monitors on your system setup and you regularly connect to other systems via Remote Desktop, you know how frustrating it is to go from a multiple-monitor display to a single-monitor display for your remote connection. If so, you’ll definitely want to learn how you can take advantage of multiple monitors in Microsoft Windows 7’s Remote Desktop Connection.

However, before going any further it is important to understand right off the bat that multiple-monitors support in Windows 7’s Remote Desktop is available only on Windows 7 Ultimate and Windows 7 Enterprise. (It is also available in Windows Server 2008 R2.) Furthermore, both the local and remote systems must be running one of the supported versions. For example, Windows 7 Ultimate is running on the local and Windows 7 Enterprise is running on the remote.

As long as you have the proper configuration, Windows 7 provides you with real multiple-monitor support as opposed to the monitor-spanning feature that was introduced in the previous version of Remote Desktop Connection. This means that in Windows 7 you can use this feature to connect to a remote computer and take full advantage of your local system’s multiple monitors on your remote system.

In this edition of the Windows Desktop Report, we’ll describe Windows 7’s Remote Desktop support for multiple monitors and show you how to configure it for connecting to other Windows 7 systems. we’ll also show you how to use Remote Desktop’s monitor-spanning feature when connecting to, and from, Windows versions that do not support the multiple-monitors feature.

What’s the difference?

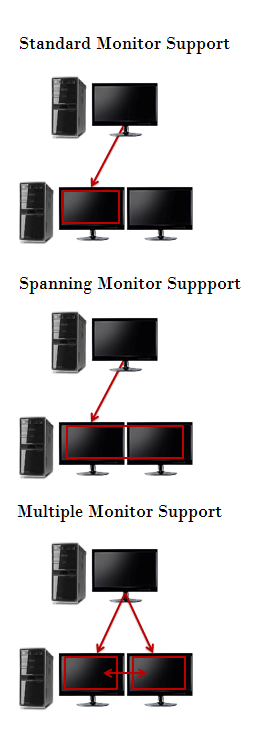
Before we get started, let’s take a moment to discuss the different types of Remote Desktop monitor configurations you can have when using a system with multiple monitors. In the standard type of connection, Remote Desktop displays the remote system in a window on one monitor. In a connection configured with the monitor-spanning feature, Remote Desktop displays the remote system in a window on one monitor but allows you to drag or span that window across multiple monitors. In a connection configured with the multiple-monitors feature, Remote Desktop makes the remote system behave as if it were physically connected to multiple monitors. Each of these configurations is illustrated in Figure A.

Figure A

There are three types of configurations you can use when using Remote Desktop on a system with multiple monitors.

Configuring a multiple-monitors connection

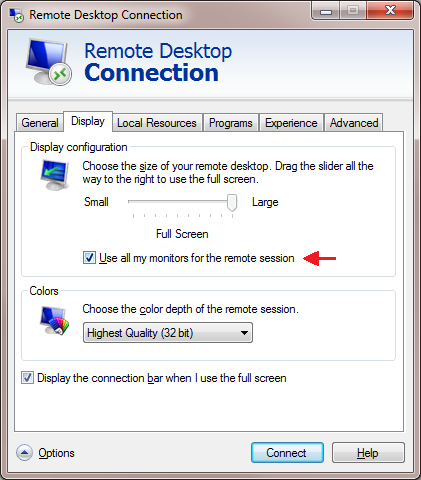
If you have the proper setup, configuring Windows 7’s Remote Desktop multiple-monitor feature is easy. To begin, Launch Remote Desktop Connection and select the system you want to connect to with multiple-monitor support from the Computer drop-down list. Then, click the Options button to expand the Remote Desktop Connection window so that you can see all the tabs. Next, choose the Display tab and select the Use All My Monitors for the Remote Session check box, as shown in Figure B. To complete the procedure, return to the General tab and click the Save button.

Figure B

Selecting the Use All My Monitors for the Remote Session check box is all that is needed to enable the multiple-monitor feature.

When you connect to the remote system, the remote system’s monitor will instantly fill your multiple monitors, just as if it were physically connected to the monitors.

Configuring a monitor-spanning connection

As mentioned, in a connection configured with the monitor-spanning feature, Remote Desktop allows you to drag or span the window across multiple monitors. However, there are a couple of caveats. First your multiple monitors must have the same screen resolution. Second, the monitors must be aligned, or positioned, side-by-side. Third, the combined screen resolution of your multiple monitors must be under 4096 x 2048.

To launch Remote Desktop Connection with monitor-spanning support, just click the Start button and type the following command in the Start Search box. (Alternatively, you can open a Command Prompt window and type the same command.)

Mstsc /span

When you do, you’ll see the standard Remote Desktop Connection dialog box, and you can launch the connection as you normally would. As soon as you make a connection, you’ll immediately see the desktop of the remote system spread across your multiple monitors. If you need to have access to both the local and remote desktops, you can reduce the size of the remote system’s desktop to only one monitor by clicking the Restore Down button on the Remote Desktop window. As a shortcut, you can also use the keystroke: [Ctrl][Alt][Break].

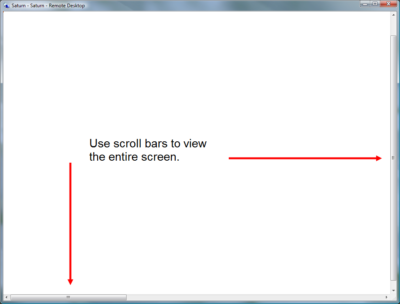
Once the window is on one monitor, you use click and drag to resize the window to completely cover a single monitor. Keep in mind that when you reduce the size of a spanned remote widow, it will display both horizontal and vertical scroll bars, as shown in Figure C, that you’ll have to use to see the entire screen. However, you can instantly span the window by clicking the Maximize button.

Figure C

When you resize the remote desktop’s spanned window, you’ll have to use scroll bars to view the entire screen.

Creating a shortcut

Of course, using a command line to launch your Remote Desktop connection isn’t the most convenient way to use the monitor-spanning feature. Chances are that you already have a Remote Desktop Connection RDP file saved on your desktop. If so, you can create a standard Windows shortcut that will incorporate both the special command line and your RDP file.

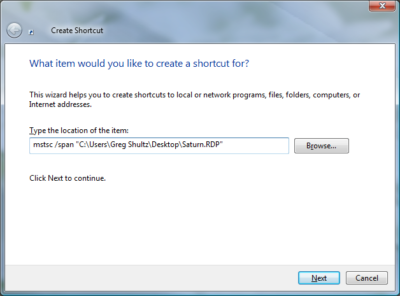
To begin, right-click anywhere on the desktop and then select New | Shortcut from the context menu. When you see the Create Shortcut wizard, just type mstsc /span and the path to the RDP file in the text box, as shown in Figure D. Be sure that you enclose the path to the RDP file in double quotes if the path has spaces in it. To continue, click Next and give the shortcut an appropriate name, such as Saturn – Remote Spanning, and then click Finish.

Figure D

You can create a standard Windows shortcut that will incorporate both the special command line and your RDP file.

You can now use this shortcut to launch your remote desktop connection and span the Remote Desktop window across all the available space on your multiple monitors. Of course, the spanned desktop won’t exactly behave like a multiple-monitor setup when you open multiple windows. As such you’ll have to use a little creative click-and-drag resizing to reposition the windows on the spanned desktop.

Have questions?

Get answers from Microsofts Cloud Solutions Partner!
Call us at: 856-745-9990 or visit: https://southjerseytechies.net/

South Jersey Techies, LL C is a full Managed Web and Technology Services Company providing IT Services, Website Design ServicesServer SupportNetwork ConsultingInternet PhonesCloud Solutions Provider and much more. Contact for More Information.

To read this article in its entirety click here.http://www.techrepublic.com/blog/windows-and-office/use-multiple-monitors-with-windows-7s-remote-desktop-connection/

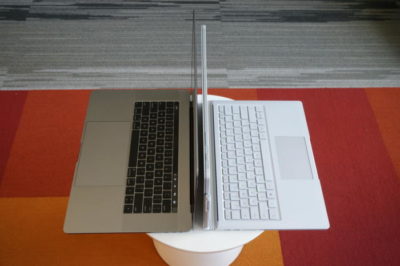
Surface Book i7 vs. MacBook Pro: Fight!

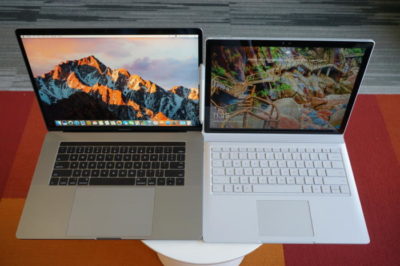
Now that Apple’s introduced the first major update to its MacBook Pro lineup in years, it’s time to square off the best of the best in Mac and PC laptops to see who currently prevails in this age-old rivalry. 
The contenders

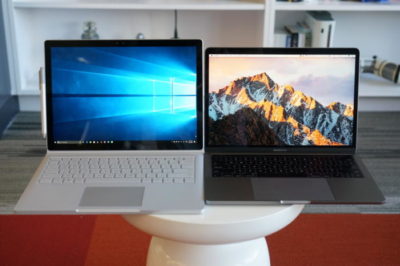
The newest Surface Book is a top-of-the-line model with a Core i7-6600U, a GeForce GTX 965M, 16GB of RAM, and a 1TB SSD. The updated product line varies from $2,400 to $3,300 (our model) in price. All three net you a 6th-gen Skylake dual-core Core i7 chip, and all three get you the same Performance Base with a GeForce GTX 965M. The only differences are in the size of the SSD and how much RAM you get. Only the SSD would affect performance significantly.

On the Apple side, the contender is a $2,400 MacBook Pro 15 with a quad-core Core i7-6700HQ, 16GB of LPDDR/2133, and a 256GB SSD. I also had partial access to two MacBook Pro 13’s. The first was the non-touch bar model with a Core i5-6360U, 8GB of LPDDR/1866, and a 256GB SSD ($1,500). The second was the Touch Bar version with a Core i5-6267U, 8GB of LPDDR/2133, and a 256GB SSD ($1,800).
Why this contest isn’t rigged

Let’s make it clear from the outset: This isn’t a direct comparison of the laptops based on cost, but an attempt to compare the performance of the new MacBook Pros to that of similar PC laptops.

For those who’ve noticed the considerable price delta between the Surface Book i7 and the 15-inch MacBook Pro, the stack of other PCs used in this comparison will help smooth out that line. You might argue that it’s silly to compare a $3,300 Surface Book i7 against an $1,800 MacBook Pro 13, or a $1,100 Dell XPS 13 against an $1,800 MacBook Pro 13, or a $1,400 Dell XPS 15 against a $2,400 MacBook Pro 15. But these are all real-world models that you’ll find in a store, rather than configurations contrived to hit a number. Price differences are just part of the comparison puzzle.

For the same reason, we’re not loading the same OS on all the laptops—no OSX on PCs, no Windows on Macs. Real people wouldn’t do that, and neither will we.
Cinebench R15 multi-threaded performance

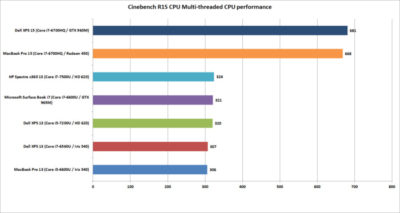
Our first test is Cinebench R15. This is a 3D rendering test based on Maxon’s Cinema4D engine. The test is heavily multi-threaded, and the more cores or threads you can throw at it, the better the performance. The test is is a pretty harsh reminder that if your tasks demand a quad-core, listen to them.

Between the two quad-cores, the Dell XPS 15 crosses the finish line first—but not by much. Let’s just call it mostly a tie.

Among the dual-cores, the Core i5-based MacBook Pro 13 is last, but not by much. It’s basically the same as the last-gen XPS 13 with a similar Core i7-6560U.

The surprise is where the Surface Book i7 finishes. Its 6th-gen CPU is hanging right with the 7th-generation Kaby Lake CPUs in the new HP Spectre x360 13 and the new Dell XPS 13.
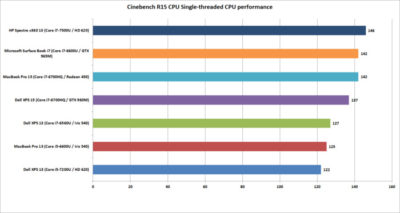
Cinebench R15 single-threaded performance

Cinebench R15 has an optional test that lets you measure the single-threaded performance. It’s a valuable way to gauge how fast a laptop will be in applications or tasks that don’t use all the cores available.

The surprise to many will be the result from the Dell XPS 13. Its 7th-generation Core i5 CPU could hang with the Core i7 chips on heavier loads, but on lighter loads, it ends up being last. That’s because Core i7 chips in laptops excel at short, “bursty” loads. Once you heat them up, the clock speeds crank back. When running a test in single-threaded mode, the Core i7’s advantage with short burst loads shows up big-time.

The real shocker is how the HP Spectre x360 with a 7th-gen CPU comes out the clear winner. The quad-core MacBook Pro 15 or Dell XPS 15 were expected to lead the pack, but nope. That Kaby Lake CPU is indeed pulling its weight.
Cinebench R15 OpenGL performance

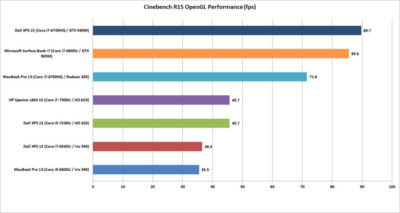
Our last Cinebench R15 test measures performance with OpenGL, a popular graphics API used for rendering professional CAD/CAM applications and a few games.

The results here break down into three bands. At the bottom is the new MacBook Pro 13 and an older Dell XPS 13 model. Both use Intel’s Skylake CPU and include “faster” Iris 540 graphics with 64MB of embedded DRAM inside the CPU. Both are nearly dead-even, which validates this test for comparing OSX to Windows 10 performance.

The second band up is a shocker to me. The pair of 7th-gen Kaby Lake laptops from Dell and HP are a good 25 percent faster than the 6th-gen Skylake laptops in OpenGL. The Iris 540 laptops were expected to come out in front. The results made us wonder whether this isn’t some driver optimization that Intel put into Kaby Lake but not Skylake.

The last band is the graphics performance of the discrete-GPU laptops. Unexpectedly, the GeForce GTX 960M in the XPS 15 finishes just ahead of the GTX 965M in the Surface Book i7. The MacBook Pro 15, with its Radeon Pro 450, finishes in a firm third place. Some MacBook Pro reviews have said the graphics don’t measure up in games, while in “work”-related tasks, they rules. So far, no one has seen that to be true.
GeekBench 4.01 multi-threaded performance

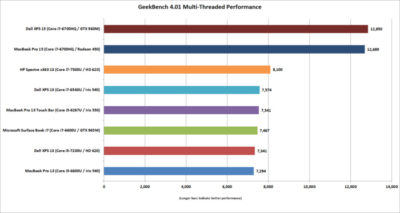
Another popular cross-platform benchmark is Primate Lab’s GeekBench. Experts may disdain its cross-platform results between ARM and x86. Within the same micro-architecture, however, it’s pretty kosher, especially when running the newest 4.01 version of the popular test. There is  also a score to report for the MacBook Pro 13 with Touch Bar

The first result we’ll look at is the multi-threaded performance. Like Cinebench R15, you can see the quad-core XPS 15 and MacBook Pro 15 step away from the dual-core laptops. It’s just more proof that if your tasks really need a quad-core chip, pay for it.

On the dual-cores, the redesigned HP Spectre x360 13 again shows the newest 7th-gen Core i7’s clock speed advantage over the Skylake models. The Surface Book i7 and MacBook Pro are pretty much dead-even. For MacBook Pro 13 fans that might be something to crow about, because we’re talking about a Core i5 MacBook Pro 13 vs. a Core i7 Surface Book.
GeekBench 4.01 single-threaded performance

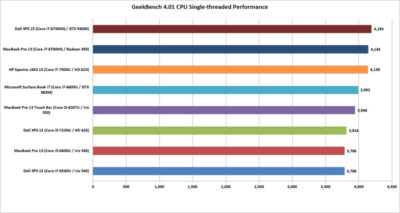
Moving on to the single-threaded performance in GeekBench 4.01, there are a few patterns we can discern. First, that 7th-gen Core i7 in the HP Spectre x360 13 is indeed faster in lighter loads, outpacing the Surface Book i7 and the Core i5-equipped MacBook Pro 13 with Touch Bar.

The Dell XPS 15 inches over the MacBook Pro 15, but the real takeaway is this: If you don’t do many multi-threaded tasks on your laptop, you don’t need a quad-core CPU.
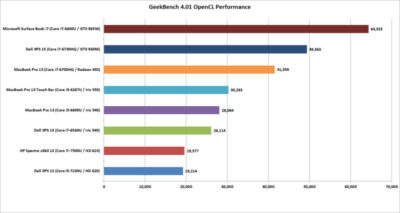
GeekBench 4.01 OpenCL performance

GeekBench also has an OpenCL test that simulates popular Computer Language tasks on a GPU that would normally be handled by the CPU.

The first takeaway: Unlike in the OpenGL performance tests, the older Iris 540 in the Skylake dual-cores is faster than the Kaby Lake integrated graphics for whatever tasks Prime Labs thinks best represent OpenCL.

The second takeaway: OpenCL loves fast GPUs. The Surface Book i7 and its GTX 965M run away with this test, and trash the MacBook Pro 13. For those who didn’t pony up for the MacBook Pro’s faster Radeon Pro 455 or 460 GPU, it’s hard to watch how thoroughly the the Surface Book i7 smokes the 450-equipped MacBook Pro. The Surface Book’s GTX 965M even makes a mockery of the GTX 960M in the XPS 15.
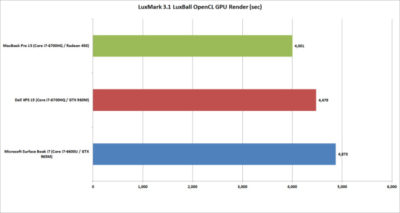
LuxMark 3.1 OpenCL GPU Render Performance

When you play the benchmarketing game, one truth that’s often overlooked is that no one test defines the entire category. You can’t take the results from Geek Bench 4.01 OpenCL and declare it representative of all OpenCL performance.

To balance Geek Bench 4.01, I also ran the free LuxMark 3.1 OpenCL test. This takes a scene and renders it using the LuxRender engine on the GPU (or CPU if you ask it to.)

The results put these GPUs a lot closer than the OpenCL numbers from Geek Bench 4.01 would have you believe. In the end, both the XPS 15 and Surface Book i7 again both clearly win. But would this be true if it were a Radeon 460 in the MacBook Pro 15? Probably not.
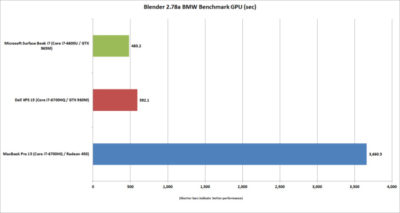
Blender 2.78 Performance

The last “work”-related graphics test we’ll run is Blender 2.78. This a free rendering application popular in a lot of indie movies. For a test render file, I used Mike Pan’s BMW Benchmark and set Blender to ray-trace the scene on the GPU rather than the CPU. The result is, frankly, beyond ugly. The Surface Book i7 finished in about eight minutes, and the XPS 15 took another two more minutes. The MacBook Pro 15 took more than an hour to complete the task.

This doesn’t mean the MacBook Pro 15’s Radeon Pro 450 is a dog. The other benchmarks should tell you that the Apple isn’t that bad in some tasks. Still, this kind of performance disparity indicates a serious problem at the OS or driver level, or something with this compile of Blender. Unless or until that mystery is solved, you’ll want to do your Blender renders on a PC laptop.
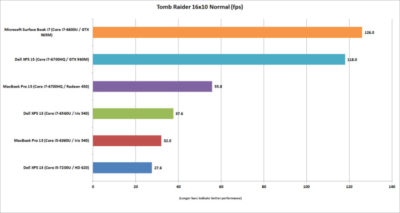
Tomb Raider performance

The last graphics test is Tomb Raider. It’s an older game available in both OSX and Windows and includes a built-in benchmark. While we could set the graphics settings the same on both platforms, we couldn’t quite sync the resolutions. Depending on the laptop, we could set the horizontal resolution at 1680-, 1650-, or 1600×1050 (the latter, for the Macs). The graphics setting on all of the laptops was Normal.

If you can’t bear to look, don’t: The Surface Book i7 and XPS 15 soundly thrashed the MacBook Pro 15. The Radeon Pro 460 would not make a difference here, either. If you want gaming performance at any decent levels, no surprise—buy a PC.
Battery life

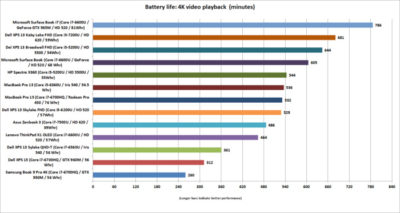
The final test is for all-important battery life. The same 4K-resolution were used, open-source Tears of Steel short video, looping continuously. On the Windows laptops, we used the Movies & TV player, and on OSX Sierra, we used QuickTime.

All of the laptops had their screens set at 250 to 260 nits in brightness. All laptops had the adaptive brightness setting turned off. All were tested with Wi-Fi disabled and with earbuds plugged into the analog ports. One thing to note: The Windows laptops are left in their default power settings, which means they use their last bits of battery life to shut off unused apps and slightly dim the screen. OSX was set not to dim the display on battery—otherwise, it immediately dims the screen once unplugged.

Our results on the pair of MacBook Pros were amazingly similar. Started both early in the morning and watched until they died in the early evening. Both were minutes apart.

Apple claims about 10 hours of run time in iTunes. We were pretty close in QuickTime at nearly 9 hours. The variance can be attributed to the video file and the settings the company uses.

For the MacBook Pro 15, that’s pretty impressive. The battery life for 15-inch laptops with quad-core CPUs, discrete graphics, and high-resolution screens tends to be mediocre. For example, look at the XPS 15 and its six hours of run time. (Dell offers an XPS 15 battery with about 50 percent more capacity—but it’s also heavier.)

Even worse is the Samsung Notebook 9 Pro, another quad-core laptop with the addition of a 4K screen. Ouch. Overall, I’d say the MacBook Pro 15 has decent battery life for a quad-core.

Moving to the MacBook Pro 13, the result is a little more nuanced. With roughly nine hours of run time, it compares well to some laptops, such as the XPS 13 with a QHD+ touchscreen. But there are a lot more PCs ahead of it. You know, like the Surface Book i7, which sets the bar at an amazing 13 hours of video run time. Other laptops with better video stamina include the newest XPS 13, HP’s redesigned Spectre x360 13, and even the older Surface Book. When you consider that all three are also generally faster, it’s not good.
The cost equation

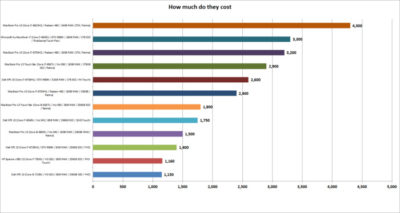
The most important question for users isn’t related to an obscure OpenCL benchmark but to how much these laptops cost. To help you understand just how much of a premium Apple and Microsoft are charging, I mapped out the cost of most of the laptops that appeared here, along with other configurations worth highlighting.

That top-spec Surface Book i7, formally known as Surface Book with Performance Base,  really pushes the boundaries of what people will pay for a dual-core laptop. To be fair, this is no ordinary laptop. It has a 1TB SSD and 16GB of RAM, plus pen support, a tablet mode, and probably class-leading GPU performance. But umm, yeah, 3,300 bucks.

Apple is no stranger to nose-bleed altitudes. When you throw a Core i7, 1TB SSD, and 16GB of RAM into the MacBook Pro 13 with Touch Bar, you’re looking at  $2,900. And you don’t even get the discrete GPU, touch, and tablet or pen support of the Surface Book. Apple’s most powerful MacBook Pro 15 tilts the meter all the way to $4,300. Granted, that’s with one of Intel’s priciest mobile CPUs and a whopping 2TB SSD, but that’s also the price of a modest used car.

Compared to a “normal” PC, both Microsoft and Apple give you a lot less performance for your cash. The Dell XPS 15, which pretty much aces the new MacBook Pro 15 except in battery life, is $1,400.

Take that Dell XPS 15 and load it up with a 1TB M.2 SSD, 32GB of RAM (which isn’t available on the MacBook Pro 15), a GTX 960M, 4K touchscreen, and a larger battery: $2,600. That’s only $200 more than what Apple charges for a machine with 16GB of RAM, a 256GB SSD, and the slowest Radeon Pro GPU.

You can do the same with the new HP Spectre x360 or Dell’s current XPS 13. Both give you a lot more value than either the MacBook Pro 13 or the MacBook Pro 13 Touch Bar.
Conclusion

Ten tests and one price comparison later, the PC wins. Again.

That’s no surprise. The MacBooks are caught in a tough spot—even if they were running higher-performance configurations. They’re both ultra-expensive compared to most PCs, and at the top-end, outclassed in GPU performance by Microsoft’s comparably expensive Surface Book i7.

It’s not all bad news for the Mac, though. The MacBook Pro 15’s battery life is impressive for a 15-inch laptop with a quad-core CPU and discrete GPU. Comparably powerful quad-core laptops we’ve seen can’t touch it in battery life. Even the MacBook Pro 13s do relatively well in battery life compared to a similar PC.

The problem for Apple and Mac fans is PC makers just don’t ever stand still. And as we know, Apple seemingly does that now with its Macs.

Have questions?

Get answers from Microsofts Cloud Solutions Partner!
Call us at: 856-745-9990 or visit: https://southjerseytechies.net/

South Jersey Techies, LL C is a full Managed Web and Technology Services Company providing IT Services, Website Design ServicesServer SupportNetwork ConsultingInternet PhonesCloud Solutions Provider and much more. Contact for More Information.

To read this article in its entirety click here.
 

If you’ve ever owned a PC with a DVD drive, you may get a $10 settlement

Don’t expect your money anytime soon, however.

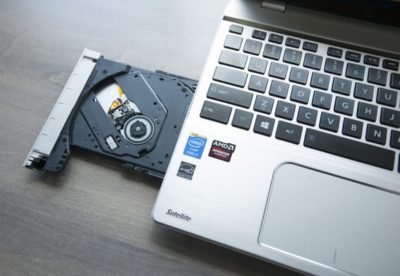
DVD drives may be a thing of the past, but the past could pay you $10 via a proposed settlement from a class-action suit.

If you purchased a DVD-ROM, DVD-RW or combination drive between April, 2003 and December 31, 2008, a collection of DVD drive manufacturers have tentatively agreed to pay you $10 per drive, whether you purchased the drive as part of a PC or by itself. You’ll simply need to visit the claim site and testify (under penalty of perjury) that you indeed purchased those drives within the given time period, and live in one of the 23 states (plus the District of Columbia) covered by the suit. The deadline to file is July 1.

Why this matters: Though the optical drive market continues to decrease—“the physical disk format is somewhat obsolete in the era of content streaming,” IDC wrote last year—that wasn’t the case fourteen years ago, when virtually all software was distributed via DVD-ROM. Fortunately, the settlement site isn’t asking for proof of purchase yet, but it reserves the right to do so. Filing a claim can take literally seconds, but don’t hold your breath—you’ll probably receive compensation, but there’s no guarantee.

The wheels of justice turn slowly

Simply put, a group of 23 plaintiffs sued virtually every DVD drive manufacturer, alleging that they collectively conspired to keep drive prices higher than they normally would be, in violation of antitrust laws. Though the defendants denied they did anything wrong, several—Hitachi-LG, Panasonic, NEC, and Sony—settled and agreed to pay a collective total of $124.5 million into four separate settlement funds.

(Note that only DVD drives for PCs are covered; a DVD player, such as the one gathering dust in your living room, isn’t.)

If you do submit a claim, however, the chances of receiving your settlement soon are slim. That’s because seventeen more defendants, including various subsidiaries of BenQ, Philips, Samsung, TEAC, and Pioneer, have yet to settle, and the suit will continue until all of the claims are resolved.

“Because other defendants remain in this litigation, the plaintiffs are proposing that distribution of the settlement funds not occur at this time,” the settlement site reads. “This is to save the expenses associated with distribution.”

In fact, the settlement hearing to finally approve the Hitachi-LG-Panasonic-NEC-Sony agreement will be held on December 8. After that, payments may begin—which means that you’ll probably receive your $10 or less a year from now. Yes, less: Payments will be “up to” $10 per drive, according to the claims site.

You should probably treat the settlement like one of those “print out your own rebate” slips from the turn of the century. Even under the best of circumstances, chances are you’ll have totally forgotten about your $10 windfall by the time the check arrives.

Have questions?

Get answers from Microsofts Cloud Solutions Partner!
Call us at: 856-745-9990 or visit: https://southjerseytechies.net/

South Jersey Techies, LL C is a full Managed Web and Technology Services Company providing IT Services, Website Design ServicesServer SupportNetwork ConsultingInternet PhonesCloud Solutions Provider and much more. Contact for More Information.

To read this article in its entirety click here.
5 free anti-malware tools; VR terms you should know

There’s plenty of free, effective anti-malware protection available. Just don’t let it push your browser around.

Although malware was once predicted to become extinct, it remains a constant threat. Thankfully, countless tools are available to help protect your PC against such security threats—including the popular (and free) anti-malware products on this list.

: AVG AntiVirus Free

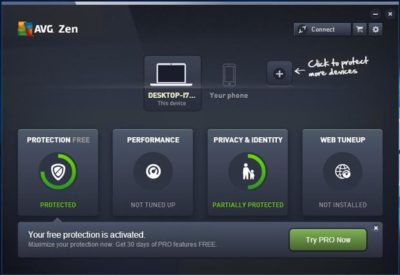
AVG AntiVirus Free (Figure A) provides protection for your computer, your browser, and your mail client. Like many other free products, AVG AntiVirus Free tries to sell you a paid license, which includes an enhanced firewall, anti-spam protection, and a few other features.

Figure A

AVG-SJTechies

Although AVG AntiVirus Free seems to do a good job protecting systems against viruses, you have to be careful about the options you choose when installing and configuring this product. Otherwise, AVG will attempt to “hijack” your browser by installing AVG Web TuneUp, changing your search page, changing your new tab pages, and changing your home page.

2: Malwarebytes Anti-Malware Free

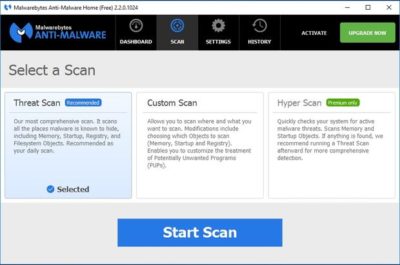
Malwarebytes Anti-Malware Free (Figure B) offers basic protection against malware. There are two main things I like about this app. First, unlike some of the other free anti-malware products, it doesn’t try to change your browser settings or install unwanted toolbars. Second, it has a clean and intuitive interface that doesn’t leave you guessing about what to do.

Figure B

antimalware-SJTechies

The disadvantage to using Malwarebytes Anti-Malware Free is that unlike the premium version, it does not support real-time protection. You can scan your PC for malware at any time, but you won’t be alerted to infections in real time unless you upgrade to the paid version.

3: Avast Free Antivirus 2016

Avast Free Antivirus 2016 (Figure C) is probably the most comprehensive antivirus tool on this list. It offers 12 components, including Rescue Disk, Browser Cleaner, Web Shield, and File Shield. The installer lets you choose which components to install.

Figure C

Avast-SJTechies

During the hour or so that I used Avast Free Antivirus, it did not attempt to take over my browser or engage in any other obnoxious behavior. The software does, however, prominently display a warning message during the installation process telling you in no uncertain terms that Avast Free Antivirus 2016 collects personal information. At least it gives you a way to opt out of this data collection.

4: Panda Free Antivirus

Panda Free Antivirus (Figure D) is another free anti-malware solution that requires a bit of caution during the installation process—otherwise, Panda will install a browser toolbar and change your home page and your default search provider.

Figure D

PandaAntivirus-SJTechies

The free version of Panda Antivirus offers real-time protection against malware, but it does try to get you to upgrade to the paid version. That version, which Panda refers to as the Pro Edition, adds a firewall, Wi-Fi protection, and VIP support.

5: YAC

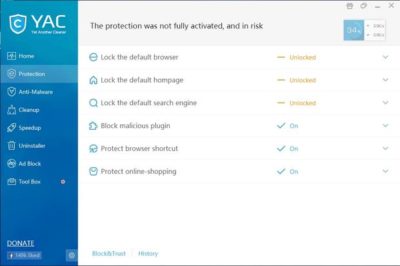
YAC (Figure E) stands for Yet Another Cleaner and—you guessed it—it’s yet another free tool for blocking threats and removing malware from an infected system. It offers a simple, easy-to-follow interface, and it doesn’t try to hijack your browser (which is a personal pet peeve, in case you hadn’t noticed). In fact, the software gives you a way to lock your browser settings so that your preferred home page, default browser, and default search engine can’t be changed without your consent.

Figure E

YAC-SJTechies

In addition to its basic anti-malware capabilities, YAC includes some nice extras, such as a tool for speeding up your computer, an uninstaller, and an ad blocker. The primary disadvantage to using YAC is that you have to upgrade to the paid version if you want to receive real-time protection. Otherwise, you’ll have to initiate anti-malware scans manually.

Have questions?

Get answers from Microsofts Cloud Solutions Partner!
Call us at: 856-745-9990 or visit: https://southjerseytechies.net/

South Jersey Techies, LL C is a full Managed Web and Technology Services Company providing IT Services, Website Design ServicesServer SupportNetwork ConsultingInternet PhonesCloud Solutions Provider and much more. Contact for More Information.

To read this article in its entirety click here.

Change and customize Windows 7’s Logon screen wallpaper

In this edition of the Windows Vista and Windows 7 Report, we show you how to change Windows 7’s Logon screen wallpaper.

While experimenting with several Microsoft Windows 7 systems recently, we spent a lot of time staring at the Logon screen. During that time, we began to think about changing the Logon screen wallpaper. Now, we have changed the Logon screen wallpaper in just about every version of Windows we’ve used, so we know that there had to be a way to do so.

When we began to investigate the procedure in Windows 7, we discovered that changing the Logon screen wallpaper in the newest version of the Windows operating system is easy, once you know the steps — and you don’t even need any third-party software to do it.

In order to make it easy for OEMs to customize Windows 7, Microsoft built the ability to change the Logon screen wallpaper right in to the operating system. In this edition of the Windows Vista and Windows 7 Report, we’ll show you how to change Windows 7’s Logon screen wallpaper.

A Registry tweak

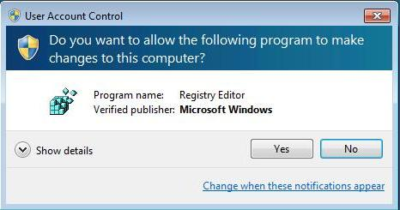
The process begins with a very minor Registry tweak. Even for those who would not normally feel comfortable editing the Registry, this one’s a piece of cake. To begin, click the Start button and type Regedit in the Search box. Then, select the appropriate result and press [Enter]. When you do, you’ll see the User Account Control, shown in Figure A, and will need to click the Yes button.Note: Editing the Windows Registry file is not without its risks, so be sure you have a verified backup before making any changes.

Figure A

You will encounter a UAC when you launch the Registry Editor.

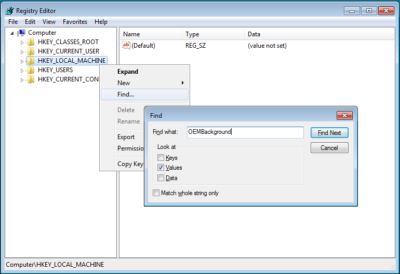
Once the Registry Editor launches, locate and right-click on HKEY_LOCAL_MACHINE key and select the Find command. When you see the Find dialog box, type OEMBackground in the text box and make sure that only the Values check box is selected, as shown in Figure B.

Figure B

Type OEMBackground in the Find dialog box.

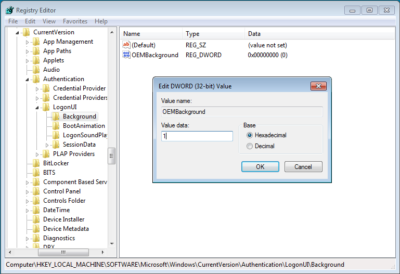
When the HKEY_LOCAL_MACHINE\SOFTWARE\Microsoft\Windows\CurrentVersion\Authentication\LogonUI\Background key opens, locate and double-click the OEMBackground value. When you see the Edit DWORD dialog box, change the value data from 0 to 1, as shown in Figure C. (If the OEMBackground value doesn’t exist in the Background key, you’ll need to pull down the Edit menu from that key and select New | DWORD (32-bit) Value).

Figure C

Change the value data from 0 to 1.

To complete this part of the operation, click OK to close the Edit DWORD dialog box and then close the Registry Editor.

Creating folders

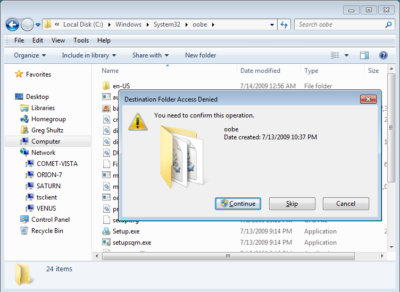
In the second part of the operation, you’ll need to create a couple of folders. To begin, launch Windows Explorer. Then navigate to the C:\Windows\System32\Oobe folder. Once you access the Oobe folder, click the New Folder button in the Windows Explorer toolbar. You’ll see a confirmation dialog box, like the one shown in Figure D. When you click Continue, the new folder will be created and you can name it info.

Figure D

When you click the New Folder button, you’ll encounter a confirmation dialog box.

Then, open the info folder, click the New Folder button again, work through the confirmation dialog box, and then name the second new folder backgrounds.

Configuring the wallpaper

You can use any image that you want for your new Logon screen wallpaper. However, the image has to be in JPG format and you need to name it backgroundDefault.jpg. When you copy your file to the Windows\System32\Oobe\info\backgrounds folder, you’ll encounter and will need to work through a confirmation dialog box similar to the one shown in Figure D.

Two other things to keep in mind: First, the actual file size of backgroundDefault.jpg cannot exceed 256 KB. Second, you’ll want to use an image whose dimensions match the screen resolution that you are using. If you use a file whose dimensions are smaller, the image will be stretched and may appear distorted.

Altering shadows

As you know, the button and the text used to identify your user account on the Logon screen have shadows behind them to give them a 3D-like look, and these shadows work well with the default Logon screen wallpaper. Depending on what image you use for your new Logon screen wallpaper, these shadows might not work so well.

In addition to making it easy to change the Logon screen wallpaper, Microsoft also made it easy to adjust or disable the text and button shadows to accommodate your particular image.

To alter the shadows, launch the Registry Editor again as described above and access the

HKEY_LOCAL_MACHINE\SOFTWARE\Microsoft\Windows\CurrentVersion\Authentication\LogonUI folder

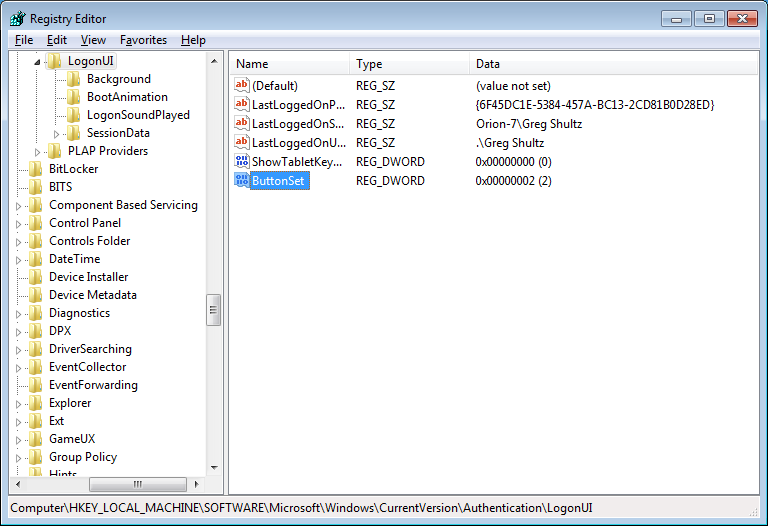
Once you open the LogonUI folder, you’ll create a new DWORD value called ButtonSet, as shown in Figure E. You can then configure the shadow by setting the value data to one of the following numbers:

  • 0 — Light shadow
  • 1 — Dark shadow
  • 2 — No shadow

Figure E

The ButtonSet value allows you to adjust or disable the text and button shadows.

Have questions?

Get answers from Microsofts Cloud Solutions Partner!
Call us at: 856-745-9990 or visit: https://southjerseytechies.net/

South Jersey Techies, LL C is a full Managed Web and Technology Services Company providing IT Services, Website Design ServicesServer SupportNetwork ConsultingInternet PhonesCloud Solutions Provider and much more. Contact for More Information.

To read this article in its entirety click here.

How Microsoft rebounded to outshine Apple

As more consumers grow disenchanted with Apple, Microsoft has taken the opportunity to cash in on the growing popularity of Surface devices.

Microsoft claims that more people are switching to Surface devices from Macs than ever before. That’s a concept that would have been hard to picture when Microsoft first released the Microsoft Surface RT and Surface Pro in 2012 and 2013, respectively. The Surface RT suffered from a watered-down version of the new — and generally disliked — Windows 8 operating system and, while the Surface Pro featured the full desktop version, it came with hardware limitations and a high price tag.

In a sea of clam shell notebooks, all vying to be thinner and lighter than the last, the Surface clumsily debuted as a confusing mashup of a tablet and a laptop. And people didn’t like it. RT users complained of the limited functionality and never-ending bugs, while Surface Pro users were forced to pay a high price just to avoid Windows RT. In fact, the Surface RT did so poorly that Microsoft had to take a $900 million dollar write-down after drastically cutting the price of the device.

The backlash even made some question whether or not we were witnessing the end of Microsoft. It might seem dramatic now in 2016, but in 2013, people really missed the Start menu. Instead, Microsoft listened to consumers’ complaints to find a balance between the company’s vision and what consumers wanted. And it worked — Microsoft has regained credibility and popularity by creating new products that didn’t simply mimic or improve upon what was already out there.

Apple’s identity crisis

For a company once targeting modern, creative professionals, it’s hard to tell who Apple makes products for anymore. Apple’s devices now feel tailored to a low-tech crowd, or people who like new tech, but just aren’t that interested in specs. They want a reliable, easy-to-use device that just works. But where does that leave the original fan base of creative workers who need high-performance and cutting edge features? Apple hasn’t left this industry with many options — and at this point, you can get more for your money in graphics and performance on a Surface Book than a Macbook Pro. Plus, with the newly announced Microsoft Studio, there is finally a strong alternative to the iMac — with a touch display, no less.

Apple’s compromise is the MacBook Pro with Touch Bar, which features a dynamic touch bar replacing the row of function keys on the keyboard. The display changes depending on settings and the app you’re using; it’s a cool feature, and certainly useful, but it’s a confusing message. If the iPad Pro is competing with hybrid notebooks like the Surface Pro 4, but Apple doesn’t think people want touch-displays on a notebook, then does that make the iPad Pro a giant iPad?

Microsoft is focused on touch-based input — in fact, you’d be hard-pressed to find even a mid-ranged PC that doesn’t at least offer the option of an upgrade to a touch display. The two companies have taken different stances, but in siding with touch, Microsoft has more to offer in each of its devices. If you want a notebook that can sometimes be a tablet, or a tablet that can sometimes be a notebook, you can purchase just one device instead of two.

Microsoft has focused on developing a family of Surface devices that can suit a wide range of users. It starts with the lower-end Surface 3, which is a great device for anyone who just wants a computer to surf the web and use basic apps. The Surface Pro 4 acts as a step up in size and hardware, with configurations for anyone from light users to those who need more performance. And now, with the Surface Book and Surface Studio, even those who need the highest end configurations for heavy-duty video or image editing have an option.

The Surface in pop culture

Remember when Windows users were the boring, out of touch, suit-wearing nerds in commercials, and a Mac user was the hipster CEO of a startup — that guy in 2006 who wore hoodies and scootered to all his meetings? That landscape has changed a lot since then, and now Microsoft is the one calling out Apple on selling outdated hardware and falling behind the curve.

Microsoft has clearly made a push to get the Surface in front of consumers anyway possible — CNN commentators used the devices in this year’s debates, but it was later discovered they were using them to hide their iPads. Hulu’s The Mindy Project also features Mindy Kaling’s character using a Surface Book, with one very obvious instance of product marketing, where she very purposefully ejects the display from the keyboard. And what New Englander can forget when the Surface Pro 4 made headlines after Patriot’s coach, Bill Belichick, became so frustrated with the technology that he spiked it onto the field.

These might not be the most positive representations of the brand, but the visibility of the device seems to be working. In places where it used to be a sea of aluminum notebooks, featuring the familiar, backlit Apple logo, we’re starting to see some diversity.

Just as it wasn’t the end of Microsoft in 2013, it’s now Apple’s chance to step out of the spotlight and make some changes. But there’s nothing like a little healthy competition to help spark new, creative designs and that’s exactly what motivated Microsoft to step back, refocus and come back strong.

Have questions?

Get answers from Microsofts Cloud Solutions Partner!
Call us at: 856-745-9990 or visit: https://southjerseytechies.net/

South Jersey Techies, LL C is a full Managed Web and Technology Services Company providing IT Services, Website Design ServicesServer SupportNetwork ConsultingInternet PhonesCloud Solutions Provider and much more. Contact for More Information.

To read this article in its entirety click here.
Killer keyboard shortcuts to help you master Windows

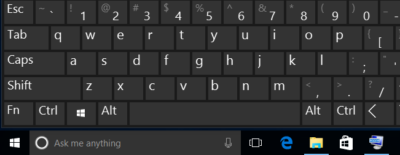
These Windows keyboard shortcuts help you navigate your PC faster, master documents, wrangle various virtual desktops, and shut down and secure a computer, using just a few keys.windows-keyboardDespite notable advancements in speech-recognition technology and voice input, and the popularity of tablets, the humble PC continues to be the workhorse device of choice for many workers around the world. And whether you’re an office-bound professional slouched behind a desktop PC, or a globetrotting executives armed with the latest ultrabook, the “physical” hardware keyboard continues to play a crucial role in productivity.The last thing you want in the heat of the moment is to fumble around for a mouse or have to take multiple steps to complete a task that could be done with a quick keyboard shortcut. Of course, learning and remembering such shortcuts can be hard work, and you’ll need to take some time to find the appropriate shortcuts for you.We’re here to assist. This list of valuable Windows keyboard shortcuts will help you work smarter and faster.

Keyboard shortcuts for the Windows surfer

windows-surfer

If you hope to master Windows keyboard shortcuts, you should start with the Windows desktop. The following shortcuts let you toggle between app windows and quickly resize them without having to reach for a mouse or align your apps.

  • Windows key (a.k.a., “Winkey“) + D.  Minimize all app windows and jump straight to the desktop. Hit the shortcut again to bring all apps back to the foreground.
  • Winkey + Comma. Take a quick peek at your desktop, and then release the keys to snap all apps back to the foreground.
  • Winkey + Left Arrow, or Winkey + Right Arrow. Dock your app windows to the left or right of the screen.
  • Winkey + Down Arrow, or Winkey + Up Arrow. Maximize or minimize a selected app. Or dock your app windows to the top or bottom of your display, when app windows are already docked to the left or right.
  • F11 – Toggle an active window in and out of full screen mode.
  • Ctrl + Esc – Bring up your Start menu. (This is particularly helpful if you use a keyboard that doesn’t have a Winkey.)

Windows keyboard shortcuts for the Kung Fu typer

These useful shortcuts help zoom the cursor around your page much quicker than if you use a mouse or trackpad.

  • Ctrl + Right Arrow, or Ctrl + Left Arrow. Move the cursor one word to the right or left.
  • Ctrl + Down Arrow, or Ctrl + Up Arrow. Move the cursor to the start or end of the next or previous paragraph.
  • Ctrl + Z, or Ctrl + Y. Undo or redo almost any action, as long as the app supports the feature.

Windows keyboard shortcuts for virtual desktop Jujutsu

Long a staple feature in Linux and the Mac, Microsoft finally officially incorporated virtual desktops into its Windows 10 OS. The indispensable feature lets you create additional desktops to better manage multiple app windows.

  • Winkey + Ctrl + D, or Winkey + Ctrl + F4. Create or close a virtual desktop.
  • Winkey + Ctrl + Left Arrow, or Winkey + Ctrl +Right Arrow. Toggle through your virtual desktops.
  • Winkey + Tab. Display the “Task View” interface for an overview of all virtual desktops. You can use the Arrow keys to toggle through desktops if you also hit Tab when in this mode. Hit Enter to jump to a selected desktop.

Windows keyboard shortcuts for the browser ninja

You’ve probably used a web browser for as long as you’ve had a computer, but do you take full advantage of keyboard shortcuts for browser navigation? These browser shortcuts all work the in latest versions of Internet Explorer, Microsoft Edge, Mozilla Firefox and Google Chrome.

  • Alt + D. Put the cursor into the browser’s address bar.
  • Ctrl + W, or Ctrl + T. Close or open a new browser tab.
  • Ctrl + Shift + T. Reopen the last browser tab you closed. (This comes in handy when if you hit Ctrl + W too quickly.)
  • Ctrl + Plus sign, or Ctrl + Minus sign. Zoom in and out on a web page. Reset the zoom level with Ctrl + 0.
  • Ctrl + Tab, or Ctrl + Shift + Tab. Toggle to the next browser tab from left to right, or from right to left.
  • Alt + Right Arrow, or Alt + Left Arrow. Browse forward or backward through recently visited websites. These shortcuts perform the same function as a browser’sForward and Back buttons.

Windows keyboard shortcuts for locking up and shutting down

This guide wouldn’t be complete without some shortcuts that help you shut down your PC and then lock things up.

  • Winkey + L. Immediately lock your PC.
  • Ctrl + Shift + Esc. Open the Task Manager to monitor app or forcibly shut down frozen programs.
  • Alt + F4. Close an active app. Using this shortcut key when your desktop is at the forefront invokes the “Shut Down Windows” prompt.

Have questions?

Get answers from Microsofts Cloud Solutions Partner!
Call us at: 856-745-9990 or visit: https://southjerseytechies.net/

South Jersey Techies, LL C is a full Managed Web and Technology Services Company providing IT Services, Website Design ServicesServer SupportNetwork ConsultingInternet PhonesCloud Solutions Provider and much more. Contact for More Information.

To read this article in its entirety click here.

Pro tip: Sort table data in a Word document

sort word

Microsoft Word


Sorting data in a Word document isn’t something you routinely do. On the other hand, presenting list and table data is, so the potential exists that one day you’ll want to sort something. The good news is that it’s easy to sort data in a table or a list. In this article, I’ll show you how to do just that. We’ll work through a few simple sorting examples. You can use most any table, or you can download the example .docx or .doc file.

Behind the scenes

Word relies on paragraphs when sorting, which seems a bit odd within the context of a table (or list). The paragraph formatting mark determines where one paragraph ends and the next starts. As you can see in Figure A, there’s no paragraph mark in a table. The end-of-cell markers denote the end of each cell’s content. The similar marker at the end of each row (outside the right border) is an end-of-row marker. These markers also contain cell and row formatting. When sorting a table, Word relies on the end-of-row marker to identify where one row ends and the next begins, the same way the paragraph mark does. (To see a document’s formatting symbols, click Show/Hide in the Paragraph group on the Home tab.)

Figure A

Table end-of-row markers are similar to paragraph markers.

Sort by the first column

We’ll start with the simplest sort possible; we’ll sort a table by the values in the first column. To do so, select, the table by clicking its move handle (the small square in the top-left corner). If you don’t see this handle, check the view. It’s available only in Print Layout and Web Layout. With the entire table selected, do the following:

  1. Click the contextual Layout tab. In the Data group, click Sort — or click Sort in the Paragraph group on the Home tab. In Word 2003, choose Sort from the Table menu.
  2. The resulting dialog does a good job of anticipating the sort. Notice that the Header Row option (at the bottom) is selected. As a result, the Sort By field is set to Species — the label in the first column’s header (Figure B).
    Figure B

  3. This is exactly what we want, so click OK. Figure C shows the sorted table.
    Figure C

Before we move on, let’s discuss the Type and Using options to the right. We didn’t need to change either, but sometimes you will. The Type options are Text, Number, and Date. Word usually defaults to the appropriate data type. You can force a specific type by choosing a different option other than the one Word assumes (but you’ll rarely have reason to do so). The Using options defaults to Paragraph — we talked about that earlier.

Sort by the second column

That first exercise was easy. Let’s complicate things a bit by sorting by the second column. Fortunately, it’s just as easy as the first. Repeat steps 1 and 2 from the first exercise. Then, do the following:

  1. In the resulting dialog, click the Sort By drop-down.
  2. Choose Common Name, the header label for the second column.
  3. Click OK. Figure D shows the results of sorting by the second column.
    Figure D

That wasn’t any more difficult that the first sort. Tell Word which column contains the values you want to sort by and click OK — that’s it!

Sort by multiple columns

With only two sort tasks under your belt, you’re beginning to see how simple the sorting process in Word can be. Let’s complicate things a bit so you can see how flexible this feature truly is. Let’s sort by the Class column and then sort the bird and mammal groups in a secondary sort. Repeat steps 1 and 2 from the first two exercises. Then, do the following:

  1. To sort by the Class, choose Class from the Sort By drop-down.
  2. To further sort each class group, click Common Name from the Then by drop-down (Figure E). You could add a third column to the sort if the results warranted the additional grouping.
    Figure E

  3. Click OK to see the results shown in Figure F.
    Figure F

What about lists?

You might be wondering how to sort the same data in list form. Word handles the list sort the same way — the exact same way. Highlight the list and click Sort in the Paragraph group on the Home tab. In the resulting dialog, check the header option and set appropriately (if necessary). Then, determine the sort order by choosing the fields (columns), appropriately.Figure G shows the result of sorting the same data in list form.

Figure G

Sort a columnar list the same way you sort a table.


CALL US NOW!