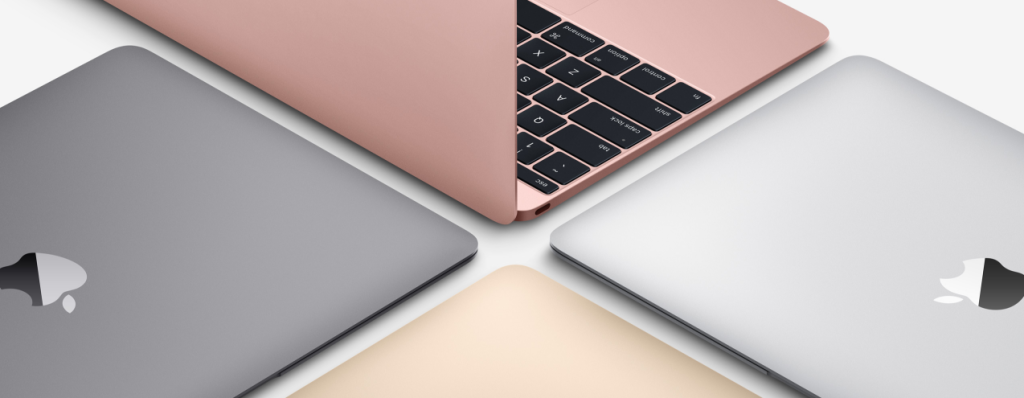
Now that Apple’s introduced the first major update to its MacBook Pro lineup in years, it’s time to square off the best of the best in Mac and PC laptops to see who currently prevails in this age-old rivalry.
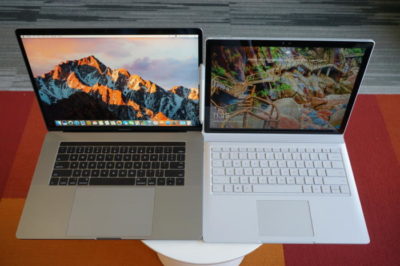
The contenders
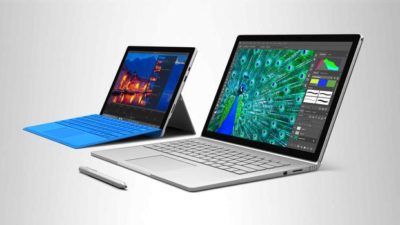
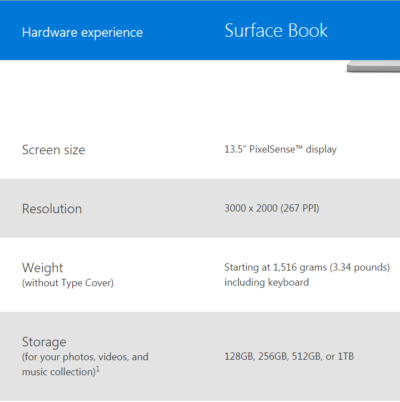
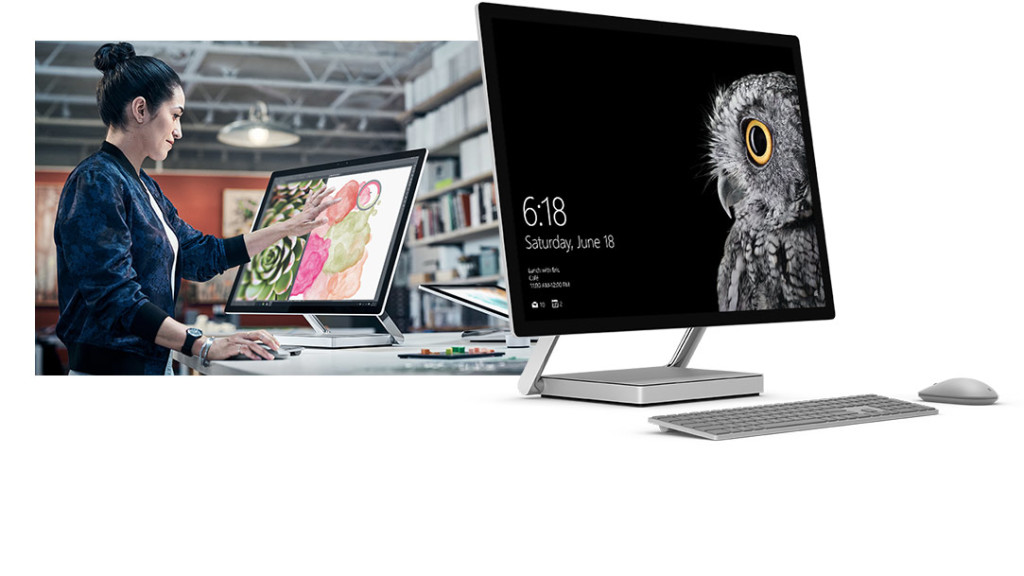
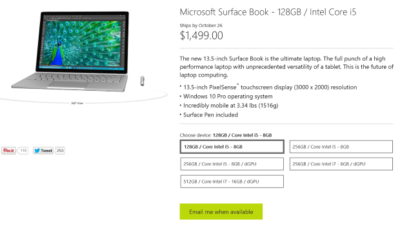
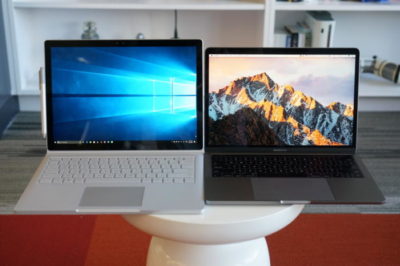
The newest Surface Book is a top-of-the-line model with a Core i7-6600U, a GeForce GTX 965M, 16GB of RAM, and a 1TB SSD. The updated product line varies from $2,400 to $3,300 (our model) in price. All three net you a 6th-gen Skylake dual-core Core i7 chip, and all three get you the same Performance Base with a GeForce GTX 965M. The only differences are in the size of the SSD and how much RAM you get. Only the SSD would affect performance significantly.
On the Apple side, the contender is a $2,400 MacBook Pro 15 with a quad-core Core i7-6700HQ, 16GB of LPDDR/2133, and a 256GB SSD. I also had partial access to two MacBook Pro 13’s. The first was the non-touch bar model with a Core i5-6360U, 8GB of LPDDR/1866, and a 256GB SSD ($1,500). The second was the Touch Bar version with a Core i5-6267U, 8GB of LPDDR/2133, and a 256GB SSD ($1,800).
Why this contest isn’t rigged
Let’s make it clear from the outset: This isn’t a direct comparison of the laptops based on cost, but an attempt to compare the performance of the new MacBook Pros to that of similar PC laptops.
For those who’ve noticed the considerable price delta between the Surface Book i7 and the 15-inch MacBook Pro, the stack of other PCs used in this comparison will help smooth out that line. You might argue that it’s silly to compare a $3,300 Surface Book i7 against an $1,800 MacBook Pro 13, or a $1,100 Dell XPS 13 against an $1,800 MacBook Pro 13, or a $1,400 Dell XPS 15 against a $2,400 MacBook Pro 15. But these are all real-world models that you’ll find in a store, rather than configurations contrived to hit a number. Price differences are just part of the comparison puzzle.
For the same reason, we’re not loading the same OS on all the laptops—no OSX on PCs, no Windows on Macs. Real people wouldn’t do that, and neither will we.
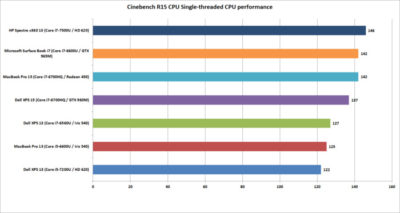
Cinebench R15 multi-threaded performance
Our first test is Cinebench R15. This is a 3D rendering test based on Maxon’s Cinema4D engine. The test is heavily multi-threaded, and the more cores or threads you can throw at it, the better the performance. The test is is a pretty harsh reminder that if your tasks demand a quad-core, listen to them.
Between the two quad-cores, the Dell XPS 15 crosses the finish line first—but not by much. Let’s just call it mostly a tie.
Among the dual-cores, the Core i5-based MacBook Pro 13 is last, but not by much. It’s basically the same as the last-gen XPS 13 with a similar Core i7-6560U.
The surprise is where the Surface Book i7 finishes. Its 6th-gen CPU is hanging right with the 7th-generation Kaby Lake CPUs in the new HP Spectre x360 13 and the new Dell XPS 13.

Cinebench R15 single-threaded performance
Cinebench R15 has an optional test that lets you measure the single-threaded performance. It’s a valuable way to gauge how fast a laptop will be in applications or tasks that don’t use all the cores available.
The surprise to many will be the result from the Dell XPS 13. Its 7th-generation Core i5 CPU could hang with the Core i7 chips on heavier loads, but on lighter loads, it ends up being last. That’s because Core i7 chips in laptops excel at short, “bursty” loads. Once you heat them up, the clock speeds crank back. When running a test in single-threaded mode, the Core i7’s advantage with short burst loads shows up big-time.
The real shocker is how the HP Spectre x360 with a 7th-gen CPU comes out the clear winner. The quad-core MacBook Pro 15 or Dell XPS 15 were expected to lead the pack, but nope. That Kaby Lake CPU is indeed pulling its weight.
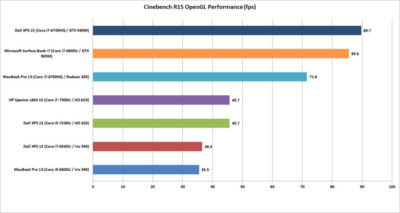
Cinebench R15 OpenGL performance
Our last Cinebench R15 test measures performance with OpenGL, a popular graphics API used for rendering professional CAD/CAM applications and a few games.
The results here break down into three bands. At the bottom is the new MacBook Pro 13 and an older Dell XPS 13 model. Both use Intel’s Skylake CPU and include “faster” Iris 540 graphics with 64MB of embedded DRAM inside the CPU. Both are nearly dead-even, which validates this test for comparing OSX to Windows 10 performance.
The second band up is a shocker to me. The pair of 7th-gen Kaby Lake laptops from Dell and HP are a good 25 percent faster than the 6th-gen Skylake laptops in OpenGL. The Iris 540 laptops were expected to come out in front. The results made us wonder whether this isn’t some driver optimization that Intel put into Kaby Lake but not Skylake.
The last band is the graphics performance of the discrete-GPU laptops. Unexpectedly, the GeForce GTX 960M in the XPS 15 finishes just ahead of the GTX 965M in the Surface Book i7. The MacBook Pro 15, with its Radeon Pro 450, finishes in a firm third place. Some MacBook Pro reviews have said the graphics don’t measure up in games, while in “work”-related tasks, they rules. So far, no one has seen that to be true.
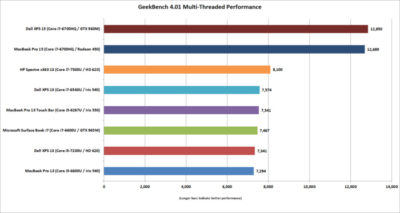
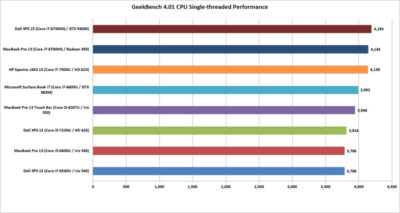
GeekBench 4.01 multi-threaded performance
Another popular cross-platform benchmark is Primate Lab’s GeekBench. Experts may disdain its cross-platform results between ARM and x86. Within the same micro-architecture, however, it’s pretty kosher, especially when running the newest 4.01 version of the popular test. There is also a score to report for the MacBook Pro 13 with Touch Bar
The first result we’ll look at is the multi-threaded performance. Like Cinebench R15, you can see the quad-core XPS 15 and MacBook Pro 15 step away from the dual-core laptops. It’s just more proof that if your tasks really need a quad-core chip, pay for it.
On the dual-cores, the redesigned HP Spectre x360 13 again shows the newest 7th-gen Core i7’s clock speed advantage over the Skylake models. The Surface Book i7 and MacBook Pro are pretty much dead-even. For MacBook Pro 13 fans that might be something to crow about, because we’re talking about a Core i5 MacBook Pro 13 vs. a Core i7 Surface Book.
GeekBench 4.01 single-threaded performance
Moving on to the single-threaded performance in GeekBench 4.01, there are a few patterns we can discern. First, that 7th-gen Core i7 in the HP Spectre x360 13 is indeed faster in lighter loads, outpacing the Surface Book i7 and the Core i5-equipped MacBook Pro 13 with Touch Bar.
The Dell XPS 15 inches over the MacBook Pro 15, but the real takeaway is this: If you don’t do many multi-threaded tasks on your laptop, you don’t need a quad-core CPU.
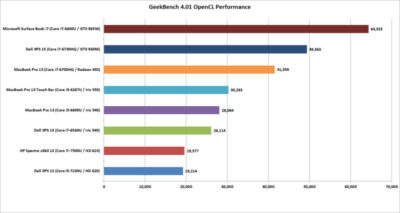
GeekBench 4.01 OpenCL performance
GeekBench also has an OpenCL test that simulates popular Computer Language tasks on a GPU that would normally be handled by the CPU.
The first takeaway: Unlike in the OpenGL performance tests, the older Iris 540 in the Skylake dual-cores is faster than the Kaby Lake integrated graphics for whatever tasks Prime Labs thinks best represent OpenCL.
The second takeaway: OpenCL loves fast GPUs. The Surface Book i7 and its GTX 965M run away with this test, and trash the MacBook Pro 13. For those who didn’t pony up for the MacBook Pro’s faster Radeon Pro 455 or 460 GPU, it’s hard to watch how thoroughly the the Surface Book i7 smokes the 450-equipped MacBook Pro. The Surface Book’s GTX 965M even makes a mockery of the GTX 960M in the XPS 15.
LuxMark 3.1 OpenCL GPU Render Performance
When you play the benchmarketing game, one truth that’s often overlooked is that no one test defines the entire category. You can’t take the results from Geek Bench 4.01 OpenCL and declare it representative of all OpenCL performance.
To balance Geek Bench 4.01, I also ran the free LuxMark 3.1 OpenCL test. This takes a scene and renders it using the LuxRender engine on the GPU (or CPU if you ask it to.)
The results put these GPUs a lot closer than the OpenCL numbers from Geek Bench 4.01 would have you believe. In the end, both the XPS 15 and Surface Book i7 again both clearly win. But would this be true if it were a Radeon 460 in the MacBook Pro 15? Probably not.

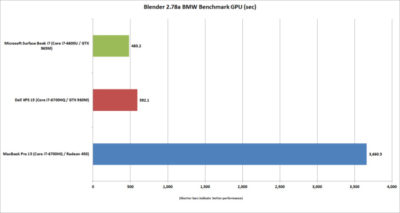
Blender 2.78 Performance
The last “work”-related graphics test we’ll run is Blender 2.78. This a free rendering application popular in a lot of indie movies. For a test render file, I used Mike Pan’s BMW Benchmark and set Blender to ray-trace the scene on the GPU rather than the CPU. The result is, frankly, beyond ugly. The Surface Book i7 finished in about eight minutes, and the XPS 15 took another two more minutes. The MacBook Pro 15 took more than an hour to complete the task.
This doesn’t mean the MacBook Pro 15’s Radeon Pro 450 is a dog. The other benchmarks should tell you that the Apple isn’t that bad in some tasks. Still, this kind of performance disparity indicates a serious problem at the OS or driver level, or something with this compile of Blender. Unless or until that mystery is solved, you’ll want to do your Blender renders on a PC laptop.
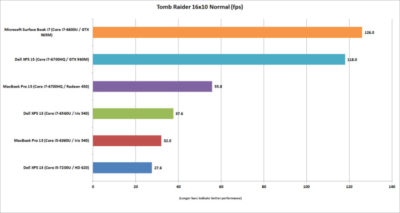
Tomb Raider performance
The last graphics test is Tomb Raider. It’s an older game available in both OSX and Windows and includes a built-in benchmark. While we could set the graphics settings the same on both platforms, we couldn’t quite sync the resolutions. Depending on the laptop, we could set the horizontal resolution at 1680-, 1650-, or 1600×1050 (the latter, for the Macs). The graphics setting on all of the laptops was Normal.
If you can’t bear to look, don’t: The Surface Book i7 and XPS 15 soundly thrashed the MacBook Pro 15. The Radeon Pro 460 would not make a difference here, either. If you want gaming performance at any decent levels, no surprise—buy a PC.
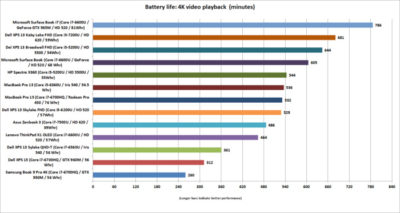
Battery life
The final test is for all-important battery life. The same 4K-resolution were used, open-source Tears of Steel short video, looping continuously. On the Windows laptops, we used the Movies & TV player, and on OSX Sierra, we used QuickTime.
All of the laptops had their screens set at 250 to 260 nits in brightness. All laptops had the adaptive brightness setting turned off. All were tested with Wi-Fi disabled and with earbuds plugged into the analog ports. One thing to note: The Windows laptops are left in their default power settings, which means they use their last bits of battery life to shut off unused apps and slightly dim the screen. OSX was set not to dim the display on battery—otherwise, it immediately dims the screen once unplugged.
Our results on the pair of MacBook Pros were amazingly similar. Started both early in the morning and watched until they died in the early evening. Both were minutes apart.
Apple claims about 10 hours of run time in iTunes. We were pretty close in QuickTime at nearly 9 hours. The variance can be attributed to the video file and the settings the company uses.
For the MacBook Pro 15, that’s pretty impressive. The battery life for 15-inch laptops with quad-core CPUs, discrete graphics, and high-resolution screens tends to be mediocre. For example, look at the XPS 15 and its six hours of run time. (Dell offers an XPS 15 battery with about 50 percent more capacity—but it’s also heavier.)
Even worse is the Samsung Notebook 9 Pro, another quad-core laptop with the addition of a 4K screen. Ouch. Overall, I’d say the MacBook Pro 15 has decent battery life for a quad-core.
Moving to the MacBook Pro 13, the result is a little more nuanced. With roughly nine hours of run time, it compares well to some laptops, such as the XPS 13 with a QHD+ touchscreen. But there are a lot more PCs ahead of it. You know, like the Surface Book i7, which sets the bar at an amazing 13 hours of video run time. Other laptops with better video stamina include the newest XPS 13, HP’s redesigned Spectre x360 13, and even the older Surface Book. When you consider that all three are also generally faster, it’s not good.
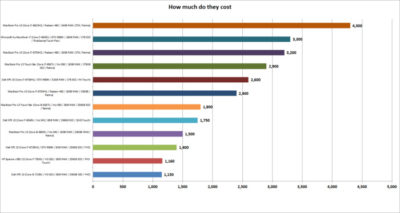
The cost equation
The most important question for users isn’t related to an obscure OpenCL benchmark but to how much these laptops cost. To help you understand just how much of a premium Apple and Microsoft are charging, I mapped out the cost of most of the laptops that appeared here, along with other configurations worth highlighting.
That top-spec Surface Book i7, formally known as Surface Book with Performance Base, really pushes the boundaries of what people will pay for a dual-core laptop. To be fair, this is no ordinary laptop. It has a 1TB SSD and 16GB of RAM, plus pen support, a tablet mode, and probably class-leading GPU performance. But umm, yeah, 3,300 bucks.
Apple is no stranger to nose-bleed altitudes. When you throw a Core i7, 1TB SSD, and 16GB of RAM into the MacBook Pro 13 with Touch Bar, you’re looking at $2,900. And you don’t even get the discrete GPU, touch, and tablet or pen support of the Surface Book. Apple’s most powerful MacBook Pro 15 tilts the meter all the way to $4,300. Granted, that’s with one of Intel’s priciest mobile CPUs and a whopping 2TB SSD, but that’s also the price of a modest used car.
Compared to a “normal” PC, both Microsoft and Apple give you a lot less performance for your cash. The Dell XPS 15, which pretty much aces the new MacBook Pro 15 except in battery life, is $1,400.
Take that Dell XPS 15 and load it up with a 1TB M.2 SSD, 32GB of RAM (which isn’t available on the MacBook Pro 15), a GTX 960M, 4K touchscreen, and a larger battery: $2,600. That’s only $200 more than what Apple charges for a machine with 16GB of RAM, a 256GB SSD, and the slowest Radeon Pro GPU.
You can do the same with the new HP Spectre x360 or Dell’s current XPS 13. Both give you a lot more value than either the MacBook Pro 13 or the MacBook Pro 13 Touch Bar.
Conclusion
Ten tests and one price comparison later, the PC wins. Again.
That’s no surprise. The MacBooks are caught in a tough spot—even if they were running higher-performance configurations. They’re both ultra-expensive compared to most PCs, and at the top-end, outclassed in GPU performance by Microsoft’s comparably expensive Surface Book i7.
It’s not all bad news for the Mac, though. The MacBook Pro 15’s battery life is impressive for a 15-inch laptop with a quad-core CPU and discrete GPU. Comparably powerful quad-core laptops we’ve seen can’t touch it in battery life. Even the MacBook Pro 13s do relatively well in battery life compared to a similar PC.
The problem for Apple and Mac fans is PC makers just don’t ever stand still. And as we know, Apple seemingly does that now with its Macs.
Have questions?
Get answers from Microsofts Cloud Solutions Partner!
Call us at: 856-745-9990 or visit: https://southjerseytechies.net/
South Jersey Techies, LL C is a full Managed Web and Technology Services Company providing IT Services, Website Design Services, Server Support, Network Consulting, Internet Phones, Cloud Solutions Provider and much more. Contact for More Information.
To read this article in its entirety click here.