Back to Top

Tech, Web, Cloud & Cabling Services

Author Archives: Website Admin

XP will be Non-Compliant

logo_footer_hipaa

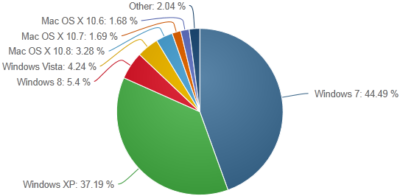
Windows XP was released on October 25, 2001 and has become one of the most popular versions of Windows for home and business environments.

The HIPAA Security Rule requires all systems to be updated regularly, as of April 8, 2014 Microsoft will end support for Windows XP, after which no new updates, hotfixes, patches or support will be issued.

This is a major problem within the healthcare industry since many computers are still running XP.  Migrating to a new operating system can be a challenging task because some XP machines have proprietary software that are not compatible with Windows 7+.  

Evaluate the technical infrastructure including servers, workstations and network equipment to create a migration plan.  Communicating with product vendors will help create the migration plan.  Vendors can provide support for updating and upgrading the software/hardware.  Implementing Virtualization within your network is a centralized option to replacing your current setup.  A virtual desktop infrastructure is having 50+ desktops reside on one physical server and sharing the resources, such as CPU, storage and memory.

During the migration, providing an efficient setup for the clinical staff may also include upgrading the manageability of the network and designing a much more scalable and secure IT infrastructure.

To protect and upgrade your home or business

 please contact us 856-745-9990 or click here.


10 Ways to Survive a System Outage

Fact: Something is broken – you need to get to work.

toolbox1.  Stay calm.

Remaining calm is the best strategy to surviving a system outage and keeping your focus on the current task.  Also, remaining calm will produce less emotional and techinical errors in a workplace.  

2.  Notify all users.

Proactively preparing for a system outage would include creating a Notification Plan based on different scenarios.  Using company e-mail, instant messaging, have a Co-Worker announce the outage or put a sign up saying “System is down.  Working on it now!”.

3.  Recruit a “buffer” to answer any questions.

After the initial notification, users will have many questions.  It would be ideal to recruit someone who is available to answers those questions, especially ETA questions.

4.  Be polite and understanding.

Remember to be polite and understanding when it comes to upset users.  In Step 1, keeping your focus on the current task to avoid making errors, also try to avoid “play-by-play” status updates.

5.  Documentation.

Always document each step of the recovery process.  Start with the initial problem or outage, followed by what you find, what commands you used, what errors you received and all attempts to fix the outage.  Lastly, document the steps that resolved the outage.

6.  Present the facts.

During the resolution process and the aftermath, always remain honest and present the facts.  If you caused the problem or outage, do not try to cover it up because it will complicate the process of resolving the outage.

7. Take your time.

Although, time is of the essense when system is down, take your time while troubleshooting.  If you are not sure what will resolve the problem, taking your time and implementing different solutions at a steady pace will allow you to narrow down the exact problem and resolution.

8.  Call Support.

Having product support is an essential tool for IT departments.  Calling support and submitting a ticket may consist of being on hold, waiting for a call back and sometimes an onsite visit can be a smart business decision.

9.  Stay positive.

Staying positive and continue building a knowledge of system events will prepare you for problem situations.  Having strong work relationships with co-workers will be useful for emergency situations.

10.  Be Prepared.

To be prepared for every system problem is almost impossible.  Continue building a knowledge of your environment is the strongest way to prepare for problem situations, previously mentioned in Step 9.


Windows 8 – Access Windows XP Apps

Client Hyper-V is a virtualization tool that comes with Windows 8 Professional and Windows 8 Enterprise.  Using Client Hyper-V can run Windows XP applications on a Windows 8 machine.  This tool requires that your system has a minimum of 4GB of RAM, 64-bit CPU that supports Second Level Address Translation (SLAT).  Also, the key virtualization feature must be enabled prior to setup.

6388488-620-290

Step 1 – Getting Started with Windows 8 Client Hyper-V

Step 2 – Installing Client Hyper-V

Step 3 – Create a Virtual Switch

Step 4 – Create a Virtual XP Machine

Step 5 – Setup USB Access

Step 6 – Install RemoteApp Tool

Step 1 – Getting Started

Launch and verify System Information:

  • To access the Apps Search page:  [Windows] + Q keystroke.
  • In the text box type msinfo32 and click msinfo32.exe.
  • Scroll to the bottom of the right panel and the following values are set to Yes:  (If the Second Level Address Translation Extensions or the Data Execution Protection values are set to No, then you will not be able to use Windows 8’s Client Hyper-V.)
      1. Hyper-V – VM Monitor Mode Extensions
      2. Hyper-V – Second Level Address Translation Extensions
      3. Hyper-V – Virtualization Enables in Firmware
      4. Hyper-V – Data Execution Protection.

Enabling Virtualization through Setup Utility

    • Before the operating system loads, boot into your Setup Utility.
    • Select Computer Setup (If applicable)
    • Scroll to Security drop-down menu and select System Security.

  • Enable Virtualization Technology.
  • Save Changes and Exit.

Go to Step 2 – Installing Client Hyper-V.

Step 2 – Install Client Hyper-V

    • To access the Programs and Features tool:  [Windows] + X keystroke.
    • Select Turn Windows Features on or off (located in the left panel).
    • Select the Hyper-V box.

  • Click OK.  After Installation there will be a prompt to Restart the system.

Go to Step 3 – Create a Virtual Switch.

Step 3 – Create a Virtual Switch

For a VM to connect to your network or Internet, the VM must be connected to a Virtual Switch.

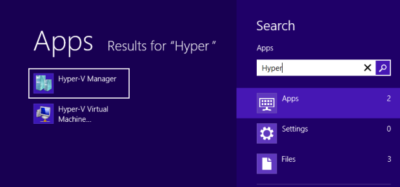
  • Open Hyper-V Manager (Start Screen)
  • In the Actions Pane, select Virtual Switch Manager.
  • Choose the type of Virtual Switch you would like to create:  External*, Internal and Private
    1. External:  Connection with entire network and Internet.
    2. Internal:  Connection with “Host” machine network connection only.
    3. Private:  Connection with other virtual machines only.
  • After selecting the type, another window will open where you can Name the switch and add the Description.
  • Click OK.  Then click Yes to “Apply Networking Changes”.

In a typical Client Hyper-V Configuration, you will not use the following settings:

    • “Enable virtual LAN identification for management operating system in the VLAN ID” check box.
    • Extensions (Located under the Virtual Switch on the left panel).

  • MAC Address Range (Global Network Settings on the left panel).

Go to Step 4 – Create a Virtual XP Machine.

Step 4 – Create a Virtual XP Machine

  • Open Hyper-V Manager (Start Screen)
  • In the Actions Pane, select New and then Virtual Machine…
  • Before You Begin window, click Next.
  • Specify Name and Location window, you can name your VM and where you would like to save it, then click Next.
  • Assign Memory window, type the amount of memory you would like to allocate for the VM (8MB – 1804MB), then click Next.
  • Configure Networking window, click Next.
  • Connect Virtual Hard Disk window, you can Create a virtual hard disk, Use an existing virtual hard disk or Attach a virtual hard disk later, then click Next.
  • Installation Options window, you can Install the OS laterInstall an OS from a boot CD/DVD or ISOInstall OS from boot floppy disk or Install OS from a netowrk-based installation server.
  • Then click Next to view the Summary or click Finish to complete the setup.

Setting up the Networking settings for an XP machine requires additional steps.

  • Open Hyper-V Manager (Start Screen)
  • In the Actions Pane, select Settings…
  • Select Legacy Network Adapter in the “Add Hardware” section, then click Add.
  • In the “Legacy Network Adapter” section, select the Virtual Switch you created in the last step.
  • Click Apply and then OK.

Installation:

    • Insert the Windows XP CD into the computer.
    • Open Hyper-V Manager (Start Screen)
    • Select your VM and then in the Actions Pane, select Connect.
    • Click the Green Power Button.

  • Once Windows XP Installation appears, follow all of the installation steps.

Go to Step 5 – Setup USB Access.

Step 5 – Setup USB Access

Client Hyper-V does not support USB access.  Setting up a Remote Desktop Connection allows the XP Virtual Machine to access USB devices while also providing a full screen display and better performance.  For Remote Desktop Connection to work the Host and Client machines must be setup on the same Workgroup.

Host Machine Setup:

      • To access the System window:  [Windows] + [Break] keystroke.
      • From this window, you can change your Computer Name and the Workgroup name.
      • Restart machine.

Client Machine Setup:

      • Open Hyper-V Manager (Start Screen)
      • Select your VM and then in the Actions Pane, select Connect.
      • Click the Green Power Button.
      • To access the System window:  [Windows] + [Break] keystroke.
      • Select the Remote tab, check the box to “Allow users to connect remotely to this computer“.
      • Click Apply and OK.
      • Select Computer Name tab, you can change your Computer Name and the Workgroup name.
      • Restart machine.

Setting up initial remote connection:

    • Acccess the App Search Page on the Host Machine:  [Windows] + Q keystroke.
    • In the text box type Remote and click Remote Desktop Connection.
    • Remote Desktop Connection window, click the Show Options button.
    • Type:  Windows XP System name and Windows XP User name, then click Save As and assign a Connection name.
    • Select the Local Resources tab, in the Local devices and resources section, click More.
    • Select all the devices you would like access to, and then click OK.
    • Return to the General Tab and click Save.

  • Select Connect.
  • After logging in you can install XP drivers, install a printer and access Host machine files.

Go to Step 6 – Install RemoteApp Tool.

Step 6 – RemoteApp Tool

RemoteApp tool can directly access Windows XP applications from Windows 8.

Install RemoteApp Update

  • Open Hyper-V Manager (Start Screen)
  • Select your VM and then in the Actions Pane, select Connect.
  • Open IE, go to Microsoft Download Center, and search for Enable Remote App.
  • Select “Update for Windows XP SP3 to enable RemoteApp” and click Download.
  • Follow instructions to install RemoteApp, select Finish.  After Installation there will be a prompt to Restart the system.

Modify the Registry

  • Open Run [Windows] + R keystroke.
  • In the text box type Regedit to open Registry Editor.
  • Go to:  HKEY_LOCAL_MACHINE\SOFTWARE\Microsoft\Windows NT\CurrentVersion\Terminal Server\TSAppAllowList
  • In TSAppAllowList, select fDisabledAllowList, change the value from 0 to 1.
  • Click OK.

File Path to EXE for Programs (For each Application)

  • Locate the application shortcut.
  • Right click on it.
  • Select the Properties.
  • In the Properties dialog box, select the Find Target button.
  • Copy the path and executable file name.
  • Log off but keep the Virtual Machine running.

Customize RDP File (Saved in Step 5)

  • Navigate to your RDP file and copy/paste a copy of the file.
  • Rename the copy to an *Application*.rdp.  (Example:  Outlook.RDP)
  • Open the file using Notepad and make the following changes:
    • Locate:
      • remoteapplicationmode:i:0
      • alternate shell:s:
    • Change to:
      • remoteapplicationmode:i:1
      • alternate shell:s:rdpinit.exe
    •   Add:
      • disableremoteappcapscheck:i:1
      • remoteapplicationname:s:{Application Name}
      • remoteapplicationprogram:s:{Path to executable file}
  • Select File and Save.

Return to Step 1 – Getting Started with Windows 8 Client Hyper-V.


iOS 7 + Business

222

Apple has officially released iOS 7 Today, September 18, 2013.  The new OS includes many new features and Apps that are beneficial to enterprise users.  iPhone(s) and iPad(s) with these new features will be easier for IT departments to deploy and manage in enterprise environments.

overview_features_title

Touch ID Fingerprint Reader

fingerprint-o2Touch ID Fingerprint Reader is a 500ppi fingerprint sensor embedded in the “Home” button.  The touch sensor has a 360 degree ability to read a fingerprint.  Your fingerprint can also approve purchases from iTunes Store, the App Store, and the iBooks Store.

Single Sign On (SSO)

sso

Enterprise single sign on (SSO) logs users in without requiring them to enter credentials multiple times.  SSO with can be configured across apps to verifies user permissions for enterprise resources and can be used for the App Store.

Per App VPN

vpnPer app VPN ensures that only managed app data travels through VPN.  iOS 7 apps can automatically be connected to VPN when launched.  Per app VPN will provide IT  administrators control over corporate network access.

Open-In Management

openin

iOS 7 allows business to protect corporate data by controlling which apps (and accounts) are used to open documents and attachments. Managed “open in…” gives IT the ability to configure the list of apps available in the sharing panel.

Mobile Device Management (MDM)

mdm

The MDM protocol in iOS 7 includes a number of new commands, queries, and configuration options that make third-party MDM solutions even more powerful.  Also, Stremlined MDM enrollment allows IT to skip basic setup steps and fully configure devices with corporate settings and policies

To read previous articles regarding iOS 7, new iOS features and additional iOS features.


Tips to Troubleshoot Outlook

microsoft-outlook

Microsoft Outlook can connectivity issue with Microsoft Exchange.  Troubleshooting and fixing these issues can range from a simple reboot to creating a new mail profile.

Restart Outlook and/or Computer

Many connectivity problems with Outlook can be resolved by simply restarting Outlook and/or the Computer.

  1. Restart Outlook.
  2. After restarting Outlook, verify connectivity.
  3. If there are still connectivity problems, restart Computer.
  4. Once computer is up and running, verify connectivity in Outlook.

Outlook3

Offline Mode

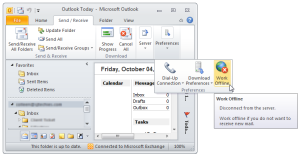
 Outlook 2010 and newer:

  1. Click the Send/Receive tab.
  2. Locate the Work Offline button.
  3. Click the Offline button. 

Outlook 2007 and older:

  1. Click File Menu.
  2. Uncheck the Offline box.

At the bottom of your Outlook Window there will be a “Trying to Connect” prompt.  If  Outlook is “Connected” the problem is solved.

Rebuild PST or OST File

OST File

  1. Close Outlook.
  2. Open the Control Panel.
  3. Select Mail icon.
  4. In the next window, click Data Files.
  5. Locate your data file, select and click Open File Location.
  6. Locate the data file using Windows Explorer.
  7. Rename the file extension from .OST to .OLD
  8. Close these windows and open Outlook

PST File

  1. Search for scanpst.exe using Windows Explorer.
  2. Double click scanpst.exe to run the application.
  3. In the next window, click Browse.
  4. Locate your .pst file.
  5. Click Start.
  6. Scanpst will scan the data file eight times.  
  7. If the scan finds errors, there will be a prompt to repair. For backup purposes, check the Make Backup Of Scanned File Before Repairing box.
  8. Click Repair.
  9. Close these windows and open Outlook

outlook2

Repair Software Install

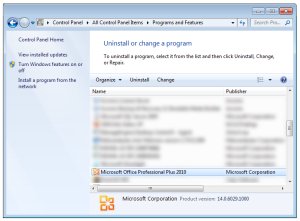
  1. Open Control Panel.
  2. Click Programs and Features.
  3. Scroll down and highlight the Microsoft Office installation.
  4. Click Change.
  5. Select Repair.
  6. Click Continue.
  7. Allow the repair to complete.
  8. Reboot your computer. 

outlook

Recreate Mail Profile

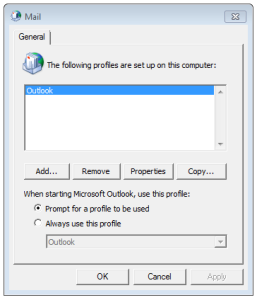
  1. Open Control Panel.
  2. Click Mail.
  3. Select Show Profiles.
  4. Click Add.
  5. Name the new profile.
  6. Follow the steps for the Outlook Account Setup Wizard.
  7. Verify the new profile and set as the default or delete old profile. 


Important Privacy Settings in iOS 7

The new iOS 7 upgrade resets original settings and adds new settings that users should be aware of.

System Services

The System Services is difficult to find at the bottom of the Privacy > Location Services panel.

Status Bar Icon

Settings > Privacy > Location Services > System Services

The Status Bar Icon setting will appear in three ways:  Purple for Recently Used, Gray for Used within 24 Hours and Outlined for Geofence.  Turn ON this setting.

SBI

Diagnositcs & Usage

Settings > Privacy > Location Services > System Services > Diagnostics & Usage

DU

The Diagnostics & Usage setting detects/records iPhone usage and anonymously sends a report to Apple to improve the device.  Turn OFF this setting.

Frequent Locations

Settings > Privacy > Location Services > System Services > Frequent Locations

FLThe Frequent Locations setting detects/records data about your locations, using GPS coordinates of frequently visited locations.  Turn OFF this setting.

Location-Based iAds

Settings > Privacy > Location Services > System Services > Location-Based iAds

LBIA

The Location-Based iAds collect and share location data based on real-time geographic location of your Apple device.  Turn OFF this setting.

Advertising

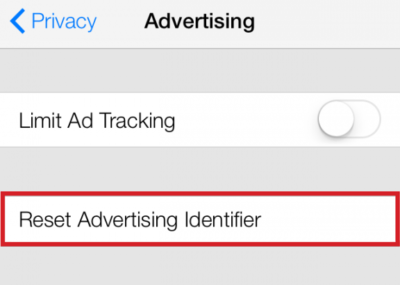
Settings > Privacy > Advertising

The Limit Ad Tracking setting prevents adverizers  from targeting your device. Turn Limit Ad Tracking ON.

The Advertising Identifier gives users control over advertisers’ capability to use tracking systems by resetting the Advertising ID.  Reset Advertising Identifier.

RAI

Do Not Track

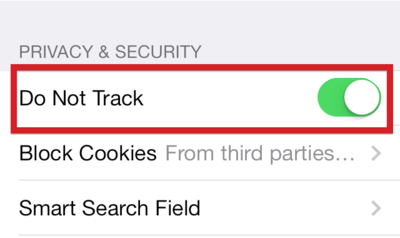
Settings > Safari > Do Not Track

The Do Not Track setting allows users to have privacy while using Safari.  Turn ON this setting.

DNT


Top Smartphones for 2013 Holiday Season

2013smartphone2

iPhone 5s

The iPhone 5S was launched with iOS7.  The updated camera with iPhone 5S has become popular against competitors. Also, the iOS 7 includes many new features including fingerprint identification on the home button, control center, multitasking, enhanced Siri and many more.

The iPhone 5S is available with all major carriers.  Contract prices are $199-399 or without Contract prices are $649-$849.

HTC One

The HTC One runs Android 4.3, a quad-core processor, 2 GB of RAM, 1080p LCD displays and an ultra mega pixel camera.  The most popular feature with HTC One is the front facing speakers and dual microphones.

The HTC One is available with all major carriers.  Contract prices are as low as $50 or without Contract price is $550.

Samsung Galaxy Note 3

The Samsung Galaxy Note 3 is the most prevailing Android device on the market.  The Galaxy Note 3 includes many features, such as, the S Pen, 13 mega pixel camera (rear), microSD storage, a removable battery, LTE and many more.

The Samsung Galaxy Note 3 is available with all major carriers.  Contract price is$299.99 or without Contract price is $699.99.

Nokia Lumia 1520

The Nokia Lumia 1520 runs Windows Phone 8 OS.  The 1520 offers a larger display, faster processor, and lower resolution camera than the Lumia 1020.  Features of the Lumia 1520 include integrated Microsoft Office, 20 mega pixel camera, HD 1080p display and many more.

The Nokia Lumia is only available through AT&T.  Contract price is $199.99 or without Contract price  is$584.99.

Google Nexus 5

The Nexus 5 runs Android 4.4.  The Nexus 5 includes a Snapdragon 800 processor, 8 mega pixel camera, HDR+, wireless charging and many more.

The Nexus 5 prices are $349 (16GB) and $399 (32GB).

Moto X

The Moto X runs Android 4.4.  The Moto X includes many features, such as, 10 mega pixel camera with quick capture, touch-less control, face unlock and many more.

The Moto X is available with all major carriers. Contract price is $99 or without Contract price is $499.

LG G2

The LG G2 runs Android 4.2.2.  The LG G2 has 1080p IPS display, 13 mega pixel camera, power and volume rear keys , clip tray, knock on and many more features.

The LG G2 is available with all the major carriers.  Contract price is $199.99 or without Contract price is $603.99.

Samsung Galaxy S4

The Samsung Galaxy S4 runs Android 4.2.  The Galaxy S4 has a 13 mega pixel camera with Dual shot and Drama Shot, Air View that allows you to control your phone with hovering instead of touch, WatchON, S Health and many more.

The Samsung Galaxy S4 is available with all the major carriers.  Contract price is $199.99 or without Contract price is $627.99.

Motorola Droid Maxx

The Motorola Droid Maxx has outlasting power with a 3,500 mAh capacity battery.  The Droid Maxx features include active notifications, always-on listening, Command Center, wireless charging, 10 mega pixel camera and many more.

The Droid Maxx is only available at Verizon Wireless.  Contract price is $199.99 or without Contract price is $499.99.

Sony Xperia Z1

The Sony  Xperia Z1 is waterproof and dust resistant.  The Xperia Z1 has man features that include 20.7 mega pixel camera, full HD TRILUMINOUS display, quad-core processor, 2GB RAM, microSD card slot, and many more.

The Sony Xperia Z1 is available without a contract for $649.99.


Microsoft OneDrive for Business

onedrive

OneDrive (formerly “SkyDrive”) in an essential tool for the Office 365 package.  OneDrive provides safe data storage that can be easily accessed from virtually anywhere.  Although, this storage option is safe, it is not practical for business use.

OneDrive for Business (formerly “SkyDrive Pro”) offers a administrative controls with a content management platform. OneDrive for Business allow IT Administrators/Departments to control the intellectual property of their business(es).

Improved features for OneDrive for Business include a menu bar to easily access frequent tools and controls, search bar with type-ahead feature to quickly find files and many more.  Additional features such as, higher storage limits, encryption on stored data, data loss prevention features and many more will be released throughout 2014.

Currently, OneDrive for Business is included with Office 365 and SharePoint package plans.  Microsoft announced that as of April 1, 2014 OneDrive for Business, as well as other services/software, will be available as a standalone cloud service for $5 a month per user.

For assistance with Office 365, SharePoint or OneDrive for Business

 please contact us 856-745-9990 or click here.

CALL US NOW!