Back to Top

Tech, Web, Cloud & Cabling Services

Author Archives: Website Admin

Microsoft – What went wrong?

ET83-screen[1]Touch 10 MonitorMicrosoft has always been key player in the Technology world.  In 2009, Microsoft released Windows 7, for many users it became the best operating system yet.  Not too long after the release of Windows 7, Microsoft predicted that “touch-screens” were the future of technology and focused all of their resources in one place.

On October 26, 2012, Microsoft released their Windows 8 OS and their first tablet, the Surface RT.  Shortly thereafter, on February 9, 2013, Microsoft released the second tablet, the Surface Pro.  For more information regarding the Surface RT or the Surface Pro, click here

“A Windows 8-based PC is really a new kind of device, one that scales from touch-only small screens through to large screens, with or without a keyboard and mouse,” said Julie Larson-Green from Microsoft.

Apple and Android touchscreen devices have been very successful because they are useful on-the-go.  Trying to compete with Apple and Android, Microsoft developed Windows 8, a touch-oriented OS.  Many desktop and laptop users have had problems adjusting to the new OS.   Also, the Surface Tablet users are having trouble adjusting to this device and OS because it is a touch-enabled laptop.  Using the touchscreen features on a laptop is not convenient and very uncomfortable.

How long will it take for Microsoft to regain its position in the technology world?


5 Steps to Keep Personal Data Safe

Takeaway: Managing personal data can be risky and expensive for organizations.

Untitled“As the amount of personal information increases multifold, individuals and their personal data will increasingly become a security target. And, yet in most scenarios the organization is still ultimately accountable for the personal data on its IT systems,” said Carsten Casper, research vice president at Gartner, Inc.

Gartner, Inc. has a five step plan to create an exit strategy:

Step 1:  

The first step to preparing a strategy for transporting personal data is to distinguish personal data from non-personal data.

Step 2:  

Once personal data is distinguished, it will need protection. Ways to protect data are:

    • Encryption
    • Virtual Machines
    • Secure Apps
    • Mobile Data Management Products
    • & many more options.

Step 3:  

Next step is to use Human Resource (HR), Customer Relationship Managment (CRM) and Enterprise Resource Planning (ERP) programs that specialize in organizing and storing personal data.

Step 4:  

The most problematic task is guaranteeing that an organization will obey privacy standards for the transfer of personal data which is Gartner’s fourth step.  

Step 5:  

Create a practical method of discussing  Cloud computing including laws and jurisdictions for the physical location and logical location of stored personal data.


ActiveSync Limits – Exchange 2010 SP1

es10sp1

Exchange 2010 Service Pack 1 restricts the number of ActiveSync devices (=EAS PartnerShips) by setting the default to allow up to only 10 devices.  This default helps eliminate resources from being monopolized.

Limiting ActiveSync devices is for the new feature “Throttling” which manages Exchange performance. Throttling enforces bandwidth limits by tracking consumed resources per user.

Run command in cmdlet to adjust ActiveSync limits:

 Set-ThrottlingPolicy –EASMaxDevices # –Identity DefaultThrottlingPolicy_hex_string

  • Change # to the number of devices.
  • Run  Get-ThrottlingPolicy to find out the hex_string identity.


Features the iPhone Could Use

Untitled2

iPhone 5 is the fastest, thinnest and lightest iPhone;  nevertheless many features remain absent that are provided by Apple’s competitors. 

NFS Built-In

Apple prefers to use Passbook system instead of Near Field Communication (NFC).  Passbook is not capable of performing all tasks that NFC can handle such as the ability to beam content by touching devices or send money via PayPal wirelessly.

Swypeswype-symbian

“Swype is a faster and easier way to input text on any screen.”

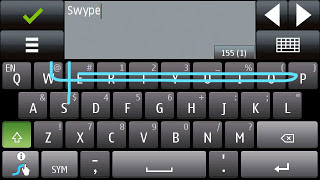
Swype gives your phone the capability to input text by sliding your finger from letter to letter accross the screen.  Only Android smartphones offer this input ability.

SD Cards

iPhone’s are not built to extend device storage using external SD Cards, Micro SD Cards or Mini SD Cards.

Storage

Many iPhone user’s have replaced their iPod’s with their smartphone.  The storage capacity for an iPhone (64GB) versus an iPod Classic (160GB) is not comparable. 

USB

iPhones have never used a standard USB cable to sync.  Currently, iPhone 5 uses a new MicroDock connection that will not allow older sync cables to connect without a specific adapter.

Micro HDMIUntitled3

Android devices have a Micro-HDMI port for retrieving video from your phone. iPhone 5 requires a special adapter or an Apple TV to retrieve video.

Changing the Battery

Although, iPhone 5 provides a stronger battery, some users require more power but replacing an iPhone battery is challenging.  To replace the battery it requires a special screw driver and special tools to lift the screen 90°.

Battery Life

While the iPhone 5’s battery is larger that the iPhone 4S, it produces the same battery life because of the bigger screen and power to run 4G LTE.

Implementing BYOD

BYOD

Bring-Your-Own-Device (BYOD) is permitting employees to bring personal devices (laptops, tablets, and smart phones) to their workplace, and use those devices to access company information and applications.

Create a Private App Store

Designing a private App Store provides the ability to manage custom and purchased apps.  Businesses can manage apps by pushing mandatory apps, approving recommended apps and blocking rouge or unrelated apps.

Policy Compliance

Policies ensure security, productivity, protection of resources and reduce risks.  Implementing a location-based service (LBS) such as Geo-Fencing and GPS will set limitations on access to data based on location.

Strong Security

There are many layers of security for a BYOD environment.  Device enrollment can be a one-time passcode and/or Active Directory credentials.  Applying user profiles will distribute policies, restrictions and Apps based on logical groups (department/location/device type).  Other types of security are tracking device locations, Remote Lock, Complete Wipe and Corporate Wipe.

Track Usage

Usage thresholds can be monitored based on talk, text, data and roaming for each user.  Setting up alerts and reports for misuse, excessive bandwidth, additional charges and security exposures will help track usage appropriately. 

Banning Rouge Devices

Compromised devices such as “jail broken” iPhone or a rooted Android should be restricted from accessing enterprise data and resources.  Compromised devices are susceptible to virus attacks.

For more information on Mobile Device Management

Contact us at 856-745-9990 or click here.


10 Enterprise Benefits of Windows 8.1

3

Windows 8.1 will be released on October 17, 2013, followed by a full launch on October 18, 2013.  Although Windows 8.1 is not a “new” operating system, the major updates created for 8.1 have made the upgrade more than a simple service pack.

Enterprise Benefits:

1.  Mobility

Windows 8.1 benefits a wider range of employees to include a combination of productivity and mobility.  IT can manage Windows 8.1 devices, such as desktops, laptops, and tablets, with a universal management client.

2.  Tablets

Enabled hardware for Windows 8  offers the option to have a standard operating system for enterprises, but allow individual users to select their device, such as desktops, laptops, and tablets, and have a consistent interface across these devices. 

3.  Application Development

Streamlining Windows 8.1 allow developers to design applications that can work across devices, such as desktops, laptops, tablets and smartphones.

4.  IT Support

To reduce the strain on IT resources for business mobility, standardizing on Windows 8.1 allows a majority of IT support to become simplified. 

5.  Total Savings

Standardizing on Windows 8.1 will reduce the cost for development, maintenance and support.  Also, reducing costs by eliminating licensing/support costs of a enterprise environment with varied devices.

6.  Restore Optimization

Windows 8.1 has the ability to restore factory settings for the operating system.  For all businesses, this is an advantage and a simple way to reduce costs and recover time for IT departments. 

7.  IT Operations

Windows 8.1 is a services pack for Windows 8 that includes new features, not just fixes.  Creating user documentation can be streamlined for Windows 8.1 for all applications.  Additionally, future service packs will follow in the footsteps of Windows 8.1 to include new features; then IT departments can frequently provide updates to user documentation.

8.  Reduced Confusion

To reduce user confusion, after a user joins to Windows Intune Management Service the user gains access to the Company Portal.  The company portal has access to the applications, data, and device settings.  Also, users can troubleshoot their own devices using the service desk self-help portal.

9.  Security

Microsoft is enhancing security with Windows 8.1 with Remote Business Data Removal and the new Internet Explorer.  Remote Business Data Removal provides control over encrypted data that can be wiped from any device.  The new Internet Explorer has Anti-Malware included to scan binary extensions to prevent infections.

10.  Education

Windows 8.1 offers an evaluation of current infrastructure, how to execute migrations plans and ways to educate users on how to use the new version.  Microsoft ends support for Windows XP on April 8, 2014, business should consider the option of upgrading to Windows 8.1. 

For more information regarding Windows 8.1 click here.


‘Zero-Day’ for Microsoft XP Users

194212

On April 10, 2012, Microsoft officially announced that as of April 8, 2014 they will end extended support for Windows XP and Office 2003, after which no new updates, hotfixes, patches or support will be issued.  “Since a security update will never become available for Windows XP to address these vulnerabilities, Windows XP will essentially have a “zero day” vulnerability forever” said Tim Rains from Microsoft.  Zero-day attacks are when attackers exploit a vulnerability before the developer is aware or can fix the problem.

Windows XP already has a notably higher infection rate than its successors Windows 7 and Windows 8.  Those preparing to continue using XP after the cut-off date, are going to be in a unpleasant situation trying to protect their intellectual property.   With Microsoft ending their support, the vendors for applications running on it will most likely end support.

Attackers will have the upper hand once Microsoft cuts off XP support and presumably will have more information than the defenders about system and application vulnerabilities.  Also, attackers will have the possibility of compromising the system and applications if they exploit the zero-day vulnerabilities.

For more information regarding Windows XP End of Life, click here.

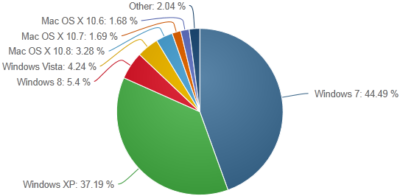
According to NetMarketShare.com, Windows XP still has about 37 percent desktop operating system share as of June 2013.   Although it is the second most used operating system, Microsoft said that they will not be extending support for XP after April 8, 2014.

xp

To protect and upgrade your home or business

 please contact us 856-745-9990 or click here.


XP will be Non-Compliant

logo_footer_hipaa

Windows XP was released on October 25, 2001 and has become one of the most popular versions of Windows for home and business environments.

The HIPAA Security Rule requires all systems to be updated regularly, as of April 8, 2014 Microsoft will end support for Windows XP, after which no new updates, hotfixes, patches or support will be issued.

This is a major problem within the healthcare industry since many computers are still running XP.  Migrating to a new operating system can be a challenging task because some XP machines have proprietary software that are not compatible with Windows 7+.  

Evaluate the technical infrastructure including servers, workstations and network equipment to create a migration plan.  Communicating with product vendors will help create the migration plan.  Vendors can provide support for updating and upgrading the software/hardware.  Implementing Virtualization within your network is a centralized option to replacing your current setup.  A virtual desktop infrastructure is having 50+ desktops reside on one physical server and sharing the resources, such as CPU, storage and memory.

During the migration, providing an efficient setup for the clinical staff may also include upgrading the manageability of the network and designing a much more scalable and secure IT infrastructure.

To protect and upgrade your home or business

 please contact us 856-745-9990 or click here.


10 Ways to Survive a System Outage

Fact: Something is broken – you need to get to work.

toolbox1.  Stay calm.

Remaining calm is the best strategy to surviving a system outage and keeping your focus on the current task.  Also, remaining calm will produce less emotional and techinical errors in a workplace.  

2.  Notify all users.

Proactively preparing for a system outage would include creating a Notification Plan based on different scenarios.  Using company e-mail, instant messaging, have a Co-Worker announce the outage or put a sign up saying “System is down.  Working on it now!”.

3.  Recruit a “buffer” to answer any questions.

After the initial notification, users will have many questions.  It would be ideal to recruit someone who is available to answers those questions, especially ETA questions.

4.  Be polite and understanding.

Remember to be polite and understanding when it comes to upset users.  In Step 1, keeping your focus on the current task to avoid making errors, also try to avoid “play-by-play” status updates.

5.  Documentation.

Always document each step of the recovery process.  Start with the initial problem or outage, followed by what you find, what commands you used, what errors you received and all attempts to fix the outage.  Lastly, document the steps that resolved the outage.

6.  Present the facts.

During the resolution process and the aftermath, always remain honest and present the facts.  If you caused the problem or outage, do not try to cover it up because it will complicate the process of resolving the outage.

7. Take your time.

Although, time is of the essense when system is down, take your time while troubleshooting.  If you are not sure what will resolve the problem, taking your time and implementing different solutions at a steady pace will allow you to narrow down the exact problem and resolution.

8.  Call Support.

Having product support is an essential tool for IT departments.  Calling support and submitting a ticket may consist of being on hold, waiting for a call back and sometimes an onsite visit can be a smart business decision.

9.  Stay positive.

Staying positive and continue building a knowledge of system events will prepare you for problem situations.  Having strong work relationships with co-workers will be useful for emergency situations.

10.  Be Prepared.

To be prepared for every system problem is almost impossible.  Continue building a knowledge of your environment is the strongest way to prepare for problem situations, previously mentioned in Step 9.


Windows 8 – Access Windows XP Apps

Client Hyper-V is a virtualization tool that comes with Windows 8 Professional and Windows 8 Enterprise.  Using Client Hyper-V can run Windows XP applications on a Windows 8 machine.  This tool requires that your system has a minimum of 4GB of RAM, 64-bit CPU that supports Second Level Address Translation (SLAT).  Also, the key virtualization feature must be enabled prior to setup.

6388488-620-290

Step 1 – Getting Started with Windows 8 Client Hyper-V

Step 2 – Installing Client Hyper-V

Step 3 – Create a Virtual Switch

Step 4 – Create a Virtual XP Machine

Step 5 – Setup USB Access

Step 6 – Install RemoteApp Tool

Step 1 – Getting Started

Launch and verify System Information:

  • To access the Apps Search page:  [Windows] + Q keystroke.
  • In the text box type msinfo32 and click msinfo32.exe.
  • Scroll to the bottom of the right panel and the following values are set to Yes:  (If the Second Level Address Translation Extensions or the Data Execution Protection values are set to No, then you will not be able to use Windows 8’s Client Hyper-V.)
      1. Hyper-V – VM Monitor Mode Extensions
      2. Hyper-V – Second Level Address Translation Extensions
      3. Hyper-V – Virtualization Enables in Firmware
      4. Hyper-V – Data Execution Protection.

Enabling Virtualization through Setup Utility

    • Before the operating system loads, boot into your Setup Utility.
    • Select Computer Setup (If applicable)
    • Scroll to Security drop-down menu and select System Security.

  • Enable Virtualization Technology.
  • Save Changes and Exit.

Go to Step 2 – Installing Client Hyper-V.

Step 2 – Install Client Hyper-V

    • To access the Programs and Features tool:  [Windows] + X keystroke.
    • Select Turn Windows Features on or off (located in the left panel).
    • Select the Hyper-V box.

  • Click OK.  After Installation there will be a prompt to Restart the system.

Go to Step 3 – Create a Virtual Switch.

Step 3 – Create a Virtual Switch

For a VM to connect to your network or Internet, the VM must be connected to a Virtual Switch.

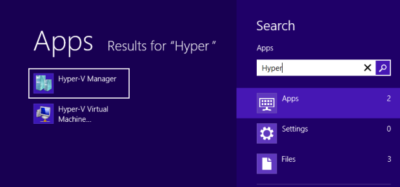
  • Open Hyper-V Manager (Start Screen)
  • In the Actions Pane, select Virtual Switch Manager.
  • Choose the type of Virtual Switch you would like to create:  External*, Internal and Private
    1. External:  Connection with entire network and Internet.
    2. Internal:  Connection with “Host” machine network connection only.
    3. Private:  Connection with other virtual machines only.
  • After selecting the type, another window will open where you can Name the switch and add the Description.
  • Click OK.  Then click Yes to “Apply Networking Changes”.

In a typical Client Hyper-V Configuration, you will not use the following settings:

    • “Enable virtual LAN identification for management operating system in the VLAN ID” check box.
    • Extensions (Located under the Virtual Switch on the left panel).

  • MAC Address Range (Global Network Settings on the left panel).

Go to Step 4 – Create a Virtual XP Machine.

Step 4 – Create a Virtual XP Machine

  • Open Hyper-V Manager (Start Screen)
  • In the Actions Pane, select New and then Virtual Machine…
  • Before You Begin window, click Next.
  • Specify Name and Location window, you can name your VM and where you would like to save it, then click Next.
  • Assign Memory window, type the amount of memory you would like to allocate for the VM (8MB – 1804MB), then click Next.
  • Configure Networking window, click Next.
  • Connect Virtual Hard Disk window, you can Create a virtual hard disk, Use an existing virtual hard disk or Attach a virtual hard disk later, then click Next.
  • Installation Options window, you can Install the OS laterInstall an OS from a boot CD/DVD or ISOInstall OS from boot floppy disk or Install OS from a netowrk-based installation server.
  • Then click Next to view the Summary or click Finish to complete the setup.

Setting up the Networking settings for an XP machine requires additional steps.

  • Open Hyper-V Manager (Start Screen)
  • In the Actions Pane, select Settings…
  • Select Legacy Network Adapter in the “Add Hardware” section, then click Add.
  • In the “Legacy Network Adapter” section, select the Virtual Switch you created in the last step.
  • Click Apply and then OK.

Installation:

    • Insert the Windows XP CD into the computer.
    • Open Hyper-V Manager (Start Screen)
    • Select your VM and then in the Actions Pane, select Connect.
    • Click the Green Power Button.

  • Once Windows XP Installation appears, follow all of the installation steps.

Go to Step 5 – Setup USB Access.

Step 5 – Setup USB Access

Client Hyper-V does not support USB access.  Setting up a Remote Desktop Connection allows the XP Virtual Machine to access USB devices while also providing a full screen display and better performance.  For Remote Desktop Connection to work the Host and Client machines must be setup on the same Workgroup.

Host Machine Setup:

      • To access the System window:  [Windows] + [Break] keystroke.
      • From this window, you can change your Computer Name and the Workgroup name.
      • Restart machine.

Client Machine Setup:

      • Open Hyper-V Manager (Start Screen)
      • Select your VM and then in the Actions Pane, select Connect.
      • Click the Green Power Button.
      • To access the System window:  [Windows] + [Break] keystroke.
      • Select the Remote tab, check the box to “Allow users to connect remotely to this computer“.
      • Click Apply and OK.
      • Select Computer Name tab, you can change your Computer Name and the Workgroup name.
      • Restart machine.

Setting up initial remote connection:

    • Acccess the App Search Page on the Host Machine:  [Windows] + Q keystroke.
    • In the text box type Remote and click Remote Desktop Connection.
    • Remote Desktop Connection window, click the Show Options button.
    • Type:  Windows XP System name and Windows XP User name, then click Save As and assign a Connection name.
    • Select the Local Resources tab, in the Local devices and resources section, click More.
    • Select all the devices you would like access to, and then click OK.
    • Return to the General Tab and click Save.

  • Select Connect.
  • After logging in you can install XP drivers, install a printer and access Host machine files.

Go to Step 6 – Install RemoteApp Tool.

Step 6 – RemoteApp Tool

RemoteApp tool can directly access Windows XP applications from Windows 8.

Install RemoteApp Update

  • Open Hyper-V Manager (Start Screen)
  • Select your VM and then in the Actions Pane, select Connect.
  • Open IE, go to Microsoft Download Center, and search for Enable Remote App.
  • Select “Update for Windows XP SP3 to enable RemoteApp” and click Download.
  • Follow instructions to install RemoteApp, select Finish.  After Installation there will be a prompt to Restart the system.

Modify the Registry

  • Open Run [Windows] + R keystroke.
  • In the text box type Regedit to open Registry Editor.
  • Go to:  HKEY_LOCAL_MACHINE\SOFTWARE\Microsoft\Windows NT\CurrentVersion\Terminal Server\TSAppAllowList
  • In TSAppAllowList, select fDisabledAllowList, change the value from 0 to 1.
  • Click OK.

File Path to EXE for Programs (For each Application)

  • Locate the application shortcut.
  • Right click on it.
  • Select the Properties.
  • In the Properties dialog box, select the Find Target button.
  • Copy the path and executable file name.
  • Log off but keep the Virtual Machine running.

Customize RDP File (Saved in Step 5)

  • Navigate to your RDP file and copy/paste a copy of the file.
  • Rename the copy to an *Application*.rdp.  (Example:  Outlook.RDP)
  • Open the file using Notepad and make the following changes:
    • Locate:
      • remoteapplicationmode:i:0
      • alternate shell:s:
    • Change to:
      • remoteapplicationmode:i:1
      • alternate shell:s:rdpinit.exe
    •   Add:
      • disableremoteappcapscheck:i:1
      • remoteapplicationname:s:{Application Name}
      • remoteapplicationprogram:s:{Path to executable file}
  • Select File and Save.

Return to Step 1 – Getting Started with Windows 8 Client Hyper-V.


CALL US NOW!