Back to Top

Tech, Web, Cloud & Cabling Services

Category: Microsoft Word

Software / Microsoft Word Category

Office 365: New capabilities for iPad and iPhone

New features make Office and OneDrive the best place to work on iPad and iPhone
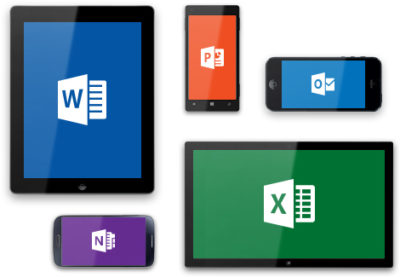
More and more, people around the world are working on the go, changing locations and devices as they create and collaborate with others throughout their day. As they work across their PCs, Macs and mobile devices, they expect an uncompromising experience that is familiar yet optimized for the device they are using.

Microsoft is committed to providing best in class experiences on all devices, and today, we are proud to share with you a set of new Office capabilities across Word, Excel, PowerPoint, and OneDrive on iOS that will delight and make iPad and iPhone users more productive than ever before.

Real-time co-authoring in Word, Excel, and PowerPoint on iOS – We live in a world where we’re often collaborating with multiple people in different locations and Office 365 provides the broadest and deepest toolkit for collaboration between individuals, teams, and entire organizations. Using real-time co-authoring, colleagues, friends, and family can contribute to and edit documents simultaneously in the Word, Excel and PowerPoint iOS apps. This allows you to know who else is working with you in a document, see where they’re working, and view changes automatically within seconds. The co-authoring experiences are also available in Office Online and the latest versions of Word, Excel and PowerPoint on the PC and Mac, all made possible by storing your documents in OneDrive or SharePoint.
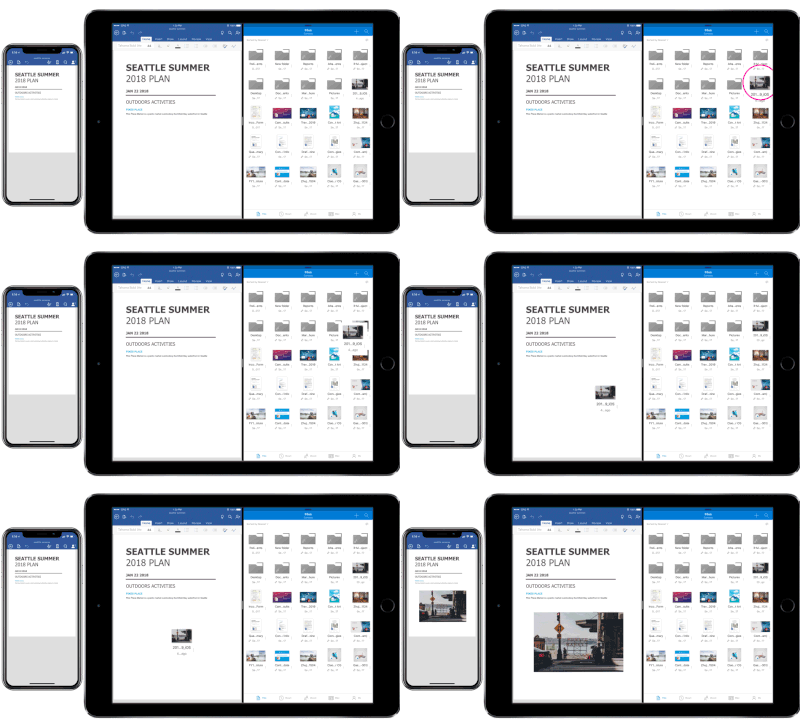
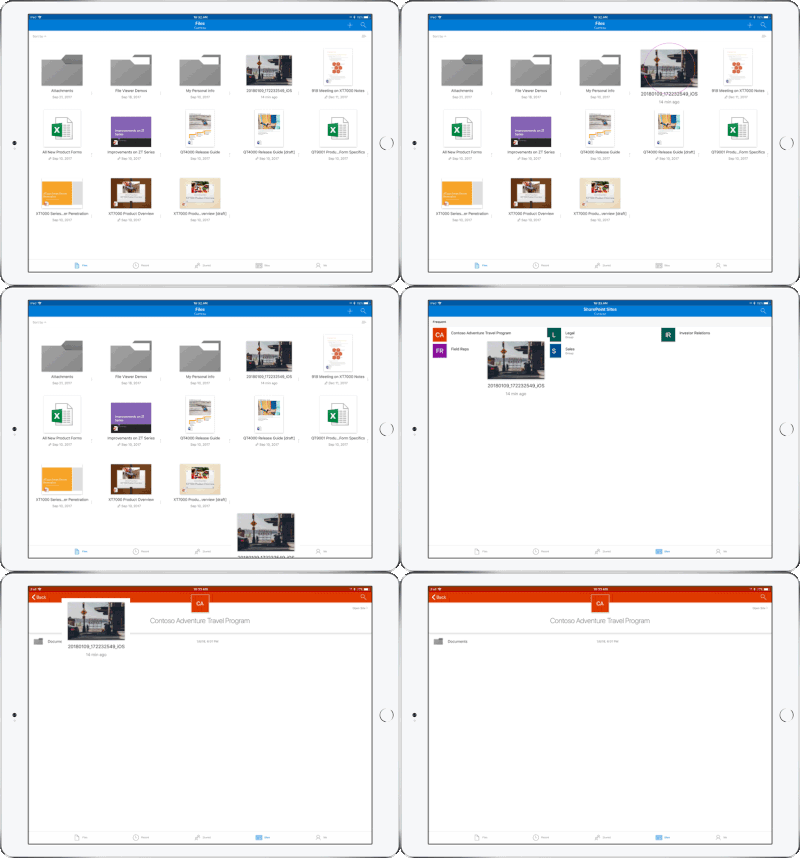
Drag and drop files anywhere with OneDrive – Sometimes your files can get scattered between different folders or even services and applications. Now it’s easier than ever to organize and rearrange your files. You can drag files in between folders in OneDrive and, if your teammates use SharePoint to work together, you can even drag OneDrive files to a SharePoint site giving them immediate access. On iPad, you can also drag files from other apps, such as iMessage, into your OneDrive and drag files out of your OneDrive to other apps.

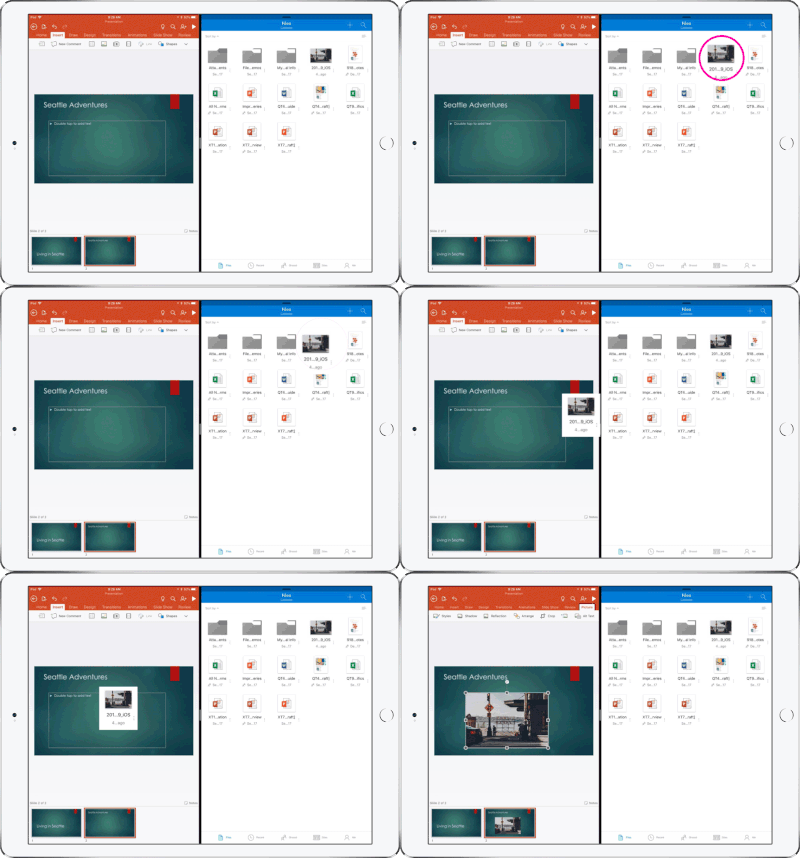
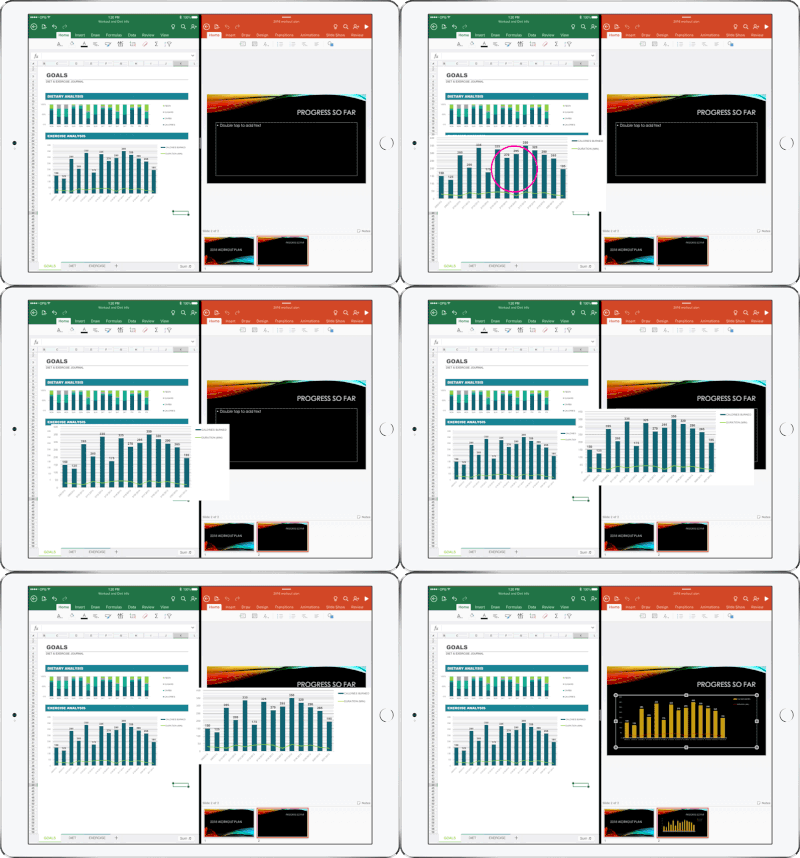
Drag and drop content between Word, Excel, PowerPoint, and OneDrive on iPad – One of the most common and powerful tasks when creating content is pulling in text, photos, graphs, and other objects from different sources. Now you can pull in content with ease on your iPad with drag and drop support in Office and OneDrive. Easily drag and drop objects from OneDrive or from one Office app to another.

OneDrive Files app support – Today we’re also announcing native support for the Files app in iOS 11. OneDrive integration with the Files app allows you to access, upload, edit, and save your content to OneDrive or SharePoint from apps that support Files app integration. You can also tag and favorite your OneDrive and SharePoint files from within the Files app.
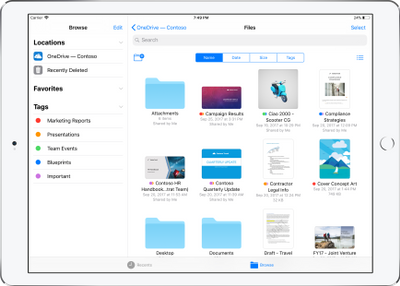
OneDrive redesigned to find the files that matter – The OneDrive iOS app has been redesigned from the ground up with a new layout that uses your screen space more efficiently allowing you to find your files faster. It’s easier to scan across file names, see the information that matters to you, and sort files how you want. New metadata is visible in the list view, so you can easily identify new files and files that have been shared.

Universal link support for shared files – Being able to seamlessly share and securely access files is essential for teamwork. Previously when you received a link to a shared file, you would be directed to a browser and prompted to re-authenticate. Today, we are announcing universal link support, which will open the document directly in the Word, Excel, or PowerPoint iOS apps. Further, if you don’t have a supporting application for the file, you’ll be directed to the OneDrive app to preview the file.

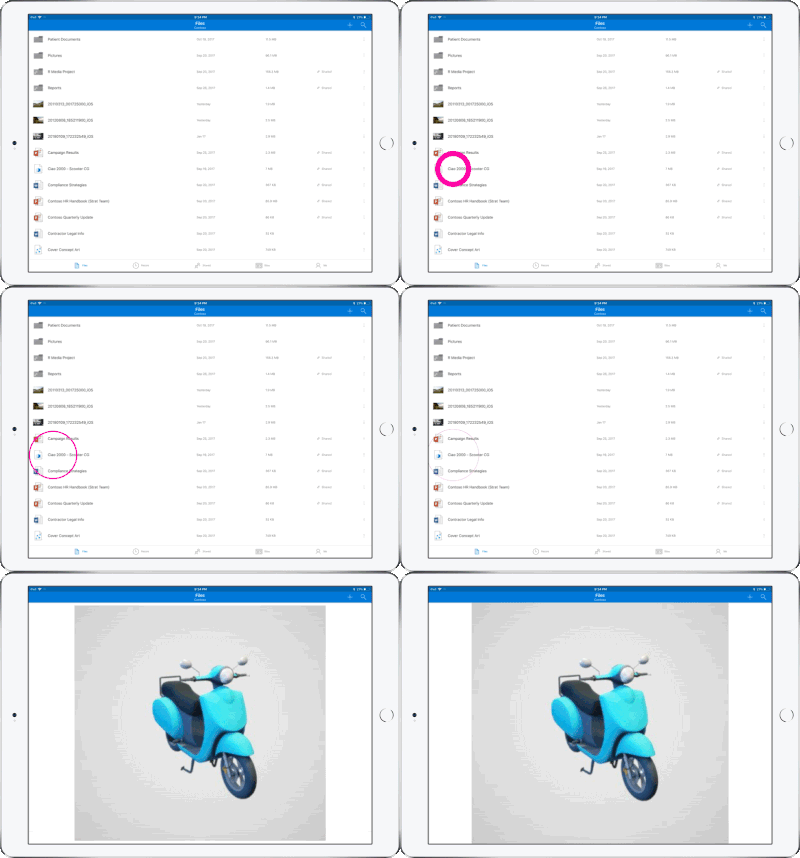
Preview 130+ file types in your OneDrive app – You and the people you work with use a variety of different file formats, but when you’re on your mobile device you might not have access to the native applications for those files. Now, the OneDrive iOS app creates crisp thumbnails and supports large previews of over 130 file types, including Adobe Photoshop and Illustrator, RAW, 3D objects, and high-precision DICOM images. OneDrive lets you open, view, and share all of your files without leaving the app.
New accessibility features for Word, Excel and PowerPoint on iOS 11
The VoiceOver rotor in iOS improves navigation and the accessibility of content. For example, you can use the built-in rotor on iOS to navigate line-by-line or word-by-word and change the speed at which VoiceOver speaks. The new Office-specific rotors also let people with vision impairments navigate more efficiently in Word across tables and links, slides in PowerPoint, and sheets in Excel.

Users can also leverage larger text options in accessibility settings to modify the text size in the core Office apps. Visit the support pages for Excel, Word, and PowerPoint to learn more.

You can use take advantage of these new capabilities in the coming days by updating the Word, Excel, PowerPoint, and OneDrive apps in the Apple App Store.

Ten Top Microsoft Office Tips

The ten most popular Microsoft Office tips

Takeaway:  Susan Harkins lists ten most popular Office tips published in the Windows and Office Blog, and the now inactive Office Blog.MS_Office_2007_Logo.svg

When considering tips to share, think about ease-of-use and efficiency. A few naturally rise to the top as your favorites. For your commemoration, here are 10 of 2012’s most popular posts from both the Office Blog, which was deactivated in mid-2012, and the current Windows and Office Blog. Thank you for reading, and thank you for sharing your thoughts and enhancements with one another throughout the year.

1: A quick Word trick for typing text into a scanned document

The response to this limited technique surprised me. It’s something only a few will use, but if you’re one of those few, it can be a big help! I was pleasantly surprised at the positive response it received and the way readers enhanced the technique.

2: Use Word macros to save your place in a document

These two short macros make quick work of bookmarking work areas in a Word document. When the built-in navigation techniques just don’t get the job done for you, consider these macros or one of the alternative methods that readers shared.

3: A quick and dirty way to compare columns of Excel data

This quick Go To comparison solution is great for a one-time task. Comparing Excel data is a common task, and I receive frequent questions for solutions. This solution is a great one to add to your bag of tricks.

4: Demystify Excel’s PivotTable feature with this simple method

Sometimes a great tip doesn’t offer a specific solution, but rather guides you to using a feature more efficiently and effectively. Users tend to ignore Excel’s pivot table feature because they don’t really understand it – hence this blog post offers some quick insight into how to use this feature without mind-bending tricks.

5: Create a dynamic Excel chart and make your own dashboard

This blog post is one of my favorites. I enjoyed sharing the technique, but more than that, I loved the way the readers jumped in to help one another with a step I accidentally omitted in the instructions. TechRepublic readers rock!

6: A quick Excel keyboard trick for selecting large ranges

This technique uses Go To ([F5]) in an unusual way – to anchor two cells, creating a range. The ensuing conversation shared a number of great selection tips!

7: Three tips for rounding Excel time values

Using the right function can help you round up your rounding woes. Excel offers three rounding functions and knowing them all will round out your skills nicely. (Okay, I promise to stop that.)

8: Three things you must do when you inherit an Excel workbook

I review a lot of workbooks, so this blog was one of my favorites to write. In my experience, performing these three quick tasks when inheriting a workbook can speed up your troubleshooting time. Fortunately, it sparked some insightful conversation into what others do.

9: Launch Word with the most recently used document

Reader response sometimes surprises me, as it did for this easy technique. I hadn’t expected so many great alternatives from the readers.

10: Run a list of rolling credits at the end of your PowerPoint presentation

I’m glad a PowerPoint technique made the top list, but it wasn’t because the readers loved my technique. Mostly, the conversation centered on the typo I missed, and then my lack of proper contrition for said typo. It was fun while it lasted.

Save Your Place In Word With Macros

Save your place in word a document using macros!

Takeaway: Use these two simple Word macros to temporarily bookmark a spot you want to return to later.

Large documents offer a few navigating challenges, especially when you need to jump back and forth between two areas. You could split the document, but that splits the screen and that might not be the right solution for you. Or, you could use any of the normal navigation tools and shortcuts, but it’s easy to get lost that way. Using VBA, you can insert a bookmark that acts as a placeholder. Then, when you’re ready to return, a single quick click is all that’s required.

This technique requires two quick macros, which follow:

Public Sub InsertBookmark ()

‘Insert bookmark for srz.

Call Bookmarks.Add(“srz”, Selection.Range)

End Sub

Public Sub ReturnToBookmark ()

‘Return to previously inserted bookmark.

ActiveDocument. Bookmarks(“srz”).Range.Select

End Sub

To add the macros, press [Alt]+[F11] to launch the Visual Basic Editor (VBE). In the Project Explorer, find ThisDocument for the current document. Then, enter the two sub procedures shown above.

Next, return to the document and add the macros to the Quick Access Toolbar (QAT), as follows:

  1. From the QAT dropdown, choose More Commands.
  2. From the Choose Commands From dropdown, choose Macros.
  3. In the list on the left, find InsertBookmark.
  4. Click Add to add the macro to the list of commands on the right.
  5. With the macro still selected, click Modify.
  6. In the resulting dialog, enter Mark in the Display Name control, and click OK. You could also change the macro’s display icon.
  7. Repeat steps 3 through 6 to add ReturnToBookmark to the list on the right and add the display name, Return.
  8. Click OK.
In Word 2003, drag the macros to the toolbar as follows:


  1. Launch the Customize dialog box by double-clicking a toolbar or menu or by choosing Customize from the Tools menu.
  2. Click the Commands tab.
  3. Choose Macros from the Categories list.
  4. Find InsertBookmark in the Commands list and drag it to the toolbar.
  5. Find Return ToBookmark and drag it to the toolbar.
  6. Click Close.
Using the macros is simple. 

Office 2016 Preview

Office 2016 Preview for existing Office 365 subscribers

For enterprise

Office 365 administrators with an Office 365 ProPlus subscription can now enable the Office 2016 Preview for their organization by turning on First Release. Learn how to turn on First Release.

Once First Release is turned on, users can install the Office 2016 Preview.

Enabled Office 365 ProPlus users

1. Sign in to the My Software page.

2. Go to Try the next version of Office.

3. Click Install.office2016

This will install the Office 2016 Preview on your device.

Note Enabled Office 365 ProPlus users can follow the same process above to install the Project 2016 Preview and the Visio 2016 Preview. On your Software page, select Project or Visio from the Software list. If Project and Visio are not listed, they are not included with your subscription.
Not ready to join First Release? You can still get the Office 2016 Preview,find out how.

For home

  • Go to the Office M Account page.
  • Click Language and install options.
  • Click Additional install options.
  • Open the Version drop-down menu and select the 32-bit or 64-bit Office 2016 Preview.
This will install the Office 2016 Preview on your device. You will stay on the Office 2016 Preview track until you uninstall the Office 2016 Preview or until Office 2016 is released.

Use AutoText to Save Multiple Return Addresses

Takeaway: If you work with multiple return addresses, you don’t have to enter those addresses manually as you use them; use Word’s AutoText feature instead.

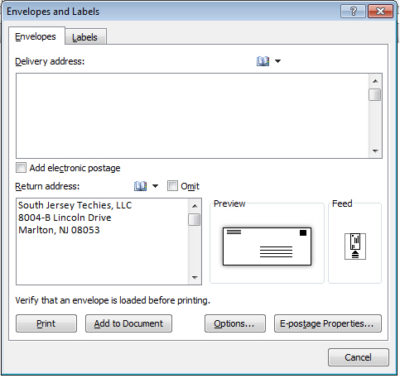
Word uses the Mailing Address entered via the options as the return address on envelopes generated by the Envelope wizard. It’s convenient and efficient. You enter the address once, but the wizard uses it for all your envelopes, until you change or delete the address This is a great setup, unless you have more than one return address. In that case, you can delete the default address and enter the second address, when you need to, but there’s an easier way – save the second address as AutoText.

First, let’s review how to store a return address for the wizard:

  1. Click the File tab and choose Options (under Help). In Office 2007, click the Office button and then click Word Options. In Word 2003, choose Options from the Tools menu.
  2. Click Advanced in the left pane. In Word 2003, click the User Information tab.
  3. In the General section, enter the return address in the Mailing Address control.
  4. Click OK.

Now you’re ready to execute the wizard by clicking the Mailings tab and then clicking Envelopes in the Create group. In Word 2003, choose Letters and Mailings from the Tools menu, and then select Envelopes and Labels. In the resulting dialog, the wizard uses the address you just entered as the return address.


If you have to replace the default return address occasionally with another, it’s no big deal. If you use another address frequently, create an AutoText entry for it, as follows:

  1. Enter and format the address.
  2. Then, select the address.
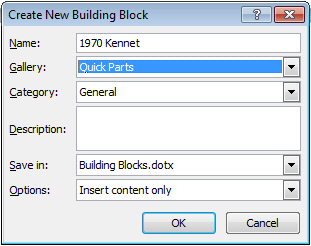
  3. Click the Insert tab, and choose Save Selection To The AutoText Gallery from the Quick Parts dropdown in the Text group. In Word 2003, choose AutoText from the Insert menu and then choose AutoText from the resulting submenu.
  4. Change the name to something simple, such as RT.
  5. If the Save In setting is the Normal.dotx, change it to Building Blocks.dotx.
  6. Click OK.


Now you can use the AutoText entry RT to quickly change the default return address in the envelope wizard, as follows:

  1. Click the mailings tab and choose Envelopes in the Create group. In Word 2003, choose Letters and Mailings from the Tools menu, and then select Envelopes and Labels.
  2. Highlight the default address and type RT.
  3. Immediately press [F3] and Word will replace RT with the AutoText entry of the same name—the second return address.
Replacing the default address with an AutoText entry is temporary. The next time you run the wizard, it will display the default address – not the one you stored as an AutoText entry. Using this simple trick, you can store several addresses as AutoText and use them in multiple spots, not just with the envelope wizard.

Tip For Typing Text Into A Scanned Document

Takeaway: This great quick Microsoft Word Document trick will have you filling in scanned paper forms in just seconds.

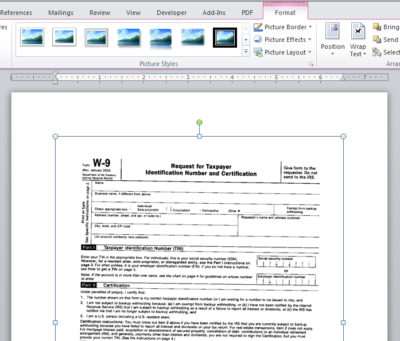
Word allows you to fill out scanned paper forms.  A quick easy trick renders most paper forms into an electronic file and isn’t a perfect solution, but works when you are in a jam. 

First, scan the form and save it as a graphics file.  Be sure to save the scanned form in a format that Word can use, such as jpg, png, or bmp. 

Once you have the scanned document file, insert it as a picture as follows:

  1. In a blank document, open the header section. In Word 2007 and 2010, just double-click in the top margin area. In Word 2003, choose Header and Footer from the View menu.
  2. With the header section open, click the Insert tab. Then, click Picture in the Illustrations group. In Word 2003, choose Picture from the Insert menu, and then choose From File. Browse to the file and double-click it or select it and click Insert.
  3. With the picture file selected, choose Behind Text from the Text Wrap dropdown in the Arrange group on the contextual Format tab. In Word 2003, right-click the picture, and choose Format Picture. Click the Layout tab, choose Behind Text, and click OK.
  4. Close the header section.  Don’t worry if the graphic dims a bit.


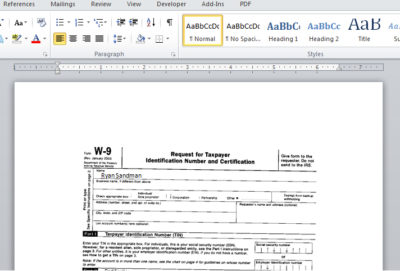
With the graphic in the header’s background, you can now type as you normally would, using the graphic as your guideline. There are no special controls or tabs to position the cursor for you. You can certainly go that route, but that takes a lot of work, and unless you’re going to reuse the form a lot, it’s probably not worth the effort.

Most likely, the form won’t align just right the first time you try. Simply open the header and adjust the position of the form as needed. You can also change the font, font size, and tab stops to accommodate the form’s fill-in positions.

Alternatives to Microsoft Office

Takeaway: Microsoft Office is not the only game in town; South Jersey Techies suggests some suitable alternatives for Microsoft Office.

Although Microsoft Office is one of the most popular productivity suites available, it is far from being the only choice available. Here are five alternatives to Microsoft Office that you might consider the next time you are looking to purchase an office suite.

1. Google Docs

Google Docs is a cloud based productivity suite that lets you create word processing documents, spreadsheets, presentations, and drawings. Because Google Docs is a browser based application, it isn’t quite as full featured as some of the other productivity suites. Even so, Google Docs is free, and there is nothing to install on your computer. The interface is completely intuitive and Google Docs can be used to create and edit Microsoft Office documents.

2. LibreOffice

LibreOffice is a free productivity suite that is designed to act as an alternative to Microsoft Office.  Like Apache Open Office, Libre Office offers a word processor, a spreadsheet, a presentation application, a drawing tool, and a database application. In fact, the launch screen is nearly identical to that of Apache Open Office. The reason for this is that in 2010 some of the OpenOffice developers broke away from OpenOffice and created LibreOffice. As such, there are a lot of similarities between the two suites. LibreOffice even supports the use of OpenOffice documents.

3. Kingsoft Office Suite Free 2012

Kingsoft Office Suite Free 2012 is, as the name implies, a free office suite. The free version includes a word processor, a spreadsheet, and a presentation application. These applications look and feel like Office 2010 applications, and the software fully supports the use of Office documents in addition to its own native file format. Also supported are standard file types such as RTF, TXT, and HTML.

4. Apache Open Office

Apache Open Office is a free office suite that can trace its roots back for well over a decade. This open source suite contains utilities for creating text documents, spreadsheets, presentations, drawings, and formulas. Open Office should be easy to use for anyone who is familiar with Office 2010. The word processor and spreadsheet look a lot like Word and Excel. The presentation application looks different than PowerPoint, but contains familiar controls. The suite is capable of opening (and saving) Microsoft Office documents and other common file formats.

5. Office Web App

The Microsoft Office Web Apps are an alternative to an on-premise Microsoft Office deployment. This free suite of cloud apps includes Word, Excel, PowerPoint, and OneNote. Furthermore, you get 7 GB of free storage space on SkyDrive, which is useful for storing your Office Web App documents. Office Web App that isn’t quite as full featured as Office 2010 or Office 2013, but Microsoft does have the basics covered. Besides, it is hard to argue with the price, which is free.

Microsoft Word Formatting Tips

Takeaway:  Save time formatting documents in Microsoft Word by using quick tools and tips.

Copy & Paste Methods:

When copying to Microsoft Word, the original formatting is automatically inserted with text and pictures.

1. Copy the content to the Clipboard: [CTRL]+[C] or Highlight content, right click on highlighted content, and select “Copy”.
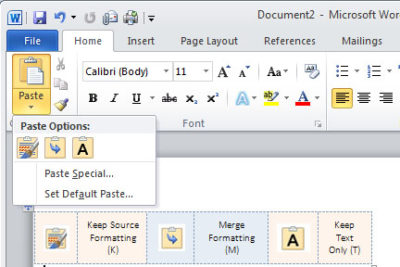
2. Paste the content into a Word document: [CTRL]+[V] or Home Tab, Paste and then select from the three options (see picture below)

–  Keep Source Formatting (K) – Original Formatting
–  Merge Formatting (M) – New content changed to format already in use
–  Keep Text Only (T) – Generic Format and will only Paste text, no pictures

Paste_Blog041013

Changing the default, as follows might be more efficient:

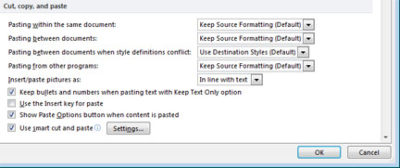
  1. Click the File tab, Help button, Options button and select the Advanced button.
  2. In the Cut, Copy, and Paste section, choose the appropriate option. (Example, you might want to keep formatting when copying from other Word documents but not from any other source)
  3. Click OK.

CCP_Blog041013

In Word 2003, select Tool menu, Options button and Edit Tab, uncheck the “Smart Cut And Paste” option or click the Settings button to customize your settings.

Section Breaks:

Separating a document with Section Breaks allows you to format each “section” differently.  Also, you can copy a previous Section Break

–  Next Page – Insert a section break and start the new section on the next page
–  Continuous – Insert a section break and start the new section on the same page.
–  Even Page – Insert a section break and start the new section on the next even-numbered page.
–  Odd Page – Insert a section break and start the new section on the next odd-numbered page.

SB_Blog041013

 In Word 2003, you can insert a Section Break from the Insert Menu.

Keeping Words Together:

Whether the word is hyphenated or simply two words you do not want to split up , a proper noun or a date, you can keep them together!

–  Hyphenated Words:  When typing the hyphen between use [CTRL]+[SHIFT]+[-]
–  Non-hyphenated Words:  When typing the space between use [CTRL]+[SHIFT]+[SPACEBAR]

Editing Number/Bullet Styles:

When formatting a list (bullets or numbers) you can simply edit the format of one or multiple bullets or numbers.

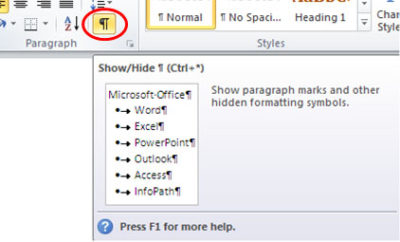
1. Select the Home tab, click Show/Hide in the Paragraph section.

SH_Blog041013

2. Highlight the Paragraph mark(s) at the end of each line you would like to re-format.  For more than one number or bullet, hold [CTRL] while highlighting.
3. Apply format using Style section.

Removing Formats:

You can highlight the entire document or only sections to remove formatting.  If you are trying to remove formatting from a few different sections, hold [CTRL] while selecting the sections.

–  Remove all formatting:  [CTRL]+[SPACEBAR]
–  Remove Paragraph formatting:  [CTRL]+[Q]

Automatically Updating Styles:

When adding a format to text, Word will let you update a style, this can be difficult.

1.  Select the Home tab.
2.  Open the Styles Dialog.
3.  Find the Style from the drop-down list.
4.  Select Modify button.
5.  Uncheck Automatically Update.

Default Line Spacing:

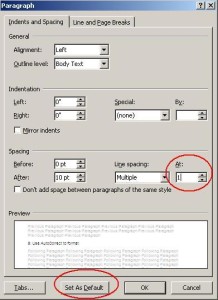
LS_Blog041013

The default line spacing in Word 2007 and 2010 is set for 1.15, commonly used for Web publishing.  You can set your default to 0 or 1 using a few steps.

1.  Select the Home tab.

2.  Right-click Normal in Styles section and select Modify.

3.  Choose Paragraph from the Format list.

4.  In the Spacing section, change the At: setting from 1.15 to 1, Click OK.

5.  You now have the option to set this as your default template for all new documents by selecting “Set As Default” button.

6.  Click OK.


Paragraph Spacing:

PS_Blog041013


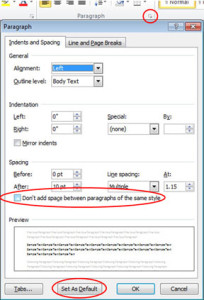
Newest versions of Microsoft Word have increased the spacing between paragraphs.  If you do not want extra space between paragraphs, you can modify it using a few steps.

1.  Select the Home tab.

2.  Open Paragraph Dialog.

3.  Check “Don’t Add Space Between Paragraphs Of the Same Style Option”.

4.  You now have the option to set this as your default template for all new documents by selecting “Set As Default” button

5.  Click OK.


Save Formatted text as AutoCorrect:

AC_Blog041013

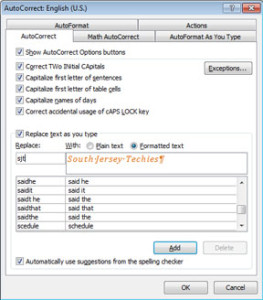
Using AutoCorrect saves time and prevents mistakes.  It can also save the text previously formatted.

1.  Highlight the content you would like to save in AutoCorrect that is pre-formatted.
2.  Open the File tab.
3.  Choose Options and then select Proofing button.
4.  Click AutoCorrect Options button.
5.  Uncheck Automatically Update.
6.  Select the option you would like to use:
–  Plain text (not formatted)
–  Formatted text (keep the format you have already applied)
7.  Enter short key in the Replace control.  (Example:  We use sjt for South Jersey Techies)
8.  Click Add button.
9.  Click OK, twice.


Find and Replace to Edit Format:

Microsoft Word’s Find and Replace tools can be used for more than replacing characters or multiple words, you can also change the format of text.

1.  Copy the text or word you would like to format.
2.  Press [CTRL]+[H] to open tool.
3.  Select More button.
3.  Paste the text or word you previously copied into Find What control.
4.  If the text you paste into Find What is formatted, select the Format button and adjust accordingly.
5.  Paste the same text into Replace With control.
6.  Select the Format button and change to the new format or remove the current Format by leaving the Format Option blank.
7.  You can either, Replace (first instance of the text or word you selected) or you can Replace All (replaces all text or words that are identical).

“Sticky Borders”:

A Sticky Border is when you type three hyphens and press enter directly below text.  This border attaches the the paragraph format or to the bottom of a page.  To easily remove this border follow these steps:

1.  Select the Home tab.
2.  Click inside the paragraph.
3.  In the Paragraph section, choose “No Border” (usually seen with editing tables).


Surface vs Surface Pro

final

Surface RT

Surface RT was released on October 26, 2012.  Running Windows RT Operating System on a Quad-Core NVIDIA Tegra 3 Processor.  Storage options are 32 GB or 64 GB.  According to recent news, only 16 GB available for the 32 GB hard drive and 46 GB available for 64 GB hard drive.  Bundled with the Surface RT is Office Home & Student 2013 RT Preview.

Office Home & Student 2013 RT includes Word, Excel, PowerPoint and OneNote.  Surface RT does not support Outlook.

The price for the Surface RT is $499.00.

Surface Pro

Surface Pro was release on February 9, 2013.  Running Windows 8 Pro Operating System on Dual-Core Intel i5 Processor.  Storage options are 64 GB or 128 GB.  According to recent news, only 23 GB available for the 64GB hard drive and 83 GB for the 128 GB hard drive.  Bundled with the Surface Pro is Full Office Suite Preview.

Surface Pro is a Business tablet that includes a pen and the pen digitizer.  The stylus helps make taking notes, drawing and marking up documents easy.  The price for the Surface Pen is $29.99.

The price for the Surface Pro is $899.00.

table2

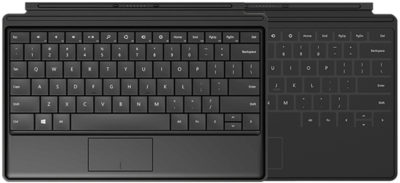
Not included with the purchase of the Surface RT or the Surface Pro is a keyboard.  Microsoft offers two options, Touch cover and Type Cover.  The Touch Cover is a pressure-sensitive keyboard and tablet cover; available in Red, Black, Cyan, White and Magenta.  The price of the Touch Cover is $119.99.  The Type Cover is thin “classic” keyboard and tablet cover; only available in Black.  The price of the Type Cover is $129.99.

typetouchcover2

Type Cover and Touch Cover

10 Changes to Office 2013

o13Takeaway: Ten popular tools and options that are unseen or removed from Office 2013.

Office 2013 has made minor adjustments and changes to the new cloud-based suite.

Creating from Existing

nfeIn previous versions of Office it was simple to create a new document from an existing one.  This would allow changes without changing the original.

Using Office 2013, the button “New From Existing” is gone;  there is a section under the File Tab for Recent Documents.

Outlook – Activities

aThere was an option to add a Contact’s Activities in older versions of Office.  For Office 2013, Activities option is replaced by Outlook Social Connection.

Word – Show Mark-Up

smFor Office 2013, the Show Markup drop-down, located in the Review Tab and Tracking Section for older versions, is removed but you can add it to your Quick Access Toolbar.

Backstage Exit

cawIn previous versions, “Exit” on the File Tab would allow you to exit all open documents in one click.  In Office 2013, you can right click the program on your task bar and select “Close all windows” or add “Exit” to your Quick Access Toolbar.

Picture Manager

pmcaUnlike previous versions of Office, Clip Art Organizer and Picture Manager are no longer available.  Clip Art Organizer is replaced with Insert Media Dialog Box.  Picture Manager is replaced with Windows Photo Gallery.

Access – PivotTables & PivotCharts

pcv ptvFor Office 2013, PivotTable and PivotChart are no longer tools in Access;  only Excel 2013 provides the PivotTable and PivotChart. 

Access – Upsizing Wizard

ssutIn previous versions of Access, it was simple to add an Access database to SQL Servers.

Using The Upsizing Wizard to migrate all or some objects to SQL Servers is no longer available with Access in Office 2013.

Excel – Workspace

swsWorkspace files save the layout you have selected.  When you open a saved Workspace Files they are displayed in that layout.

Excel 2013 you can open a Workspace file but you can not save layouts as Workspace files or add it to the Quick Access Toolbar. 

Outlook – Journal

ojJournal tool in Outlook helps you manage your productivity and time spent on projects.  This tool will no longer be available for Office 2013 and will not be replaced by another tool.

Outlook – To-Do Bar

tobThe Pinned Peek feature is replacing the traditional To-Do Bar in Outlook for Office 2013.  The Pinned Peak feature is not as detailed as the To-Do Bar, for example you can only view appointments for one day .  


CALL US NOW!