Back to Top

Tech, Web, Cloud & Cabling Services

Rogue Anti-Virus Software Explained

What Is Rogue Anti-virus Software?

It is almost unheard of in this day and age to be online without using anti-spyware and anti-virus software to safeguard your computer against viruses and other malicious code. It’s not surprising to see the prevalence of rogue anti-virus software.

Also called scareware, or rogue security software, or smitfraud, this type of software is also most commonly defined as malware—it is designed specifically to damage or disrupt your computer system. In this case, not only is the software going to disrupt your system, it’s going to try and trick you into making an unsecure credit card purchase.
Rogue anti-virus programs usually appears in the form of a fake Windows warning on your computer system that reads something like, you have a specific number of viruses on your computer (usually in the hundreds) and that this software has detected those viruses. To get rid of these viruses, you’re prompted to buy the full-version of the antivirus software (which is really rogue antivirus software).

The good news is that you probably do not have a computer that is infested with hundreds of viruses as the rouge software claims. The bad news is that the rogue antivirus software itself is on your computer and you must remove it. Removal is hindered as rouge software can lock the control panel and the the Add/Remove Programs function to prevent you from removing it easily.

Other things that may be disrupted by the rogue software include being unable to visit reputable and valid anti-virus and malware Web sites, being able to install legitimate antivirus software and also being unable to access your desktop.

The rogue software wants to stop users from removing the program and proceeding with the purchase instead. It’s important to remember that by purchasing the “claimed full version to remove the viruses” you will be submitting your personal information to unscrupulous persons and may also end up being a victim of credit card or identity theft.

Common names of rogue antivirus software include; AntiVirus (2007, 2008, and 2009), MS-Antispyware, XP AntiVirus (2007, 2008, and 2009), Home Antivirus 2009, SpyWareGuard, Malware Cleaner, Extra Antivirus, AV AntiSpyware, SpywareProtect2009, WinPC Defender as well as many other names.

How Does a Computer Get Infected with Rogue Antivirus Programs?
The reason these rogue anti-virus programs are successful (for the malicious coders) is because the warning screens very closely resemble legitimate Windows warning screens, plus the rouge software program names closely resemble or sound like legitimate antivirus programs.

When you load an infected Web site you might see a warning screen pop up and think that it is a legitimate Windows warning. Users unknowingly are tricked into downloading the software because they believe the warning to be a legitimate Windows messages.

You might also be on a Web site trying to view a video and a screen may pop-up telling you that you need to download a codec to view the file. The window prompting you to download the codec looks legitimate, however you are not going to download a codec—instead you will receive one of the many rogue antivirus software programs.

In April of this year, it was also reported that systems that had been previously infected with Conficker, found this worm had began installing rogue antivirus programs on infected machines. In the early cases this turned out to be a rogue application called SpywareProtect2009. Kaspersky researchers reported this was a typical rogue program that offered to clean the computer for $49.95.

Lastly, if you use file sharing networks you also risk downloading a rogue antivirus as it can be easily hidden inside a legitimate program—that you may or may not be legitimately downloading.
How to Spot Rogue Antivirus Warnings

For the most part, you need to look at the windows that are popping up and the name of the program being shown. If you know the program name of the antivirus and spyware software you use, then seeing a different name in the warning window is the first clue. Also, Windows itself doesn’t warn you of a virus. Legitimate warnings on your system would come from the anti-virus program you have installed, not a random Windows operating system style pop-up window. A great resource for learning how to spot these malicious programs through fake warning messages can be found on bleepingcomputer.com. This page lists the text of some of the more common false warning screens, including the following:

Malware Cleaner: Trojan detected! A piece of malicious code was found in your system that can replicate itself if no action is taken. Click here to have your system cleaned by Malware Cleaner.

AV AntiSpyware: Spyware Alert! Your computer is infected with spyware. It could damage your critical files or expose your private data on the Internet. Click here to register your copy of AV AntiSpyware and remove spyware threats from your PC.
How Do I Get Rid of Rogue Antivirus Programs?

It can be a difficult task to get rogue anti-virus programs off your computer. To complicate the matter, there are many variations of this malicious program and not all variants can be removed in the same way. This is not something that novice computer users may be able to deal with on their own.

Also, due to the popularity of these infections and people searching for answers on how to remove the program a number of scam programs also exist that lead users to believe it will remove the infection. Yes, these programs that claim to rid your system of Antivirus 2009 (or whichever variant you have been infected with) will scan your system and then prompt you for a credit card number so you can download a full version to remove the infection. Sound familiar? It should. This is a vicious cycle that users can unwittingly become trapped in.

Still, the good news is that in many instances you can get rid of the rouge antivirus program without wiping and formatting your hard drive. If you are already infected and you cannot access legitimate security related Web sites, you will need to download the following programs from a second computer and burn them to CD to run on the infected computer.

WARNING: Before running any of the following programs, you should turn off System Restore (you won’t be able to use System Restore as this deletes all restore points). If you don’t turn it off, the programs may not be able to access those system files to clean them. If you are infected the System Restore is not going to return you to an earlier uninfected date anyway. You can turn it back on after you have successfully removed the rouge antivirus program.

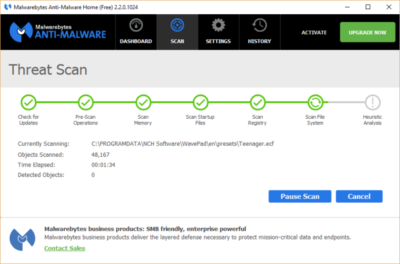
The quickest way, and first thing to try is to download Malwarebytes Anti-Malware to get rid of the rogue antivirus. On it’s own this will usually rid your computer of the problem. If Malwarebytes didn’t have the desired results, or you simply want to do a total and complete system clean, you will want to use a combination of CCleaner, Malwarebytes, Asquared, and SpyBot Search and Destroy. These programs all offer freeware versions.

NOTE: In some cases, the rogue anti-virus may block one or more of these legitimate programs. If this is the case, you will need to open the folder where you installed the program on your hard drive and rename the executable file (.exe) to anything other than the program’s name. (e.g. rename mbam.exe to aaa.exe).

Once you have run all the programs, be sure to go back and run CCleaner a final time to get rid of dead registry links from having the rouge antivirus removed. Continue to run the registry option of this program until no problems are found.

Here are additional removal resources:
bleepingcomputer.com: How to remove Extra Antivirus
bleepingcomputer.com: How to uninstall and remove AV AntiSpyware
bleepingcomputer.com: How to uninstall and remove WiniBlueSoft
bleepingcomputer.com: How to uninstall and remove HomeAntivirus 2009
bleepingcomputer.com: How to uninstall and remove Antivirus 2009 (Antivirus 09)
bleepingcomputer.com: How to uninstall and remove PAntispyware09
bleepingcomputer.com: How to uninstall and remove Virus Sweeper
bleepingcomputer.com: How to uninstall and remove WinPC Antivirus
Kaspersky Technical Support and Knowledge Base: How to disinfect rogue spyware

DID YOU KNOW…

In December 2008 it was reported that a Google sponsored link pointed to a malicious Web site where users were redirected to a spoofed CNET Download.com site with offers to download a “spyware free” copy of Winrar. This file included the rogue antivirus program “AntiSpyware2008” (Source)

To read the original article in it’s entirety Click Here

How to Clean Your PC Hardware

From dusty computer fans to fingerprints on compact discs, computer parts and devices can get awfully dirty from normal everyday use or when left sitting unused. The best way to have any computer component cleaned is to have it professionally serviced, but if you no longer have a service warranty, or if you picked up a second-hand item and want to clean it to see if it even works, here are some tips on how to clean some common items.
General Precautions

When working around electronics there are some precautions you should always take when cleaning:

* The best way to clean any computer component or device is to follow the manufacturer’s instructions in your user manual.
* Always power off the system first
* Always use anti-static wristband or other professional grounding devices
* Never work on carpeted surfaces
* Never spray cleaning fluids directly onto computer components. Always spray the cleaner onto a cloth then wipe
* Do not allow any cleaner to run or drip near circuit boards, or near seams on device casings.
* Never allow circuits or electronics to become damp or wet.
* Some cleaning solvents can damage components. In most cases, water will work just as well.
* Cleaning electronics and circuit boards requires experience, knowledge and special electronics cleaners. This type of cleaning is best left to professionals.

General Cleaning Tricks & Tips

* If compressed air is too strong for little dust jobs, try using a plastic liquid medicine plunger style dispenser. Pull the plunger all the way back to fill it with air and then push it forward quickly for a quick output of air to blow away dust in small places such as USB ports or SD memory card slots. The small ends of these dispensers enable you to reach a more concentrated area with the air then you could get with just blowing our air yourself (from your mouth).
* When using compressed air, always release in short blasts. Longer blasts can actually result in condensation.
* Anti-static cloths are great for attracting dust and are safe to use around computer equipment.
* The cleaner you keep your work space, the cleaner your equipment will be
* Be sure to hang on to your user manuals as they provide you with the best cleaning methods for that particular device.

How Do I Clean That?

A Digital Camera
The lens on a digital camera should never be touched and should be cleaned only when absolutely necessary, so be sure to put that lens cap to good use. For basic dust removal, you can buy a soft lens brush or plastic air blowers which remove dust and particles without anything touching the lens that could damage it.

For cleansing stubborn dirt, invest in a microfiber cleaning cloth for gently wiping off the lens. It’s very important to use a brush or blower first, then use a cloth to remove particles. For more stubborn dirt, you should use only a special fluid designed for lens cleaning. Never use paper towel or similar paper products to clean the lens as it may result in scratching. If you are using a fluid lens cleaner, be sure to put a drop onto proper lens tissues to clean — never put the fluid directly on the lens itself. Cannon also recommends that in place of a lens cleaner you can blow gently on the lens so that moisture condenses on its surface. Use gentle lifting motions (not rubbing motions) to clean and do not press hard. Use a clean lens tissue each time you move over the surface. This will prevent any dirt that is clinging to the tissue from scratching the lens.

The outside of the camera can be wiped down using a lint-free cotton cloth, and you can also use the soft brush and blower for cleaning dust from the battery, memory card, power adapter and USB adapter slots.

CD & DVD Discs
Dirty media can cause errors or make the media not work at all. You can remove fingerprints and dirt by lightly rubbing with a clean lint-free cloth. Cotton is the best material to use. You need to wipe starting at the middle of the disc and work your way to the outer edge. Never wipe in the direction of the tracks (the lines running around the disc). If the dirt is harder to remove, like dried on liquids for example, use water or a spot of rubbing alcohol on a cotton swab to clean it. You can also purchase disc cleaning kits. Never use a general all-purpose cleaner on a disc.

Dust Inside The Case
If you want to clean the build-up of dust from inside your computer case, you must shut the system down first, and make sure you are not working on carpet or any surface which is a electricity conductor. It is recommended you ground yourself (using an electronics wristband or other professional grounding equipment and follow the procedure for your equipment). To clean dust from the components inside you will need compressed air, an anti-static cloth, a small (child size) soft paint brush, and a cleaning fluid made specifically for electronics.

Inside the case you will want to use the compressed air to clean around the fans, power supply and areas where the dust is building up. Be careful not to aim the air directly towards any circuit board or electronic components in the case. Use short blasts and arm movement to direct the falling dust outside of the case. You can use the small brush to dislodge dust in areas where the compressed air did not remove the build-up (such as the edges of fan blades). You can also use the brush to wipe dust away from the inside case walls and the wires. If you find dust has fallen down to the bottom of your case, dampen the anti-static cloth with the electronics cleaner and wipe along the bottom of the case to remove it. You can also use the damp cloth to wipe all around the metal case of your tower and the cover.

A CRT Monitor
Monitors that are made of glass and do not have any special coatings can be cleaned using a basic glass cleaner, or water (preferred). Do not spray directly on the monitor as the liquid could run down into seams and into the electronics. Using a soft lint-free cloth cloth such as cotton, spray the cleaner onto the cloth to moisten it and gently wipe the viewable surface. You can use a computer vacuum or compressed air to remove dust from the monitor housing, paying special attention to the vents, to make sure they are free of dust. Cleaners may damage the plastic casing of your monitor, so avoid this. Use a cloth slightly moistened with water if you need on the case.

An LCD Display
LCD monitors require a different cleaning than a CRT does. LCDs are not made of glass and will have special coating on them for anti-glare. Following your manufacturer’s recommendations is the best method for cleaning an LCD. If you can’t obtained this information, here are a few general tips: Never use paper towel on an LCD as it can cause scratching. Instead be sure to use a soft cotton cloth. You can also purchase microfiber cleaning cloths that are designed for LCD and camera lens cleaning. If a dry cloth cannot remove the prints, you can use a special LCD cleaning liquid. Always slightly dampen the cloth and wipe, do not put any liquid directly onto the display.

A Keyboard
Keyboards that are dirty can cause some keys to stick when pressed or other malfunctions. Dirt and dust can easily be cleaned from your keyboard by periodically holding it upside down and shaking it, or blasting it with compressed air. If the keys are dirty, once you have powered off the system, you can use a damp lint-free cloth to wipe the top facings of the keys. Never spray cleaner directly onto the keys as it may drip down into the circuitry beneath.

If you spill a liquid on the keyboard, you should immediately shut down the computer (or if using a plug-and-play keyboard, unplug it from the computer). Turn the keyboard over onto a towel or cloth to prevent as much liquid from getting into the circuits as possible. You can use a small lint-free cloth to help clean the liquid out from between the keys, but do so with the keyboard still upside down. Leave the keyboard upside down for a day to help ensure as much of the liquid dries out as possible. A large amount of liquid spilled into the keyboard will usually result in the keyboard needing to be replaced, regardless of how well you try to clean it.

If you just want to freshen up the look of the keyboard (e.g. not clean due from problems or spilling of liquid) a cloth that has been moistened with warm water and a gentle soap will work quite well.

A PDA, Smartphone, Cellphone, & Similar Displays
Many of these devices do not contain glass, and glass cleaner and paper towel should never be used. For these devices, use the same procedure for cleaning the display area as listed for LCD monitors. Use a slightly moistened (water and gently soap) soft cotton cloth to wipe the external casing on these types of devices.

Non-optical Mouse
A trackball and roller mouse will need regular cleaning. When you begin to notice delays or jerkiness in cursor movement on the screen chances are your mouse needs a a good cleaning. To clean the mouse you will need to have a few supplies in easy reach such as cotton swabs, rubbing alcohol and a soft lint-free cloth.

With the mouse disconnected from the computer, you turn the mouse over and unlock the cover ring that holds the trackball inside. When you turn the mouse back over, both should fall out easily (be sure to catch them with your hand — don’t drop the trackball onto your desk or other surface). Both the trackball and ring can be cleaned using a soft lint-free cloth. Set the ring down and place the trackball on top of the ring to securely hold it while cleaning the rest of the mouse.

Start by blowing into the trackball holder area of the mouse to get rid of dust and loose particles. Inside you will see the rollers that hold the trackball in place. Chances are you will also see strands of dirt all the way around the rollers. Use a drop of alcohol on the cotton swap (just enough to dampen it) and use the swab to push against the dirt buildup on the roller to free it. Keep the tip of the swab against the dirt and rotate the rollers. You usually will see the dirt come off in a long piece (or several small if it breaks). You can also use your fingernail to pull the strip off instead of the cotton swab, once it has been loosened. Don’t use anything sharp that could damage the rollers. Make sure you pull the gunk out of the trackball hole when it comes off the roller. You will need to repeat the process on each of the rollers inside. Leave the mouse opened to the air to ensure any wetness from the alcohol has completely dried up before replacing the trackball and cover ring.

Every time you move this type of mouse across a mouse pad it picks up dirt and dust. To help cut down on the amount of dirt buildup in the mouse, you should ensure that the surface of your mouse pad is clean and dry. Wash it frequently making sure you give it lots of drying time before using the mouse on it again.
Optical or Laser Mouse

An optical or laser mouse usually won’t malfunction like a mechanical trackball mouse will, but you can still clean them for optimal performance. Wipe the bottom surface of the mouse with a clean lint-free cloth. For dust and particles over the lens area, you can use compressed air to blow it away. If you don’t have compressed air you can also try just blowing air (from your mouth) in a couple quick strong spurts. If this doesn’t clear the lens, you can also try a cotton swab to clean it without scratching.

USB Connectors and Ports
With USB powering so many devices, these ports get a lot of usage. Some front USB ports come with covers, which many people actually leave open because they are used so frequently. Thumb drives get left laying on desks, without the caps on and so on. Digital camera cords pick up dust then get transferred when plugged into the USB port. The list goes on. For the most part you can clean around the USB connector to remove dust and particles, simply by using compressed air or blowing inside of it. You can also wipe the plastic case area near the USB port every so often with an anti-static wipe which helps to repel dust.

Battery Contacts
There are professional battery contact cleaners available. If there is only a small buildup but enough to cause problems with enabling the battery to get a good contact you can clean the contact by rubbing them gently with a cotton swab that has been slightly dampened with alcohol. If it is a heavier buildup, you can also try rubbing gently with a pencil eraser. Just remember not to apply too much pressure when rubbing as you could damage the contacts

To view the original article in it’s entirety Click Here

How To Remove Windows 7 Antispyware

Remove Windows 7 Antispyware 2012, Vista Antivirus 2012, and XP Security 2012 (See Uninstall Guide Below)

Win 7 Antispyware 2012, Vista Antivirus 2012, and XP Security 2012 are all names for the same rogue anti-spyware program. This family of rogues is promoted in two ways. The first is through the use of fake online antivirus scanners that state that your computer is infected and then prompt you to download a file that will install the infection. The other method are hacked web sites that attempt to exploit vulnerabilities in programs that you are running on your computer to install the infection without your knowledge or permission. Regardless of how it is installed, once it is running on your computer it will install itself as a variety of different program names and graphical user interfaces depending on the version of Windows that is running. Regardless of the name, though, they are all ultimately the same program with just a different skin on it. This rogue goes by different program names, which I have listed below based upon the version of Windows that it is installed on:

Windows XP Rogue Name Windows Vista Rogue Name Windows 7 Rogue Name
XP Antispyware 2012 Vista Antispyware 2012 Win 7 Antispyware 2012
XP Antivirus 2012 Vista Antivirus 2012 Win 7 Antivirus 2012
XP Security 2012 Vista Security 2012 Win 7 Security 2012
XP Home Security 2012 Vista Home Security 2012 Win 7 Home Security 2012
XP Internet Security 2012 Vista Internet Security 2012 Win 7 Internet Security 2012

When installed, this rogue pretends to be a security update for Windows installed via Automatic Updates. It will then install itself as a single executable that has a random consisting of three characters, such as kdn.exe, that uses very aggressive techniques to make it so that you cannot remove it. First, it makes it so that if you launch any executable it instead launches Vista Home Security 2012, XP Internet Security 2012, Win 7 Security 2012, or any of the other names it goes under. If the original program that you wanted to launch is deemed safe by the rogue, it will then launch it as well. This allows the rogue to determine what executables it wants to allow you to run in order to protect itself. It will also modify certain keys so that when you launch FireFox or Internet Explorer from the Window Start Menu it will launch the rogue instead and display a fake firewall warning stating that the program is infected.

Win 7 Antispyware 2012 Screen shot

Once started, the rogue itself, like all other rogues, will scan your computer and state that there are numerous infections on it. If you attempt to use the program to remove any of these infections, though, it will state that you need to purchase the program first. In reality, though, the infections that the rogues states are on your computer are all legitimate files that if deleted could cause Windows to not operate correctly. Therefore, please do not manually delete any files based upon the results from this rogue’s scan.

While running, XP Internet Security 2012, Win 7 Antivirus 2012, and Vista Security 2012 will also display fake security alerts on the infected computer. The text of some of these alerts are:

XP Home Security 2012 Firewall Alert
XP Home Security 2012 has blocked a program from accessing the internet
Internet Explorer is infected with Trojan-BNK.Win32.Keylogger.gen
Private data can be stolen by third parties, including credit card details and passwords.

Malware Intrusion
Sensitive areas of your system were found to be under attack. Spy software attack or virus infection possible. Prevent further damage or your private data will get stolen. Run an anti-spyware scan now. Click here to start.

System danger!
Your system security is in danger. Privacy threats detected. Spyware, keyloggers or Trojans may be working the background right now. Perform an in-depth scan and removal now, click here.

System Hijack!
System security threat was detected. Viruses and/or spyware may be damaging your system now. Prevent infection and data loss or stealing by running a free security scan.

Privacy threat!
Spyware intrusion detected. Your system is infected. System integrity is at risk. Private data can be stolen by third parties, including credit card details and passwords. Click here to perform a security repair.

Stealth intrusion!
Infection detected in the background. Your computer is now attacked by spyware and rogue software. Eliminate the infection safely, perform a security scan and deletion now.

XP Antispyware 2012 Alert
Security Hole Detected!
A program is trying to exploit Windows security holes! Passwords and sensitive data may be stolen. Do you want to block this attack?

Just like the scan results, these security warnings and alerts are all fake and should be ignored.

While running, Win 7 Home Security 2012, XP Antivirus 2012, and Vista Antivirus 2012 will also hijack Internet Explorer so that you cannot visit certain sites. It does this so that you cannot receive help or information at sites like BleepingComputer.com on how to remove this infection. When you attempt to visit these sites you will instead be shown a fake alert stating that the site you are visiting is dangerous and that the rogue is blocking it for your protection. The message that you will see is:

Vista Security 2012 Alert
Internet Explorer alert. Visiting this site may pose a security threat to your system!

Possible reasons include:
– Dangerous code found in this site’s pages which installed unwanted software into your system.
– Suspicious and potentially unsafe network activity detected.
– Spyware infections in your system
– Complaints from other users about this site.
– Port and system scans performed by the site being visited.

Things you can do:
– Get a copy of Vista Security 2012 to safeguard your PC while surfing the web (RECOMMENDED)
– Run a spyware, virus and malware scan
– Continue surfing without any security measures (DANGEROUS)

Just like the fake security alerts, the browser hijack is just another attempt to make you think that your computer has a security problem so that you will then purchase the program.

Without a doubt, this rogue is designed to scam you out of your money by hijacking your computer and trying to trick you into thinking you are infected. Therefore, please do not purchase this program , and if you have, please contact your credit card company and dispute the charges stating that the program is a computer infection. Finally, to remove Win 7 Antispyware 2012, Vista Antivirus 2012, and XP Security 2012 please use the guide below, which only contains programs that are free to use.

Tools Needed for this fix:

  • Malwarebytes’ Anti-Malware


Automated Removal Instructions for Win 7 Antispyware 2012 & Vista Antivirus 2012 using Malwarebytes’ Anti-Malware:

  1. Print out these instructions as we will need to close every window that is open later in the fix.
  1. It is possible that the infection you are trying to remove will not allow you to download files on the infected computer. If this is the case, then you will need to download the files requested in this guide on another computer and then transfer them to the infected computer. You can transfer the files via a CD/DVD, external drive, or USB flash drive.
  1. This infection changes settings on your computer so that when you launch an executable, a file ending with .exe, it will instead launch the infection rather than the desired program. To fix this we must first download a Registry file that will fix these changes. From a clean computer, please download the following file and save it to a removable media such as a CD/DVD, external Drive, or USB flash drive. FixNCR.reg.  Once that file is downloaded and saved on a removable devices, insert the removable device into the infected computer and open the folder the drive letter associated with it. You should now see the FixNCR.reg file that you had downloaded onto it. Double-click on the FixNCR.regfile to fix the Registry on your infected computer. You should now be able to run your normal executable programs and can proceed to the next step.If you do not have any removable media or another clean computer that you can download the FixNCR.reg file onto, you can try and download it to your infected computer using another method. On the infected computer, right click on the Internet Explorer’s icon, or any other browser’s icon, and select Run As or Run as Administrator. If you are using Windows XP, you will be prompted to select a user and enter its password. It is suggested that you attempt to login as the Administratoruser. For Windows 7 or Windows Vista, you will be prompted to enter your Administrator account password.Once you enter the password, your browser will start and you can download the above FixNCR.reg file. When saving it, make sure you save it to a folder that can be accessed by your normal account. Remember, that you will be launching the browser as another user, so if you save it to a My Documents folder, it will not be your normal My Documents folder that it is downloaded into. Instead it will be the My Documents folder that belongs to the user you ran the browser as. Once the download has finished, close your browser and find the FixNCR.reg file that you downloaded. Now double-click on it and allow the data to be merged. You should now be able to run your normal executable programs and can proceed to the next step.
  1. Now we must first end the processes that belong to Win 7 Antispyware 2012 & Vista Antivirus 2012 and clean up some Registry settings so they do not interfere with the cleaning procedure. To do this, please download RKill to your desktop from the following link.RKill Download Link.  When at the download page, click on the Download Now button labeled iExplore.exe download link . When you are prompted where to save it, please save it on your desktop.
  1. Once it is downloaded, double-click on the iExplore.exe icon in order to automatically attempt to stop any processes associated with Win 7 Antispyware 2012 & Vista Antivirus 2012 and other Rogue programs. Please be patient while the program looks for various malware programs and ends them. When it has finished, the black window will automatically close and you can continue with the next step. If you get a message that RKill is an infection, do not be concerned. This message is just a fake warning given by Win 7 Antispyware 2012 & Vista Antivirus 2012 when it terminates programs that may potentially remove it. If you run into these infections warnings that close RKill, a trick is to leave the warning on the screen and then run RKill again. By not closing the warning, this typically will allow you to bypass the malware trying to protect itself so that rkill can terminate Win 7 Antispyware 2012 & Vista Antivirus 2012 . So, please try running RKill until the malware is no longer running. You will then be able to proceed with the rest of the guide. If you continue having problems running RKill, you can download the other renamed versions of RKill from the rkill download page. All of the files are renamed copies of RKill, which you can try instead. Please note that the download page will open in a new browser window or tab.Do not reboot your computer after running RKill as the malware programs will start again.
  1. There have been reports of this infection being bundled with the TDSS rootkit infection. To be safe you should also run a program that can be used to scan for this infection. Please follow the steps in the following guide:

How to remove Google Redirects or the TDSS, TDL3, or Alureon rootkit using TDSSKiller

If after running TDSSKiller, you are still unable to update Malwarebytes’ Anti-malware or continue to have Google search result redirects, then you should post a virus removal request using the steps in the following topic rather than continuing with this guide:

Preparation Guide For Use Before Using Malware Removal Tools and Requesting Help Topic

If TDSSKiller requires you to reboot, please allow it to do so. After you reboot, reboot back into Safe Mode with Networking again.

  1. Download Malwarebytes’ Anti-Malware, also referred to as MBAM, from the following location and save it to your desktop:Malwarebytes’ Anti-Malware Download Link (Download page will open in a new window)
  1. Once downloaded, close all programs and Windows on your computer, including this one.
  1. Double-click on the icon on your desktop named mbam-setup.exe. This will start the installation of MBAM onto your computer.
  1. When the installation begins, keep following the prompts in order to continue with the installation process. Do not make any changes to default settings and when the program has finished installing, make sure you leave both the Update Malwarebytes’ Anti-Malware and Launch Malwarebytes’ Anti-Malware checked. Then click on the Finish button.
  1. MBAM will now automatically start and you will see a message stating that you should update the program before performing a scan. As MBAM will automatically update itself after the install, you can press the OK button to close that box and you will now be at the main program as shown below.


  1. On the Scanner tab, make sure the the Perform full scan option is selected and then click on the Scan button to start scanning your computer for Win 7 Antispyware 2012 & Vista Antivirus 2012 related files.
  1. MBAM will now start scanning your computer for malware. This process can take quite a while, so we suggest you go and do something else and periodically check on the status of the scan. When MBAM is scanning it will look like the image below.


  1. When the scan is finished a message box will appear as shown in the image below.


You should click on the OK button to close the message box and continue with the Vista AntiSpyware 2012 & Win 7 Home Security removal process.

  1. You will now be back at the main Scanner screen. At this point you should click on the Show Results button.
  2. A screen displaying all the malware that the program found will be shown as seen in the image below. Please note that the infections found may be different than what is shown in the image.


You should now click on the Remove Selected button to remove all the listed malware. MBAM will now delete all of the files and registry keys and add them to the programs quarantine. When removing the files, MBAM may require a reboot in order to remove some of them. If it displays a message stating that it needs to reboot, please allow it to do so. Once your computer has rebooted, and you are logged in, please continue with the rest of the steps.

  1. When MBAM has finished removing the malware, it will open the scan log and display it in Notepad. Review the log as desired, and then close the Notepad window.
  1. You can now exit the MBAM program.
  1. As many rogues and other malware are installed through vulnerabilities found in out-dated and insecure programs, it is strongly suggested that you use Secunia PSI to scan for vulnerable programs on your computer. A tutorial on how to use Secunia PSI to scan for vulnerable programs can be found here:How to detect vulnerable and out-dated programs using Secunia Personal Software Inspector

Your computer should now be free of the Vista AntiSpyware 2012 & Win 7 Home Security program. If your current anti-virus solution let this infection through, you may want to consider purchasing the PRO version of Malwarebytes’ Anti-Malware to protect against these types of threats in the future.

If you are still having problems with your computer after completing these instructions, then please follow the steps outlined in the topic linked below:

Preparation Guide For Use Before Using Malware Removal Tools and Requesting Help

To see the original article in its entirety click here.


Microsoft Stream: The future of secure business video

Microsoft is previewing Stream, a new service for publishing and managing business videos. One day it will be the default video publishing system for Office 365.

MicrosoftStream


On July 18, 2016, Microsoft announced that a preview version of a new service called Microsoft Stream was available. Like most of you, I passed over the news with an indifferent “whatever” attitude. But later I realized that the news was actually more important than I had first thought.

Microsoft Stream fulfills a niche by providing a secure place to share videos created within, and for, businesses. By using a cloud-based service like this, businesses can reap the benefits of video communication without the threat of anonymous forum trolls trashing the brand or harassing employees.

Upload and forget it

While it is still a preview version, Microsoft Stream seems mostly ready for prime time. All you have to do is set up an account with a valid business email—One can use a personal domain email—and then log in. To test how easy Stream is to work with, you can make a 10-second video with a smartphone. Upload your video to Google Drive and then drag and drop it on the Stream portal website.

The web service processes the video while you give it a title and a brief description. Stream then asks if you are ready to publish and when you say yes, it publishes the video after a few seconds of grinding. It takes all of two minutes from start to finish and requires nothing more technical than knowing how to drag and drop a file.

Gone are the days of worrying about file format, aspect ratio, preferred playback applications, and all the other minutia we had to go through in years past to get a video published. You just take the video and then publish the video.

Video management

The key features of Microsoft Stream have to do with managing videos after they are published. Videos can be classified and placed into specific channels. Those channels can have their access restricted to certain individuals or certain groups, like a specific department, for instance. Access is controlled via the Azure Active Directory system.

According to the blog post, Microsoft plans to integrate Stream into the existing Office 365 Video system. Once the integration is complete, Microsoft Stream will be the default system for publishing video in an Office 365 environment.

There are plans in the works to add intelligent search to Stream by taking advantage of tools like audio transcription and face recognition. Developers are also working on ways to integrate Stream with other tools, like PowerApps, Microsoft Flow, and SharePoint.

Bottom line

We are aware of Microsoft Bookings and how that application attempts to cut out other third-party developers by integrating appointment scheduling for small businesses with the standard Office 365 subscription. By offering Stream, a secure video publishing and management service, Microsoft is attempting to execute the same strategy for video publishing.

Microsoft Stream gives businesses a secure system for publishing videos. Through Stream, businesses control access and manage who can see what and when they can see it. And because it is all handled internally, problems with anonymous forum trolls are likely to be reduced.

It seems that Microsoft’s grand strategy is to become the only software company a business needs—ever. The glaring application that Office 365 is missing now is a double-entry accounting system that includes payroll, accounts receivable, accounts payable, and the general ledger. Should we be looking for an announcement regarding those applications soon, Microsoft?

Have questions?

Get answers from Microsofts Cloud Solutions Partner!
Call us at: 856-745-9990 or visit: https://southjerseytechies.net/

South Jersey Techies, LL C is a full Managed Web and Technology Services Company providing IT Services, Website Design ServicesServer SupportNetwork ConsultingInternet PhonesCloud Solutions Provider and much more. Contact for More Information.

To read this article in its entirety click here.

Here’s how Microsoft will integrate LinkedIn into its products

Microsoft’s massive $26.2 billion acquisition of LinkedIn finally closed, and CEO Satya Nadella explained how the companies will begin working together.

Microsoft’s $26.2 billion purchase of professional networking site LinkedIn officially came to a close on Thursday, after the deal was approved by regulators. Following the close, Microsoft CEO Satya Nadella penned a blog post on LinkedIn detailing how the website would begin integrating with Microsoft’s products.

For starters, LinkedIn identity and network capabilities will be coming to Microsoft Outlook, and to the Office suite in general, the post stated. Additionally, LinkedIn notifications will be available to users in the Windows action center as well.

Since LinkedIn is known as a digital CV of sorts, Microsoft will enable LinkedIn members who draft a résumé in Word to directly update their LinkedIn profile page, and more easily search for and apply to relevant job postings, the post said.

One of the potentially troubling integrations is “extending the reach of Sponsored Content across Microsoft properties,” as Nadella wrote on his blog. Whether that means that users will begin seeing ads in their Office apps remains to be seen, but it sets the stage for a potentially tricky user experience.

Enterprise LinkedIn Lookup will soon be powered by Active Directory and Office 365, which could make it easier for employees to connect with one another. Nadella’s blog post also noted that LinkedIn Learning will be made available across the Office 365 and Windows ecosystem, giving Microsoft shops access to new forms of training and continued learning that could prove valuable to their employees.

Additionally, Nadella wrote that the two companies would begin developing a business news desk across their existing ecosystem of content, and for MSN.com. Sales Navigator and Dynamics 365 will also be integrated in hopes of improving social selling capabilities.

Since the acquisition was first announced, it’s been fairly clear that data was the driving force behind the deal. The two companies had non-overlapping, complementary data graphs, and these integrations show just the first steps that Microsoft is taking to leverage LinkedIn’s data, along with its own, to build out a more holistic ecosystem of business technologies and services.

Current LinkedIn CEO Jeff Weiner will continue to lead the company after the acquisition, and theNew York Times reported that roughly 10,000 LinkedIn employees will join Microsoft.

The 3 big takeaways for readers

  1. Microsoft closed its $26.2 billion acquisition of social networking site LinkedIn on Thursday, with Microsoft CEO Satya Nadella outlining how the two companies will merge.
  2. LinkedIn features and services will be coming to Outlook, Office 365, Dynamics 365, and even MSN.com, with LinkedIn search getting a boost from Active Directory.
  3. The deal has always been about data, and the integrations are just the start of how the two companies will merge their individual data graphs.

Have questions?

Get answers from Microsofts Cloud Solutions Partner!
Call us at: 856-745-9990 or visit: https://southjerseytechies.net/

South Jersey Techies, LL C is a full Managed Web and Technology Services Company providing IT Services, Website Design ServicesServer SupportNetwork ConsultingInternet PhonesCloud Solutions Provider and much more. Contact for More Information.

Microsoft hints at September release of Windows 10’s next feature upgrade

Based on the current progress for Windows 10 version 1903, due to arrive next spring, it now looks like the fall update for the OS will arrive around Sept. 10 or Sept. 24.

Microsoft last week released the first preview of what will become Windows 10 version 1903, the opening feature upgrade of next year, slated to ship in the spring.

The debut of what Microsoft calls the “Skip Ahead” build for Windows 10 1903 also hints that the release of this fall’s upgrade, aka 1809, will take place in September. If so, it would be the first time since late-2015 that the actual delivery date matched the numerical label.

On July 25, Microsoft forked the 1809 preview of Windows 10 – as it’s done before when a feature upgrade approaches – so developers could continue to deliver betas for that build while also beginning to work on the next-in-line, 1903. (Microsoft uses a yymm labeling system to mark its Windows 10 feature upgrades; 1809 should indicate a September 2018 release, while 1903 would be a March 2019 release.)

When it forks preview code, Microsoft provides the even-further-in-the-future build, in this case, 1903, to Windows Insider participants who earlier volunteered for Skip Ahead. As the current feature upgrade gets close to release, Microsoft switches Skip Ahead users to the following upgrade, so that engineers can start collecting feedback on that version even as they keep polishing the one set to launch soon. The bulk of Insiders remain on the latter.

Think of the Skip Ahead debut as a warning bell, like the one rung at track meets when racers start the final lap: When Microsoft begins to ship Skip Ahead code, it’s close to wrapping up the impending feature upgrade.

In 2017, as Windows 10 1709 (aka “Fall Creators Update”) neared completion, Microsoft first forked the preview code and distributed a different build to Skip Aheaders on Aug. 31. Windows 10 1709 began its release cycle on Oct. 17, or 47 days later. With this year’s version 1803, Skip Ahead debuted Feb. 14, or 75 days before the April 30 release of that upgrade.

(Windows 10 1803’s original launch date, reportedly April 10 – which was one of two dates Computerworld had forecast in February – was postponed by 20 days after a deal-breaking bug was uncovered at nearly the last minute.)

For one estimate of the release date for Windows 10 1809, Computerworld added 47 days to July 25, arriving at Sept. 10. A second estimate was generated by adding 61 days – the average of the two previous Skip Ahead triggers – to July 25, resulting in a Sept. 24 rollout.

Because the last three feature upgrades launched on either a Monday or Tuesday – April 11, 2017 for version 1703; Oct. 17, 2017 for 1709; April 30, 2018 for 1803 – Sept. 10 or 11 would be the most likely release dates for 1809, absent a show-stopping problem like the bug before 1803’s launch. Computerworld’s alternate forecast would be September 24 or 25, also a Monday/Tuesday combination, because it would match the previous upgrades’ average time-between-Skip-Ahead-and-release.

If Microsoft does release Windows 10 1809 in September, it would be the first time since November 2015 that the company has matched delivery date and the upgrade’s label. Version 1511 debuted Nov. 10, 2015. The four subsequent upgrades, 1607, 1703, 1709 and 1803, all missed their release months by between 2 and 30 days. (Version 1607 came the nearest, releasing Aug. 2, 2016.)

Although Microsoft has never expressly tied itself to March and September release months – in a support document, it gives itself wiggle room by stating that feature upgrades will be released “twice per year, around March and September [emphasis added]” – the disconnect between release and numerical designation has always seemed odd.

Issuing feature upgrades during the appointed months would be a sign that Microsoft has gotten a better handle on the rapid development tempo it has at times struggled with executing. It would also be a step toward a more predictable schedule, which was the point of the pledge it made over a year ago to issue a pair of feature upgrades annually.

Windows 10 quick tips: 10 ways to speed up your PC

Want Windows 10 to run faster? Take a few minutes to try out these tips, and your machine will be zippier and less prone to performance and system issues.


1. Change your power settings

If you’re using Windows 10’s Power saver plan, you’re slowing down your PC. That plan reduces your PC’s performance in order to save energy. (Even desktop PCs typically have a Power saver plan.) Changing your power plan from Power saver to High performance or Balanced will give you an instant performance boost.

To do it, launch Control Panel, then select Hardware and Sound > Power Options. You’ll typically see two options: Balanced (recommended) and Power saver. (Depending on your make and model, you might see other plans here as well, including some branded by the manufacturer.) To see the High performance setting, click the down arrow by Show additional plans.

To change your power setting, simply choose the one you want, then exit Control Panel. High performance gives you the most oomph, but uses the most power; Balanced finds a median between power use and better performance; and Power saver does everything it can to give you as much battery life as possible. Desktop users have no reason to choose Power saver, and even laptop users should consider the Balanced option when unplugged and High performance when connected to a power source.


2. Disable programs that run on startup

One reason your Windows 10 PC may feel sluggish is you’ve got too many programs running in the background programs that you may never use, or only rarely use. Stop them from running, and your PC will run more smoothly.

Start by launching the Task Manager: Press Ctrl-Shift-Esc or right-click the lower-right corner of your screen and select Task Manager. If the Task Manager launches as a compact app with no tabs, click “More details” at the bottom of your screen. The Task Manager will then appear in all of its full-tabbed glory. There’s plenty you can do with it, but we’re going to focus only on killing unnecessary programs that run at startup.

Click the Startup tab. You’ll see a list of the programs and services that launch when you start Windows. Included on the list is each program’s name as well as its publisher, whether it’s enabled to run on startup, and its “Startup impact,” which is how much it slows down Windows 10 when the system starts up.

To stop a program or service from launching at startup, right-click it and select “Disable.” This doesn’t disable the program entirely; it only prevents it from launching at startup — you can always run the application after launch. Also, if you later decide you want it to launch at startup, you can just return to this area of the Task Manager, right-click the application and select “Enable.”

Many of the programs and services that run on startup may be familiar to you, like OneDrive or Evernote Clipper. But you may not recognize many of them. (Anyone who immediately knows what “bzbui.exe” is, please raise your hand. No fair Googling it first.)

The Task Manager helps you get information about unfamiliar programs. Right-click an item and select Properties for more information about it, including its location on your hard disk, whether it has a digital signature, and other information such as the version number, the file size and the last time it was modified.

You can also right-click the item and select “Open file location.” That opens File Explorer and takes it to the folder where the file is located, which may give you another clue about the program’s purpose.

Finally, and most helpfully, you can select “Search online” after you right-click. Bing will then launch with links to sites with information about the program or service.

If you’re really nervous about one of the listed applications, you can go to a site run by Reason Software called Should I Block It? and search for the file name. You’ll usually find very solid information about the program or service.

Now that you’ve selected all the programs that you want to disable at startup, the next time you restart your computer, the system will be a lot less concerned with unnecessary program.


3. Turn off search indexing

Windows 10 indexes your hard disk in the background, allowing you – in theory – to search your PC more quickly than if no indexing were being done. But slower PCs that use indexing can see a performance hit, and you can give them a speed boost by turning off indexing. Even if you have an SSD disk, turning off indexing can improve your speed as well, because the constant writing to disk that indexing does can eventually slow down SSDs.

To get the maximum benefit in Windows 10, you need to turn indexing off completely. To do so, first type services.msc in the Start Menu search box, and click the Services result that come up. The Services app then appears. Scroll down to either Indexing Service or Windows Search in the list of services. Double-click it, and from the screen that appears, click Stop. Then reboot. Your searches may be slightly slower, although you may not notice the difference. But you should get an overall performance boost.

If you’d like, you can turn off indexing for only files in certain locations. To do this, first type index in the Start Menu search box, and click the Indexing Options result that appears. The Indexing Options page of Control Panel appears. Click the Modify button and you’ll see a list of locations that are being indexed, such as Microsoft Outlook, your personal files, and so on. Uncheck the boxes next to any location, and it will no longer be indexed.


4. Clean out your hard disk

If you’ve got a bloated hard disk filled with files you don’t need, you could be slowing down your PC. Cleaning it out can give you a speed boost. Windows 10 has a surprisingly useful built-in tool for doing this called Storage Sense. Go to Settings > System > Storage and at the top of the screen – in the Storage Sense section – move the toggle from Off to On. When you do this, Windows constantly monitors your PC, and deletes old junk files you no longer need; temporary files; files in the Downloads folder that haven’t been changed in a month; and old Recycle Bin files.

You can customize how Storage Sense works and also use it to free up even more space than it normally would. Underneath Storage Sense, click “Change how we free up space automatically.” From the screen that appears, you can change how often Storage Sense deletes files (every day, every week, every month or when Windows decides). You can also tell Storage Sense to delete files in your Download folder, depending on how long they’ve been there. And you can also set how long to wait to delete files in the Recycle Bin automatically.

You can also delete old versions of Windows that might be hogging space. At the bottom of the screen, check the box next to “Delete previous versions of Windows.” Storage Sense will then delete old versions of Windows ten days after you’ve installed an upgrade. Note that if you do this, you won’t be able to revert to the older version of Windows.


5. Clean out your Registry

Under the Windows hood, the Registry tracks and controls just about everything about the way Windows works and looks. That includes information about where your programs are stored, which DLLs they use and share, what file types should be opened by which program or just about everything else.

But the Registry is a very messy thing. When you uninstall a program, for example, that program’s settings don’t always get cleaned up in the Registry. So over time, it can get filled with countless outdated settings of all types. And that can lead to system slowdowns.

Don’t even think of trying to clean any of this out yourself. It’s impossible. To do it, you need a Registry Cleaner. There are plenty available, some free and some paid. But there’s really no need to outright buy  one, because the free Auslogics Registry Cleaner does a solid job.

Before using Auslogics or any other Registry Cleaner, you should back up your Registry so you can restore it if anything goes wrong. (Auslogics Registry Cleaner does this for you as well, but it can’t hurt to have it backed up twice.) To do your own Registry backup, type regedit.ext in the search box, then press Enter. That runs the Registry editor.  From the File menu, select Export. From the screen that appears, make sure to choose the “All” option in the Export range section at the bottom of the screen. Then choose a file location and file name and click Save. To restore the Registry, open the Registry editor, select Import from the File menu, then open the file you saved.

Now download, install and run Auslogics Registry Cleaner. On the left-hand side of the screen you can select the kinds of Registry issues you want to clean up – for example, File Associations, Internet or Fonts. I generally select them all.

Next tell it to scan the Registry for problems. To do that, click “Scan Now” and from a drop-down menu that appears select Scan. That lets you first examine the Registry problems it finds. If you instead choose “Scan and Repair,” it makes the fixes without you checking them.

It now scans your Registry for errors, then shows you what it found. It ranks the errors according to their severity, to help you decide which to fix. Click Repair when you’ve made your decision, and make sure that “Back up Changes” is checked, so you can restore the Registry easily if something goes wrong.


6. Disable shadows, animations and visual effects

Windows 10 has some nice eye candy — shadows, animations and visual effects. On fast, newer PCs, these don’t usually affect system performance. But on slower and older PCs, they can exact a performance hit.

It’s easy to turn them off. In the Windows 10 search box type sysdm.cpl and press Enter. That launches the System Properties dialog box. Click the Advanced tab and click “Settings” in the Performance section. That brings you to the Performance Options dialog box. You’ll see a varied list of animations and special effects.

If you have time on your hands and love to tweak, you can turn individual ones on and off. These are the animations and special effects you’ll probably want to turn off, because they have the greatest effect on system performance:

  • Animate controls and elements inside windows
  • Animate windows when minimizing and maximizing
  • Animations in the taskbar
  • Fade or slide menus into view
  • Fade or slide ToolTips into view
  • Fade out menu items after clicking
  • Show shadows under windows

However, it’s probably a lot easier to just select “Adjust for best performance” at the top of the screen and then click OK. Windows 10 will then turn off the effects that slow down your system.


7. Launch the Windows troubleshooter

Windows 10 has a very useful, little-known tool that can sniff out performance problems and solve them. To launch it, run Control Panel and select System and Security > Security and Maintenance > Troubleshooting > Run maintenance tasks. A screen titled “Troubleshoot and help prevent computer problems” will appear. Click Next.

The troubleshooter will find files and shortcuts you don’t use, identify any performance and other issues on your PC, report them to you and then fix them. Note that you may get a message that says, “Try troubleshooting as an administrator.” If you have administrative rights to the PC, click it and the troubleshooter will launch and do its work.


8. Get help from the Performance Monitor

There’s a great tool in Windows 10 called the Performance Monitor that can, among other things, create a detailed performance report about your PC, detail any system and performance issues, and suggest fixes.

To get the report, type perfmon /report into your search box and press Enter. (Make sure there’s a space between “perfmon” and the slash mark.) The Resource and Performance Monitor launches and gathers information about your system. It will say that it will take 60 seconds, but I’ve found that it takes several minutes. When the Monitor finishes, it will launch an interactive report.

You’ll find a lot of extremely detailed information in the report, and it can take a lot of time to go through. Your best bet is to first look at the Warnings section, which details the biggest issues (if any) it found on your PC, such as problems with Windows, with drivers and so on. It also tells you how to fix each problem — for example, how to turn on a device that has been disabled.

It is also worthwhile to scroll down to the Resource Overview section, where you’ll find an analysis of how well your CPU, network, disk and memory are performing. Each result is color-coded, with green meaning no problems, yellow meaning potential issues, and red showing a problem.

Beyond that, the Resource Overview also reports performance metrics and explanatory details. For example, for the CPU, it might show green and a utilization of 21%, with the details, “Normal CPU load.” Or for Memory, it might show yellow, with 62% utilization and the details, “1520 MB is available.” Based on what you get, you might want to do something about your hardware — for example, add more memory.


9. Kill bloatware

Sometimes the biggest factor slowing down your PC isn’t Windows 10 itself, but bloatware or adware that takes up CPU and system resources. Adware and bloatware are particularly insidious because they may have been installed by your computer’s manufacturer. You’d be amazed at how much more quickly your Windows 10 PC can run if you get rid of it.

First, run a system scan to find adware and malware. If you’ve already installed a security suite such as Norton Security or McAfee LiveSafe, you can use that. You can also use Windows 10’s built in anti-malware app — just type Windows Defender in the search box, press Enter, and then click Scan Now. Windows Defender will look for malware and remove any it finds.

It’s a good idea to get a second opinion, though, so consider a free tool like Malwarebytes Anti-Malware. The free version scans for malware and removes what it finds; the paid version offers always-on protection to stop infections in the first place.

Now you can check for bloatware and get rid of it. Several free programs will do this for you; your best bet is to run several of them, because no single one will find all the bloatware on your PC. Good choices are the PC Decrapifier, Should I Remove It? and SlimComputer.


10. Shut down and restart Windows

Here’s one of IT’s not-quite-secret weapons for troubleshooting and speeding up a PC: Shut it down and restart it. Doing that clears out any excess use of RAM that otherwise can’t be cleared. It also kills processes that you might have set in motion and are no longer needed, but that continue running and slow your system. If your Windows 10 PC has turned sluggish over time for no apparent reason, you may be surprised at how much more quickly it will run when you do this.

Try just some of these tricks, and you’ll find that you’ve got a faster Windows 10 PC — and one that is less likely to have any reliability problems.

Ransomware-as-a-service is exploding: Be ready to pay

RaaS has outgrown smaller targets and now threatens governments, NGOs, and SMBs.

ransomware

It starts with a fast click on a link in a harmless-looking email. Then your PC slows to a crawl. A message suddenly pops up and takes over your screen. “Your files and hard drive have been locked by strong encryption. Pay us a fee in 12 hours, or we will delete everything.” Then a bright red clock begins counting down. No antivirus will save your machine. Pay the fee or lose everything.

You’re the latest victim of a ransomware attack. The scary thing is, you’re not alone. The ransomware market ballooned quickly, from a $400,000 US annual haul in 2012, to nearly $18 million in 2015. The average ransom—the sweet spot of affordability for individuals and SMBs—is about $300 dollars, often paid in cash vouchers or Bitcoin.

The ransomware market scaled up so quickly, claims a recent report by Imperva, due to the rise of ransomware-as-a-service, or RaaS. Here’s how it works:

  • Ransomware authors are marketing on-demand versions of code, using traditional malware distributors in a classic affiliate model.
  • The ransomware author collects the ransom and shares it with the distributor.
  • Malware is distributed through spam email messages, malicious advertisements, and BlackHat SEO sites.
  • According to the Imperva report, “in classical affiliate marketing, the larger cut goes to the possessor of the product. In RaaS … the ransomware author gets a small cut of the funds (5%-25%) while the rest goes to the distributor (affiliate).”
  • Using the deep web, TOR, and Bitcoin, the report says, “this model, based on TOR and Bitcoins, is designed to keep the identity of the author and the distributor hidden from law enforcement agencies.”

Phishing in particular, is a highly effective tactic for malware distribution.

The well-worded email appears to come from a legitimate email address and domain name, and raises very few irregularities. The email comes with a demand for money for an arbitrary service, along with a link that purports to be an “overdue invoice.”

Click that link and open the file (which looks like a Word document), and you’ll become the latest victim of ransomware — that is, malware that encrypts your files and locks you out of your computer until you pay a ransom.

Phishing attacks have also helped ransomware move into the enterprise. In 2015 the medical records system at Hollywood Presbyterian Medical Center was attacked. The hospital paid $17,000 in Bitcoin to unlock the sensitive records. In early 2016 the Lincolnshire County Council was snagged by a phishing scheme and held up for 500 dollars.

To prevent your business from attack, make sure the IT department and communication team are in sync, keep your company’s security systems updated, and remind employees to use caution when clicking on email links from unknown addresses.

If you’ve been hacked, the ransomware rescue kit provides a suite of tools designed to help clean particularly pugnacious malware.

Businesses that suffer ransomware attacks face a tough choice. Paying the fee could restore access to mission-critical data, but there’s no guarantee the extortionists will honor the deal. And of course, paying a ransom provides incentive to hackers and validates the attack.

Have questions?

Get answers from Microsofts Cloud Solutions Partner!
Call us at: 856-745-9990 or visit: https://southjerseytechies.net/

South Jersey Techies, LL C is a full Managed Web and Technology Services Company providing IT Services, Website Design ServicesServer SupportNetwork ConsultingInternet PhonesCloud Solutions Provider and much more. Contact for More Information.

The 10 most important lessons IT learned in 2015

Every year brings with it new challenges, and new lessons, for IT in the enterprise. Here are 10 of the lessons IT learned this past year.

IT lessons


The end of a year is always a good time for reflection, especially so if you’re evaluating what your business did right and what you can improve upon. In an increasingly digital world, IT has quickly become one of, if not the most, important aspects of an organization. So, it should be with great care that executives and admins look back on their year and try to glean some wisdom about what can be done differently in the year to come.

Here are 10 of the most important lessons that IT learned in 2015.

1. BYOX is here to stay

As smartphone use grew to near ubiquity in the enterprise, it brought with it the trend of BYOD, or, bring your own device. While that originally referred to mobile devices such as smartphones and tablets, it spawned as host of “bring your own” everything else.

“BYOX is the new mantra with consumers bringing their own applications, cloud sharing tools, social media into the enterprise; essentially bringing their own expectations of which technology they want to use and how and where they want to work in a corporate environment,” said Chuck Pol, president of Vodafone Americas.

2. DevOps is no longer just a buzzword

The term “DevOps” gained huge popularity in 2015 as a reference to an agile method that stresses the collaboration of development and operations. The goal is to connect the writers of the code with those who maintain the systems that run it. However, DevOps continues to evolve and, although it has its own set of challenges, it could be poised to become the method of choice for enterprise IT starting in 2016.

3. Data is currency

Data, especially as it relates to big data has been steadily growing in value but 2015 felt like a tipping point. Tools for both structured and unstructured data exploded in popularity and major data service providers went public, adding credibility to the field and likely creating a better inroad into the enterprise. Also, businesses got better at distinguishing between relevant and irrelevant data.

“It is no longer credible to look at data as big static objects in a deep lake, but rather be considered a set of fast moving assets in a raging river,” said Neil Jarvis, CIO of Fujitsu America. “In 2016 and beyond, companies need to look at the data that creates business-relevant information for today and tomorrow.”

4. Finding talent is problematic

Talent shortages don’t just affect startups on the West Coast. CompTIA CIO Randy Gross said that current estimates suggest there are more than one million IT job opening across the US alone, ranging across skill level from support specialists to network admins. Enterprises are going to have to work harder to attract and retain talent.

“Wise employers with IT jobs to fill have engaged in a self-examination of the tactics and strategies they’re using to attract new talent—and adjusting accordingly,” Gross said. “For some companies, new telecommuting and remote work options have helped them fill their talent gaps.”

5. SMAC is still relevant

The SMAC stack, which stands for social, mobile, analytics, and cloud, is also known by some as the “third platform.” As all of these individual components continue to grow and thrive in the workplace, their interdependencies will grow along with them.

“Senior management must become well versed about these technologies and their possibilities to create new value and new competitive advantages in their own business and markets,” Pol said.

6. Cloud lost its fear factor

Cloud acceptance was a mixed bag for a long time, but 2015 brought a more widespread embrace of cloud technologies and services in the enterprise. In fact, some trends are making it almost a necessity.

“The complete adoption of virtualization, as well as investigation into cloud and other strategies, is far more advanced than expected—particularly amongst SMBs,” said Patrick Hubbard, technical product marketing director at SolarWinds. “Making operating systems and applications truly mobile is redefining how companies think about their IT infrastructure.”

7. The security mindset is changing

Anthem BlueCross BlueShield and Harvard University were among the major organizations that dealt with a public security breach in 2015. With today’s social media, you can almost guarantee any data breach that occurs in the enterprise won’t stay a secret. And, with the risk of a breach high, Intel Security CTO Steve Grobman said that teams must adopt a new way of thinking.

“IT must embrace the mindset that they have already been breached, now how do you protect your environment with this new default outlook?,” Grobman said.

8. Shadow IT is a line item

Shadow IT carries nowhere near the same amount of scorn it once did in the enterprise. Some organizations are even openly embracing it, and making it a foundational part of their IT strategy. And, as shadow IT continues to grow, Pol said, it needs to be properly accounted for in the budget.

“As technology continues to transform business, IT infrastructure will become more complex and more difficult to have a complete view of technology across the business,” Pol said. “The role of IT will need to become more strategic and set clear lines of accountability between IT and line of business budget holders.”

9. Employees are the biggest security risk

When most people think about security risks to their organization, the image of the hooded hacker furiously typing away in a dark room. However, employees themselves pose a real threat to the security of an organization as well. Issues such as poor password practices and using unsecured networks with company devices are a real problem. Kelly Ricker, senior vice president of events and education at CompTIA, said mobile, while helping with agility and productivity, is a cybersecurity nightmare.IT

“Every device that employees use to conduct business—smartphones and smartwatches, tablets and laptops—is a potential security vulnerability,” Ricker said. “Companies that fail to acknowledge and address this fact face the very real risk of becoming a victim of cyber criminals and hackers.”

10. Commoditization is a threat

With the plethora of tools available to build and replicate popular tech, it is increasingly important for organizations to guard against the threat of commoditization.

“As development cycles become shorter and the potential for intellectual property to be recreated and copied increases, it is becoming more difficult to create a sustainable competitive advantage for your products and services,” Pol said.

Have questions?

Get help from IT Experts/Microsofts Cloud Solutions Partner
Call us at: 856-745-9990 or visit: https://southjerseytechies.net/

South Jersey Techies, LLC is a full Managed Web and Technology Services Company providing IT Services, Website Design ServicesServer SupportNetwork ConsultingInternet PhonesCloud Solutions Provider and much more. Contact for More Information.

To read this article in its entirety click here.

How to Upgrade to Windows 10

Windows 10 is now available as a free update. Here is what you can expect when you say “yes” to the update.

Here’s a step-by-step walkthrough of the upgrade process while upgrading Windows 8 machine to Windows 10.

Launch Windows 10 upgrade through Windows Update

Look for the Update screen in Windows 8 and click the Check for Updates link. When the check is over, you will see the screen shown in Figure A.

Figure A

As you can see, it is a 2699.0 MB download. Click the Get Started button and then the screen shown in Figure B will appear.

Figure B

You may be able to get Windows 10 via a free update, but it still requires that you agree to a license/user agreement.

The next screen (Figure C) is very important. Updating takes about 2 hours depending upon the machine. If you cannot afford to be off your computer for that long, it may be a good idea to schedule a time when you can.

Figure C

Installation process

After you start the update process, your PC will immediately restart. From that point on you will just have to wait for the update to finish. During update the screen gets blank for over an hour, so please don’t panic and turn your PC during this seeming lack of activity.

Your PC may also restart several times during the update, but eventually you will reach a screen that asks if you want to do an Express Configuration or a Custom Configuration. Express configuration will be the best choice for most people.

Note that the update does take a bit of bandwidth, so it might be more efficient to update one PC at a time.

When the entire update procedure is complete, you will be presented with the Windows 10 desktop or tablet interface depending on your device as you can see in Figure D.

Figure D

There are new versions of OneDrive and the Snipping Tool in Windows 10. Of course, there is also the new web browser, Microsoft Edge, too.

Get Windows 10 without using Windows Update

If you would like to get Windows 10 without going through the update process, for a clean install for example, then you will have to download the Windows 10 ISO file.

If you have a Windows Vista or Windows XP PC you would like to update, you have to purchase Windows 10. Windows 10 Home will cost you $119, while Windows 10 Pro will cost $199.

As of July 29, 2015, most new devices will be available with either Windows 10 or Windows 8.1, which can be upgraded to Windows 10 for free. If your PC is more than a few years old, it might make more sense to spend money on a new device rather than to update an old one.

Have questions?

Get answers from Microsofts Cloud Solutions Partner!
Call us at: 856-745-9990 or visit: https://southjerseytechies.net/

South Jersey Techies, LLC is a full Managed Web and Technology Services Company providing IT Services, Website Design ServicesServer SupportNetwork ConsultingInternet PhonesCloud Solutions Provider and much more. Contact for More Information.

To read this article in its entirety click here.

CALL US NOW!