Back to Top

Tech, Web, Cloud & Cabling Services

Tag Archives: Windows 7

Windows 7 tag

How To Remove Windows 7 Antispyware

Remove Windows 7 Antispyware 2012, Vista Antivirus 2012, and XP Security 2012 (See Uninstall Guide Below)

Win 7 Antispyware 2012, Vista Antivirus 2012, and XP Security 2012 are all names for the same rogue anti-spyware program. This family of rogues is promoted in two ways. The first is through the use of fake online antivirus scanners that state that your computer is infected and then prompt you to download a file that will install the infection. The other method are hacked web sites that attempt to exploit vulnerabilities in programs that you are running on your computer to install the infection without your knowledge or permission. Regardless of how it is installed, once it is running on your computer it will install itself as a variety of different program names and graphical user interfaces depending on the version of Windows that is running. Regardless of the name, though, they are all ultimately the same program with just a different skin on it. This rogue goes by different program names, which I have listed below based upon the version of Windows that it is installed on:

Windows XP Rogue Name Windows Vista Rogue Name Windows 7 Rogue Name
XP Antispyware 2012 Vista Antispyware 2012 Win 7 Antispyware 2012
XP Antivirus 2012 Vista Antivirus 2012 Win 7 Antivirus 2012
XP Security 2012 Vista Security 2012 Win 7 Security 2012
XP Home Security 2012 Vista Home Security 2012 Win 7 Home Security 2012
XP Internet Security 2012 Vista Internet Security 2012 Win 7 Internet Security 2012

When installed, this rogue pretends to be a security update for Windows installed via Automatic Updates. It will then install itself as a single executable that has a random consisting of three characters, such as kdn.exe, that uses very aggressive techniques to make it so that you cannot remove it. First, it makes it so that if you launch any executable it instead launches Vista Home Security 2012, XP Internet Security 2012, Win 7 Security 2012, or any of the other names it goes under. If the original program that you wanted to launch is deemed safe by the rogue, it will then launch it as well. This allows the rogue to determine what executables it wants to allow you to run in order to protect itself. It will also modify certain keys so that when you launch FireFox or Internet Explorer from the Window Start Menu it will launch the rogue instead and display a fake firewall warning stating that the program is infected.

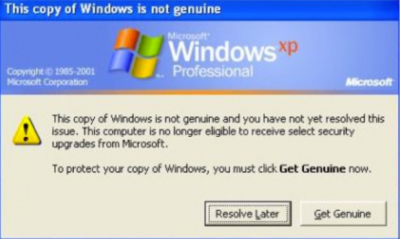
Win 7 Antispyware 2012 Screen shot

Once started, the rogue itself, like all other rogues, will scan your computer and state that there are numerous infections on it. If you attempt to use the program to remove any of these infections, though, it will state that you need to purchase the program first. In reality, though, the infections that the rogues states are on your computer are all legitimate files that if deleted could cause Windows to not operate correctly. Therefore, please do not manually delete any files based upon the results from this rogue’s scan.

While running, XP Internet Security 2012, Win 7 Antivirus 2012, and Vista Security 2012 will also display fake security alerts on the infected computer. The text of some of these alerts are:

XP Home Security 2012 Firewall Alert
XP Home Security 2012 has blocked a program from accessing the internet
Internet Explorer is infected with Trojan-BNK.Win32.Keylogger.gen
Private data can be stolen by third parties, including credit card details and passwords.

Malware Intrusion
Sensitive areas of your system were found to be under attack. Spy software attack or virus infection possible. Prevent further damage or your private data will get stolen. Run an anti-spyware scan now. Click here to start.

System danger!
Your system security is in danger. Privacy threats detected. Spyware, keyloggers or Trojans may be working the background right now. Perform an in-depth scan and removal now, click here.

System Hijack!
System security threat was detected. Viruses and/or spyware may be damaging your system now. Prevent infection and data loss or stealing by running a free security scan.

Privacy threat!
Spyware intrusion detected. Your system is infected. System integrity is at risk. Private data can be stolen by third parties, including credit card details and passwords. Click here to perform a security repair.

Stealth intrusion!
Infection detected in the background. Your computer is now attacked by spyware and rogue software. Eliminate the infection safely, perform a security scan and deletion now.

XP Antispyware 2012 Alert
Security Hole Detected!
A program is trying to exploit Windows security holes! Passwords and sensitive data may be stolen. Do you want to block this attack?

Just like the scan results, these security warnings and alerts are all fake and should be ignored.

While running, Win 7 Home Security 2012, XP Antivirus 2012, and Vista Antivirus 2012 will also hijack Internet Explorer so that you cannot visit certain sites. It does this so that you cannot receive help or information at sites like BleepingComputer.com on how to remove this infection. When you attempt to visit these sites you will instead be shown a fake alert stating that the site you are visiting is dangerous and that the rogue is blocking it for your protection. The message that you will see is:

Vista Security 2012 Alert
Internet Explorer alert. Visiting this site may pose a security threat to your system!

Possible reasons include:
– Dangerous code found in this site’s pages which installed unwanted software into your system.
– Suspicious and potentially unsafe network activity detected.
– Spyware infections in your system
– Complaints from other users about this site.
– Port and system scans performed by the site being visited.

Things you can do:
– Get a copy of Vista Security 2012 to safeguard your PC while surfing the web (RECOMMENDED)
– Run a spyware, virus and malware scan
– Continue surfing without any security measures (DANGEROUS)

Just like the fake security alerts, the browser hijack is just another attempt to make you think that your computer has a security problem so that you will then purchase the program.

Without a doubt, this rogue is designed to scam you out of your money by hijacking your computer and trying to trick you into thinking you are infected. Therefore, please do not purchase this program , and if you have, please contact your credit card company and dispute the charges stating that the program is a computer infection. Finally, to remove Win 7 Antispyware 2012, Vista Antivirus 2012, and XP Security 2012 please use the guide below, which only contains programs that are free to use.

Tools Needed for this fix:

  • Malwarebytes’ Anti-Malware


Automated Removal Instructions for Win 7 Antispyware 2012 & Vista Antivirus 2012 using Malwarebytes’ Anti-Malware:

  1. Print out these instructions as we will need to close every window that is open later in the fix.
  1. It is possible that the infection you are trying to remove will not allow you to download files on the infected computer. If this is the case, then you will need to download the files requested in this guide on another computer and then transfer them to the infected computer. You can transfer the files via a CD/DVD, external drive, or USB flash drive.
  1. This infection changes settings on your computer so that when you launch an executable, a file ending with .exe, it will instead launch the infection rather than the desired program. To fix this we must first download a Registry file that will fix these changes. From a clean computer, please download the following file and save it to a removable media such as a CD/DVD, external Drive, or USB flash drive. FixNCR.reg.  Once that file is downloaded and saved on a removable devices, insert the removable device into the infected computer and open the folder the drive letter associated with it. You should now see the FixNCR.reg file that you had downloaded onto it. Double-click on the FixNCR.regfile to fix the Registry on your infected computer. You should now be able to run your normal executable programs and can proceed to the next step.If you do not have any removable media or another clean computer that you can download the FixNCR.reg file onto, you can try and download it to your infected computer using another method. On the infected computer, right click on the Internet Explorer’s icon, or any other browser’s icon, and select Run As or Run as Administrator. If you are using Windows XP, you will be prompted to select a user and enter its password. It is suggested that you attempt to login as the Administratoruser. For Windows 7 or Windows Vista, you will be prompted to enter your Administrator account password.Once you enter the password, your browser will start and you can download the above FixNCR.reg file. When saving it, make sure you save it to a folder that can be accessed by your normal account. Remember, that you will be launching the browser as another user, so if you save it to a My Documents folder, it will not be your normal My Documents folder that it is downloaded into. Instead it will be the My Documents folder that belongs to the user you ran the browser as. Once the download has finished, close your browser and find the FixNCR.reg file that you downloaded. Now double-click on it and allow the data to be merged. You should now be able to run your normal executable programs and can proceed to the next step.
  1. Now we must first end the processes that belong to Win 7 Antispyware 2012 & Vista Antivirus 2012 and clean up some Registry settings so they do not interfere with the cleaning procedure. To do this, please download RKill to your desktop from the following link.RKill Download Link.  When at the download page, click on the Download Now button labeled iExplore.exe download link . When you are prompted where to save it, please save it on your desktop.
  1. Once it is downloaded, double-click on the iExplore.exe icon in order to automatically attempt to stop any processes associated with Win 7 Antispyware 2012 & Vista Antivirus 2012 and other Rogue programs. Please be patient while the program looks for various malware programs and ends them. When it has finished, the black window will automatically close and you can continue with the next step. If you get a message that RKill is an infection, do not be concerned. This message is just a fake warning given by Win 7 Antispyware 2012 & Vista Antivirus 2012 when it terminates programs that may potentially remove it. If you run into these infections warnings that close RKill, a trick is to leave the warning on the screen and then run RKill again. By not closing the warning, this typically will allow you to bypass the malware trying to protect itself so that rkill can terminate Win 7 Antispyware 2012 & Vista Antivirus 2012 . So, please try running RKill until the malware is no longer running. You will then be able to proceed with the rest of the guide. If you continue having problems running RKill, you can download the other renamed versions of RKill from the rkill download page. All of the files are renamed copies of RKill, which you can try instead. Please note that the download page will open in a new browser window or tab.Do not reboot your computer after running RKill as the malware programs will start again.
  1. There have been reports of this infection being bundled with the TDSS rootkit infection. To be safe you should also run a program that can be used to scan for this infection. Please follow the steps in the following guide:

How to remove Google Redirects or the TDSS, TDL3, or Alureon rootkit using TDSSKiller

If after running TDSSKiller, you are still unable to update Malwarebytes’ Anti-malware or continue to have Google search result redirects, then you should post a virus removal request using the steps in the following topic rather than continuing with this guide:

Preparation Guide For Use Before Using Malware Removal Tools and Requesting Help Topic

If TDSSKiller requires you to reboot, please allow it to do so. After you reboot, reboot back into Safe Mode with Networking again.

  1. Download Malwarebytes’ Anti-Malware, also referred to as MBAM, from the following location and save it to your desktop:Malwarebytes’ Anti-Malware Download Link (Download page will open in a new window)
  1. Once downloaded, close all programs and Windows on your computer, including this one.
  1. Double-click on the icon on your desktop named mbam-setup.exe. This will start the installation of MBAM onto your computer.
  1. When the installation begins, keep following the prompts in order to continue with the installation process. Do not make any changes to default settings and when the program has finished installing, make sure you leave both the Update Malwarebytes’ Anti-Malware and Launch Malwarebytes’ Anti-Malware checked. Then click on the Finish button.
  1. MBAM will now automatically start and you will see a message stating that you should update the program before performing a scan. As MBAM will automatically update itself after the install, you can press the OK button to close that box and you will now be at the main program as shown below.


  1. On the Scanner tab, make sure the the Perform full scan option is selected and then click on the Scan button to start scanning your computer for Win 7 Antispyware 2012 & Vista Antivirus 2012 related files.
  1. MBAM will now start scanning your computer for malware. This process can take quite a while, so we suggest you go and do something else and periodically check on the status of the scan. When MBAM is scanning it will look like the image below.


  1. When the scan is finished a message box will appear as shown in the image below.


You should click on the OK button to close the message box and continue with the Vista AntiSpyware 2012 & Win 7 Home Security removal process.

  1. You will now be back at the main Scanner screen. At this point you should click on the Show Results button.
  2. A screen displaying all the malware that the program found will be shown as seen in the image below. Please note that the infections found may be different than what is shown in the image.


You should now click on the Remove Selected button to remove all the listed malware. MBAM will now delete all of the files and registry keys and add them to the programs quarantine. When removing the files, MBAM may require a reboot in order to remove some of them. If it displays a message stating that it needs to reboot, please allow it to do so. Once your computer has rebooted, and you are logged in, please continue with the rest of the steps.

  1. When MBAM has finished removing the malware, it will open the scan log and display it in Notepad. Review the log as desired, and then close the Notepad window.
  1. You can now exit the MBAM program.
  1. As many rogues and other malware are installed through vulnerabilities found in out-dated and insecure programs, it is strongly suggested that you use Secunia PSI to scan for vulnerable programs on your computer. A tutorial on how to use Secunia PSI to scan for vulnerable programs can be found here:How to detect vulnerable and out-dated programs using Secunia Personal Software Inspector

Your computer should now be free of the Vista AntiSpyware 2012 & Win 7 Home Security program. If your current anti-virus solution let this infection through, you may want to consider purchasing the PRO version of Malwarebytes’ Anti-Malware to protect against these types of threats in the future.

If you are still having problems with your computer after completing these instructions, then please follow the steps outlined in the topic linked below:

Preparation Guide For Use Before Using Malware Removal Tools and Requesting Help

To see the original article in its entirety click here.


How to Get Windows 10 for Free

A new notification prompts Windows 7 and 8.1 users to reserve an upgrade to the upcoming OS, due to debut July 29.

Microsoft is now pushing Windows 10 via a notice suggesting you reserve a copy. On Monday, the software giant announced thatWindows 10 will officially roll out July 29. That means it will be available on any PCs you purchase as of that date — and as a free upgrade to your existing Windows 7 or 8.1 tablet or PC.

Microsoft has a lot riding on Windows 10. The new OS has the task of erasing the bad experiences people had with the touchscreen-focused Windows 8, which ultimately failed to catch fire among PC users. Windows 10 comes packed with new features, such as a redesigned Start menu, the Cortana voice assistant and a new browser called Edge, all designed to win over jaded Windows users. The new OS will also offer a more unified experience among PCs, tablets and smartphones as a way to convince consumers to go the Windows route for all their devices. As such, the company wants to make sure that current device owners know they can now get in line to pick up Windows 10.So how can you now reserve your free copy of Windows 10?

Windows 10 Free Upgrade

You can now reserve your free copy of Windows 10, if you meet the necessary requirements.

First, you must be running Windows 7 Service Pack 1 or Windows 8.1, and you must have installed a March the Windows update dubbed KB3035583, according to blog site VentureBeat. That update will already be on your PC as long as you have Automated Updates enabled.

Peek at your Windows system tray in the lower right corner, and you should see a new icon displaying the Windows logo. Hover over it, and the popup messages says: “Get Windows 10.”

Click that icon, and up pops a window that explains how the free upgrade works. Once it’s available, Windows 10 will automatically download onto your PC. You’ll receive a notification after the download is complete so that you can choose an appropriate time to install it.

You can scroll through the various screens of the Get Windows 10 window to read more about the new OS.

When you’re done, simply click the button to reserve your free upgrade.

The reservation screen asks for your email address so you can receive the notification. Enter your email address and click the Send confirmation button. You can now close the Get Windows 10 window.

Should you change your mind and wish to cancel the reservation, just click the Get Windows 10 icon again.

Click the three horizontal lines in the upper left corner to display the menu and click the link for View confirmation.

Then click the link to Cancel reservation and click the button for Cancel reservation to confirm your choice.

Windows 10 is a free upgrade. The upgrade offers the full version of Windows 10, not simply a trial or limited version. It also ensures that you can run Windows 10 on your specific device for free “for the supported lifetime of your device,” according to Microsoft.

But there are some caveats. The free upgrade applies only to Windows 7 SP1 and Windows 8.1. So if you haven’t upgraded Windows 7 to SP1 or Windows 8 to 8.1, you’ll have to perform those tasks first. Also, you have one year from July 29 to upgrade your PC to Windows 10 for free. After that year is up, you’ll have to purchase Windows 10 yourself.

Those of you running Windows RT or RT 8.1 are out of luck. Microsoft has excluded Windows RT and RT 8.1 from the free upgrade offer.

And what will Windows 10 cost you if the miss the free upgrade window? On Monday, Microsoft revealed the various prices. Windows Home will retail for $119. Windows 10 Pro wil sell for price of $199. And the Windows 10 Pro Pack, which lets you upgrade from Windows 10 Home to Windows 10 Pro, will cost you $99.

Have questions?

Our Upgrade Assistants and IT business team is here to help.
Call us at: 856-745-9990 or visit: https://southjerseytechies.net/

South Jersey Techies, LLC is a full Managed Web and Technology Services Company providing IT Services, Website Design ServicesServer SupportNetwork ConsultingInternet PhonesCloud Solutions Provider and much more. Contact for More Information.

To read this article in its entirety click here.

Windows 10 Upgrade: 5 Microsoft Tactics

To achieve its goal of getting one billion people onto Windows 10, Microsoft is getting more forceful in how it pushes Windows 7 and 8.1 users towards its new OS.

Windows10

Microsoft wants Windows 10 on one billion devices by 2018 – and its tactics for hitting that ambitious goal are about to get more aggressive.

From next year, Microsoft will be more direct in pushing Windows 7 and 8.1 users to upgrade to its latest OS, in an attempt to bolster the 110 million-strong Windows 10 userbase.

Here’s how Microsoft is about to crank up the pressure to make the switch.

1. Windows 10 will automatically begin installing itself

From “early next year”, Microsoft will change the status of the free Windows 10 upgrade so it is classified as a Recommended Update.

Given that most home machines are set up to install Recommended Updates automatically, the change to Windows 10’s update status will lead to most Windows 7 and 8.1 machines beginning the upgrade.

However, Microsoft says that before Windows 10 is installed users will need to manually confirm the installation, giving them a chance to pull out.

Business users should be able to prevent the upgrade from automatically starting using tools such as Windows Server Update Services.

For those on metered connections, Terry Myerson, Microsoft’s executive VP of the Windows and Devices Group, said people “have the option of turning off automatic updates” before going on to say that such a move is unwise because of “the constant risk of internet threats”.

Those who don’t like the new OS will have 31 days to roll back to their previous version of Windows. To go back, select “Start Button->Settings->Update and Security->Recovery and Uninstall Windows 10”.

2. Upgrade notifications will be made more obvious

Despite Microsoft sticking a ‘Get Windows 10’ icon on the taskbar of most Windows 7 desktops, many customers apparently still can’t figure out how to initiate the upgrade.

Myerson says since launching Windows 10 the number one complaint has been ‘How do I get my upgrade?’.

To address the difficulty some users are having, Myerson said Microsoft will change “our notifications to be more approachable and hopefully clear, and sometimes fun”.

3. Upgrades will happen immediately

The process of initiating the upgrade to Windows 10 has also been streamlined.

In the weeks after Windows 10’s launch earlier this year, Microsoft required users to first reserve a Windows 10 upgrade, which would then be installed at a later date.

Microsoft has now replaced that two-step process with an immediate upgrade. Users clicking on the ‘Get Windows 10’ icon will now be given the option to ‘Upgrade Now’ to begin the upgrade process straightaway.

4. Simpler upgrade from unsanctioned copies of Windows

Myerson admits surprise at how many people running copies of Windows 7 and 8.1 that have not been authenticated then go on to buy Genuine copies of Windows 10.

Based on this experience, Microsoft plans to make it a “one-click” process for people running unsanctioned copies of the OS to “get Genuine” via the Windows Store or by entering an activation code bought elsewhere. The offer will be trialled in the US and, if successful, may be extended to other countries.

5. Upgrading multiple machines to Windows 10 will be easier

Those looking to upgrade several Windows 7 and Windows 8.1 machines to Windows 10 will soon find the process gets more straightforward.

Microsoft’s Media Creation Tool is used to create an image that can be run off a DVD or USB stick to upgrade qualifying machines to Windows 10.

According to Myerson, you will soon be able to use the tool to create a single image that will allow any number of 32-bit or 64-bit, Home or Pro machines to be upgraded and which will also allow for clean installs “wherever you have a Windows license”.

Have questions?

Get help from IT Experts/Microsofts Cloud Solutions Partner
Call us at: 856-745-9990 or visit: https://southjerseytechies.net/

South Jersey Techies, LLC is a full Managed Web and Technology Services Company providing IT Services, Website Design ServicesServer SupportNetwork ConsultingInternet PhonesCloud Solutions Provider and much more. Contact for More Information.

To read this article in its entirety click here.

4 WAYS TO SPEED UP YOUR PC

Speed Up Computer

How to make a computer faster: 4 ways to speed up your PC

By following a few simple guidelines, you can maintain your computer, help increase your PC speed, and help keep it running smoothly. This article discusses how to use the tools installed on your computer, plus a few safe and free downloads, to help make your computer faster, maintain your computer efficiently, and help safeguard your privacy when you’re online.

Note: Some of the tools mentioned in this article require you to be logged on as an administrator. If you aren’t logged on as an administrator, you can only change settings that apply to your user account.

1. Remove spyware, and help protect your computer from viruses

Spyware collects personal information without letting you know and without asking for permission. From the websites you visit to user names and passwords, spyware can put you and your confidential information at risk. In addition to privacy concerns, spyware can hamper your computer’s performance. To combat spyware, you might want to consider using Malwarebytes. This scan is a free service that helps check for and remove viruses. You should also download Microsoft Security Essentials for free to help guard your system in the future from viruses, spyware, adware, and other malicious software (also known as malware). Microsoft Security Essentials acts as a spyware removal tool and includes automatic updates to help keep your system protected from emerging threats.

2. Free up disk space

The Disk Cleanup tool helps you to free up space on your hard disk to improve the performance of your computer. The tool identifies files that you can safely delete and then enables you to choose whether you want to delete some or all of the identified files.

Use Disk Cleanup to:

– Remove temporary Internet files.
– Delete downloaded program files, such as Microsoft ActiveX controls and Java applets.
– Empty the Recycle Bin.
– Remove Windows temporary files, such as error reports.
– Delete optional Windows components that you don’t use.
– Delete installed programs that you no longer use.
– Remove unused restore points and shadow copies from System Restore.

Tip: Typically, temporary Internet files take the most amount of space because the browser caches each page you visit for faster access later.

To use Disk Cleanup:

Windows 7 users

1. Click Start, click All Programs, click Accessories, click System Tools, and then click Disk Cleanup. If several drives are available, you might be prompted to specify which drive you want to clean.

2. When Disk Cleanup has calculated how much space you can free up, in the Disk Cleanup for dialog box, scroll through the content of the Files to delete list.

3.  Clear the check boxes for files that you don’t want to delete, and then click OK.

4.  When prompted to confirm that you want to delete the specified files, click Yes.

After a few minutes, the process completes and the Disk Cleanup dialog box closes, leaving your computer cleaner, performing better, and potentially increasing your PC speed.  For more options, such as cleaning up System Restore and Shadow copy files, under Description, click Clean up system files, and then click the More Options tab.

Windows Vista users

1. In the Start menu, click All Programs, click Accessories, click System Tools, and then click Disk Cleanup.

2. In the Disk Cleanup Options dialog box, choose whether you want to clean up your own files only or all of the files on the computer.

3. If the Disk Cleanup: Drive Selection dialog box appears, select the hard disk drive that you want to clean up, and then click OK.

4. Click the Disk Cleanup tab, and then select the check boxes for the files you want to delete.

5. When you finish selecting the files you want to delete, click OK, and then, to confirm the operation, click Delete files. Disk Cleanup then removes all unnecessary files from your computer. This may take a few minutes.

The More Options tab is available when you choose to clean files from all users on the computer.

Windows XP users

1.  Click Start, point to All Programs, point to Accessories, point to System Tools, and then click Disk Cleanup. If several drives are available, you might be prompted to specify which drive you want to clean.

2.  In the Disk Cleanup for dialog box, scroll through the content of the Files to delete list.

3.  Clear the check boxes for files that you don’t want to delete, and then click OK.

4.  When prompted to confirm that you want to delete the specified files, click Yes.

After a few minutes, the process completes and the Disk Cleanup dialog box closes, leaving your computer cleaner and potentially performing better.

3. Speed up access to data

Disk fragmentation slows the overall performance of your system. When files are fragmented, the computer must search the hard disk as a file is opened (to piece it back together). The response time can be significantly longer.

Disk Defragmenter (sometimes shortened to Defrag by users) is a Windows utility that consolidates fragmented files and folders on your computer’s hard disk so that each occupies a single space on the disk. With your files stored neatly end to end, without fragmentation, reading and writing to the disk speeds up.

When to run Disk Defragmenter
In addition to running Disk Defragmenter at regular intervals (weekly is optimal), there are other times you should run it, too, such as when:

– You add a large number of files.
– Your free disk space totals 15 percent or less.
– You install new programs or a new version of the Windows operating system.

To use Disk Defragmenter:

Windows 7 users

1. Click Start, click All Programs, click Accessories, click System Tools, and then click Disk Defragmenter.


2. In the Disk Defragmenter dialog box, click the drives that you want to defragment, and then click the Analyze disk button. After the disk is analyzed, a dialog box appears, letting you know whether you should defragment the analyzed drives.

Tip: You should analyze a volume before defragmenting it to get an estimate of how long the defragmentation process will take.

3.  To defragment the selected drive or drives, click the Defragment disk button. In the Current status area, under the Progress column, you can monitor the process as it happens. After the defragmentation is complete, Disk Defragmenter displays the results.

4.  To display detailed information about the defragmented disk or partition, click View Report.

5.  To close the View Report dialog box, click Close.

6.  You can also schedule the Disk Defragmenter to run automatically. (Your computer might even be set up this way by default.) Under Schedule, it reads Scheduled defragmentation is turned on and then displays the time of day and frequency of defragmentation. If you want to turn off automatic defragmentation or to change the time or frequency, click Configure schedule (or Turn on Schedule, if it is not currently configured to run automatically). Change the settings, and then click OK.

7.  To close the Disk Defragmenter utility, on the title bar of the window, click the Close button.

Windows Vista users

1.  Open Disk Defragmenter: Click the Start button, click All Programs, click Accessories, click System Tools, and then click Disk Defragmenter. If you are prompted for an administrator password or confirmation, type the password or provide confirmation.

2.  In the Disk Defragmenter dialog box, click the drives that you want to defragment and then click the Analyze diskbutton. After the disk is analyzed, a dialog box appears letting you know whether you should defragment the analyzed drives.

Tip: You should analyze a volume before defragmenting it to get an estimate of how long the defragmentation process will take.

3.  To defragment the selected drive or drives, click the Defragment disk button. In the Current status area, under the Progress column, you can monitor the process as it happens. After the defragmentation is complete, Disk Defragmenter displays the results.

4.  To display detailed information about the defragmented disk or partition, click View Report.

5.  To close the View Report dialog box, click Close.

6.  You can also schedule the Disk Defragmenter to run automatically. (Your computer might be set up this way by default.) Click Modify schedule….

7.  In the Disk Defragmenter: Modify Schedule dialog box, choose how often, which day, and at what time of day you want defragmentation to occur, and then click OK.

8.  Click OK again.

Windows XP users

1.  Click Start, point to All Programs, point to Accessories, point to System Tools, and then click Disk Defragmenter.

2.  In the Disk Defragmenter dialog box, click the drives that you want to defragment and then click the Analyze button. After the disk is analyzed, a dialog box appears, letting you know whether you should defragment the analyzed drives.

Tip: You should analyze a volume before defragmenting it to get an estimate of how long the defragmentation process will take.

3.  To defragment the selected drive or drives, click the Defragment button. Note:In Windows Vista, there is no graphical user interface to demonstrate the progress—but your hard drive is still being defragmented.  After the defragmentation is complete, Disk Defragmenter displays the results.

4.  To display detailed information about the defragmented disk or partition, click View Report.

5.  To close the View Report dialog box, click Close.

6.  To close the Disk Defragmenter utility, on the title bar of the window, click the Close button.

Running Disk Cleanup and Disk Defragmenter on a regular basis is a proven way to help keep your computer running quickly and efficiently. If you’d like to learn how to schedule these tools and others to run automatically, please read Speed up your PC: Automate your computer maintenance schedule.

4. Detect and repair disk errors

In addition to running Disk Cleanup and Disk Defragmenter to optimize the performance of your computer, you can check the integrity of the files stored on your hard disk by running the Error Checking utility.

As you use your hard drive, it can develop bad sectors. Bad sectors slow down hard disk performance and sometimes make data writing (such as file saving) difficult or even impossible. The Error Checking utility scans the hard drive for bad sectors and scans for file system errors to see whether certain files or folders are misplaced.

If you use your computer daily, you should run this utility once a week to help prevent data loss.

Run the Error Checking utility:

1.  Close all open files.

2.  Click Start, and then click Computer.

3.  In the Computer window (My Computer in Windows XP), right-click the hard disk you want to search for bad sectors, and then click Properties.

4.  In the Properties dialog box, click the Tools tab.

5.  Click the Check Now button.

6.  In the Check Disk dialog box (called Error-checking in Windows 7), select the Scan for and attempt recovery of bad sectors check box, and then click Start.

7.  If bad sectors are found, choose to fix them.

Tip: Only select the “Automatically fix file system errors” check box if you think that your disk contains bad sectors.

To see the original article in its entirety click here.

10 Ways to Make Outlook Faster

Takeaway: Does Outlook’s pokey performance have you gnashing your teeth with frustration? Try these simple fixes to give it a kick in the pants.

If you’ve used Microsoft Outlook for a while, you know that it can slow down… way down. In fact, when not looked after, Outlook can become nearly useless. Fortunately, there are several things you can do to make Outlook not only usable, but significantly improved. And none of these techniques requires a single configuration change to your Exchange server (IMAP or POP3).

Of course, some of these suggestions might seem to have a bit more “‘duh” factor than others. But you never know what level of skills you’re dealing with, so we’ll cover all the bases. In the end, you should have a much faster Outlook experience.

1: Update Windows

Many people don’t realize that with Windows updates, the updates for Microsoft Office are also “hidden.” But it’s not just the Office updates that can help speed up Outlook. Make sure you allow the updates to happen. Why? There are times when Microsoft might update Exchange. In some cases, those updates can either break or cause problems with the communication between Outlook and Exchange. Or Microsoft might issue a patch to the application to resolve a speed issue or security hole.

2: Download Complete Items

When you connect Microsoft Outlook with either IMAP or POP3, you should have Outlook set up to download the complete message (instead of just the header). If you do this, Outlook won’t have to sync with the server every time you click on a new item (as it will already be in the data file.) How you do this will depend upon which version of Outlook you’re using. But basically, you’re looking for the setting Download Complete Item Including Attachments.

3: Archive your Inbox

I can’t tell you how many times I see clients with thousands upon thousands (and in some cases tens of thousands) of emails in their Inbox. This can cause serious issues, especially when using PST files. Instead of just letting those Inbox folders grow to outrageous proportions, set up auto archiving so that your Inbox retains only a portion of those emails. I like to tell clients to keep the current and previous months’ email in the Inbox and archive everything else. When you archive, you effectively create a new data file, so Outlook doesn’t have to strain against the weight of an oversize PST or OST file

4: Use Cached Exchange Mode

If you use Cached Exchange Mode in Outlook, you effectively take the data file from the server (PST) and cache it on your local machine (OST). This can go a long way toward speeding up your Outlook experience because Outlook doesn’t have to read its data file across a network. Instead, all it has to do is read the locally stored data file. This option (obviously) is available only when connecting Outlook with an Exchange server.

5: Compact your PST File

When the Outlook PST file gets out of hand, a built-in tool can keep the size of that file under control. One of the issues is that even when you delete email from your Inbox, the size of the PST file may remain the same. If you’re using Outlook 2010, you can go to Account Settings | Data Files and select the data file to be compacted. Once you’ve selected the file click Settings | Advanced | Outlook Data File Settings and click Compact Now. Depending on the size of your data file, this process can take some time.

6: Repair your PST File

Scanpst is often my go-to tool when Outlook is acting off kilter. It will scan through your data file and look for data inconsistencies and errors. Here’s the thing about Scanpst — it’s not always the easiest tool to find. Do yourself a favor and search through your C drive to locate the Scanpst.exe file. Make note of its location (usually within the Office installation folder). But be forewarned: This tool can cause PST files to become unusable. Make sure you back up that data file before you start the repair tool. Fortunately, should Scanpst find errors, it will prompt you to make a backup before it attempts to fix the errors.

7: Cut down on the published and shared calendars

Yes, it’s easy to publish and share your calendars with others. The problem is, the more you do it, the more drag you’re putting on Outlook. The more data Outlook has to share and pull down from the Internet, the slower it will perform. Sure, it’s fine to have one or two shared calendars (and even more if you have a lightning-fast data pipe). Just know that the more data you have to push and pull, the slower your connection will be.

8: Disable RSS

By default, Microsoft Outlook will sync RSS feeds from Internet Explorer to the RSS reader in Outlook. If you have a lot of RSS feeds bookmarked in Internet Explorer, that syncing could easily bring Outlook to a crawl. Disable this feature (if you don’t use Outlook as an RSS reader) from within Outlook 2010 by going to Options | Advanced and then unchecking both options under RSS Feeds.

9: Disable add-ins

How many times have you installed some program only to find it installed something else behind your back? This can happen to Outlook as well as Internet Explorer. Sometimes those add-ins can cause major Outlook slowdowns. To find out what add-ins you have installed in Outlook 2010, go to Options | Add-ins. Select COM Add-ins from the drop-down and click the Go button. The resultant window will list all add-ins available to Outlook. Search through this list and uncheck any that might seem suspect.

10: Fix ShoreTel Windows 7 Integration

If you use the ShoreTel Communicator, you might notice some issues when trying to open and use Outlook. The problem lies in an incompatibility issue between ShoreTel and Windows 7. The fix is simple. Open up the Task Manager and look for a process called Agent.exe. Right-click that entry and click Properties |Compatibility. Choose the Run This Program In Compatibility Mode For option and then select Windows XP (Service Pack 3).

Other Tricks?

There’s no reason why anyone should have to struggle with a bogged down Outlook that will have you pulling your hair out strand by strand. These tips should help you enjoy a much speedier and reliable Outlook experience.

What other methods have you found for improving Outlook performance? Share your suggestions with fellow TechRepublic members.

Windows 10 is being adopted by business at nearly twice the rate of Windows 8

Microsoft’s latest OS is proving more attractive to firms than Windows 8 – particularly among larger businesses.

Windows 10


Businesses are proving far more willing to experiment with Windows 10 than they were with Windows 8.

Six months after Windows 10’s launch nearly one in five firms, 18 percent, appear to be testing the OS, research by professional IT network Spiceworks found. In contrast, at the same point after Windows 8’s release, the OS was only being trialled by just over nine percent of businesses.

The anonymised data on what proportion of firms are using at least one Windows 10 machine was gathered from the millions of IT pros that use its software. Spiceworks says businesses of all sizes use the software to inventory devices connected to their networks.

This faster pace of enterprise adoption is backed up by figures from IT asset management company Samanage, told that 62.4 percent of its enterprise customers have at least one managed PC running Windows 10. These are sizeable businesses, with each of Samanage’s enterprise customers having an average of more than 1,000 seats. Microsoft also claims that 76 percent of its enterprise customers are piloting its new OS.

“Our data shows that IT pros were most excited about the return of the familiar start button experience in Windows 10, which reduces the need for end-user training required for Windows 8,” said Peter Tsai, IT analyst at Spiceworks in his assessment of why the new OS is proving more popular than Windows 8.

“Many IT pros also liked the free upgrade offer via Windows Update, which makes it easy for many to test the new OS. And lastly, they were looking forward to new security features that promise to make Windows 10 a more secure operating system than previous versions.”

Windows 10 is benefiting from a comparison to an unpopular OS, demand for Windows 8 was so weak that analyst firm Canalys warned in 2014 that “Microsoft risks losing momentum unless it does something drastic to turn its Windows business around”.

And while a significant proportion of businesses may be experimenting with Windows 10, it is likely to be some time before a large number move to the OS, as business typically lag behind consumers due to the complexity of managing such upgrades at scale. Of those firms testing Windows 10, about 40 percent have three or more devices running the OS, according to Spiceworks’ data.

Medium and large businesses were the most likely to have at least one Windows 10 machine Spiceworks found – with 31 percent of firms with more than 500 people trialling the OS, compared to 10 percent of companies with 50 employees or fewer.

Windows 10


“We also know from many conversations with IT pros that smaller companies tend to have fewer resources for OS migration, so many SMBs could be holding off on Windows 10 until they have the time and manpower to adequately test the OS for hardware and application compatibility,” said Tsai.

Last year, half of the 500 IT pros surveyed by Spiceworks expressed an interest in adopting Windows 10 inside their business.

Microsoft’s decision to phase out support for Windows 7 and 8 on new PC hardware will also put pressure on businesses not to downgrade new Windows 10 machines to an earlier OS, as has been common in the past in order to standardize corporate hardware.

Microsoft is also reporting rapid adoption of Windows 10 by home users, with more than 200 million devices worldwide running the OS.

The popularity of the OS may, in part, be a result of Microsoft’s tactics to get consumers to upgrade. This aggressive approach includes recently implementing changes that will trigger the free upgrade to Windows 10 to begin automatically installing on many Windows 7 and Windows 8.1 PCs used in homes. Microsoft is making this push as part of its drive to get one billion devices running Windows 10 by 2018.

Have questions?

Get help from IT Experts/Microsofts Cloud Solutions Partner
Call us at: 856-745-9990 or visit: https://southjerseytechies.net/

South Jersey Techies, LL C is a full Managed Web and Technology Services Company providing IT Services, Website Design ServicesServer SupportNetwork ConsultingInternet PhonesCloud Solutions Provider and much more. Contact for More Information.

To read this article in its entirety click here.

When free Windows 10 becomes Expensive. You Must Know this!!

Is Microsoft really going to charge $100 to $200 to users who want the Pro edition or who don’t qualify for the free upgrade? Lets take a look at some alternative pricing ideas.

In Last week’s article, qw showed you how to reserve your free copy of Windows 10 upgrade from your Windows 7 and Windows 8.1 System. As you may know, the free upgrade will move you to the same edition of Windows that you’re currently running.


Windows 10 cost

“When you upgrade, you’ll stay on like-to-like editions of Windows. For example, Windows 7 Home Premium will upgrade to Windows 10 Home.”

However, what if you get Windows 10 Home and then decide that you would like Windows 10 Pro? How much will it cost to upgrade? What if you are running Windows Vista or XP? Or, what if you are planning on building your own system and want to install Windows 10 from scratch? How much will you have to pay for Windows 10? Let’s take a closer look.

The free upgrade chart

Along with the like-to-like editions description, Microsoft presented an upgrade chart (Figure A).

Figure A

sjt-blog-photo-windows

As you can see, this is how Microsoft will be doling out the free editions of Windows 10. For those getting the Pro edition of Windows 10, this will be perfect. And for most folks getting the Home edition of Windows 10, this will be a fine deal. However, what if you’re really a Pro type of user who just happened to end up with a Home edition of Windows 7/8? Will you be satisfied with the Home edition of Windows 10?

For example, my main system is running Windows 8.1 Pro with Media Center. However, my laptop is running the standard Windows 8.1, because that’s what was preinstalled when I purchased it last year from Dell. I’ve always wished that it had the Pro edition, as there are certain features that I’ve grown accustomed to on the Pro edition that I sorely miss, such as being able to configure my laptop as a Remote Desktop host.

I know that I won’t be satisfied with the Home edition of Windows 10 on my laptop.

The Windows 10 Pro Pack

Microsoft has released statements to various technology media sites, such as CNET, confirming the existence of an upgrade package called the Windows 10 Pro Pack that will allow you to move up from the Windows 10 Home edition to Pro edition. The Windows 10 Pro Pack will cost $99 (USD).

While that might not sound like a lot, when compared to FREE, it seems kind of unfair.

I understand that I’m getting a like-to-like edition upgrade, but I was hoping for some kind of break. After all, I’ve been a loyal Microsoft customer for years.

How about selling the Windows 10 Pro Pack for $39.99 for a limited time? Say, 90 days after launch? That would be more than acceptable to me–and it’s not unprecedented.

As you may remember, back when Windows 8 was first launched in October of 2012, upgrades to the Pro edition were priced at just $39.99 for anyone using an existing product. That offer ran until January 31, 2013. After that, the price of Windows 8 went up to the regular price point.

Retail packages

Microsoft has also released the MSRP for copies of the new operating system. Windows 10 Home will sell for $119 and Windows 10 Pro will sell for $199. Again, this seems to be a pretty stiff deal when compared to FREE.

This is the price that anyone using Windows XP or Windows Vista on a system that’s capable of running Windows 10 will have to pay for the full install of the new operating system. This also applies to users who are planning on building their own systems.

If the goal is to really get everyone off of old operating systems and onto Windows 10, Microsoft should offer these folks a special price for a limited time.

Again, such a deal is not unprecedented. When Windows 8 first came out, the retail package of the Pro edition cost $69.99.

If Windows XP/Vista users and system builders could get Windows 10 Pro for $69.99 for the first 90 days after launch, I think that a lot more people would go for it than if they have to pay $199.

What’s your take?

If you get a free Windows 10 Home upgrade, will you be satisfied–or will you want to move up to Windows 10 Pro? If so, would you be willing to pay $39 for the upgrade? If you don’t qualify for the free upgrade, would you be willing to pay $69 for Windows 10? Let us know

Have questions?

Microsoft’s Partner are here to help.
Call us at: 856-745-9990 or visit: http://southjerseytechies.net/

South Jersey Techies, LLC is a full Managed Web and Technology Services Company providing IT Services, Website Design ServicesServer SupportNetwork ConsultingInternet PhonesCloud Solutions Provider and much more. Contact for More Information.

To read this article in its entirety click here.

The 16 most pivotal events in Windows history

Thirty years of Windows is a lifetime.

30yearsofwindows-1

Thirty years of Windows

For better or for worse, Windows has defined the modern era of personal computing. Microsoft’s signature OS runs on the vast majority of PCs worldwide, and it has also worked its way into servers, tablets, phones, game consoles, ATMs, and more.

Windows’ 30 years or so of existence has spanned generations of computing and entire lifetimes of companies and their products. Understandably, choosing the most noteworthy moments of Windows’ long life has been a challenging task, but we went for it. On the following slides we present our our list of the obvious, and not-so-obvious, milestones in Windows history.

30yearsofwindows-2

Windows 1.0

On Nov. 20, 1985, Microsoft launched the first iteration of Windows, essentially a graphical shell that overlaid Microsoft’s well-known MS-DOS. Requiring a couple of floppy drives, 192KB of RAM, and, most importantly, a mouse, Windows wasn’t actually that well-received. But Bill Gates told InfoWorld that “only applications that run Windows will be competitive in the long run.” He was right—for a time.

Featuring tiled windows that could be minimized or extended to cover the full screen, plus “apps” like Calendar and Write, Windows was the precursor to what the majority of PC users run today. Oh, and it was sold by Microsoft’s eventual CEO, Steve Ballmer, in perhaps the best computer commercial (Apple’s “1984” ad notwithstanding) ever shown.

30yearsofwindows-3

Windows 3.x

Windows puttered along until May 1990, when the first iconic Windows release, Windows 3.0, was released. It’s difficult to decide whether Windows 3.0 or its immediate successor, Windows 3.1, was more important; Windows 3.0 introduced sound to the Windows platform, but Windows 3.1 added TrueType fonts.

Yes, Windows 3.1 included File Manager (drag and drop!) and Program Manager, but the real innovations were more fun: support for MIDI sound and AVI files.  More importantly, Windows 3.x introduced screensavers (a staple of shovelware for years) and the ultimate timewasters: Solitaire (Windows 3.0) and Minesweeper (Windows 3.1). An entire generation learned how to place digital playing cards, one on top of the other, all for the glory of seeing all the cards bounce when a game was completed.

30yearsofwindows-4

Windows 95

Early iterations of Microsoft’s Windows operating system catered more toward the business user than anyone else. That changed on August 24, 1995 with the launch of Windows 95.

It featured a few key technical upgrades: Windows 95 was Microsoft’s first “mass-market” 32-bit OS. It was the also first to add the Start button that we use today. The first integrated web browser, Internet Explorer, just missed the launch and shipped later.

With a promotional budget of hundreds of millions of dollars, much of what we remember about Windows 95, though, was tied up in the marketing: a midnight launch, an ad campaign built around the The Rolling Stones hit “Start Me Up,” a partnership with Brian Eno that produced the iconic boot melody.

Oh, and Windows 95 also allowed users to pay $19.95 to try out a time-limited beta of the OS, which expired at the launch. Good times.

30yearsofwindows-5

Microsoft Bob

Windows 3.1, however, also gave us Microsoft Bob, a March 1995 release that remodeled Windows as a series of “rooms.” Each was populated by virtual objects that might have a purpose—but you wouldn’t know until you clicked on them. Bob also featured a series of “assistants” that offered to help you perform all sorts of tasks, whether you wanted to or not.

Bob bombed. But Microsoft never quite gave up on trying to humanize Windows, a noble if slightly pathetic effort that would later produce the unfortunately iconic Clippy assistant.

30yearsofwindows-6

Windows NT

Though PCWorld tends to focus on the PC (natch), we’d be remiss to neglect Windows NT, the precursor to Windows’ expansion into the server and workstation space. Windows NT was Microsoft’s first 32-bit OS designed (and priced) for both the server and workstation market, with specific versions optimized for the X86, DEC Alpha, and MIPS series of microprocessors. It eventually was combined with the standard Windows architecture to form Windows XP.

Today, Microsoft has built a sizeable portion of its business upon Windows Server, SQL Server, and Windows Center, among others, plus its investments in the Azure cloud. All of this originated with Microsoft’s desire to take on UNIX in the server space.

30yearsofwindows-7

Windows XP

Whether it’s due to nostalgia, good design, or the famous “Bliss” backdrop featuring an emerald-green hillside in California’s wine country, 2001’s Windows XP remains one of the more beloved Windows operating systems. Shoot, it managed to erase the memory of Windows ME, one of Microsoft’s biggest blunders.

Windows XP shipped in two editions: one for professionals, the other for home users, with features stripped out of the “pro” version, such as domain join. But Windows XP also shipped with a Media Center edition that transformed a PC equipped with a TV tuner into a powerful DVR. (Media Center remains one of the more popular, and mourned, features of Windows today—it’s one reason users cite for refusing to upgrade to Windows 10.)

30yearsofwindows-8

Windows Genuine Advantage

Maybe you thought every pivotal Windows moment was a product release. Not so. As good as it was, Windows XP also unleashed Windows Genuine Advantage—or what we now refer to as “activation”—upon an unsuspecting world. It was the first step in evolving Windows from a “hobby” to what some would refer to as “Micro$oft.”

This attitude was nothing new. In 1976, Bill Gates penned “An Open Letter to Hobbyists,” where he complained that the amount of royalties paid by customers using its BASIC software amounted to about $2 per hour. “Most directly, the thing you do is theft,” Gates wrote, essentially equating sharing code with outright stealing.

Microsoft sought to curtail this activity with the release of Windows Genuine Advantage, which stealthily installed itself onto millions of PCs by way of a high-priority “update.” (Sound familiar?) Windows Genuine Advantage consisted of two parts, one to actually validate the OS and another to inform users whether they had an illegal installation: In 2006, Microsoft said it had found about 60 million illegal installations that failed validation.

Now? Virtually every standalone product Microsoft sells comes with its own software protections and licenses. If you want a “hobby” OS, you run Linux—which Microsoftalso spent millions trying to discredit, to no avail.

30yearsofwindows-9

United States v. Microsoft

In May of 1998, following government concerns that bundling Internet Explorer within its operating system gave Microsoft an unfair advantage, the Department of Justice and several states filed a landmark antitrust suit against the company.

The trial lasted 76 days. Cofounder and chief executive Bill Gates appeared on videotape, seemingly dismissing questions put to him by government lawyers. Judge Thomas Penfield Jackson ultimately ruled that Microsoft had acted as a monopoly and should be broken up into two companies, though that ruling was later overturned by an appeals court.

Years later, an integrated browser is generally viewed as part and parcel of an OS, though consumers are free to select any browser they choose. Today, Microsoft and IE still power most older PCs, but consumers selecting new browsers are turning to Chrome.

Judge Penfield argued that consumers would have benefitted from a breakup of Microsoft. But we’ve argued before that Microsoft would have, too.

30yearsofwindows-10

Browser-choice screen

In 2009, Microsoft struck a deal with the European Commission, ending the EU’s own antitrust investigation. That agreement created what became known as the “browser-choice screen,” encouraging European consumers to pick a browser besides Internet Explorer.

The browser-choice screen didn’t kill Internet Explorer; in fact, IE remained the most popular downloaded browser until March 2016, when Windows 10 helped push it out of the top spot. But the browser-choice screen certainly reminded consumers that other browsers existed, and that they could pick and choose whichever they preferred, rather than accepting what Microsoft provided to them.

30yearsofwindows-11

Windows 7

For many, Windows reached its apex with Windows 7, which continues to be the dominant OS in Windows’ history: It reached a high of almost 61 percent market share in June 2015, and still commands about 47 percent of the market today.

Why? Any number of reasons, not the least of which is familiarity: Windows’ UI remained relatively static for almost 11 years, from the 2001 launch of Windows XP on up to the dramatic tiled revamp of 2012’s Windows 8. Windows 7 also added several elements that we take for granted in Windows today: the taskbar, a more evolved Snap function, and support for multiple graphics cards. It’s also important to note that Windows 7 supports DirectX 11.1, which is arguably still the dominant graphics API today. Until DirectX12 supersedes it, gamers won’t have a reason to leave.

Windows 7 also eliminated many of the annoying UAC popups that its predecessor, Windows Vista, had put in place. And (as our commenters have repeatedly pointed out) it lacks the frustratingly frequent updates of the current Windows 10, allowing users to essentially “set it and forget it.”

30yearsofwindows-12

Laptop Hunters ads

Microsoft ran a series of “Laptop Hunters” ads during 2009, featuring real people buying real laptops from real stores—and consistently picking Windows PCs over the more expensive Apple options. For about three years, Microsoft had been stung by the barrage of “I’m a Mac/I’m a PC” ads portraying PCs as clunky and out of touch, and “Laptop Hunters” effectively skewered that message as pretentious and expensive.

The campaign followed a $300 million “I’m a PC” push a year earlier, which lacked the real-world punch of Lauren and other real-world customers. Both campaigns illustrated Microsoft’s pivot to being the face of the PC. The “Dude, you’re getting a Dell!” days are long gone.

30yearsofwindows-13

Windows 8.1

I vividly remember the first time I saw a Windows 7 user try out Windows 8: He stabbed at tile after tile, unable to figure out what to do with Microsoft’s new OS. Most of the public did the same. Today, we barely even talk about Windows 8.

Instead, we talk about Windows 8.1: the “service pack” update that undid at least some of the flaws that plagued Windows 8. In my opinion, the most notable thing about Windows 8.1 was that it showed Microsoft was listening to its customers again, even adding a hidden “boot to desktop” command to remedy one of its users’ biggest complaints. (It also was the last time SkyDrive, later renamed OneDrive, actually acted like the cloud backup we wanted.)

By itself, Windows 8.1 is a relatively minor release. But it stands as an important admission of guilt, and an apology, for the sins of its predecessor.

30yearsofwindows-14

The rise of Android, the fall of Windows Mobile

In February 2007, Microsoft debuted Windows Mobile 6, its first mobile operating system for true smartphones and arguably one of the company’s most successful. In November 2007, however, the free Android OS debuted. A year later, HTC launched the first Android smartphone: the HTC Dream, seen here. It was all downhill from there for Microsoft.

Yes, you could make a strong argument that Microsoft’s massive $7.8 billion acquisition of Nokia’s devices business in 2013—which, by now, has been almost completely written off—was actually the last gasp of Microsoft’s mobile vision. But the launch of the Dream, and the hundreds of millions of Android phones that followed it, lured away third-party developers Microsoft needed for its mobile aspirations to thrive.

30yearsofwindows-15

Windows 10: The ‘last Windows’

With Windows 10, Microsoft made the gutsy call to bring beta testers in as partners rather than as guinea pigs. The Windows Insider program lets users try out and evaluate builds almost as quickly as Microsoft can churn them out, fostering an air of camaraderie between users and Microsoft.

Windows 10 also introduced a number of features: a revamped Start menu, better notifications, virtual desktops, and more. It launched Cortana, a digital assistant that Microsoft hoped would eliminate the grunt work of setting reminders and sending quick texts and email.

But Cortana’s privacy-intruding nature and Microsoft’s aggressive upgrade practiceswashed away some of the goodwill Windows 10 originally engendered. Today, Windows 10 is one of the more polarizing operating systems in recent memory, with many Windows 7 fans loudly criticizing it, and others supporting the direction Microsoft has taken.

30yearsofwindows-16

The evolution of the digital assistant

 Of course, Microsoft has a long, controversial history with digital assistants, beginning way back in 1995 with the debut of Microsoft Bob. That program was meant to help familiarize Windows users with various applications by anticipating the users’ needs. While universally derided, Bob introduced the concept of ostensibly helpful characters, from a superhero dog to a clone of Albert Einstein to the infamous Office assistant  “Clippit,” aka “Clippy.”

You can make the case that Clippy and its ilk evolved, over time and behind the scenes, into the far more sophisticated digital assistant that’s built into Windows 10: Cortana. The difference, of course, is that Cortana is part of a larger trend, joined by Google Now and Siri, digital assistants in their own rights for the Android and iOS platforms, respectively. Indeed, Microsoft is pushing its Bot Framework, which enables the creation of intelligent digital helpers, into all sorts of new applications beyond the OS, such as Skype and Bing.

30yearsofwindows-17

Patches, good and bad

Windows has bugs. Windows requires patches. And while there have been many, many updates over the years to fix bugs, slowdowns, and other incompatibilities, there have also been many, many screwups, too. InfoWorld has an entire list of them.

My favorite? A patch that put a mysterious black bar on one side of Internet Explorer—and if you clicked it—CRASH!—down came your machine with a BSOD. For a time, Microsoft allowed you to refuse Windows patches. Windows 10, unfortunately, did away with all that.

That concludes our list of Windows’ most pivotal moments. We could have spent dozens upon dozens of slides diving deep into Windows’ history, but we had to stop somewhere. Is there anything we missed? Tell us below.

Have questions?

Get answers from Microsofts Cloud Solutions Partner!
Call us at: 856-745-9990 or visit: https://southjerseytechies.net/

South Jersey Techies, LL C is a full Managed Web and Technology Services Company providing IT Services, Website Design ServicesServer SupportNetwork ConsultingInternet PhonesCloud Solutions Provider and much more. Contact for More Information.

To read this article in its entirety click here.

Microsoft Windows 7 Service Pack 1 released

Takeaway: On February 22, 2011, Microsoft released Service Pack 1 for Windows 7 to the general public. Should you download and install it?

As of February 22, 2011, Service Pack 1 for Windows 7 is available to the general public from the Microsoft Service Pack Center. Windows 7 SP1 includes previously released security, performance, and stability updates, plus some improvements to features and services.

Microsoft suggests that individuals just let the normal Windows update system handle installation of the service pack. However, if you’d like to accelerate the process you can download the file and install it manually. The install will take around 30 minutes and you will have to reboot the PC during the process.

Depending on what method is used to install the service pack, you will need anywhere from 750MB to 7400MB of available disk space storage to complete the installation procedure, so plan accordingly. If you have a pre-release version of SP1 installed, you will have to uninstall it before you install the latest version.

Also note that some antivirus software will prevent SP1 from being installed properly, so you may want to temporarily turn off your antivirus while the installation takes place

To view the original article in it’s entirety Click Here

Microsoft offers Windows XP, Office XP users 50% percent discount

Microsoft is now offering significant discounts on its product upgrades. Discounts are available for Open License programs.

Microsoft officials are well aware that its biggest Windows 7 and Office 2010 competitors are its own previous product iterations (Windows XP and Office XP/2003). To try and wean users away from older, “good-enough” releases, Microsoft is introducing a new licensing promotion.

The revamped “Up to Date Discount” program is targeted at small/mid-size business (SMB) customers running older versions of Windows and Office. Between January 1 and June 30 of this year, Microsoft is enabling users running Windows XP or Vista (on the operating system side) and Office XP, Office 2003 or Office 2007 (on the productivity suite side) to receive a discount of 50 percent on the cost of their licenses for Windows 7 and Office 2007 (or Office 2010, once it is released by June 2010).

The 50% discount calculations “are based on estimated retail prices and reseller prices may vary,” Microsoft officials acknowledge. But the Softies say U.S. customers who sign up for the program “would be paying $35.00 for a Windows 7 Professional Upgrade and/or $91.00 for Office 2007 Professional Plus in year 1, plus receiving all of the Software Assurance benefits (such as an automatic upgrade to Office 2010 when it launches, Office Home Use Rights, and much more) for that price.”

As you’d expect, there are lots of caveats. First,customers get the 50 percent discount only for the first year of their Open Value Subscription (OVS) payment. (OVS is a Microsoft licensing program, introduced last year for SMBs, which allows users to pay for software licenses over time and includes many of the same provisions as Microsoft’s Software Assurance licensing program.) The new deal applies only to those customers using the Professional versions of Windows and/or the Professional versions of Office.

The new promotion, which Eric Ligman, Global Partner Experience Lead with Microsoft’s Worldwide Partner Group, announced via the Microsoft SMB Community Blog on January 1, goes beyond the current Up-to-Date Discount offer. Before the new so-called “N-2? update to the program was put in place, Windows XP users and Office XP users were ineligible for the discount. But Microsoft is now offering users of the older Windows and Office releases coverage if they’re willing to sign up for the Open Volume Subscription plan.

Meanwhile, speaking of new Microsoft licensing promotions, Microsoft is introducing “version 4.0? of another SMB promotional licensing offer, known as “The Big Easy,” according to Ligman.

Starting January 3, SMB customers can increase dollars available for them to spend with Microsoft partners  “by purchasing multiple qualifying product groups, adding Software Assurance to their orders and/or acquiring advanced, premium or Enterprise editions of the MIcrosoft Solutions.” To qualify, customers need to buy products through their Microsoft partners between January 3 and March 31 via the Microsoft Open License, Open Value and/or Open Value Subscription programs.

Products included under the program include Dynamics CRM, Office Communications Server, SharePoint Server, SQL Server, Systems Center and Windows Server, among others.

Article located here to read more.

CALL US NOW!